2007 NISSAN ARMADA lock
[x] Cancel search: lockPage 189 of 344

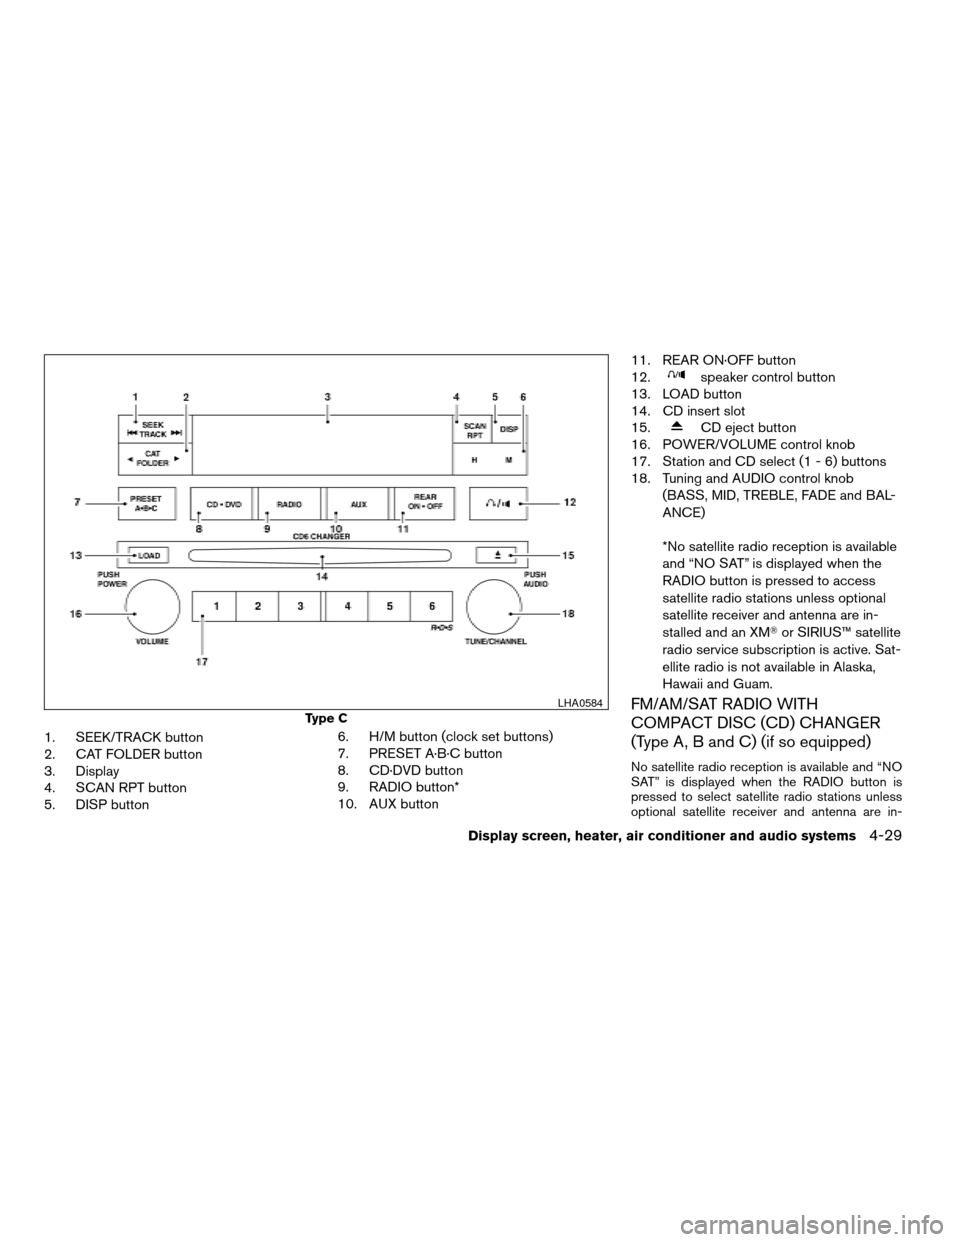
1. SEEK/TRACK button
2. CAT FOLDER button
3. Display
4. SCAN RPT button
5. DISP button6. H/M button (clock set buttons)
7. PRESET A·B·C button
8. CD·DVD button
9. RADIO button*
10. AUX button11. REAR ON·OFF button
12.
speaker control button
13. LOAD button
14. CD insert slot
15.
CD eject button
16. POWER/VOLUME control knob
17. Station and CD select (1 - 6) buttons
18. Tuning and AUDIO control knob
(BASS, MID, TREBLE, FADE and BAL-
ANCE)
*No satellite radio reception is available
and “NO SAT” is displayed when the
RADIO button is pressed to access
satellite radio stations unless optional
satellite receiver and antenna are in-
stalled and an XMTor SIRIUS™ satellite
radio service subscription is active. Sat-
ellite radio is not available in Alaska,
Hawaii and Guam.
FM/AM/SAT RADIO WITH
COMPACT DISC (CD) CHANGER
(Type A, B and C) (if so equipped)
No satellite radio reception is available and “NO
SAT” is displayed when the RADIO button is
pressed to select satellite radio stations unless
optional satellite receiver and antenna are in-
Type C
LHA0584
Display screen, heater, air conditioner and audio systems4-29
ZREVIEW COPYÐ2007 Armada(wzw)
Owners ManualÐUSA_English(nna)
07/08/06Ðtbrooks
X
Page 190 of 344

stalled and an XMTor SIRIUS™ satellite radio
service subscription is active. Satellite radio is
not available in Alaska, Hawaii and Guam.
Audio main operation
POWER/VOLUME control:
Turn the ignition key to ACC or ON, and then
push the POWER/VOLUME control knob while
the system is off to call up the mode (radio or CD)
which was playing immediately before the system
was turned off.
To turn the system off, press the
POWER/VOLUME control knob.
Turn the POWER/VOLUME control knob to ad-
just the volume.
This vehicle may be equipped with Speed Sen-
sitive Volume (SSV) for audio. The audio volume
changes as the driving speed changes.
AUDIO knob (BASS, MIDRANGE, TREBLE,
FADE, BALANCE and SSV if so equipped):
Press the AUDIO knob to change the mode as
follows:
BASS!MID!TREBLE!FADE!BALANCE
!SSV (if so equipped)
To adjust Bass, Mid (Midrange) , Treble, Fade and
Balance, press the AUDIO knob until the desired
mode appears in the display. Turn the Tuningknob to adjust Bass and Treble to the desired
level. You can also use the Tuning knob to adjust
Fader and Balance modes. Fader adjusts the
sound level between the front and rear speakers
and Balance adjusts the sound between the right
and left speakers.
To change the SSV mode to OFF, LOW, MID or
HIGH, turn the Tuning knob to the right or left.
Once you have adjusted the sound quality to the
desired level, press the AUDIO knob repeatedly
until the radio or CD display reappears. Other-
wise, the radio or CD display will automatically
reappear after about 10 seconds.
Clock set (type C only)
1. Press and hold the H button to advance
hours.
2. Press and hold the M button to advance
minutes.
For setting the clock on type A and B audio
systems see “Adjusting the time” earlier in this
section.
DISP (display) button:
This DISP (display) button will show text about
MP3, SAT or CD information in the audio display.CD display mode
To change the text displayed while playing a CD
with text, press the DISP button. The DISP button
will allow you to scroll through CD text as follows:
Disc titleÃ!Track title.
To change the default display mode, press the
AUDIO knob repeatedly until DISPLAY MODE
appears on the display, then rotate the knob to
select the following display modes: Disc number
Ã!Folder number.
Once the display mode is selected, press the
AUDIO knob again to store the setting. If the
AUDIO knob is not pressed within 8 seconds, the
display will refresh with the last selected display
mode setting.
cTrack title mode displays the title of the se-
lected CD track.
cDisc title mode displays the title of the CD
being played.
cTrack number mode displays the number
selected disc and the track that is currently
being played on the disk.
cDisc number mode displays the current disc
number playing in the changer.
4-30Display screen, heater, air conditioner and audio systems
ZREVIEW COPYÐ2007 Armada(wzw)
Owners ManualÐUSA_English(nna)
07/08/06Ðtbrooks
X
Page 211 of 344

5 Starting and driving
Precautions when starting and driving................5-2
Exhaust gas (carbon monoxide)..................5-2
Three-way catalyst..............................5-2
On-pavement and off-road driving
precautions....................................5-3
Tire pressure monitoring system (TPMS)..........5-3
Avoiding collision and rollover....................5-5
Drinking alcohol/drugs and driving................5-5
Driving safety precautions.......................5-6
Ignition switch.....................................5-8
Automatic transmission..........................5-8
Key positions..................................5-9
Nissan vehicle immobilizer system................5-9
Before starting the engine..........................5-9
Starting the engine...............................5-10
Driving the vehicle................................5-10
Engine protection mode........................5-10
Automatic transmission.........................5-11
Parking brake....................................5-15
Cruise control....................................5-15
Precautions on cruise control...................5-15Cruise control operations.......................5-16
Break-in schedule................................5-17
Increasing fuel economy...........................5-17
Using four wheel drive (4WD).............5-18
Transfer case shifting procedures...............5-19
Parking/parking on hills............................5-25
Power steering...................................5-26
Brake system....................................5-26
Brake precautions.............................5-26
Anti-lock braking system (ABS).................5-27
Vehicle dynamic control (VDC) system..............5-28
Rear sonar system (if so equipped).................5-29
Cold weather driving..............................5-30
Freeing a frozen door lock......................5-30
Anti-freeze....................................5-30
Battery.......................................5-30
Draining of coolant water.......................5-31
Tire equipment................................5-31
Special winter equipment.......................5-31
Driving on snow or ice.........................5-31
Engine block heater (if so equipped).............5-32
ZREVIEW COPYÐ2007 Armada(wzw)
Owners ManualÐUSA_English(nna)
07/08/06Ðtbrooks
X
Page 218 of 344

WARNING
Never remove or turn the key to the LOCK
position while driving. The steering wheel
will lock. This may cause the driver to lose
control of the vehicle and could result in
serious vehicle damage or personal injury.
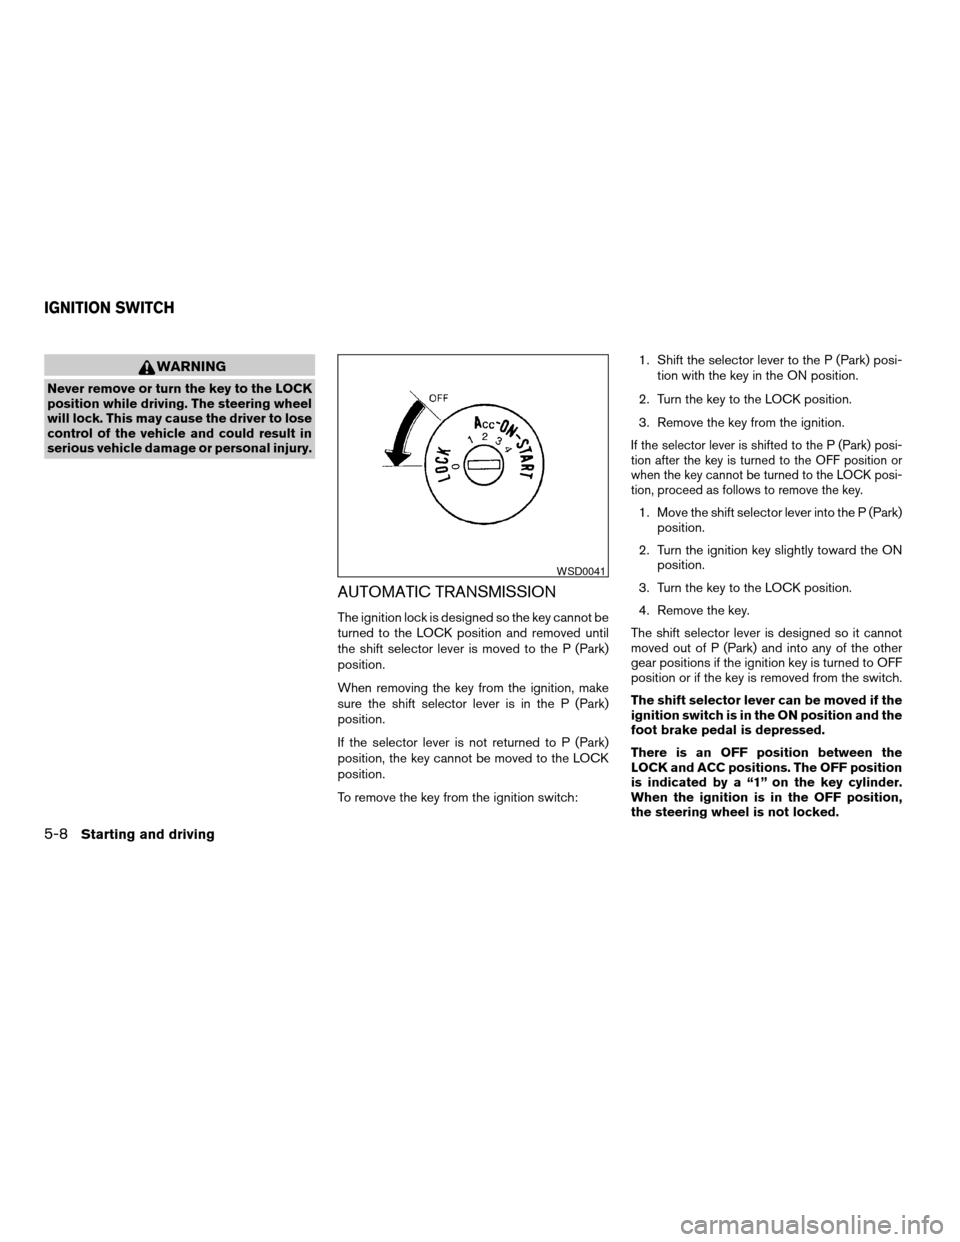
AUTOMATIC TRANSMISSION
The ignition lock is designed so the key cannot be
turned to the LOCK position and removed until
the shift selector lever is moved to the P (Park)
position.
When removing the key from the ignition, make
sure the shift selector lever is in the P (Park)
position.
If the selector lever is not returned to P (Park)
position, the key cannot be moved to the LOCK
position.
To remove the key from the ignition switch:1. Shift the selector lever to the P (Park) posi-
tion with the key in the ON position.
2. Turn the key to the LOCK position.
3. Remove the key from the ignition.
If the selector lever is shifted to the P (Park) posi-
tion after the key is turned to the OFF position or
when the key cannot be turned to the LOCK posi-
tion, proceed as follows to remove the key.
1. Move the shift selector lever into the P (Park)
position.
2. Turn the ignition key slightly toward the ON
position.
3. Turn the key to the LOCK position.
4. Remove the key.
The shift selector lever is designed so it cannot
moved out of P (Park) and into any of the other
gear positions if the ignition key is turned to OFF
position or if the key is removed from the switch.
The shift selector lever can be moved if the
ignition switch is in the ON position and the
foot brake pedal is depressed.
There is an OFF position between the
LOCK and ACC positions. The OFF position
is indicated by a “1” on the key cylinder.
When the ignition is in the OFF position,
the steering wheel is not locked.
WSD0041
IGNITION SWITCH
5-8Starting and driving
ZREVIEW COPYÐ2007 Armada(wzw)
Owners ManualÐUSA_English(nna)
07/08/06Ðtbrooks
X
Page 219 of 344

In order for the steering wheel to be locked, it
must be turned about 1/8 of a turn clockwise
from the straight up position.
To lock the steering wheel, turn the key to
the LOCK position. Remove the key. To
unlock the steering wheel, insert the key
and turn it gently while rotating the steer-
ing wheel slightly right and left.
If the key will not turn from the LOCK posi-
tion, turn the steering wheel to the left or
right while turning the key to unlock the
key cylinder.
KEY POSITIONS
LOCK: Normal parking position (0)
OFF: (Not used) (1)
ACC: (Accessories) (2)
This position activates electrical accessories
such as the radio when the engine is not running.
ON: Normal operating position (3)
This position turns on the ignition system and the
electrical accessories.
START: (4)
This position starts the engine. As soon as the
engine has started, release the key. It automati-
cally returns to the ON position.
NISSAN VEHICLE IMMOBILIZER
SYSTEM
The NISSAN Vehicle Immobilizer System will not
allow the engine to start without the use of the
registered key.
If the engine fails to start using a registered key
(for example, when interference is caused by
another registered key, an automated toll road
device or automatic payment device on the key
ring) , restart the engine using the following pro-
cedures:
1. Leave the ignition switch in the ON position
for approximately 5 seconds.
2. Turn the ignition switch to the OFF or LOCK
position, and wait approximately 10 sec-
onds.
3. Repeat steps 1 and 2.
4. Restart the engine while holding the device
(which may have caused the interference)
separate from the registered key.
If the no start condition re-occurs, NISSAN rec-
ommends placing the registered key on a sepa-
rate key ring to avoid interference from other
devices.cMake sure the area around the vehicle is
clear.
cCheck fluid levels such as engine oil, cool-
ant, brake fluid, and window washer fluid as
frequently as possible, or at least whenever
you refuel.
cCheck that all windows and lights are clean.
cVisually inspect tires for their appearance
and condition. Also check tires for proper
inflation.
cLock all doors.
cPosition seat and adjust head restraints.
cAdjust inside and outside mirrors.
cFasten seat belts and ask all passengers to
do likewise.
cCheck the operation of warning lights when
the key is turned to the ON (3) position. See
“Warning/indicator lights and audible re-
minders” in the “Instruments and controls”
section of this manual.
BEFORE STARTING THE ENGINE
Starting and driving5-9
ZREVIEW COPYÐ2007 Armada(wzw)
Owners ManualÐUSA_English(nna)
07/08/06Ðtbrooks
X
Page 222 of 344

The recommended operating procedures for this
transmission are shown on the following pages.
Follow these procedures for maximum vehicle
performance and driving enjoyment.
Starting the vehicle
1. After starting the engine, fully depress the
foot brake pedal before attempting to move
the shift selector lever out of the P (Park)
position.
2. Keep the foot brake pedal depressed and
move the shift selector lever into a driving
gear.
3. Release the foot brake, then gradually start
the vehicle in motion.
The automatic transmission is designed so
the foot brake pedal MUST be depressed
before shifting from P (Park) to any drive
position while the ignition switch is in the
ON position.
The shift selector lever cannot be moved
out of P (Park) and into any of the other
gear positions if the ignition key is turned
to the LOCK, OFF or ACC position or if the
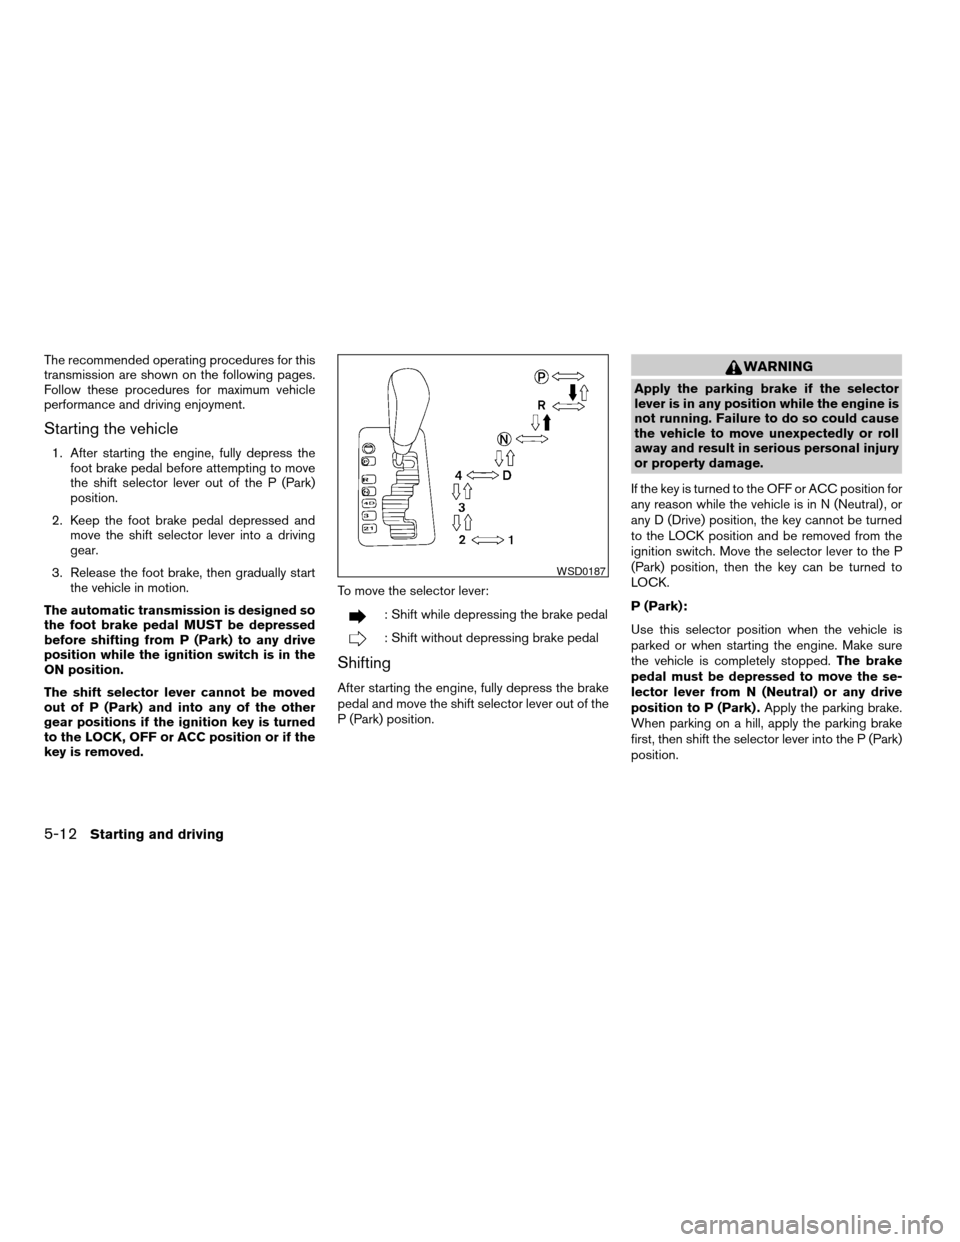
key is removed.To move the selector lever:
: Shift while depressing the brake pedal
: Shift without depressing brake pedal
Shifting
After starting the engine, fully depress the brake
pedal and move the shift selector lever out of the
P (Park) position.
WARNING
Apply the parking brake if the selector
lever is in any position while the engine is
not running. Failure to do so could cause
the vehicle to move unexpectedly or roll
away and result in serious personal injury
or property damage.
If the key is turned to the OFF or ACC position for
any reason while the vehicle is in N (Neutral) , or
any D (Drive) position, the key cannot be turned
to the LOCK position and be removed from the
ignition switch. Move the selector lever to the P
(Park) position, then the key can be turned to
LOCK.
P (Park):
Use this selector position when the vehicle is
parked or when starting the engine. Make sure
the vehicle is completely stopped.The brake
pedal must be depressed to move the se-
lector lever from N (Neutral) or any drive
position to P (Park) .Apply the parking brake.
When parking on a hill, apply the parking brake
first, then shift the selector lever into the P (Park)
position.
WSD0187
5-12Starting and driving
ZREVIEW COPYÐ2007 Armada(wzw)
Owners ManualÐUSA_English(nna)
07/08/06Ðtbrooks
X
Page 224 of 344

Shift lock release
If the battery is discharged, the shift selector lever
may not be moved from the P (Park) position even
with the brake pedal depressed.
To move the shift selector lever, release the shift
lock. The shift selector lever can be moved to N
(Neutral) . However, the steering wheel will be
locked unless the ignition switch is turned to the
ON position. This allows the vehicle to be moved
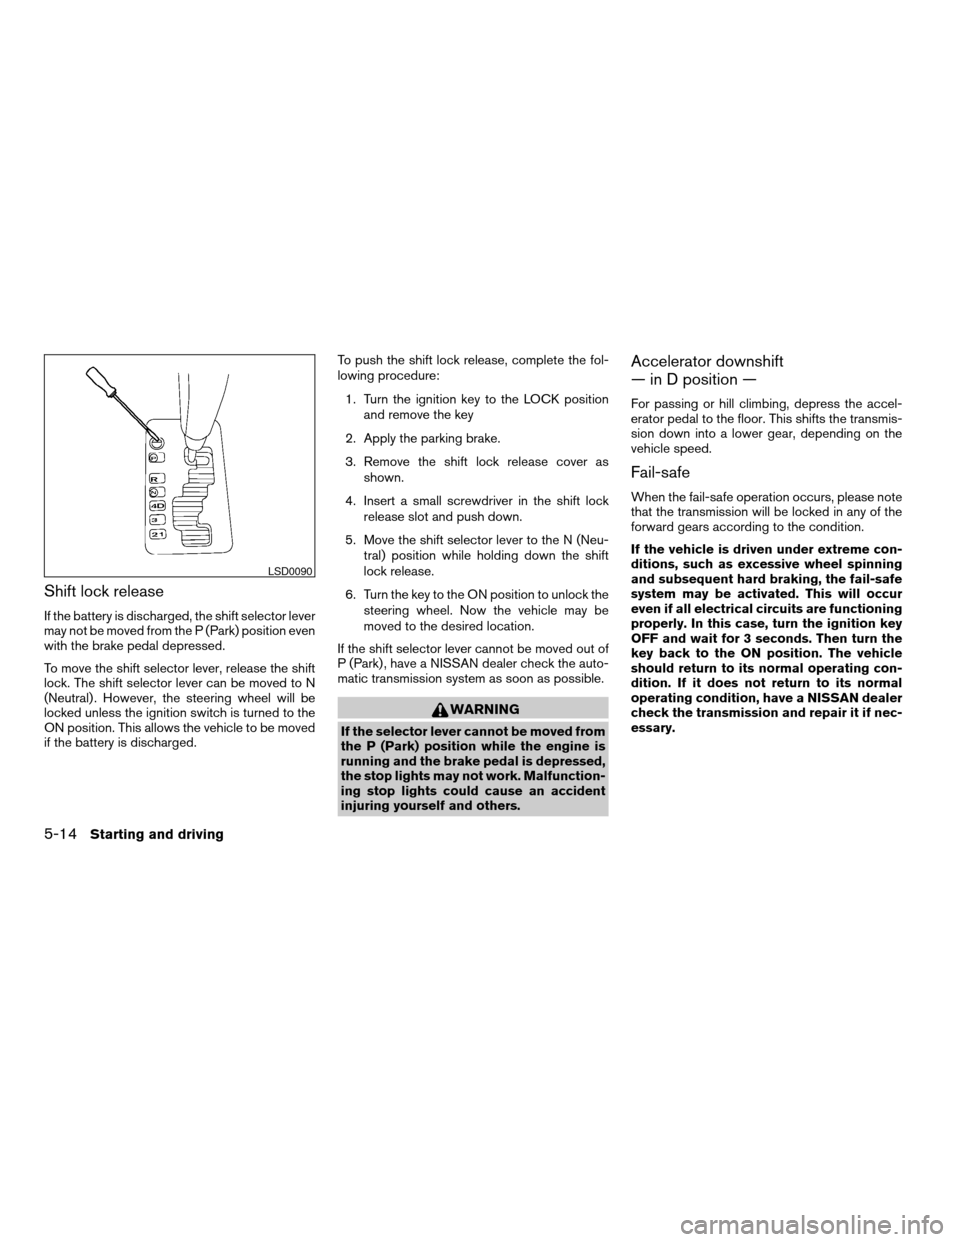
if the battery is discharged.To push the shift lock release, complete the fol-
lowing procedure:
1. Turn the ignition key to the LOCK position
and remove the key
2. Apply the parking brake.
3. Remove the shift lock release cover as
shown.
4. Insert a small screwdriver in the shift lock
release slot and push down.
5. Move the shift selector lever to the N (Neu-
tral) position while holding down the shift
lock release.
6. Turn the key to the ON position to unlock the
steering wheel. Now the vehicle may be
moved to the desired location.
If the shift selector lever cannot be moved out of
P (Park) , have a NISSAN dealer check the auto-
matic transmission system as soon as possible.
WARNING
If the selector lever cannot be moved from
the P (Park) position while the engine is
running and the brake pedal is depressed,
the stop lights may not work. Malfunction-
ing stop lights could cause an accident
injuring yourself and others.
Accelerator downshift
— in D position —
For passing or hill climbing, depress the accel-
erator pedal to the floor. This shifts the transmis-
sion down into a lower gear, depending on the
vehicle speed.
Fail-safe
When the fail-safe operation occurs, please note
that the transmission will be locked in any of the
forward gears according to the condition.
If the vehicle is driven under extreme con-
ditions, such as excessive wheel spinning
and subsequent hard braking, the fail-safe
system may be activated. This will occur
even if all electrical circuits are functioning
properly. In this case, turn the ignition key
OFF and wait for 3 seconds. Then turn the
key back to the ON position. The vehicle
should return to its normal operating con-
dition. If it does not return to its normal
operating condition, have a NISSAN dealer
check the transmission and repair it if nec-
essary.
LSD0090
5-14Starting and driving
ZREVIEW COPYÐ2007 Armada(wzw)
Owners ManualÐUSA_English(nna)
07/08/06Ðtbrooks
X
Page 230 of 344

2WD or 4WD shift procedure:
4WD
Shift
Switch
PositionWheels
DrivenIndicator Light
Use Conditions 4WD Shift Procedure 4WD
shiftTransfer
4LO
position
AUTORear
wheels
or 4
wheels
For driving on paved or slippery roadsMove the 4WD switch.
2WD <—> AUTO <—> 4H
4WD shift indicator light will indicate transfer shift position engaged.
IT IS NOT NECESSARY TO MOVE THE AUTOMATIC TRANSMISSION SE-
LECT LEVER TO THE N POSITION IN THIS OPERATION. PERFORM THIS
OPERATION WHEN DRIVING STRAIGHT.
2WDRear
wheels
For driving on dry, paved roads (Economy
drive) or state dynamometer I/M testing
4H4
wheels
For driving on rocky, sandy or snow-covered
roads
Neutral
*1
May
blinkNeutral disengages the automatic transmis-
sion mechanical parking lock, which will al-
low the vehicle to roll. Do not leave the
transfer shift position in Neutral.*21. Stop the vehicle.
2. Move the automatic transmission selector lever to the N position.
3. Push the 4WD shift switch and move it to 4LO or 4H with the brake pedal
depressed.
YOU CANNOT MOVE THE TRANSFER 4WD SHIFT SWITCH BETWEEN 4H
AND 4LO (OR 4LO TO 4H)UNLESS YOU HAVE FIRST STOPPED THE VE-
HICLE, DEPRESSED THE BRAKE PEDAL AND MOVED THE AUTOMATIC
TRANSMISSION SHIFT LEVER TO NEUTRAL. *3
4LO4
wheelsIllumi-
natedFor use when maximum power and traction
is required (for example: on steep grades or
rocky, sandy, muddy roads)
*1: The transfer 4LO position indicator light may blink. Stop the vehicle. Be sure to shift the 4WD shift switch after the automatic transmission leverhas been shifted to the N position. If the
indicator light keeps blinking after the 4WD shift procedure in the previous page, drive slowly without abrupt maneuvers for a while. Then the light will turn on or off.
• Avoid making a turn or abrupt starts while shifting to 4LO. Otherwise gears may grind, damaging the drive system.
*2: While changing in and out of 4LO, the ignition key must be ON and the vehicle’s engine must be running for a shift to take place and for the indicator lights (4WD shift and 4LO position
indicator) to be operable. Otherwise, the shift will not take place and no indicator lights will be on or flashing.
*3: Make sure the transfer 4LO position indicator light turns on when you shift the 4WD shift switch to 4LO. The
indicator light (if so equipped) will also turn on when 4LO is selected.
See “Vehicle dynamic control system” later in this section.
5-20Starting and driving
ZREVIEW COPYÐ2007 Armada(wzw)
Owners ManualÐUSA_English(nna)
07/08/06Ðtbrooks
X