2007 NISSAN ALTIMA HYBRID warning light
[x] Cancel search: warning lightPage 2 of 28
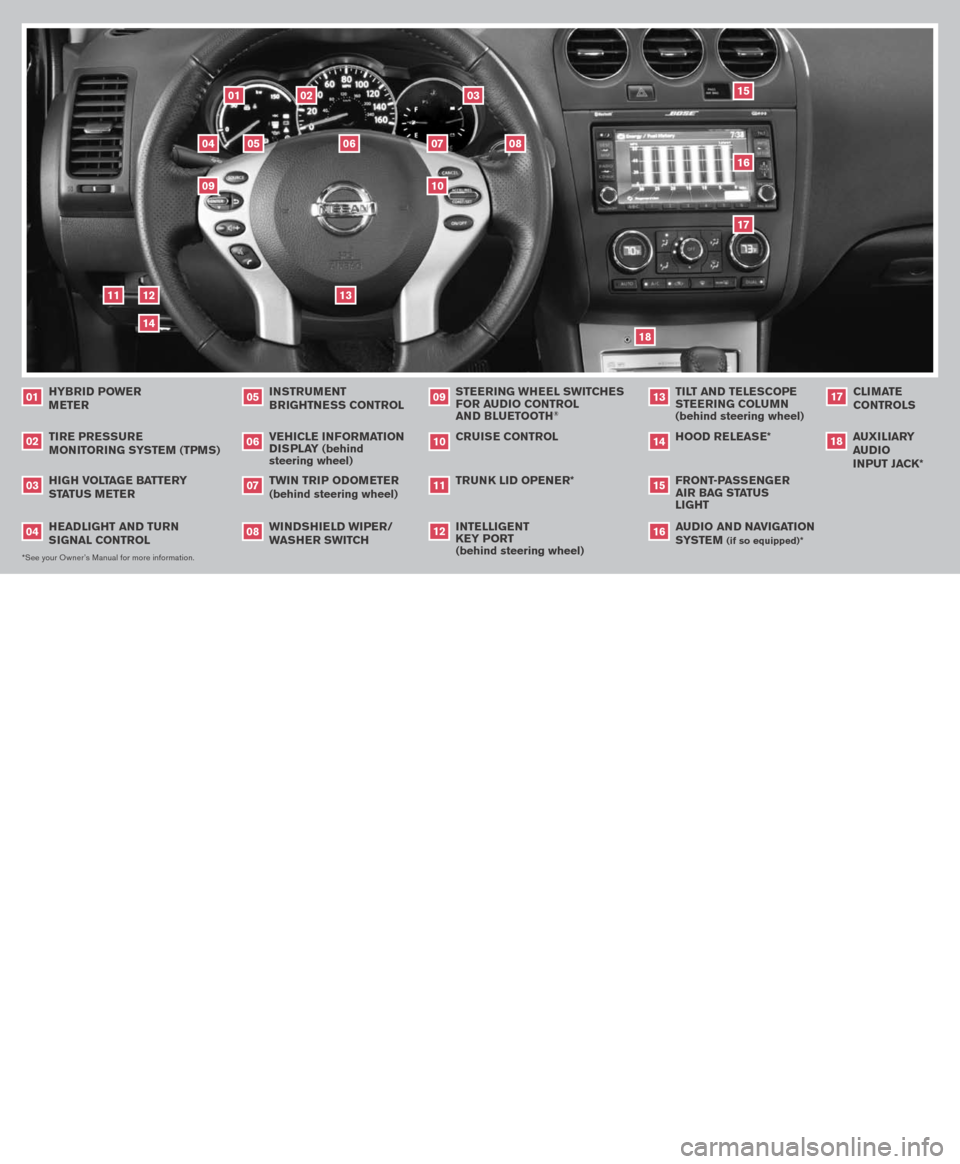
INSTRUMENT
BRIGHTNESS CONTROL
05
TIRE PRESSURE
MONITORING SYSTEM (TPMS)
02
TWIN TRIP ODOMETER
(behind steering wheel)
07
WINDSHIELD WIPER/WASHER SWITCH
08
CRUISE CONTROL
10
TRUNK LID OPENER*
11
12
04
HYBRID POWER
M ETER
01
VEHICLE INFORMATION DISPLAY (behind steering wheel)
06
STEERING WHEEL SWITCHES FOR AUDIO CONTROL
AND BLUETOOTH
®
09
*See your Owner’s Manual for more information.
09
FRONT-PASSENGER AIR BAG STATUS LIGHT
15
HOOD RELEASE*
14
TILT AND TELESCOPE STEERING COLUMN (behind steering wheel)
13
AUDIO AND NAVIGATION SYSTEM
(if so equipped)*
16
CLIMATE CONTROLS
17
01
18
AUXILIARY AUDIO INPUT JACK*
18
TAB LE O F C O NTE NTS
Unique Hybrid Characteristics . . . . . . . . . . . . . . . . . . 2
Power Meter . . . . . . . . . . . . . . . . . . . . . . . . . . . . 2
High Voltage Battery Status Meter . . . . . . . . . . . . . . . . 2
Electronically Controlled Continuously Variable
Transmission (eCVT) . . . . . . . . . . . . . . . . . . . . . . 2
Energy Monitors . . . . . . . . . . . . . . . . . . . . . . . . . . 3
Low Indicator Temperature Light . . . . . . . . . . . . . . . . . 3
Intelligent Key System . . . . . . . . . . . . . . . . . . . . . . . 4
Headlight and Turn Signal Control . . . . . . . . . . . . . . . . 5
Windshield Wiper/Washer Switch . . . . . . . . . . . . . . . . 5
Steering Wheel Switches for Audio Control . . . . . . . . . . . 6
Cruise Control . . . . . . . . . . . . . . . . . . . . . . . . . . . 6
Rearview Monitor . . . . . . . . . . . . . . . . . . . . . . . . . 6
Automatic Climate Control . . . . . . . . . . . . . . . . . . . . 7
FM/AM/SAT* Radio with CD Changer . . . . . . . . . . . . . . 8
Clock/Set Adjustment . . . . . . . . . . . . . . . . . . . . . . . 9
Twin Trip Odometer . . . . . . . . . . . . . . . . . . . . . . . 10
Vehicle Information Display . . . . . . . . . . . . . . . . . . . 10
Trunk Security . . . . . . . . . . . . . . . . . . . . . . . . . . 10
Front-Passenger Air Bag Status Light . . . . . . . . . . . . . 11
Tire Pressure Monitoring System (TPMS) . . . . . . . . . . . 11
Fuel-Filler Door Release . . . . . . . . . . . . . . . . . . . . 11
Seatbelt Warning Light and Chime . . . . . . . . . . . . . . .12
Child Safety Rear Door Lock . . . . . . . . . . . . . . . . . . 12
Sunroof Controls . . . . . . . . . . . . . . . . . . . . . . . . 12
Front Seat Adjustments . . . . . . . . . . . . . . . . . . . . .13
HomeLink® Universal Transceiver . . . . . . . . . . . . . . . .13
Bluetooth® Hands-Free Phone System . . . . . . . . . . . . .15
Navigation System . . . . . . . . . . . . . . . . . . . . . . . .18
151617
14
11
13
02
03
05
06
07
08
10
HEADLIGHT AND TURN SIGNAL CONTROL
04
HIGH VOLTAGE BATTERY STATUS METER
03
INTELLIGENT
KEY PORT
(behind steering wheel)
12
Page 3 of 28
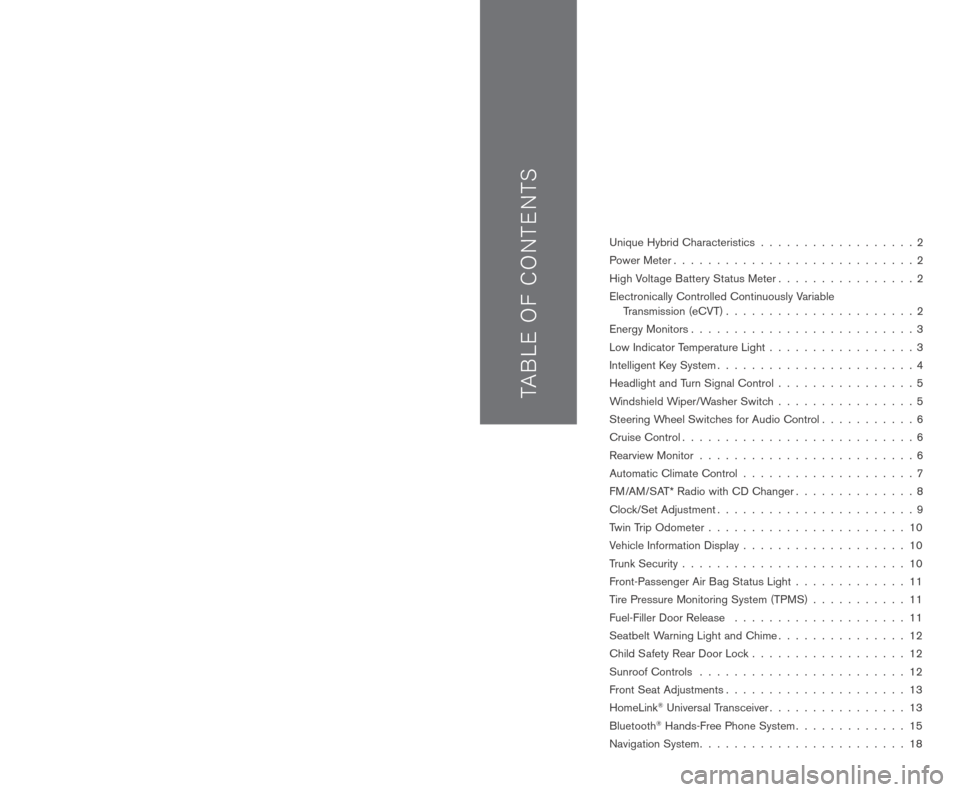
INSTRUMENT
BRIGHTNESS CONTROL
05
TIRE PRESSURE
MONITORING SYSTEM (TPMS)
02
TWIN TRIP ODOMETER
(behind steering wheel)
07
WINDSHIELD WIPER/WASHER SWITCH
08
CRUISE CONTROL
10
TRUNK LID OPENER*
11
12
04
HYBRID POWER
M ETER
01
VEHICLE INFORMATION DISPLAY (behind steering wheel)
06
STEERING WHEEL SWITCHES FOR AUDIO CONTROL
AND BLUETOOTH
®
09
*See your Owner’s Manual for more information.
09
FRONT-PASSENGER AIR BAG STATUS LIGHT
15
HOOD RELEASE*
14
TILT AND TELESCOPE STEERING COLUMN (behind steering wheel)
13
AUDIO AND NAVIGATION SYSTEM
(if so equipped)*
16
CLIMATE CONTROLS
17
01
18
AUXILIARY AUDIO INPUT JACK*
18
TAB LE O F C O NTE NTS
Unique Hybrid Characteristics . . . . . . . . . . . . . . . . . . 2
Power Meter . . . . . . . . . . . . . . . . . . . . . . . . . . . . 2
High Voltage Battery Status Meter . . . . . . . . . . . . . . . . 2
Electronically Controlled Continuously Variable
Transmission (eCVT) . . . . . . . . . . . . . . . . . . . . . . 2
Energy Monitors . . . . . . . . . . . . . . . . . . . . . . . . . . 3
Low Indicator Temperature Light . . . . . . . . . . . . . . . . . 3
Intelligent Key System . . . . . . . . . . . . . . . . . . . . . . . 4
Headlight and Turn Signal Control . . . . . . . . . . . . . . . . 5
Windshield Wiper/Washer Switch . . . . . . . . . . . . . . . . 5
Steering Wheel Switches for Audio Control . . . . . . . . . . . 6
Cruise Control . . . . . . . . . . . . . . . . . . . . . . . . . . . 6
Rearview Monitor . . . . . . . . . . . . . . . . . . . . . . . . . 6
Automatic Climate Control . . . . . . . . . . . . . . . . . . . . 7
FM/AM/SAT* Radio with CD Changer . . . . . . . . . . . . . . 8
Clock/Set Adjustment . . . . . . . . . . . . . . . . . . . . . . . 9
Twin Trip Odometer . . . . . . . . . . . . . . . . . . . . . . . 10
Vehicle Information Display . . . . . . . . . . . . . . . . . . . 10
Trunk Security . . . . . . . . . . . . . . . . . . . . . . . . . . 10
Front-Passenger Air Bag Status Light . . . . . . . . . . . . . 11
Tire Pressure Monitoring System (TPMS) . . . . . . . . . . . 11
Fuel-Filler Door Release . . . . . . . . . . . . . . . . . . . . 11
Seatbelt Warning Light and Chime . . . . . . . . . . . . . . .12
Child Safety Rear Door Lock . . . . . . . . . . . . . . . . . . 12
Sunroof Controls . . . . . . . . . . . . . . . . . . . . . . . . 12
Front Seat Adjustments . . . . . . . . . . . . . . . . . . . . .13
HomeLink® Universal Transceiver . . . . . . . . . . . . . . . .13
Bluetooth® Hands-Free Phone System . . . . . . . . . . . . .15
Navigation System . . . . . . . . . . . . . . . . . . . . . . . .18
151617
14
11
13
02
03
05
06
07
08
10
HEADLIGHT AND TURN SIGNAL CONTROL
04
HIGH VOLTAGE BATTERY STATUS METER
03
INTELLIGENT
KEY PORT
(behind steering wheel)
12
Page 12 of 28
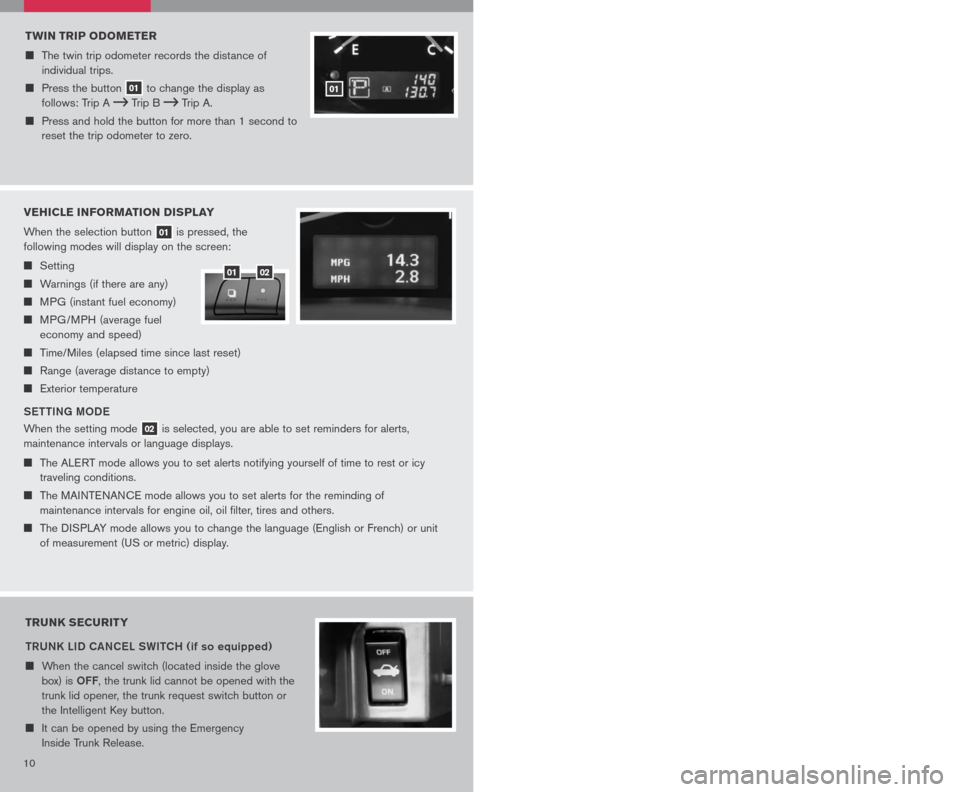
TRUNK SECURITY
tRUNK LID CANC eL SWI tCH (if so equipped)
When the cancel switch (located inside the glove
box) is oFF, the trunk lid cannot be opened with the
trunk lid opener, the trunk request switch button or
the Intelligent Key button.
It can be opened by using the Emergency
Inside Trunk Release.
1011
FRONT-PASSENGER AIR BAG STATUS LIGHT
This vehicle is equipped with the Nissan Advanced Air Bag
system. Under some conditions, depending on the type of
occupant or object detected in the front passenger seat by the
occupant classification sensor, the front-passenger air bag is
designed to automatically turn oFF. When the front-passenger air
bag is oFF, the front-passenger air bag status light will illuminate*.
For example:
When the system detects that the front-passenger’s seat is occupied by a small
adult, child or child restraint as outlined in the Owner’s Manual, the
will illuminate
to indicate that the front-passenger air bag is oFF and will not inflate in a crash.
When the front-passenger’s seat is occupied and the passenger meets the
conditions outlined in the Owner’s Manual, the will not illuminate to indicate that
the front-passenger air bag is operational.
*When the system detects that the front-passenger’s seat is unoccupied, the
passenger air bag status light will not illuminate even though the front-passenger
air bag is oFF.
Refer to the Owner’s Manual for detailed information regarding the Nissan Advanced Air
Bag System.
TIRE PRESSURE MONITORING SYSTEM (TPMS)
This system monitors tire pressure. Please remember, this system
does not detect a sudden drop in tire pressure (for example, a
blowout while driving). It also does not monitor the air pressure in
the spare tire.
Tire pressure is affected by temperature. Low outside temperature
causes lower tire pressure. This may cause the low tire pressure
warning light to illuminate.
If the low tire pressure warning light illuminates, check the tire pressure in all four tires.
To turn the low tire pressure warning light off, adjust the low tire pressure to the
recommended COLD tire pressure shown on the Tire and Loading Information label
located in the driver’s door opening.
If TPMS is not functioning properly, the low tire pressure warning light will flash for
approximately 60 seconds when the key is turned on. After 60 seconds, the light will
remain on. Have the system checked by a NISSAN dealer.
FUEL-FILLER DOOR RELEASE
The fuel-filler door release is located on the floor to the
left of the driver’s seat.
To open the fuel-filler door, pull the release up.
To lock, close the fuel-filler door securely.
TWIN TRIP ODOMETER
The twin trip odometer records the distance of
individual trips.
Press the button 01 to change the display as
follows: Trip A Trip B Trip A.
Press and hold the button for more than 1 second to
reset the trip odometer to zero.
01
VEHICLE INFORMATION DISPLAY
When the selection button 01 is pressed, the
following modes will display on the screen:
Setting
Warnings (if there are any)
MPG (instant fuel economy)
MPG/MPH (average fuel
economy and speed)
Time/Miles (elapsed time since last reset)
Range (average distance to empty)
Exterior temperature
S ett ING M oDe
When the setting mode 02 is selected, you are able to set reminders for alerts,
maintenance intervals or language displays.
The ALERT mode allows you to set alerts notifying yourself of time to rest or icy
traveling conditions.
The MAINTENANCE mode allows you to set alerts for the reminding of
maintenance intervals for engine oil, oil filter, tires and others.
The DISPLAY mode allows you to change the language (English or French) or unit
of measurement (US or metric) display.
0102
Page 13 of 28
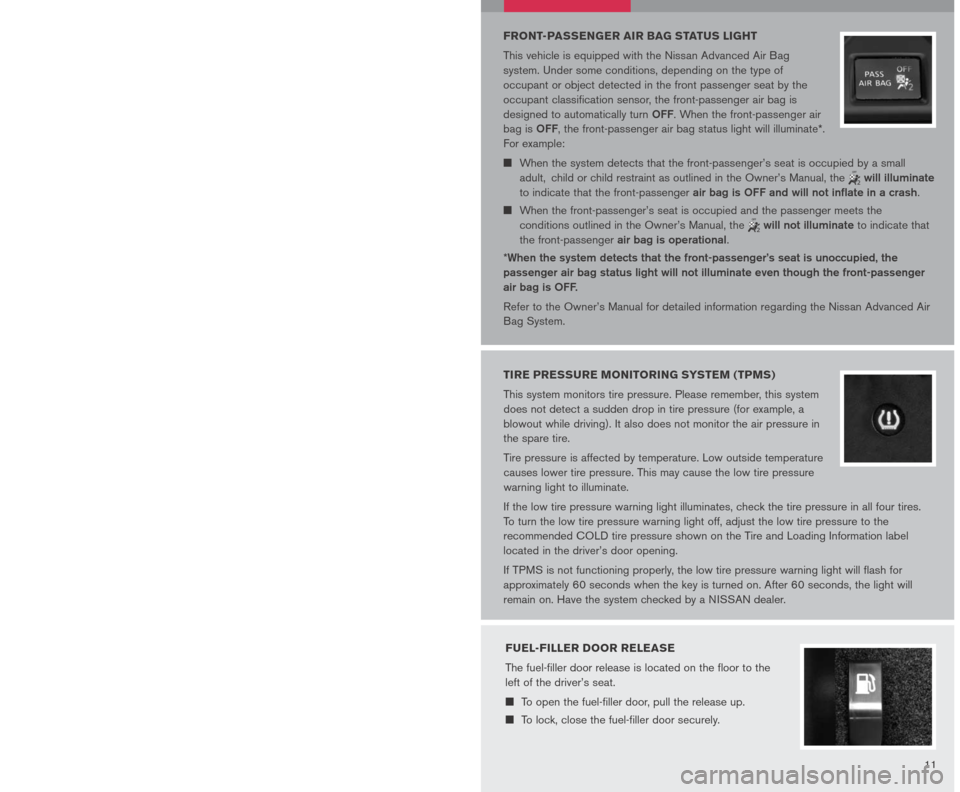
TRUNK SECURITY
tRUNK LID CANC eL SWI tCH (if so equipped)
When the cancel switch (located inside the glove
box) is oFF, the trunk lid cannot be opened with the
trunk lid opener, the trunk request switch button or
the Intelligent Key button.
It can be opened by using the Emergency
Inside Trunk Release.
1011
FRONT-PASSENGER AIR BAG STATUS LIGHT
This vehicle is equipped with the Nissan Advanced Air Bag
system. Under some conditions, depending on the type of
occupant or object detected in the front passenger seat by the
occupant classification sensor, the front-passenger air bag is
designed to automatically turn oFF. When the front-passenger air
bag is oFF, the front-passenger air bag status light will illuminate*.
For example:
When the system detects that the front-passenger’s seat is occupied by a small
adult, child or child restraint as outlined in the Owner’s Manual, the
will illuminate
to indicate that the front-passenger air bag is oFF and will not inflate in a crash.
When the front-passenger’s seat is occupied and the passenger meets the
conditions outlined in the Owner’s Manual, the will not illuminate to indicate that
the front-passenger air bag is operational.
*When the system detects that the front-passenger’s seat is unoccupied, the
passenger air bag status light will not illuminate even though the front-passenger
air bag is oFF.
Refer to the Owner’s Manual for detailed information regarding the Nissan Advanced Air
Bag System.
TIRE PRESSURE MONITORING SYSTEM (TPMS)
This system monitors tire pressure. Please remember, this system
does not detect a sudden drop in tire pressure (for example, a
blowout while driving). It also does not monitor the air pressure in
the spare tire.
Tire pressure is affected by temperature. Low outside temperature
causes lower tire pressure. This may cause the low tire pressure
warning light to illuminate.
If the low tire pressure warning light illuminates, check the tire pressure in all four tires.
To turn the low tire pressure warning light off, adjust the low tire pressure to the
recommended COLD tire pressure shown on the Tire and Loading Information label
located in the driver’s door opening.
If TPMS is not functioning properly, the low tire pressure warning light will flash for
approximately 60 seconds when the key is turned on. After 60 seconds, the light will
remain on. Have the system checked by a NISSAN dealer.
FUEL-FILLER DOOR RELEASE
The fuel-filler door release is located on the floor to the
left of the driver’s seat.
To open the fuel-filler door, pull the release up.
To lock, close the fuel-filler door securely.
TWIN TRIP ODOMETER
The twin trip odometer records the distance of
individual trips.
Press the button 01 to change the display as
follows: Trip A Trip B Trip A.
Press and hold the button for more than 1 second to
reset the trip odometer to zero.
01
VEHICLE INFORMATION DISPLAY
When the selection button 01 is pressed, the
following modes will display on the screen:
Setting
Warnings (if there are any)
MPG (instant fuel economy)
MPG/MPH (average fuel
economy and speed)
Time/Miles (elapsed time since last reset)
Range (average distance to empty)
Exterior temperature
S ett ING M oDe
When the setting mode 02 is selected, you are able to set reminders for alerts,
maintenance intervals or language displays.
The ALERT mode allows you to set alerts notifying yourself of time to rest or icy
traveling conditions.
The MAINTENANCE mode allows you to set alerts for the reminding of
maintenance intervals for engine oil, oil filter, tires and others.
The DISPLAY mode allows you to change the language (English or French) or unit
of measurement (US or metric) display.
0102
Page 14 of 28
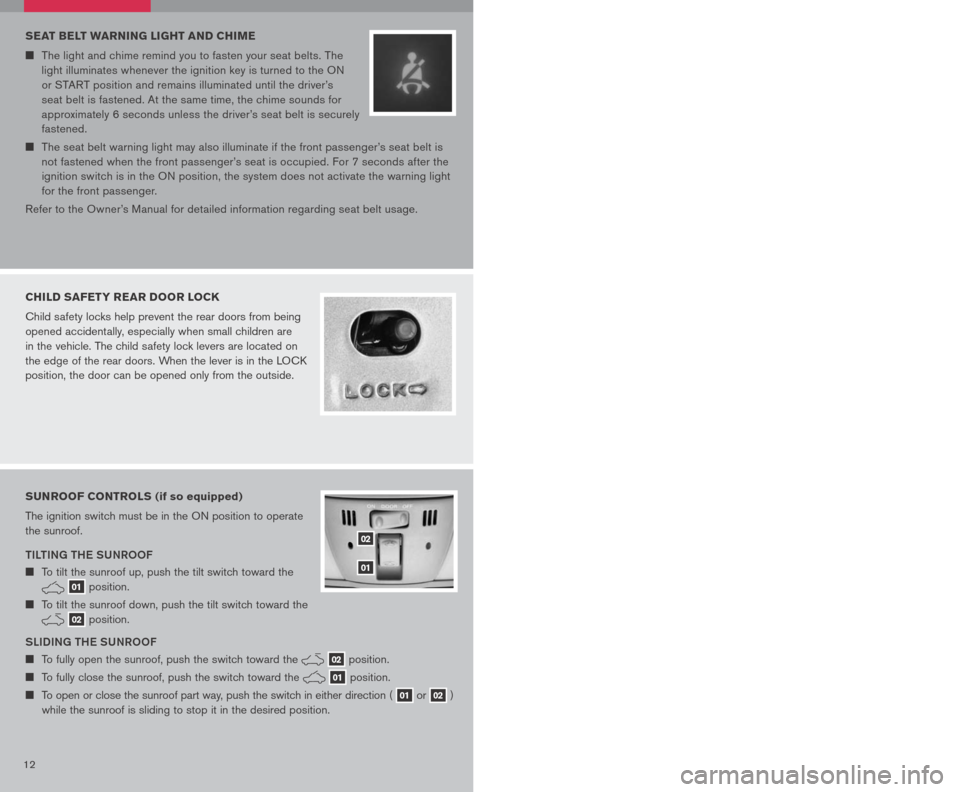
12 13
SEAT BELT WARNING LIGHT AND CHIME
The light and chime remind you to fasten your seat belts. The
light illuminates whenever the ignition key is turned to the ON
or START position and remains illuminated until the driver’s
seat belt is fastened. At the same time, the chime sounds for
approximately 6 seconds unless the driver’s seat belt is securely
fastened.
The seat belt warning light may also illuminate if the front passenger’s seat belt is
not fastened when the front passenger’s seat is occupied. For 7 seconds after the
ignition switch is in the ON position, the system does not activate the warning light
for the front passenger.
Refer to the Owner’s Manual for detailed information regarding seat belt usage.
CHILD SAFETY REAR DOOR LOCK
Child safety locks help prevent the rear doors from being
opened accidentally, especially when small children are
in the vehicle. The child safety lock levers are located on
the edge of the rear doors. When the lever is in the LOCK
position, the door can be opened only from the outside.
SUNROOF CONTROLS (if so equipped)
The ignition switch must be in the ON position to operate
the sunroof.
TILTING THE SUNROOF
To tilt the sunroof up, push the tilt switch toward the
01 position.
To tilt the sunroof down, push the tilt switch toward the
02 position.
SLIDING THE SUNROOF
To fully open the sunroof, push the switch toward the 02 position.
To fully close the sunroof, push the switch toward the 01 position.
To open or close the sunroof part way, push the switch in either direction ( 01 or 02 )
while the sunroof is sliding to stop it in the desired position.
02
01
FRONT SEAT ADJUSTMENTS
With Manual Seats (passenger’s seat):
F ORW aRD a ND back WaRD
Pull up on the lever under the front of the seat and slide backward or forward.
Release the lever to lock the seat in position.
R Ec LINING
Lift the lever on the side of the seat to adjust your seatback forward or backward;
release the lever when you have found a comfortable angle and the seat belt fits
properly.
With power Seats (driver’s seat):
F ORW aRD a ND back WaRD
Move the control 01 forward or backward
to adjust the seat cushion forward or
backward.
Pull up on the control 01 to raise the
driver’s seat cushion; press down to lower
the cushion.
R Ec LINING
Pull the switch 02 forward to move the seatback forward; push it back to move the
seatback backward.
L UM baR S Upp ORT
(driver’s seat):
Your driver’s seat has a lumbar support; adjust it by pushing the switch 03 forward
or backward.
010203
HOMELINK® UNIVERSAL TRANSCEIVER (if so equipped)
SYSTEM O pER aTING TI pS
Garage doors, electrical gates, entry doors, etc. will be activated during programming.
To avoid injury, make sure that people and objects are clear of all doors or gates
during programming. Your vehicle’s engine should be turned off while programming
the HomeLink® Transceiver. Refer to your Owner’s Manual for complete details.
To program your HomeLink® Transceiver to operate a garage door, gate, or entry door
opener, home or office lighting, you need to be at the same location as the device.
NOTE: Garage door openers (manufactured after 1996) have “rolling code
protection”. To program a garage door opener equipped with “rolling code
protection”, you will need to use a ladder to get up to the garage door opener
motor to be able to access the “smart or learn” program button.
Page 15 of 28
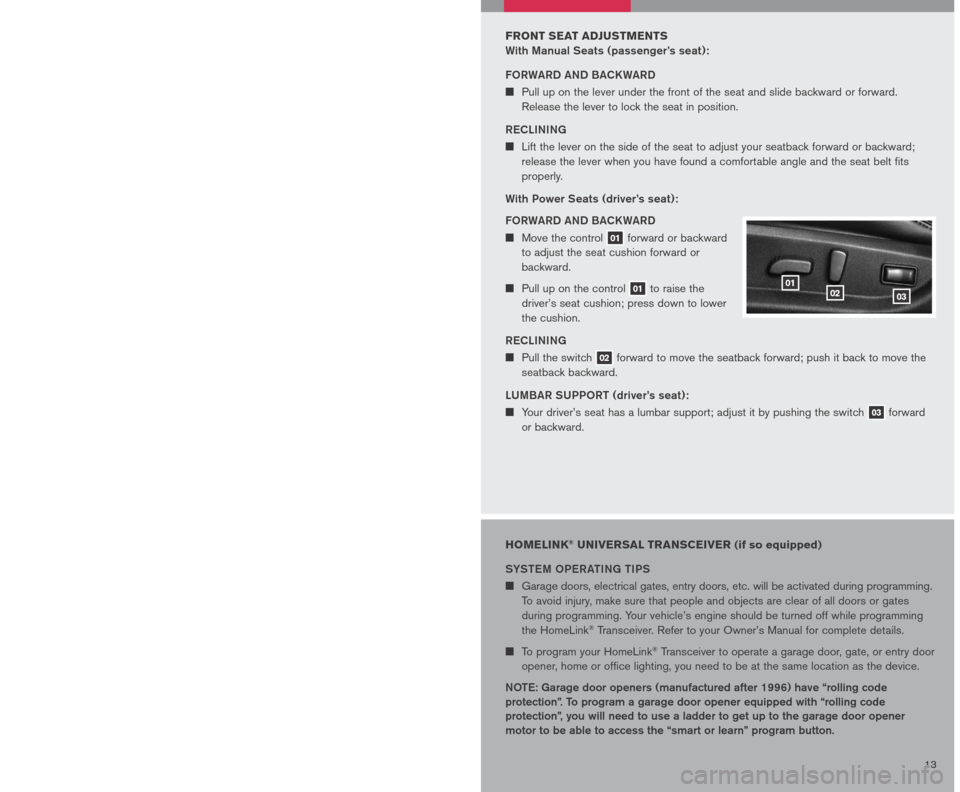
12 13
SEAT BELT WARNING LIGHT AND CHIME
The light and chime remind you to fasten your seat belts. The
light illuminates whenever the ignition key is turned to the ON
or START position and remains illuminated until the driver’s
seat belt is fastened. At the same time, the chime sounds for
approximately 6 seconds unless the driver’s seat belt is securely
fastened.
The seat belt warning light may also illuminate if the front passenger’s seat belt is
not fastened when the front passenger’s seat is occupied. For 7 seconds after the
ignition switch is in the ON position, the system does not activate the warning light
for the front passenger.
Refer to the Owner’s Manual for detailed information regarding seat belt usage.
CHILD SAFETY REAR DOOR LOCK
Child safety locks help prevent the rear doors from being
opened accidentally, especially when small children are
in the vehicle. The child safety lock levers are located on
the edge of the rear doors. When the lever is in the LOCK
position, the door can be opened only from the outside.
SUNROOF CONTROLS (if so equipped)
The ignition switch must be in the ON position to operate
the sunroof.
TILTING THE SUNROOF
To tilt the sunroof up, push the tilt switch toward the
01 position.
To tilt the sunroof down, push the tilt switch toward the
02 position.
SLIDING THE SUNROOF
To fully open the sunroof, push the switch toward the 02 position.
To fully close the sunroof, push the switch toward the 01 position.
To open or close the sunroof part way, push the switch in either direction ( 01 or 02 )
while the sunroof is sliding to stop it in the desired position.
02
01
FRONT SEAT ADJUSTMENTS
With Manual Seats (passenger’s seat):
F ORW aRD a ND back WaRD
Pull up on the lever under the front of the seat and slide backward or forward.
Release the lever to lock the seat in position.
R Ec LINING
Lift the lever on the side of the seat to adjust your seatback forward or backward;
release the lever when you have found a comfortable angle and the seat belt fits
properly.
With power Seats (driver’s seat):
F ORW aRD a ND back WaRD
Move the control 01 forward or backward
to adjust the seat cushion forward or
backward.
Pull up on the control 01 to raise the
driver’s seat cushion; press down to lower
the cushion.
R Ec LINING
Pull the switch 02 forward to move the seatback forward; push it back to move the
seatback backward.
L UM baR S Upp ORT
(driver’s seat):
Your driver’s seat has a lumbar support; adjust it by pushing the switch 03 forward
or backward.
010203
HOMELINK® UNIVERSAL TRANSCEIVER (if so equipped)
SYSTEM O pER aTING TI pS
Garage doors, electrical gates, entry doors, etc. will be activated during programming.
To avoid injury, make sure that people and objects are clear of all doors or gates
during programming. Your vehicle’s engine should be turned off while programming
the HomeLink® Transceiver. Refer to your Owner’s Manual for complete details.
To program your HomeLink® Transceiver to operate a garage door, gate, or entry door
opener, home or office lighting, you need to be at the same location as the device.
NOTE: Garage door openers (manufactured after 1996) have “rolling code
protection”. To program a garage door opener equipped with “rolling code
protection”, you will need to use a ladder to get up to the garage door opener
motor to be able to access the “smart or learn” program button.