Page 84 of 311

NISSAN dealer for service.
The windshield wiper and washer operates
when the ignition switch is in the ON position.
Push the lever down to operate the wiper at the
following speed:
�1Intermittent (INT) — intermittent operation
can be adjusted by turning the knob toward�A
(Slower) or
�B
(Faster).
�2Low (LO) — continuous low speed operation
�3High (HI) — continuous high speed operation
Push the lever up
�4
to have one sweep
operation (MIST) of the wiper.
Pull the lever toward you�5
to operate thewasher. Then the wiper will also operate several
times.
WARNING
In freezing temperatures the washer so-
lution may freeze on the windshield and
obscure your vision which may lead to
an accident. Warm the windshield with
the defroster before you wash the wind-
shield.
CAUTION
�Do not operate the washer continu-
ously for more than 30 seconds.
�Do not operate the washer if the
reservoir tank is empty.
�Do not fill the window washer reser-
voir tank with washer fluid concen-
trates at full strength. Some methyl
alcohol based washer fluid concen-
trates may permanently stain the
grille if spilled while filling the win-
dow washer reservoir tank.
SIC2998
WINDSHIELD WIPER AND
WASHER SWITCH
Instruments and controls
2-21
�
07.2.9/Z33-D/V5.0
�
Page 88 of 311

CAUTION
Use the headlights with the engine run-
ning to avoid discharging the vehicle
battery.
Headlight beam select
�1To select the high beam, push the lever
forward. The high beam lights come on and
the high beam indicator light
illumi-
nates.
�2Pull the lever back to select the low beam.
�3Pulling the lever toward you will flash the
headlight high beam.
Battery saver system�When the headlight switch is in the
or
position while the ignition switch is in
the ON position, the lights will automaticallyturn off 5 minutes after the ignition switch has
been turned to the OFF position.
�After the headlights automatically turn off with
the headlight switch in the
or
po-
sition, the headlights will illuminate again for 5
minutes if the headlight switch is turned to
the OFF position and then turned to the
or
position.CAUTION
Even though the battery saver feature
automatically turns off the headlights
after a period of time, you should turn
the headlight switch to the OFF position
when the engine is not running to avoid
discharging the vehicle battery.DAYTIME RUNNING LIGHT SYSTEM
(Canada only)The headlights (low beam) automatically illumi-
nate when the engine is started with the parking
brake released. The daytime running lights op-
erate with the headlight switch in the OFF
position or in the
position.
If the parking brake is applied before the engine
is started, the daytime running lights do not
SIC3315
Instruments and controls
2-25
�
07.2.9/Z33-D/V5.0
�
Page 100 of 311
REAR PARCEL BOXPush the upper part of the lid to open the rear
parcel box. For models without the Navigation
system, two boxes are available.
WARNING
Keep rear parcel box lid closed while
driving to help prevent injury in an acci-
dent or a sudden stop.
STOWING GOLF BAGSFollow the instructions here to stow golf bags in
the rear cargo space of your vehicle. Normally
two bags can be stowed in the luggage area
(Coupe models) or one bag in the trunk (Road-
ster models).
However, in some cases you may not be able to
stow the above number of golf bags in your
vehicle, depending on their sizes or types.
Coupe modelsNormally, two standard golf bags can be stowed
across the strut tower bar in the luggage area as
illustrated (A and B). When stowing a golf bag A
in the rear space, insert the top of the golf bag
SIC1977
SIC2196
Instruments and controls
2-37
�
07.2.9/Z33-D/V5.0
�
Page 101 of 311
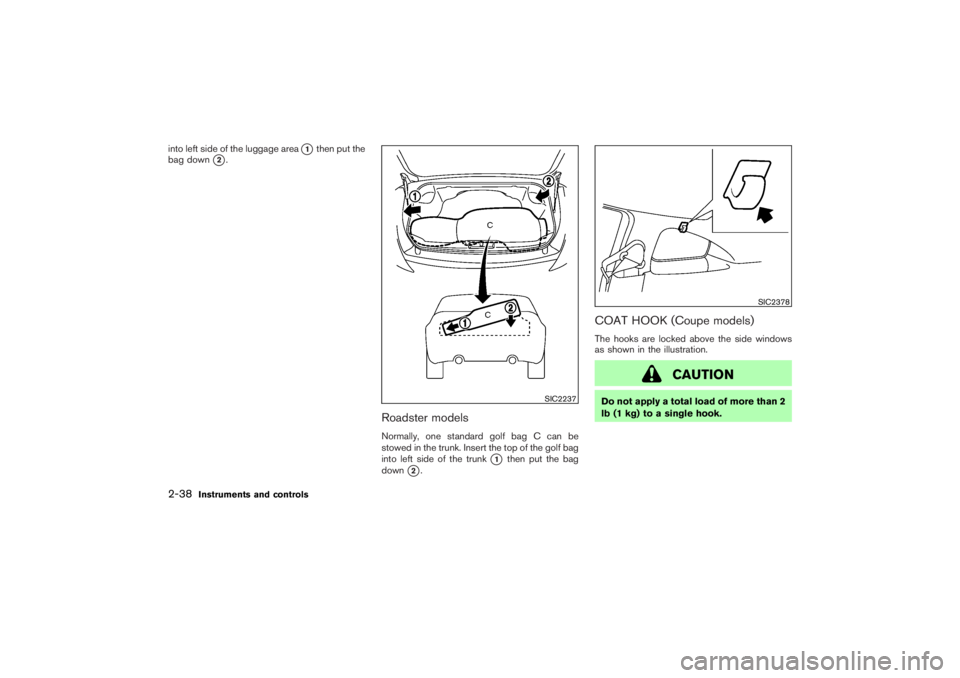
into left side of the luggage area
�1then put the
bag down
�2.
Roadster modelsNormally, one standard golf bag C can be
stowed in the trunk. Insert the top of the golf bag
into left side of the trunk
�1
then put the bag
down
�2.
COAT HOOK (Coupe models)The hooks are locked above the side windows
as shown in the illustration.
CAUTION
Do not apply a total load of more than 2
lb (1 kg) to a single hook.
SIC2237
SIC2378
2-38
Instruments and controls
�
07.2.9/Z33-D/V5.0
�
Page 114 of 311

WARNING
�Always have the doors locked while
driving. Along with the use of seat
belts, this provides greater safety in
the event of an accident by helping to
prevent persons from being thrown
from the vehicle. This also helps keep
children and others from uninten-
tionally opening the doors, and will
help keep out intruders.
�Before opening any door, always
look for and avoid oncoming traffic.
�Do not leave children unattended in-
side the vehicle. They could unknow-
ingly activate switches or controls.
Unattended children could become
involved in serious accidents.
LOCKING WITH KEYThe power door lock system allows you to lock
or unlock all doors including the rear hatch/trunk
lid simultaneously.
�Turning the driver’s door key to the rear of the
vehicle
�1
will lock all doors including the
rear hatch/trunk lid.
�Turning the driver’s door key one time to the
front of the vehicle
�2
will unlock the driver’s
door and rear hatch/trunk lid. From that po-
sition, returning the key to neutral (where the
key can only be removed and inserted) and
turning it to the front again within 5 secondswill unlock the passenger’s door.
Opening and closing windowsTurn the driver’s door key towards the front of
the vehicle (UNLOCK position) and hold for
about 1 second, all door windows will begin to
lower.
To close all door windows, turn the key to the
LOCK position and hold for about 1 second.
To stop opening or closing, turn the key to the
neutral position.
In the event of a hand in the way, or other
obstruction, the auto reverse function will acti-
vate.
SPA1503A
DOORS
Pre-driving checks and adjustments
3-3
�
07.2.9/Z33-D/V5.0
�
Page 121 of 311
 handle is located under the
s")
SECONDARY REAR HATCH
RELEASEThe secondary rear hatch release mechanism
allows opening the rear hatch in the event of
discharged battery or emergency.
The release (string) handle is located under the
strut tower bar inside the luggage compartment.
To open the rear hatch from the inside,
firmly pull the release handle to the direc-
tion shown above until the lock releases.
WARNING
�Do not drive with the trunk lid open.
This could allow dangerous exhaust
gases to be drawn into the vehicle.
See “Precautions when starting and
driving” in the “5. Starting and driv-
ing” section for exhaust gas.
�Closely supervise children when they
are around cars to prevent them from
playing and becoming locked in the
trunk where they could be seriously
injured. Keep the car locked, with the
trunk closed when not in use, and
prevent children’s access to car keys.
OPENER OPERATIONThe trunk lid release switch is located between
the license plate lights.
To open the trunk lid, unlock it with one of the
following operations then push the release
switch:
�Push the UNLOCK
button on the key-
fobonce. (Pushing the HATCH/TRUNK
button on the keyfob can open the
trunk lid at once without pushing the release
switch.)
�Insert the key into the door key cylinder and
turn it counterclockwise once.
SPA1556
SPA1685
TRUNK LID (Roadster models)
3-10
Pre-driving checks and adjustments
�
07.2.9/Z33-D/V5.0
�
Page 123 of 311
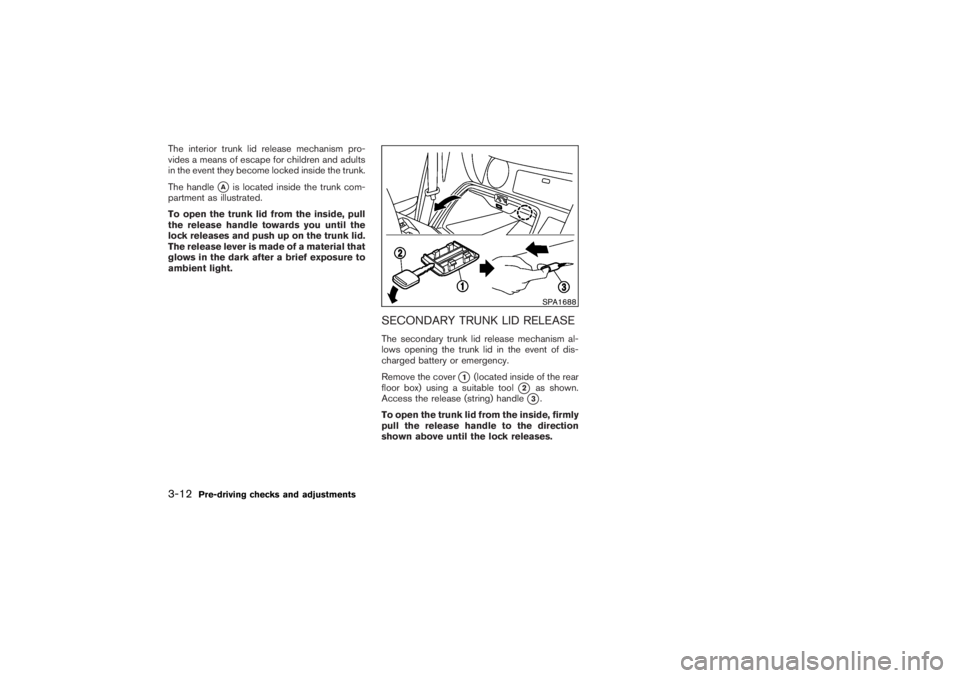
The interior trunk lid release mechanism pro-
vides a means of escape for children and adults
in the event they become locked inside the trunk.
The handle
�A
is located inside the trunk com-
partment as illustrated.
To open the trunk lid from the inside, pull
the release handle towards you until the
lock releases and push up on the trunk lid.
The release lever is made of a material that
glows in the dark after a brief exposure to
ambient light.
SECONDARY TRUNK LID RELEASEThe secondary trunk lid release mechanism al-
lows opening the trunk lid in the event of dis-
charged battery or emergency.
Remove the cover
�1
(located inside of the rear
floor box) using a suitable tool
�2
as shown.
Access the release (string) handle�3.
To open the trunk lid from the inside, firmly
pull the release handle to the direction
shown above until the lock releases.SPA1688
3-12
Pre-driving checks and adjustments
�
07.2.9/Z33-D/V5.0
�
Page 127 of 311

Top latch leverThe soft top has three locking points to engage
the front edge of the top to the vehicle body.
Operating the top latch lever enables you to lock
or unlock all three locking points at the same
time.
CAUTION
Before opening the top, be sure to
release the top latch. After closing,
securely engage the top to the vehicle
body.
To release the latch (before opening the
top):�1Push the safety switch
�A
.
�2The latch lever
�B
is lowered.
�3Swing the lever forward until the latch is
released.
To engage the latch (after closing the top):
Check that the top is in the fully closed position.
�1Push the safety switch
�A
.
�2The latch lever
�B
is lowered.
�3Rotate the lever forward until the front edge
of the top is completely joined to the vehicle
body.
�4Rotate the lever toward you and push it up
into the stored position. Make sure the top is
securely engaged to the vehicle body.
The soft top indicator light will flash with the
ignition switch ON when the top is not en-
gaged. See “Soft top indicator light” later in
this section.
When releasing or engaging the top latch,
you may hear the latch operating. This is
normal and not a malfunction.
SPA1690
3-16
Pre-driving checks and adjustments
�
07.2.9/Z33-D/V5.0
�