Page 286 of 312
AT-286
REPAIR FOR COMPONENT PARTS
Revision: 2006 November2007 350Z
High and Low Reverse ClutchNCS0009G
COMPONENTS
DISASSEMBLY
1. Remove bearing race from high and low reverse clutch drum.
2. Remove snap ring from high and low reverse clutch drum using
a flat-bladed screwdriver.
3. Remove retaining plate, drive plates and driven plates from high
and low reverse clutch drum.
1. High and low reverse clutch drum 2. Driven plate 3. Retaining plate
4. Snap ring 5. Drive plate 6. Bearing race
SCIA5045E
SCIA5215E
SCIA2868E
Page 287 of 312
REPAIR FOR COMPONENT PARTS
AT-287
D
E
F
G
H
I
J
K
L
MA
B
AT
Revision: 2006 November2007 350Z
INSPECTION
Check the following, and replace high and low reverse clutch assembly if necessary.
High and Low Reverse Clutch Snap Ring
�Check for deformation, fatigue or damage.
High and Low Reverse Clutch Drive Plates
�Check facing for burns, cracks or damage.
High and Low Reverse Clutch Retaining Plate and Driven Plates
�Check facing for burns, cracks or damage.
ASSEMBLY
1. Install driven plates, drive plates and retaining plate in high and low reverse clutch drum.
CAUTION:
Take care with order of plates.
2. Install snap ring in high and low reverse clutch drum using a flat-
bladed screwdriver.
3. Install bearing race to high and low reverse clutch drum.
CAUTION:
Apply petroleum jelly to bearing race.
SCIA2868E
SCIA5215E
Page 293 of 312
ASSEMBLY
AT-293
D
E
F
G
H
I
J
K
L
MA
B
AT
Revision: 2006 November2007 350Z
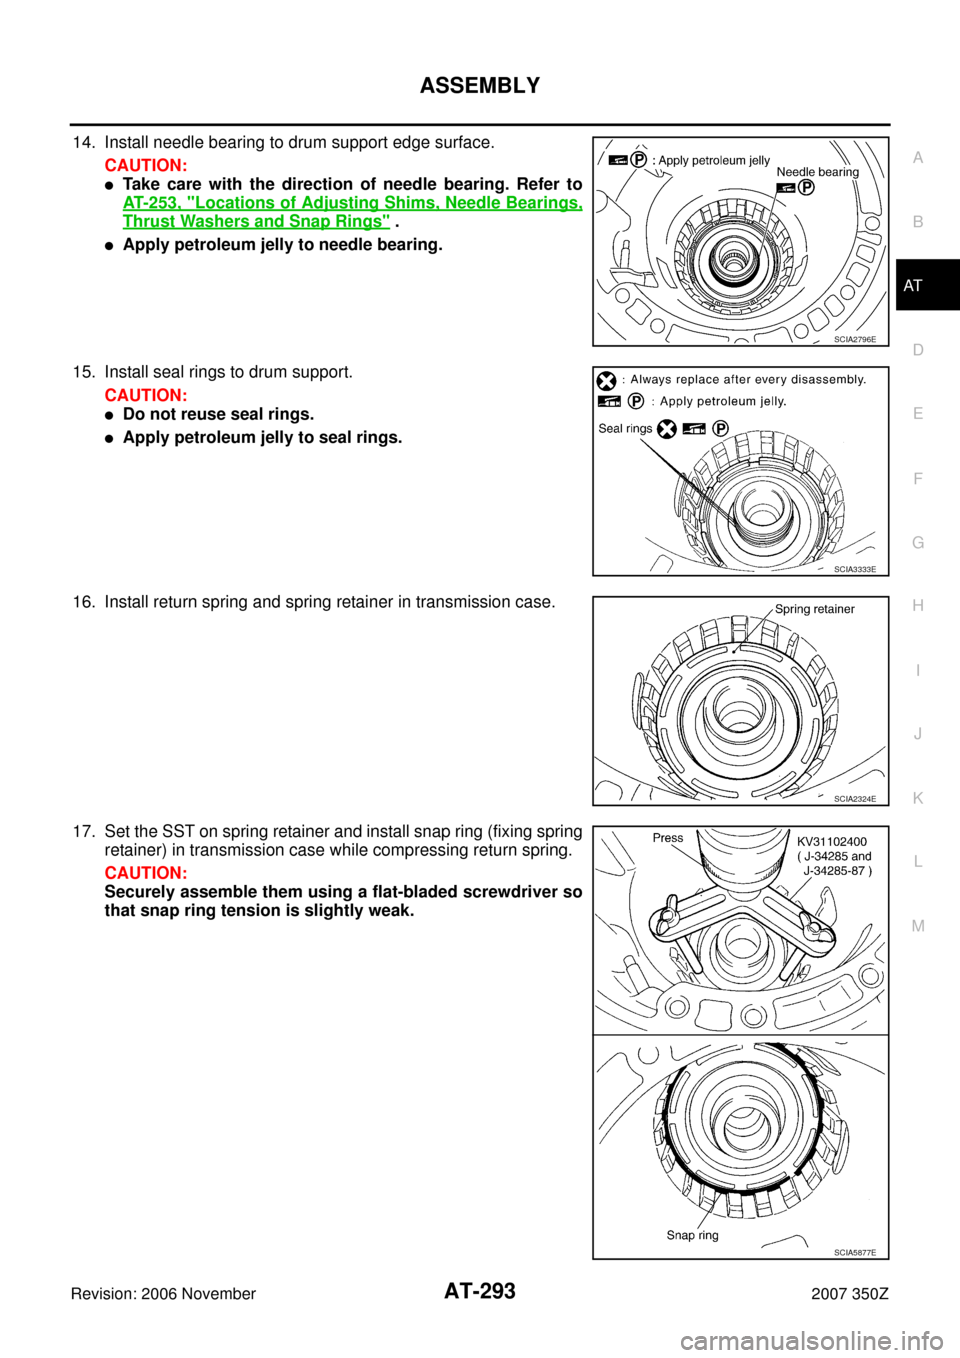
14. Install needle bearing to drum support edge surface.
CAUTION:
�Take care with the direction of needle bearing. Refer to
AT- 2 5 3 , "
Locations of Adjusting Shims, Needle Bearings,
Thrust Washers and Snap Rings" .
�Apply petroleum jelly to needle bearing.
15. Install seal rings to drum support.
CAUTION:
�Do not reuse seal rings.
�Apply petroleum jelly to seal rings.
16. Install return spring and spring retainer in transmission case.
17. Set the SST on spring retainer and install snap ring (fixing spring
retainer) in transmission case while compressing return spring.
CAUTION:
Securely assemble them using a flat-bladed screwdriver so
that snap ring tension is slightly weak.
SCIA2796E
SCIA3333E
SCIA2324E
SCIA5877E
Page 295 of 312

ASSEMBLY
AT-295
D
E
F
G
H
I
J
K
L
MA
B
AT
Revision: 2006 November2007 350Z
22. Measure clearance between retaining plate and snap ring. If not
within specified clearance, select proper retaining plate. Refer to
“Parts Information” for retaining plate selection.
23. Install needle bearing to transmission case.
CAUTION:
�Take care with the direction of needle bearing. Refer to
AT- 2 5 3 , "
Locations of Adjusting Shims, Needle Bearings,
Thrust Washers and Snap Rings" .
�Apply petroleum jelly to needle bearing.
24. Install revolution sensor to transmission case, and then tighten
mounting bolt to the specified torque. Refer to AT- 2 4 6 , "
Compo-
nents" .
CAUTION:
�Do not subject it to impact by dropping or hitting it.
�Do not disassemble.
�Do not allow metal filings, etc. to get on the sensor's front
edge magnetic area.
�Do not place in an area affected by magnetism.
25. As shown in the figure, drive rear oil seal into rear extension until
it is flush using a drift.
CAUTION:
�Do not reuse rear oil seal.
�Apply ATF to rear oil seal.
26. Install return spring (1) to parking pawl (2).Specified clearance “A”:
Refer to AT- 3 1 2 , "
Reverse Brake" .
SCIA3129E
SCIA5031E
SCIA2320E
SCIA5311E
SCIA6180J
Page 296 of 312
AT-296
ASSEMBLY
Revision: 2006 November2007 350Z
27. Install parking pawl (with return spring) and pawl shaft to rear
extension.
28. Install parking actuator support to rear extension.
29. Install needle bearing (1) to rear extension.
CAUTION:
�Take care with the direction of needle bearing. Refer to
AT- 2 5 3 , "
Locations of Adjusting Shims, Needle Bearings,
Thrust Washers and Snap Rings" .
�Apply petroleum jelly to needle bearing.
30. Install seal rings to output shaft.
CAUTION:
�Do not reuse seal rings.
�Apply petroleum jelly to seal rings.
31. Install parking gear to output shaft.
SCIA3424E
SCIA3423E
SCIA6179J
SCIA5209E
SCIA5247E
Page 297 of 312

ASSEMBLY
AT-297
D
E
F
G
H
I
J
K
L
MA
B
AT
Revision: 2006 November2007 350Z
32. Install output shaft in transmission case.
CAUTION:
Be careful not to mistake front for rear because both sides
looks similar. (Thinner end is front side.)
33. Install bearing race to output shaft.
34. Apply recommended sealant (Genuine Anaerobic Liquid Gasket
or equivalent. Refer to GI-45, "
Recommended Chemical Prod-
ucts and Sealants" .) to rear extension assembly as shown in
the figure.
CAUTION:
Completely remove all moisture, oil and old sealant, etc.
from transmission case and rear extension assembly
mounting surfaces.
35. Install rear extension assembly to transmission case.
CAUTION:
Insert the tip of parking rod between parking pawl and the
parking actuator support when assembling rear extension
assembly.
36. Tighten rear extension assembly mounting bolts to the specified
torque. Refer to AT- 2 4 6 , "
Components" .
CAUTION:
Do not reuse self-sealing bolts.
SCIA5030E
SCIA5245E
SCIA8228E
SCIA5029E
SCIA6941E
Page 298 of 312
AT-298
ASSEMBLY
Revision: 2006 November2007 350Z
37. Install needle bearing in drum support.
CAUTION:
�Take care with the direction of needle bearing. Refer to
AT- 2 5 3 , "
Locations of Adjusting Shims, Needle Bearings,
Thrust Washers and Snap Rings" .
�Apply petroleum jelly to needle bearing.
38. Install direct clutch assembly in reverse brake.
CAUTION:
Make sure that drum support edge surface and direct clutch
inner boss edge surface come to almost same place.
39. Install high and low reverse clutch assembly in direct clutch.
40. Align drive plate using a flat-bladed screwdriver.
41. Install high and low reverse clutch hub, mid sun gear assembly
and rear sun gear assembly as a unit.
SCIA5198E
SCIA5019E
SCIA2306E
SCIA3169E
SCIA5018E
Page 299 of 312
ASSEMBLY
AT-299
D
E
F
G
H
I
J
K
L
MA
B
AT
Revision: 2006 November2007 350Z
CAUTION:
Make sure that portion “A” of high and low reverse clutch
drum protrudes approximately 2 mm (0.08 in) beyond por-
tion “B” of rear sun gear.
42. Install needle bearing in rear carrier assembly.
CAUTION:
�Take care with the direction of needle bearing. Refer to
AT- 2 5 3 , "
Locations of Adjusting Shims, Needle Bearings,
Thrust Washers and Snap Rings" .
�Apply petroleum jelly to needle bearing.
43. Install bearing race in rear carrier assembly.
CAUTION:
Apply petroleum jelly to bearing race.
44. Install rear carrier assembly in direct clutch drum.
SCIA3130E
SCIA2803E
SCIA5175E
SCIA2462E


 and pawl shaft to rear
extension.
28. Install parking actuator support to rear extension.
29. Install nee")

 beyond por")