Page 344 of 473

343 Operation
Vehicle care
Seat belts
�Use only clear, lukewarm water and
soap.
Upholstery
Using aftermarket seat covers or wearing
clothing that have the tendency to give off
coloring (e.g. when wet, etc.) may cause
the upholstery to become permanently
discolored. By lining the seats with a
proper intermediate cover,
contact-discoloration will be prevented.Leather upholstery
Please note that leather upholstery is a
natural product and is therefore subject
to a natural aging process. Leather
upholstery may also react to certain
ambient influences such as high humidity
or high temperature by showing wrinkles
for example.
�Wipe leather upholstery with a damp
cloth and dry thoroughly or clean with
Mercedes-Benz approved Leather
Care.Exercise particular care when cleaning
perforated leather as its underside should
not become wet.
Wood trims
�Dampen cloth using water and use
damp cloth to clean wood trims in your
vehicle.
!The seat belts must not be treated with
chemical cleaning agents. Do not dry the seat
belts at temperatures above 176°F (80°C) or in
direct sunlight.
Warning!G
Do not bleach or dye seat belts as this may
severely weaken them. In a crash they may
not be able to provide adequate protection.
Warning!G
Only use seat covers which have been
tested and approved by Mercedes-Benz for
your vehicle model. Using other seat covers
may interfere with or prevent the deploy-
ment of the head-thorax air bags. Contact
an authorized Mercedes-Benz Center for
availability.
!Wipe with light pressure, to avoid damage to
the upholstery.
!Do not use solvents like tar remover or
wheel cleaner nor polishes or waxes as these
may be abrasive.
Page 394 of 473

393 Practical hints
Replacing bulbs
�Replacing bulbs
Bulbs
Safe vehicle operation depends on proper
exterior lighting and signaling. It is there-
fore essential that all bulbs and lamp
assemblies are in good working order at
all times.
Correct headlamp adjustment is extremely
important. Have headlamps checked and
readjusted at regular intervals and when a
bulb has been replaced. Contact an
authorized Mercedes-Benz Center for
headlamp adjustment.
Warning!G
Bulbs and bulb sockets can be very hot. Al-
low the lamp to cool down before changing
a bulb.
Keep bulbs out of reach of children.
Halogen lamps contain pressurized gas.
A bulb can explode if you:
�touch or move it when hot
�drop the bulb
�scratch the bulb
Wear eye and hand protection.
Because of high voltage in Xenon lamps, it is
dangerous to replace the bulb or repair the
lamp and its components. We recommend
that you have such work done by a qualified
technician.
iIf the headlamps are fogged up on the inside
as a result of high humidity, driving the vehicle a
short distance with the lights on should clear up
the fogging.
iBackup bulbs will be brought into use
when lamps malfunction. Read and observe
the messages in the multifunction
display (
�page 375).
Page 397 of 473
396 Practical hints
Replacing bulbs
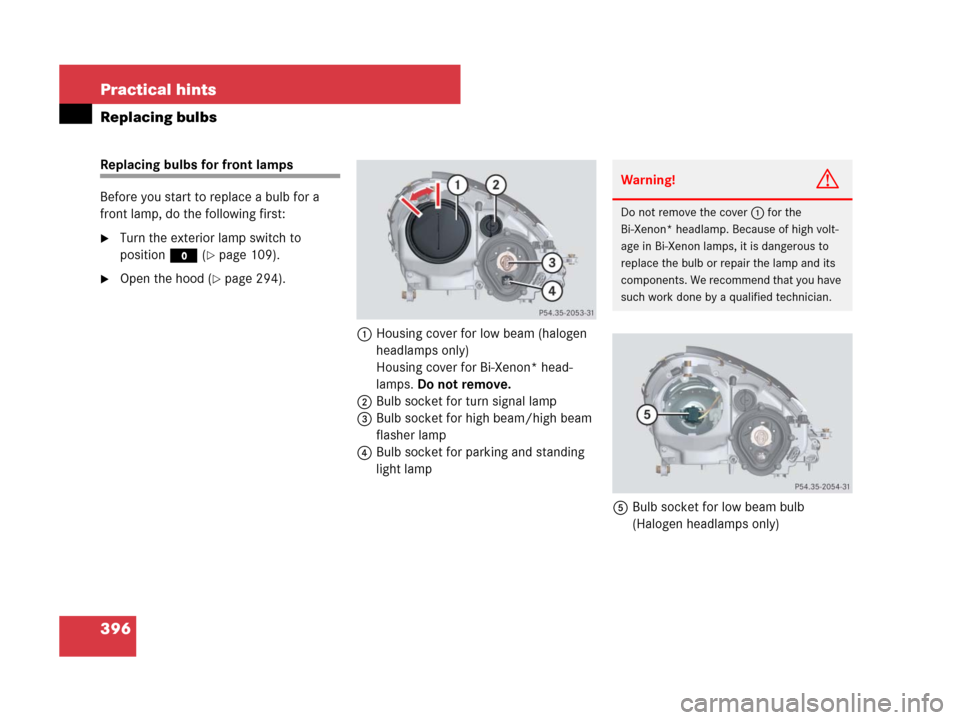
Replacing bulbs for front lamps
Before you start to replace a bulb for a
front lamp, do the following first:
�Turn the exterior lamp switch to
positionM (
�page 109).
�Open the hood (�page 294).
1Housing cover for low beam (halogen
headlamps only)
Housing cover for Bi-Xenon* head-
lamps. Do not remove.
2Bulb socket for turn signal lamp
3Bulb socket for high beam/high beam
flasher lamp
4Bulb socket for parking and standing
light lamp
5Bulb socket for low beam bulb
(Halogen headlamps only)
Warning!G
Do not remove the cover1 for the
Bi-Xenon* headlamp. Because of high volt-
age in Bi-Xenon lamps, it is dangerous to
replace the bulb or repair the lamp and its
components. We recommend that you have
such work done by a qualified technician.
Page 410 of 473
 from the
ground.Removing the wheel
4Alignment bolt
�Unscrew the upper-most wheel bolt
and remove.
�R")
409 Practical hints
Flat tire
�Jack up the vehicle until the wheel is a
maximum of 1.2 in (3 cm) from the
ground.Removing the wheel
4Alignment bolt
�Unscrew the upper-most wheel bolt
and remove.
�Replace this wheel bolt with alignment
bolt4 supplied in the vehicle tool
kit (
�page 382).
�Remove the remaining bolts.
�Remove the wheel.Mounting the spare wheel
1Wheel bolt for light alloy rims
2Wheel bolt for spare wheel with
collapsible tire (located under plastic
cover on the outside of spare wheel
rim)
Warning!G
The jack is intended only for lifting the
vehicle briefly for wheel changes. It is not
suited for performing maintenance work
under the vehicle.
�Never start the engine when the vehicle
is raised.
�Never lie down under the raised vehicle.
!Do not place wheel bolts in sand or dirt. This
could result in damage to the bolt and wheel hub
threads.
Warning!G
Inflate collapsible tire only after the wheel is
properly mounted.
Inflate the collapsible tire using the electric
pump (
�page 411) before lowering the
vehicle.
Page 411 of 473
410 Practical hints
Flat tire
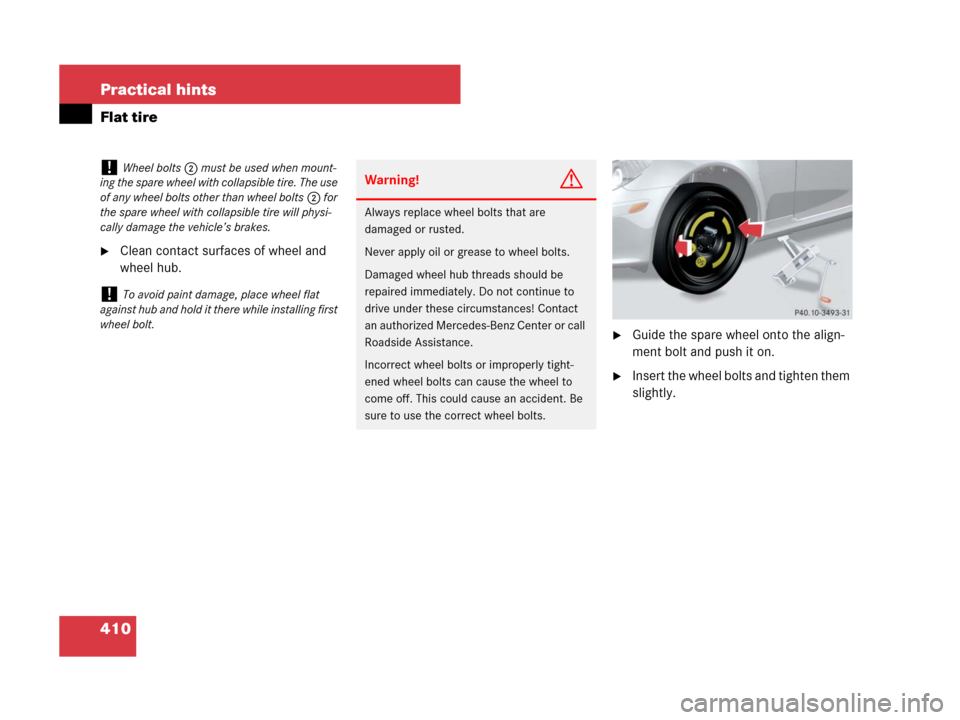
�Clean contact surfaces of wheel and
wheel hub.
�Guide the spare wheel onto the align-
ment bolt and push it on.
�Insert the wheel bolts and tighten them
slightly.
!Wheel bolts2 must be used when mount-
ing the spare wheel with collapsible tire. The use
of any wheel bolts other than wheel bolts2 for
the spare wheel with collapsible tire will physi-
cally damage the vehicle’s brakes.
!To avoid paint damage, place wheel flat
against hub and hold it there while installing first
wheel bolt.
Warning!G
Always replace wheel bolts that are
damaged or rusted.
Never apply oil or grease to wheel bolts.
Damaged wheel hub threads should be
repaired immediately. Do not continue to
drive under these circumstances! Contact
an authorized Mercedes-Benz Center or call
Roadside Assistance.
Incorrect wheel bolts or improperly tight-
ened wheel bolts can cause the wheel to
come off. This could cause an accident. Be
sure to use the correct wheel bolts.
Page 412 of 473
.Inflating the collapsible tire
1Flap
2Air pump swi")
411 Practical hints
Flat tire
�Unscrew the alignment bolt, install last
wheel bolt and tighten slightly.
�Inflate the collapsible tire
(
�page 411).Inflating the collapsible tire
1Flap
2Air pump switch
3Electrical plug
4Air hose with pressure gauge and vent
screw
5Union nut
�Take the electric air pump out of the
trunk (
�page 383).
�Open flap1 on air pump.
�Pull out electrical plug3 and air hose
with pressure gauge4.
�Close vent screw on air hose4.
�Remove the valve cap from the tire
valve.
�Screw union nut5 onto the tire valve.
�Make sure electric air pump switch2
is set to0.
�Insert electrical plug3 into the power
outlet in the passenger footwell
(
�page 257).
�Turn the SmartKey in the starter switch
to position1.
Warning!G
Use only genuine Mercedes-Benz wheel
bolts. Other wheel bolts may come loose.
Do not tighten the wheel bolts when the
vehicle is raised. Otherwise the vehicle
could fall off the jack.Warning!G
Observe instructions on air pump label.
!Do not lower the vehicle before inflating the
collapsible tire. Otherwise the rim may be
damaged.
!The cigarette lighter (�page 256) is not de-
signed for use with the electric air pump. Use the
power outlet in the passenger footwell
(
�page 257) for electric air pump operation.
��
Page 447 of 473

446 Technical data
Fuels, coolants, lubricants, etc.
Brake fluid
Only brake fluid approved by
Mercedes-Benz is recommended. Any
authorized Mercedes-Benz Center will
provide you with additional information.Premium unleaded gasoline
Warning!G
During vehicle operation, the boiling point of
the brake fluid is continuously reduced
through the absorption of moisture from the
atmosphere. Under extremely strenuous
operating conditions, this moisture content
can lead to the formation of bubbles in the
system, thus reducing the system’s
efficiency.
Therefore, the brake fluid must be replaced
regularly. Refer to your vehicle’s
Maintenance Booklet for replacement
interval.
Warning!G
Gasoline is highly flammable and poisonous.
It burns violently and can cause serious
personal injury.
Never allow sparks, flame or smoking mate-
rials near gasoline!
Turn off the engine before refueling.
Whenever you are around gasoline, avoid
inhaling fumes and skin contact, extinguish
all smoking materials.
Direct skin contact with fuels and the
inhalation of fuel vapors are damaging to
your health.
!To maintain the engine’s durability and per-
formance, premium unleaded gasoline must be
used. If premium unleaded gasoline is not avail-
able and low octane fuel is used, follow these
precautions:
�Have the fuel tank only partially filled with
unleaded regular gasoline and fill up with
premium unleaded gasoline as soon as
possible.
�Avoid full throttle driving and abrupt
acceleration.
�Do not exceed an engine speed of 3 000 rpm
if the vehicle is loaded with a light load such
as two persons and no luggage.
�Do not exceed 2/3of maximum accelerator
pedal position if the vehicle is fully loaded or
operating in mountainous terrain.
Page 457 of 473
 440
Electronic Stab")
456 Index
E
Easy-entry/exit feature* 44, 147
Electric air pump
Inflating collapsible tire 411
Sealing tires with TIREFIT 401
Vehicle tool kit 382
Electrical system (Technical data) 440
Electronic Stability Program see ESP
®
Emergency call (911) 233
Emergency call system 262
Tele Aid* 263
Emergency operations
Automatic transmission* (Limp-Home
Mode) 167
Remote door unlock, Tele Aid* 269
Retractable hardtop 390
Selector lever*, unlocking
manually 389
Trunk lid, Releasing from the
inside 101
Unlocking/locking the vehicle 387Emergency Tensioning Device see ETD
Emission control 289
Information label 431
System warranties 10
Vacuum line routing diagram 431
Engine
Cleaning 339
Compartment 294
Malfunction indicator lamp 27, 349
Number 431
Poly-V-belt layout 432
Starting 51
Tachometer 119
Technical data 433
Turning off 61Engine oil 296, 445
Adding 299
Additives 445
Checking level (Control system) 296
Checking level (Dipstick) 298
Consumption 296
Messages in the multifunction
display 297, 372–373
ESP®84, 86
Messages in the multifunction
display 358, 359
Warning lamp 350
ETD 79
Safety guidelines 68
Warning and indicator lamps 353
Exterior lamp switch 109
Exterior lighting
Lamps 393
Replacing bulbs 393
Exterior rear view mirrors see Mirrors