Page 127 of 473
126 Controls in detail
Control system
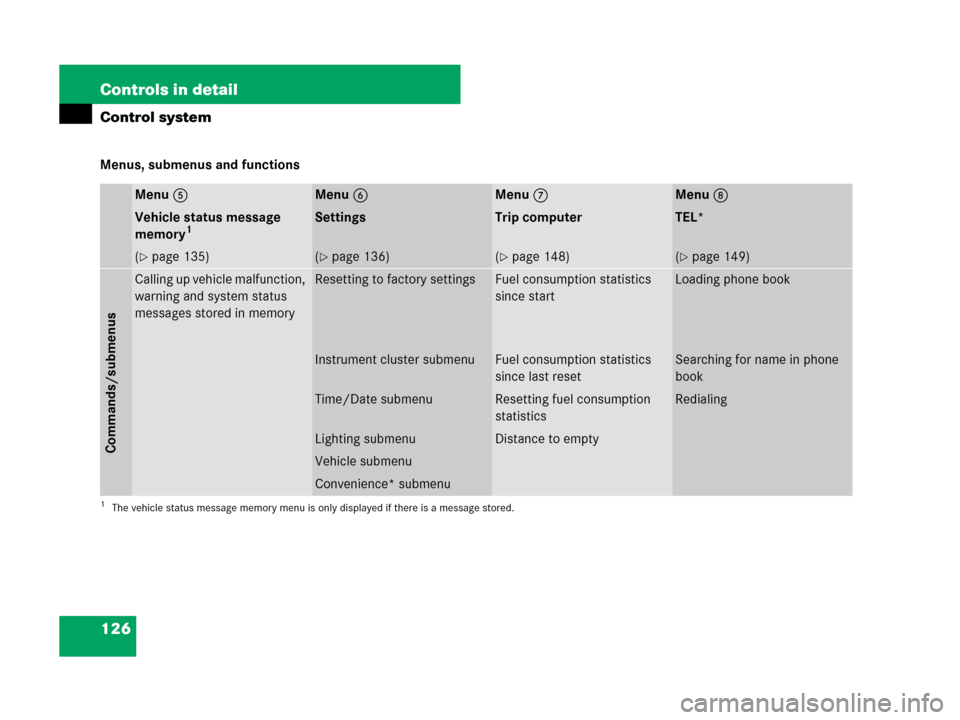
Menus, submenus and functions
Menu5Menu6Menu7Menu8
Vehicle status message
memory1SettingsTrip computerTEL*
(�page 135)(�page 136)(�page 148)(�page 149)
Commands/submenus
Calling up vehicle malfunction,
warning and system status
messages stored in memoryResetting to factory settingsFuel consumption statistics
since startLoading phone book
Instrument cluster submenu Fuel consumption statistics
since last resetSearching for name in phone
book
Time/Date submenuResetting fuel consumption
statisticsRedialing
Lighting submenuDistance to empty
Vehicle submenu
Convenience* submenu
1The vehicle status message memory menu is only displayed if there is a message stored.
Page 137 of 473

136 Controls in detail
Control system
If conditions have occurred causing status
messages to be recorded, the number of
messages appears in the multifunction dis-
play:
1Number of recorded status messages
�Press buttonjork.
The stored messages will now be dis-
played in the order in which they have
occurred. For malfunction and warning
messages, see “Vehicle status messag-
es in the multifunction display”
(
�page 356).
Should the vehicle’s system record any
conditions while driving, the number of
messages will reappear in the multifunc-
tion display when the SmartKey in the
starter switch is turned to position0 or
removed from the starter switch:
Settings menu
In the
Settings... menu are two func-
tions:
�The function To reset: Push reset
button for 3 seconds
for resetting all
settings to factory standard.
�A collection of submenus for perform-
ing individual settings for your vehicle.
�Press buttonèorÿ repeatedly
until the
Settings... menu appears in
the multifunction display.The following settings and submenus are
available in the
Settings... menu:
Resetting all settings
You can reset all the functions of most of
the submenus to the factory settings.
For safety reasons, the function
Headlamp
mode
in the Lighting submenu cannot be
reset while driving.
�Press buttonèorÿ repeatedly
until the
Settings... menu appears in
the multifunction display.
iThe vehicle status message memory will be
cleared when you turn the SmartKey in the
starter switch to position1or2.
You will then only see high-priority messages in
the multifunction display (
�page 356).
FunctionPage
Resetting all settings136
Submenus in the Settings menu137
Instrument cluster submenu139
Time/date submenu139
Lighting submenu143
Vehicle submenu146
Convenience* submenu147
��
Page 160 of 473

159 Controls in detail
Automatic transmission*
Driving tips
Accelerator position
Your driving style influences the
transmission’s shifting behavior:
Less throttle Earlier upshifting
More throttle Later upshifting
Kickdown
Use kickdown when you want maximum
acceleration.
�Press the accelerator past the point of
resistance.
Depending on the engine speed the
transmission shifts into a lower gear.
�Ease on the accelerator when you have
reached the desired speed.
The transmission shifts up again.Stopping
When you stop briefly, e.g. at traffic lights:
�Leave the transmission in gear.
�Hold the vehicle with the brake.
When you stop for a longer period of time
with the engine idling and/or on a hill:
�Set the parking brake.
�Move the gear selector lever to park
positionP.Maneuvering
When you maneuver in tight areas,
e.g. when pulling into a parking space:
�Control the vehicle speed by gradually
releasing the brakes.
�Accelerate gently.
�Never abruptly step on the accelerator.
Working on the vehicle
Warning!G
When working on the vehicle, set the
parking brake and move gear selector lever
to park positionP. Otherwise the vehicle
could roll away.
Page 170 of 473

169 Controls in detail
Good visibility
Auto-dimming rear view mirrors*
The reflection brightness of the exterior
rear view mirrors and the interior rear view
mirror will respond automatically to glare
when
�ignition is switched on
and
�incoming light from headlamps falls on
the sensor in the interior rear view
mirror
The rear view mirrors will not react if
�reverse gearR is engaged
�interior lighting is switched on
Warning!G
The auto-dimming function does not react if
incoming light is not aimed directly at sen-
sors in the interior rear view mirror.
The interior rear view mirror and the exterior
rear view mirror on the driver’s side do not
react, for example, if the wind screen* is
installed.
Light hitting the mirror(s) at certain angles
(incident light) could blind you. As a result,
you may not be able to observe traffic
conditions and could cause an accident.
Warning!G
Exercise care when using the passen-
ger-side exterior rear view mirror. The mirror
surface is convex (outwardly curved surface
for a wider field of view). Objects in mirror
are closer than they appear. Check your
interior rear view mirror or glance over your
shoulder before changing lanes.
Page 171 of 473

170 Controls in detail
Good visibility
Sun visors
The sun visors protect you from sun glare
while driving.
1Mirror lamp*
2Mounting
3Mirror cover
4Sun visor
�Swing sun visors down when you
experience glare.
�To use mirror and switch on mirror
lamp*, lift up mirror cover3.
Rear window defroster
The rear window defroster uses a large
amount of power. To keep the battery
drain to a minimum, switch off the defrost-
er as soon as the rear window is clear.
The defroster is automatically deactivated
after approximately 6 to 17 minutes of
operation depending on the outside
temperature.
Warning!G
Do not use the vanity mirror while driving.
Keep the mirrors in the sun visors closed
while vehicle is in motion. Reflected glare
can endanger you and others.
iVehicles with interior lighting package*:
If sunlight enters through a side window, disen-
gage sun visor from mounting2 and pivot it to
the side. You then can slide the sun visor along
the pivot arm to a different position if so desired.
Mirror lamp*1 will switch off as soon as sun
visor is disengaged from mounting2.
!Vehicles with interior lighting package*:
Close mirror cover3 if open before you
disengage the sun visor4 from mounting2
and pivot it to the side.
Warning!G
Any accumulation of snow and ice should be
removed from the rear window before driv-
ing. Visibility could otherwise be impaired,
endangering you and others.
Page 176 of 473

to position0.
Switching on
�Switch on the ignition (�page 37).
�Set")
175 Controls in detail
Climate control
Switching climate control system
on/off
Switching off
�Set air volume control2 (�page 174)
to position0.
Switching on
�Switch on the ignition (�page 37).
�Set air volume control2 to any speed
(
�page 174).
The previous settings are once again in
effect.
Setting the temperature
Use temperature controls1 and4
(
�page 174) to separately adjust the air
temperature on each side of the passenger
compartment. You should raise or lower
the temperature setting in small incre-
ments, preferably starting at 72°F (22°C).
The climate control will adjust to the set
temperature as fast as possible.
Increasing
�Turn temperature control 1
and/or4 (
�page 174) slightly
clockwise.
The climate control system will corre-
spondingly adjust the interior air tem-
perature.
iSevere conditions (e.g. strong air pollution)
may require replacement of the filter before its
scheduled interval. A clogged filter will reduce
the air volume to the interior.
If the vehicle interior is hot, ventilate the interior
before driving off. The climate control will then
adjust the interior temperature to the set value
much faster.
Keep the air intake grille in front of the wind-
shield free of snow and debris.
When the retractable hardtop is closed, do not
obstruct air flow by placing objects on the air
flow-through exhaust slots below the rear
window.
Warning!G
When the climate control is switched off, the
outside air supply and circulation are also
switched off. Only choose this setting for a
short time. Otherwise the windows could
fog up, impairing visibility and endangering
you and others.
Page 236 of 473

235 Controls in detail
Power windows
�Power windows
Opening and closing the windows
The windows are opened and closed elec-
trically. The switches for both door win-
dows are located on the driver’s door. The
switch for operating the passenger-side
door window is located on the passenger
door.
The door windows can also be operated
using the retractable hardtop switch
(
�page 237). The rear side windows can
only be operated using the retractable
hardtop switch (
�page 237) or the
SmartKey* (
�page 238).
1Left door window
2Right door window
Warning!G
When closing the windows, make sure there
is no danger of anyone being harmed by the
closing procedure.
The closing of the door windows can be
immediately halted by releasing the switch
or, if the switch was pressed past the resis-
tance point and released, by pressing the
respective switch.
The door windows are equipped with the
express-close and automatic reversal
function. If a door window encounters an
obstruction that blocks its path in a circum-
stance where you pressed the switch past
the resistance point and released it to close
the window, the automatic reversal function
will stop the window and open it slightly.
If a door window encounters an obstruction
that blocks its path in a circumstance where
you are closing the window by pressing and
holding the switch, by pressing and holding
button‹on the SmartKey, by pushing
and holding the retractable hardtop switch,
or by pressing and holding the,button
on the climate control panel or automatic
climate control* panel, the automatic rever-
sal function will not operate.
When leaving the vehicle, always remove the
SmartKey from the starter switch, take it
with you, and lock the vehicle. Do not leave
children unattended in the vehicle, or with
access to an unlocked vehicle.
A child’s unsupervised access to a vehicle
could result in an accident and/or serious
personal injury.
Page 238 of 473

237 Controls in detail
Power windows
Stopping windows during
Express-operation
�Briefly press the respective switch at
the symbolkorj again.Opening and closing the windows with
the retractable hardtop switch
All windows can be opened or closed with
the retractable hardtop switch.
The retractable hardtop switch is located
on the lower part of the center console.
Retractable hardtop switch
1Opening all side windows
2Closing all side windows
�Switch on the ignition (�page 37).
!If the upward movement of the window is
blocked during the closing procedure, the win-
dow will stop and open slightly.
Remove the obstruction, press the respective
switch at the symbolj again past the resis-
tance point and release.
If the window still does not close when there is
no obstruction, press and hold the respective
switch at the symbolj. The window will then
close without the obstruction sensor function.Warning!G
Never operate the windows if there is the
possibility of anyone being harmed by the
opening or closing procedure.
In case the procedure causes potential
danger, the procedure can be immediately
halted by releasing the retractable hardtop
switch.
If a door window encounters an obstruction
that blocks its path in a circumstance where
you are closing the windows using the
retractable hardtop switch, the automatic
reversal function will not operate.