Page 139 of 473
138 Controls in detail
Control system
The table below shows what settings can
be changed within the various submenus.Detailed instructions on making individual
settings can be found on the following
pages.
Instrument clusterTime/DateLightingVehicleConvenience*
(�page 139)(�page 141)(�page 143)(�page 146)(�page 147)
Selecting digital speed-
ometer display modeSynchronizing time and
date with head unit*Setting daytime running
lamp mode (USA only)Selecting audio search
functionActivating
easy-entry/exit feature*
Selecting languageSetting the timeSetting locator lightingSetting automatic locking
Selecting display (speed
display or outside
temperature) for status
indicatorSetting the dateSetting night security
illumination
Setting interior lighting
delayed shut-off
Page 142 of 473

141 Controls in detail
Control system
Time/Date submenu
Access the
Time/Date submenu via the
Settings... menu. Use the Time/Date
submenu to change the instrument cluster
display settings.
The following functions are available:Time and date synchronization with
head unit*
This function is only available in vehicles
with COMAND* and navigation module*.
�Move the selection marker with
buttonæorç to the
Time/Date
submenu.
�Press buttonjork repeatedly
until the message
Time synchroniza-
tion with Head Unit
appears in the
multifunction display.
The selection marker is on the current
setting.
�Press buttonæorç to select
the desired setting.Setting the time
This function is only available in vehicles
with audio system, or in vehicles with
COMAND* and navigation module*, if the
time and date synchronization with head
unit* feature was set to
Off (�page 141).
FunctionPage
Time and date synchronization
with head unit*141
Setting the time141
Setting the date142
iVehicles with COMAND*:
For information on setting the time in COMAND,
refer to the separate COMAND operating
instructions.
Page 143 of 473

142 Controls in detail
Control system
�Move the selection marker with
buttonæorç to the
Time/Date
submenu.
�Press buttonjork repeatedly
until the message
Time, hours Press
R to confirm
or Time, minute(s)
Press R to confirm
appears in the
multifunction display.
Example illustration for setting the hour
�Press buttonæorç to set the
hours or minute(s).
�Press reset buttonJto confirm.Setting the date
This function is only available in vehicles
with audio system, or in vehicles with
COMAND* and navigation module*, if the
time and date synchronization with head
unit* feature was set to
Off (�page 141).
�Move the selection marker with
buttonæorç to the
Time/Date
submenu.
�Press buttonjork repeatedly
until the message
Set date Month, Set
date Day
, or Set date Year appears in
the multifunction display.
Example illustration for setting the month
�Press buttonæorç to set the
month, day, or year.
iVehicles with COMAND*:
For information on setting the time in COMAND,
refer to the separate COMAND operating
instructions.
Page 144 of 473

143 Controls in detail
Control system
Lighting submenu
Access the
Lighting submenu via the
Settings... menu. Use the Lighting sub-
menu to change the lamp and lighting
settings on your vehicle.
The following functions are available:Setting daytime running lamp mode
(USA only)
�Move the selection marker with
buttonæorç to the
Lighting
submenu.
�Press buttonjork repeatedly
until the message
Headlamp mode
appears in the multifunction display.
The selection marker is on the current
setting.
�Press buttonæorç to select
manual operation (
Manual) or daytime
running lamp mode (
Constant).With daytime running lamp mode activated
and the exterior lamp switch at
positionMorU, the low beam
headlamps are switched on when the en-
gine is running.
In low ambient light conditions the follow-
ing lamps will switch on additionally:
�Parking lamps
�Tail lamps
�License plate lamps
�Side marker lamps
For more information on the daytime run-
ning lamp mode, see “Lighting”
(
�page 109).
FunctionPage
Setting daytime running lamp
mode (USA only)143
Setting locator lighting144
Setting night security
illumination144
Setting interior lighting delayed
shut-off 145
iThis function is not available in countries
where the daytime running lamp mode is manda-
tory and therefore in a constant mode.
iFor safety reasons, resetting all the func-
tions of all submenus to the factory settings
while driving (
�page 136) will not deactivate the
daytime running lamp mode.
The following message appears in the multifunc-
tion display:
Lighting Cannot be completely reset to
factory settings while driving
.
Page 149 of 473

148 Controls in detail
Control system
Trip computer menu
Use the trip computer menu to call up
statistical data on your vehicle.
The following information is available:Fuel consumption statistics since start
�Press buttonèorÿ repeatedly
until the message
From start appears
in the multifunction display.
1Statistics called up: since start
2Time elapsed since start
3Average fuel consumption since start
4Average speed since start
5Distance driven since startFuel consumption since last reset
�Press buttonèorÿ repeatedly
until the message
From start appears
in the multifunction display.
�Press buttonjork repeatedly
until the message
Since reset appears
in the multifunction display.
1Statistics called up: since last reset
2Time elapsed since last reset
3Average fuel consumption since last
reset
4Average speed since last reset
5Distance driven since last resetFunctionPage
Fuel consumption statistics
since start148
Fuel consumption statistics
since last reset148
Resetting fuel consumption
statistics149
Calling up range
(distance to empty)149
iAll statistics stored since the last engine
start will be reset approximately four hours after
the SmartKey in the starter switch is turned to
position0 or removed from the starter switch.
Resetting will not occur if you turn the SmartKey
back to position1or2 within this time period.
Page 150 of 473

�Press")
149 Controls in detail
Control system
Resetting fuel consumption statistics
�Press and hold reset buttonJuntil
the values of the statistics are reset
to
0.Calling up range (distance to empty)
�Press buttonèorÿ repeatedly
until the message
From start appears
in the multifunction display.
�Press buttonjork repeatedly
until the message
Range: appears in
the multifunction display.
The calculated remaining driving range
based on the current fuel tank level
appears in the multifunction display.
TEL* menu
iThe fuel consumption statistics reset auto-
matically to
0 when either of the following values
is exceeded:
�distance covered:
100 000 miles (100 000 km)
�time elapsed: 10 000 hours
iIf only very little fuel is left in the tank, a
vehicle at the fuel pump is shown instead of the
range.
Warning!G
A driver’s attention to the road must always
be his/her primary focus when driving. For
your safety and the safety of others, we rec-
ommend that you pull over to a safe location
and stop before placing or taking a tele-
phone call. If you choose to use the tele-
phone while driving, please use the
hands-free device and only use the tele-
phone when weather, road, and traffic
conditions permit.
Some jurisdictions prohibit the driver from
using a cellular telephone while driving a
vehicle.
Bear in mind that at a speed of just
30 mph (approximately 50 km/h), your
vehicle is covering a distance of
44 feet (approximately 14 m) every second.
��
Page 160 of 473

159 Controls in detail
Automatic transmission*
Driving tips
Accelerator position
Your driving style influences the
transmission’s shifting behavior:
Less throttle Earlier upshifting
More throttle Later upshifting
Kickdown
Use kickdown when you want maximum
acceleration.
�Press the accelerator past the point of
resistance.
Depending on the engine speed the
transmission shifts into a lower gear.
�Ease on the accelerator when you have
reached the desired speed.
The transmission shifts up again.Stopping
When you stop briefly, e.g. at traffic lights:
�Leave the transmission in gear.
�Hold the vehicle with the brake.
When you stop for a longer period of time
with the engine idling and/or on a hill:
�Set the parking brake.
�Move the gear selector lever to park
positionP.Maneuvering
When you maneuver in tight areas,
e.g. when pulling into a parking space:
�Control the vehicle speed by gradually
releasing the brakes.
�Accelerate gently.
�Never abruptly step on the accelerator.
Working on the vehicle
Warning!G
When working on the vehicle, set the
parking brake and move gear selector lever
to park positionP. Otherwise the vehicle
could roll away.
Page 169 of 473
168 Controls in detail
Good visibility
For information on the windshield wipers,
see “Windshield wipers” (
�page 56).
Headlamp cleaning system*
The button is located on the left side of the
dashboard.
1Headlamp cleaning button
�Switch on the ignition (�page 37).
�Press button1.
The headlamps are cleaned with a
high-pressure water jet.For information on filling up the washer
reservoir, see “Windshield washer system
and headlamp cleaning system*”
(
�page 302).
Rear view mirrors
For more information on setting the rear
view mirrors, see “Mirrors” (
�page 46).
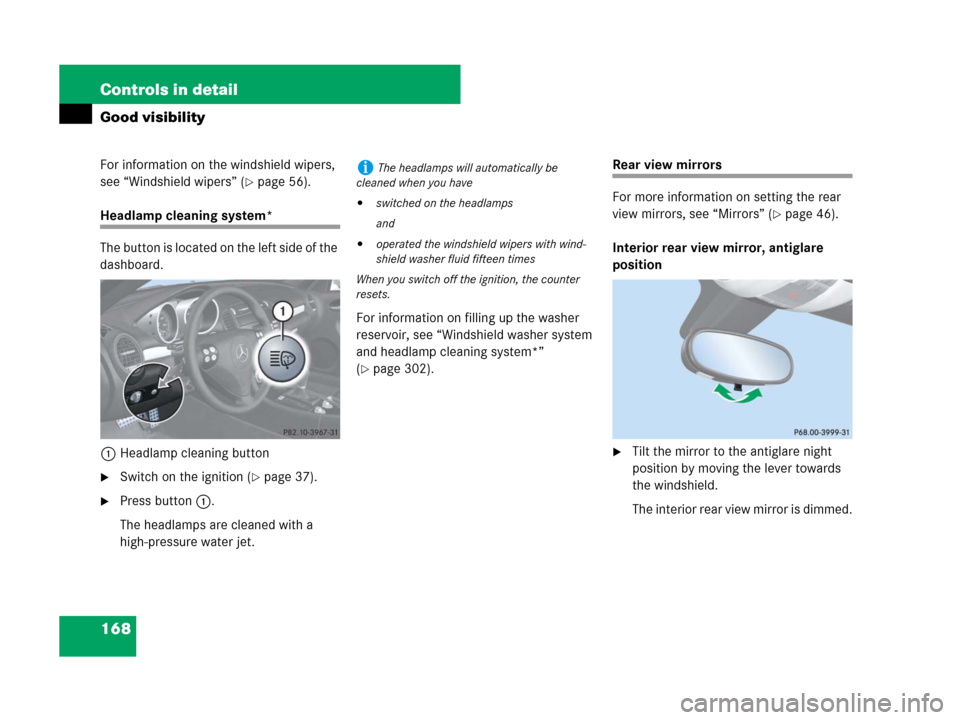
Interior rear view mirror, antiglare
position
�Tilt the mirror to the antiglare night
position by moving the lever towards
the windshield.
The interior rear view mirror is dimmed.
iThe headlamps will automatically be
cleaned when you have
�switched on the headlamps
and
�operated the windshield wipers with wind-
shield washer fluid fifteen times
When you switch off the ignition, the counter
resets.