Page 113 of 473

112 Controls in detail
Lighting
When the engine is running, and you turn
the exterior lamp switch to
positionCorB, the manual head-
lamp mode has priority over the daytime
running lamp mode.
The corresponding exterior lamps switch
on (
�page 109).
Locator lighting and night security illu-
mination
The locator lighting and the night security
illumination are described in the “Control
system” section, see “Setting locator light-
ing” (
�page 144) and “Setting night secu-
rity illumination” (
�page 144).Fog lampsFront fog lamps
�Switch on the low beam
headlampsB (
�page 109).
�Pull out the exterior lamp switch to first
stop.
The front fog lamps switch on.
The green indicator lamp‡ in the
exterior lamp switch comes on
(
�page 109).
�Push in the exterior lamp switch.
The front fog lamps switch off.
The green indicator lamp‡ in the
exterior lamp switch goes out.
iWith the daytime running lamp mode activat-
ed and the exterior lamp switch in positionM,
you cannot switch on the high beam headlamps.
The high beam flasher is available at all times.
For nighttime driving, turn the exterior lamp
switch in positionB orU to permit
activation of the high beam headlamps.
Warning!G
In low ambient lighting or foggy conditions,
only switch from positionUtoB with
the vehicle at a standstill in a safe location.
Switching fromUtoB will briefly
switch off the headlamps. Doing so while
driving in low ambient lighting conditions
may result in an accident.
iFog lamps will operate with the parking
lamps and/or low beam headlamps on. Fog
lamps should only be used in conjunction with
low beam headlamps. Consult your State or
Province Motor Vehicle Regulations regarding
allowable lamp operation.
iFog lamps cannot be switched on with the
exterior lamp switch in positionU. To switch
on the fog lamps, turn the exterior lamp switch to
positionB first.
Page 116 of 473

115 Controls in detail
Lighting
Switching off corner-illuminating front
fog lamps
The combination switch for the turn signal
resets automatically after major steering
wheel movements. This will switch off the
corner-illuminating front fog lamps if they
where activated by switching on the left or
right turn signal.
If the turn signal should stay on after
making the turn, the turn signal and
corner-illuminating front fog lamp can be
switched off by returning the combination
switch to its original position.Driving in reverse
Switching on corner-illuminating front
fog lamps
�Place the gearshift lever (automatic
transmission*: gear selector lever) in
positionR.
The front fog lamp opposite to your
steering direction comes on.
Switching off corner-illuminating front
fog lamps
�Place the gearshift lever (automatic
transmission*: gear selector lever) out
of positionR.
The respective front fog lamp goes out.
Hazard warning flasher
The hazard warning flasher can be
switched on at all times, even with the
SmartKey removed from the starter
switch.
The hazard warning flasher switches on
automatically when an air bag deploys.
The hazard warning flasher switch is
located on the upper part of the center
console.
1Hazard warning flasher switch
iThere may be a brief delay before the
corner-illuminating front fog lamps switch off.
Page 117 of 473

116 Controls in detail
Lighting
Switching on hazard warning flasher
�Press hazard warning flasher
switch1.
All turn signal lamps are flashing.
Switching off hazard warning flasher
�Press hazard warning flasher switch1
again.
Interior lighting
The controls are located in the overhead
control panel.
1Interior lighting on/off
2Automatic control on/off
3Right reading lamp on/off
4Left reading lamp on/offAutomatic control
Deactivating
�Press automatic control switch2 until
it engages at a deeper position than the
other switches.
The interior lighting remains switched
off in darkness, even when you
�unlock the vehicle
�remove the SmartKey from the
starter switch
�open a door
iWith the hazard warning flasher activated
and the combination switch set for either left or
right turn, only the respective turn signals will
operate when the ignition is switched on.
iIf the hazard warning flasher has been
activated automatically, press hazard warning
flasher switch1 once to switch it off.
!An interior lamp switched on manually does
not go out automatically.
Leaving an interior lamp switch in the ON posi-
tion for extended periods of time with the engine
turned off could result in a discharged battery.
iThe interior lighting is factory-set to
automatic mode.
iWhen you open the trunk, the trunk lighting
switches on automatically.
Page 118 of 473

117 Controls in detail
Lighting
Activating
�Press automatic control switch2 until
it is flush to the other switches.
The interior lighting switches on in
darkness, when you
�unlock the vehicle
�remove the SmartKey from the
starter switch
�open a door
The interior lighting switches off automati-
cally following a preset time delay.
For more information, see “Setting interior
lighting delayed shut-off” (
�page 145).Manual control
Switching interior lighting on and off
�Press interior lighting switch1.
The interior lighting switches on.
�Press interior lighting switch1 again.
The interior lighting switches off.
Switching reading lamps on and off
The standard reading lamps are located to
the left and right of the overhead control
panel. Reading lamps as part of the interior
lighting package* are located on the lower
edge of the interior rear view mirror.
�Press reading lamp switch3or4 to
switch on the desired reading lamp.
�Press reading lamp switch3or4
again to switch off the respective
reading lamp.
Door entry lamps
For better orientation in the dark, the
corresponding door entry lamps will switch
on in darkness when you open a door and
the automatic control is activated.
The door entry lamps switch off when the
corresponding door is closed.
iIf the door remains open, the interior lighting
switches off automatically after approximately
5minutes.
iThe footwell lighting* is switched on and off
simultaneously with the manual control.iIf you turn the SmartKey in the starter
switch to position0 and switch off the exterior
headlamps, the door entry lamps will remain lit
for approximately 5 minutes.
Page 121 of 473
120 Controls in detail
Instrument cluster
Resetting trip odometer
�Make sure you are viewing the
standard display menu (
�page 127).
�If it is not displayed, press
buttonèorÿ repeatedly until
the standard display appears in the
multifunction display.
�Press and hold reset buttonJ until
the trip odometer is reset.
Clock
Vehicles with COMAND*:
The clock in the instrument cluster can be
synchronized with the time set in
COMAND using the time synchronization
with head unit feature (
�page 141), or set
independently from COMAND using the
control system (
�page 141) with the time
synchronization with head unit feature set
to
Off.
For setting the time in COMAND, see
separate COMAND operating instructions.
For setting the time with audio system,
(
�page 141).
Page 127 of 473
126 Controls in detail
Control system
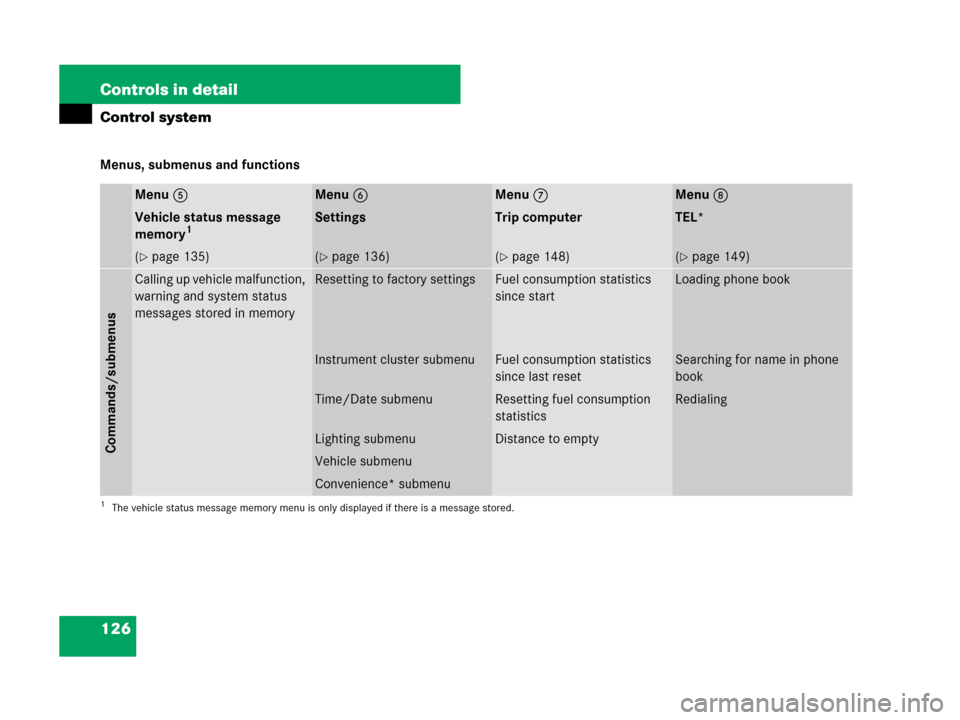
Menus, submenus and functions
Menu5Menu6Menu7Menu8
Vehicle status message
memory1SettingsTrip computerTEL*
(�page 135)(�page 136)(�page 148)(�page 149)
Commands/submenus
Calling up vehicle malfunction,
warning and system status
messages stored in memoryResetting to factory settingsFuel consumption statistics
since startLoading phone book
Instrument cluster submenu Fuel consumption statistics
since last resetSearching for name in phone
book
Time/Date submenuResetting fuel consumption
statisticsRedialing
Lighting submenuDistance to empty
Vehicle submenu
Convenience* submenu
1The vehicle status message memory menu is only displayed if there is a message stored.
Page 132 of 473
131 Controls in detail
Control system
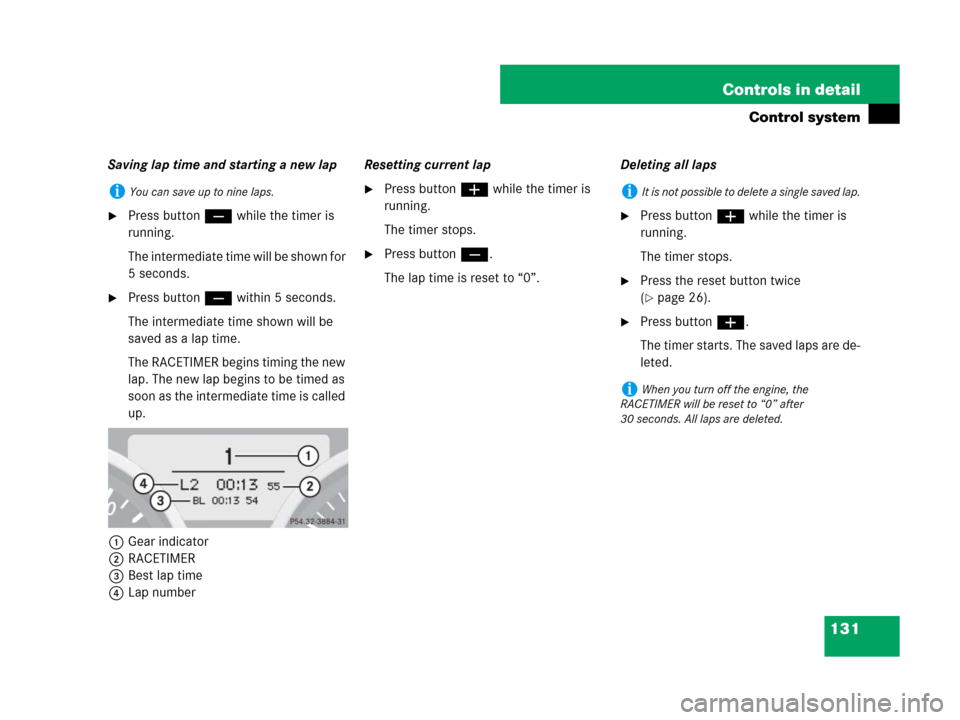
Saving lap time and starting a new lap
�Press button ç while the timer is
running.
The intermediate time will be shown for
5 seconds.
�Press button ç within 5 seconds.
The intermediate time shown will be
saved as a lap time.
The RACETIMER begins timing the new
lap. The new lap begins to be timed as
soon as the intermediate time is called
up.
1Gear indicator
2RACETIMER
3Best lap time
4Lap numberResetting current lap
�Press button æ while the timer is
running.
The timer stops.
�Press button ç.
The lap time is reset to “0”.Deleting all laps
�Press button æ while the timer is
running.
The timer stops.
�Press the reset button twice
(
�page 26).
�Press button æ.
The timer starts. The saved laps are de-
leted.
iYou can save up to nine laps.iIt is not possible to delete a single saved lap.
iWhen you turn off the engine, the
RACETIMER will be reset to “0” after
30 seconds. All laps are deleted.
Page 137 of 473

136 Controls in detail
Control system
If conditions have occurred causing status
messages to be recorded, the number of
messages appears in the multifunction dis-
play:
1Number of recorded status messages
�Press buttonjork.
The stored messages will now be dis-
played in the order in which they have
occurred. For malfunction and warning
messages, see “Vehicle status messag-
es in the multifunction display”
(
�page 356).
Should the vehicle’s system record any
conditions while driving, the number of
messages will reappear in the multifunc-
tion display when the SmartKey in the
starter switch is turned to position0 or
removed from the starter switch:
Settings menu
In the
Settings... menu are two func-
tions:
�The function To reset: Push reset
button for 3 seconds
for resetting all
settings to factory standard.
�A collection of submenus for perform-
ing individual settings for your vehicle.
�Press buttonèorÿ repeatedly
until the
Settings... menu appears in
the multifunction display.The following settings and submenus are
available in the
Settings... menu:
Resetting all settings
You can reset all the functions of most of
the submenus to the factory settings.
For safety reasons, the function
Headlamp
mode
in the Lighting submenu cannot be
reset while driving.
�Press buttonèorÿ repeatedly
until the
Settings... menu appears in
the multifunction display.
iThe vehicle status message memory will be
cleared when you turn the SmartKey in the
starter switch to position1or2.
You will then only see high-priority messages in
the multifunction display (
�page 356).
FunctionPage
Resetting all settings136
Submenus in the Settings menu137
Instrument cluster submenu139
Time/date submenu139
Lighting submenu143
Vehicle submenu146
Convenience* submenu147
��