Page 191 of 473
.
The indicator lamp on the button
comes on.Deactivating�Press button, (�page 184) again.
The indicator lamp on")
190 Controls in detail
Automatic climate control*
Activating
�Press button, (�page 184).
The indicator lamp on the button
comes on.Deactivating�Press button, (�page 184) again.
The indicator lamp on the button goes
out.Air recirculation mode with
convenience closing or opening feature
iThe air recirculation mode activates auto-
matically at high outside temperatures.
The indicator lamp on button, is not lit when
the air recirculation mode is automatically
switched on.
A quantity of outside air is added after
approximately 30 minutes.iThe air recirculation mode is deactivated
automatically:
�after 5 minutes if the outside temperature is
below approximately 41°F (5°C)
�after 5 minutes if the air conditioning is
turned off (
�page 191)
�after 30 minutes if the outside temperature
is above approximately 41°F (5°C)
Warning!G
Never operate the side windows if there is
the possibility of anyone being harmed by
the closing procedure.
When using the air recirculation mode with
convenience closing feature, should the up-
ward movement of a window be blocked by
some obstruction including but not limited
to arms, hands, fingers, etc., the automatic
reversal feature will not operate.
In the event that the closing procedure
causes potential danger, the closing of the
door windows can be immediately halted by
releasing the, button or by pressing the
respective power window switch.
The closing of the rear side windows can be
immediately halted by releasing the
,button.
Page 192 of 473

191 Controls in detail
Automatic climate control*
Convenience closing
�Press and hold button, until the
windows are closed or have reached
the desired position.
The indicator lamp on the button
comes on. The air recirculation mode is
activated.Convenience opening�Press and hold button, until the
windows are opened or have reached
the desired position.
The indicator lamp on the button
goes out. The air recirculation mode
is deactivated.
Air conditioning
The cooling function, only operational
when the engine is running, cools the
vehicle interior down to the selected
temperature. The cooling function also
dehumidifies the air in the vehicle interior,
thus preventing the windows from
fogging up.
The air conditioning uses the refrigerant
R134a. This refrigerant is free of CFCs
which are harmful to the ozone layer.
iThe closing of the windows can be immedi-
ately halted by releasing button,.iThe opening of the windows can be immedi-
ately halted by releasing button,.
A window will only return to its previous position
if it has not been moved to another position us-
ing the respective window switch after it was
closed with button,.
A window that has been moved will remain in its
current position if button, is used to reopen
the remaining windows.
Warning!G
If you turn off the cooling function, the
vehicle will not be cooled when weather
conditions are warm. The windows can fog
up more quickly. Window fogging may
impair visibility and endanger you and
others.
iCondensation may drip from underneath the
vehicle. This is normal and not an indication of a
malfunction.
Page 199 of 473

198 Controls in detail
Audio system
Returning sound functions to factory
settings
�Press O button to call up settings
menu in the display.
�Press RES soft key briefly; the respec-
tive sound function is reset to its center
level.
or
�Press and hold RES soft key until RESET
appears in the display.
The sound settings for bass and treble
are returned to their center level and
the volume is set to a predefined level.
The radio switches back to the
standard radio menu 4 seconds after
the last soft key is pressed.Adjusting balance
�Press P button.
BALANCE appears in the display.
�Press X or Y soft key.
The volume is distributed between the
left and right sides of the vehicle.
or
�Press RES soft key briefly.
The balance is reset to its center level.
The radio switches back to the
standard radio menu 8 seconds after
the last button is pressed.Returning volume distribution to
factory settings
�Press P button to call up settings
menu in the display.
�Press RES soft key briefly; the
respective volume distribution is reset
to its center (flat) level.
or
�Press and hold RES soft key until RESET
appears in the display.
The volume distribution settings for the
balance is set to the center level.
The radio switches back to the
standard radio menu 4 seconds after
the last soft key is pressed.
Page 201 of 473
200 Controls in detail
Audio system
Calling up wavebands for radios
with SAT
�Press FM, AM or WB soft key repeatedly
until desired waveband has been
selected.
The FM, AM and WB wavebands are
called up one after another.
The waveband currently selected
appears in the upper left-hand corner
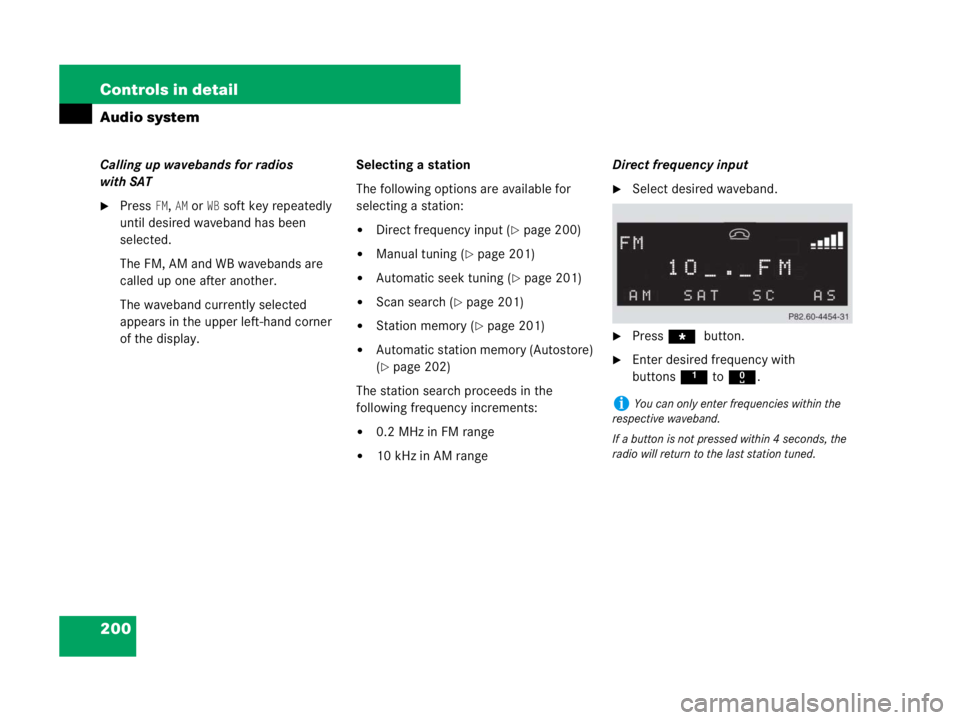
of the display.Selecting a station
The following options are available for
selecting a station:
�Direct frequency input (�page 200)
�Manual tuning (�page 201)
�Automatic seek tuning (�page 201)
�Scan search (�page 201)
�Station memory (�page 201)
�Automatic station memory (Autostore)
(
�page 202)
The station search proceeds in the
following frequency increments:
�0.2 MHz in FM range
�10 kHz in AM rangeDirect frequency input
�Select desired waveband.
�Press * button.
�Enter desired frequency with
buttons1to R.
iYou can only enter frequencies within the
respective waveband.
If a button is not pressed within 4 seconds, the
radio will return to the last station tuned.
Page 207 of 473
206 Controls in detail
Audio system
Accessing via number keys
�Enter number of preset you wish to
select, e.g. 1.
The radio plays the station stored
under this number and the PTY function
changes to the category corresponding
to the station.
Tuning via manual channel input
Example: tuning in channel 16
�Press *.
Input line appears in the main radio
menu.
�Use number keys to enter desired
channel within 8 seconds,
e.g.16.
The system tunes to channel 16.
The station you have selected begins to
play.
Tuning via the program category list
The category list contains all currently
receivable categories of programs. It is
arranged alphabetically.
�Selecting a category
�Press PTY soft key.
The current PTY category of the
station is displayed.
�Press <<< or >>> soft key.
This switches between the
individual categories.
When changing the category, the
channel selected last in the new
category becomes audible.
iYou can only enter available channel
numbers.
Page 210 of 473

209 Controls in detail
Audio system
General notes
The system may not be able to play audio
CDs with copy protection.
Playing copied CDs may cause
malfunctions during playback.Should excessively high or low tempera-
tures occur while in CD changer mode*,
CD TEMP will appear in the display, and the
CD will be muted until the temperature has
reached an acceptable level for the system
to continue operation.
The single CD player and the CD changer*
play audio CDs.
Warning!G
In order to avoid distraction which could
lead to an accident, the driver should insert
CDs with the vehicle at a standstill and
operate the audio system only if permitted
by road, weather and traffic conditions.
Bear in mind that at a speed of just
30 mph (approximately 50 km/h), your
vehicle is covering a distance of
44 feet (approximately 14 m) every second.
iThe audio system plays both CD-Rs and
CD-RWs with audio data.
!If you affix stickers to the CDs, they can be-
come warped due to the heat that develops in
the CD drive or CD changer.
In certain situations, the CDs can then no longer
be ejected and cause damage to the drive. Such
damage is not covered by the Mercedes-Benz
Limited Warranty.
!Your CD drive or CD changer has been
designed to play CDs which correspond to the
EN 60908 standard. You can therefore only use
CDs with a maximum thickness of 1.3 mm.
If you insert thicker data carriers, e.g. ones that
have data on both sides (one side with DVD data,
the other side with audio data), they cannot be
ejected and will damage the drive.
!Do not use CDs with an 8 cm diameter, not
even with a CD adapter. Attempting to play CDs
with an 8 cm diameter or playing such CDs with
an adapter may cause damage to the CD drive.
Such damage is not covered by the
Mercedes-Benz Limited Warranty.
Page 214 of 473

213 Controls in detail
Audio system
A light-emitting diode in the buttons shows
the status of the corresponding magazine
slot.
CD loading slot1 is above buttons2
and is used to load CDs.Loading the CD magazine
Loading single CDs
�Open the glove box (�page 252).
1CD loading slot
2Magazine slot button
�Briefly press button2 for the empty
magazine slot that you would like to
use.
The light-emitting diode in the maga-
zine slot button flashes in green.
INSERT CD appears in the display along
with the slot number.
The flashing light indicates that the CD
changer is ready to receive a CD.
�Insert an audio CD into CD loading
slot1 within 5 seconds, label side up.
The CD is pulled in and played.
�Close the glove box.
LEDs
no LED is litMagazine slot is
empty.
green LED flashesCD can be loaded.
red LED is litMagazine slot is in
use.
red LED flashesCD is being ejected.
iIf a CD has been inserted incorrectly or
cannot be read,
WRONG CD0 will appear in the
display.
Loading one or more CDs interrupts the
CD playback.
Page 215 of 473

214 Controls in detail
Audio system
Loading several CDs
�Open the glove box.
�Press button2 of an empty magazine
slot for more than 2 seconds.
The light-emitting diodes in all the mag-
azine slot buttons light up several
times in green, and
ALL LOAD appears
in the display.
�Wait until the light-emitting diode for
the first magazine slot flashes in green.
The flashing light indicates that the CD
changer is ready to receive a CD.
�Insert an audio CD into CD loading
slot1 within 5 seconds, label side up.
The CD is pulled in and the light-emit-
ting diode in the magazine slot button
lights up in red. The magazine slot is
loaded.
The light-emitting diode in the next
available magazine slot button flashes
in green. The CD changer is ready to re-
ceive the next CD.
�Repeat the previous step until all six
magazine slots are loaded.
Once all magazine slots are loaded, the
CD in the sixth magazine slot is played.
�Close the glove box.Ejecting CDs
Ejecting single CDs
�Open the glove box.
�Briefly press desired magazine slot but-
ton.
The light-emitting diode in the maga-
zine slot button flashes in red. The cor-
responding CD is ejected.
EJECTING CD
appears in the display along with the
magazine slot number.
�Remove CD from CD loading slot within
15 seconds.
If after removing a single CD no other
CDs remain loaded in the magazine,
MAG. EMPTY appears in the display.
iIf, for example, you only want to load maga-
zine slots 1 - 4 instead of all six, simply do not in-
sert a fifth CD into the CD loading slot. The CD
changer will first try to load a CD but will then
cancel the procedure, after which the radio will
play the fourth CD.
iThe CD playback is interrupted while one or
more CDs are being ejected.