Page 344 of 473

343 Operation
Vehicle care
Seat belts
�Use only clear, lukewarm water and
soap.
Upholstery
Using aftermarket seat covers or wearing
clothing that have the tendency to give off
coloring (e.g. when wet, etc.) may cause
the upholstery to become permanently
discolored. By lining the seats with a
proper intermediate cover,
contact-discoloration will be prevented.Leather upholstery
Please note that leather upholstery is a
natural product and is therefore subject
to a natural aging process. Leather
upholstery may also react to certain
ambient influences such as high humidity
or high temperature by showing wrinkles
for example.
�Wipe leather upholstery with a damp
cloth and dry thoroughly or clean with
Mercedes-Benz approved Leather
Care.Exercise particular care when cleaning
perforated leather as its underside should
not become wet.
Wood trims
�Dampen cloth using water and use
damp cloth to clean wood trims in your
vehicle.
!The seat belts must not be treated with
chemical cleaning agents. Do not dry the seat
belts at temperatures above 176°F (80°C) or in
direct sunlight.
Warning!G
Do not bleach or dye seat belts as this may
severely weaken them. In a crash they may
not be able to provide adequate protection.
Warning!G
Only use seat covers which have been
tested and approved by Mercedes-Benz for
your vehicle model. Using other seat covers
may interfere with or prevent the deploy-
ment of the head-thorax air bags. Contact
an authorized Mercedes-Benz Center for
availability.
!Wipe with light pressure, to avoid damage to
the upholstery.
!Do not use solvents like tar remover or
wheel cleaner nor polishes or waxes as these
may be abrasive.
Page 387 of 473

386 Practical hints
Where will I find...?
�Unscrew the valve insert from the valve
and allow the air to escape.
�Screw the valve insert back into the
valve.
�Screw the valve cap back on the valve.
�Pull the protective wrap provided with
the vehicle tool kit over the spare
wheel.
�Store the spare wheel and the valve
extractor in the storage compartment
underneath the trunk floor.
�Pierce the protective wrap with retain-
ing screw3.
�Secure the spare wheel by turning
retaining screw3 clockwise.
For information on mounting the spare
wheel, see “Flat tire” (
�page 401).
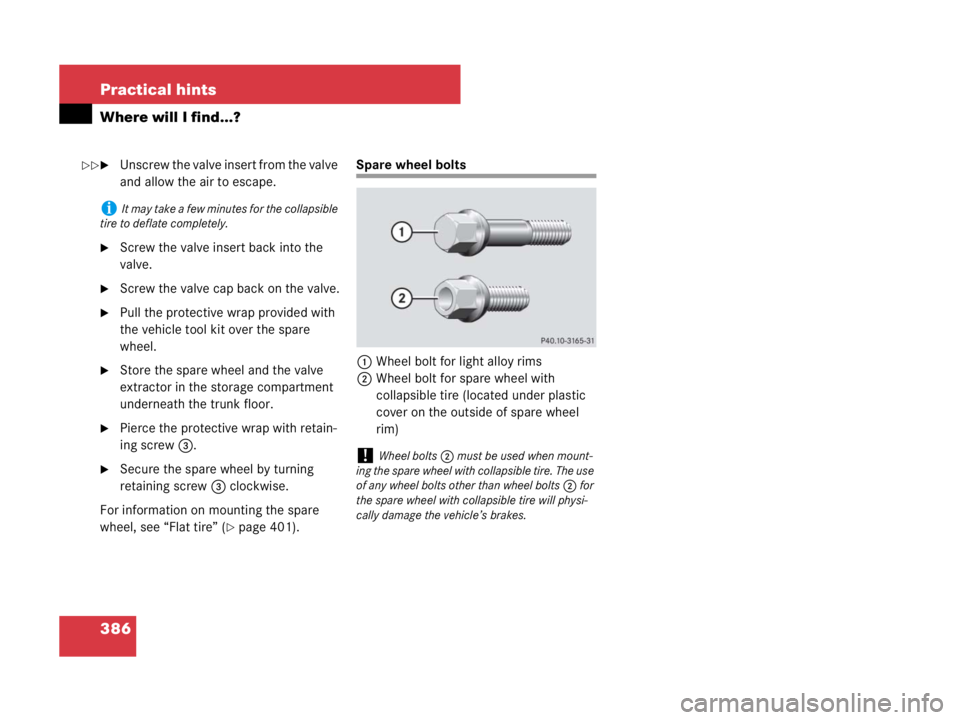
Spare wheel bolts
1Wheel bolt for light alloy rims
2Wheel bolt for spare wheel with
collapsible tire (located under plastic
cover on the outside of spare wheel
rim)
iIt may take a few minutes for the collapsible
tire to deflate completely.
!Wheel bolts2 must be used when mount-
ing the spare wheel with collapsible tire. The use
of any wheel bolts other than wheel bolts2 for
the spare wheel with collapsible tire will physi-
cally damage the vehicle’s brakes.
��
Page 410 of 473

409 Practical hints
Flat tire
�Jack up the vehicle until the wheel is a
maximum of 1.2 in (3 cm) from the
ground.Removing the wheel
4Alignment bolt
�Unscrew the upper-most wheel bolt
and remove.
�Replace this wheel bolt with alignment
bolt4 supplied in the vehicle tool
kit (
�page 382).
�Remove the remaining bolts.
�Remove the wheel.Mounting the spare wheel
1Wheel bolt for light alloy rims
2Wheel bolt for spare wheel with
collapsible tire (located under plastic
cover on the outside of spare wheel
rim)
Warning!G
The jack is intended only for lifting the
vehicle briefly for wheel changes. It is not
suited for performing maintenance work
under the vehicle.
�Never start the engine when the vehicle
is raised.
�Never lie down under the raised vehicle.
!Do not place wheel bolts in sand or dirt. This
could result in damage to the bolt and wheel hub
threads.
Warning!G
Inflate collapsible tire only after the wheel is
properly mounted.
Inflate the collapsible tire using the electric
pump (
�page 411) before lowering the
vehicle.
Page 415 of 473

414 Practical hints
Flat tire
MOExtended system*
The MOExtended system allows you to
continue driving your vehicle even if there
is a total loss of pressure in one or more
tires.
You may only use the MOExtended system
in conjunction with the Run Flat Indicator*
(
�page 315).
!The maximum distance in emergency mode
depends on the vehicle’s load. It is 30 miles
(50 km) if the vehicle is partially loaded and
18 miles (30 km) if the vehicle is fully loaded.
The point at which the maximum driving distance
begins in emergency mode is when the warning
message appears in the multifunction display
indicating that there is a loss of tire inflation
pressure.
Do not exceed the maximum speed of
50 mph (80 km/h).
Warning!G
In emergency mode, your vehicle’s driving
characteristics are diminished in such situa-
tions as:
�driving around curves
�while braking
�while accelerating rapidly
Therefore, your driving style must be adapt-
ed accordingly. Avoid abrupt steering and
driving maneuvers, as well as driving over
obstacles (road curbs, potholes, or off-road
areas). This is especially important if the
vehicle is heavily loaded.
The emergency driving distance that can be
achieved greatly depends on the demands
placed on the vehicle. Depending on speed,
load, driving maneuvers, road conditions,
outside temperature, etc., the distance can
be significantly shorter or, if the vehicle is
driven cautiously, somewhat longer.
Do not continue driving in emergency mode
if
�you notice knocking sounds
�the vehicle starts to shake
�smoke develops and you smell rubber
�ESP® is intervening continuously
�you notice tears on the tire sidewalls
After driving in emergency mode, you must
have the rims inspected by an authorized
Mercedes-Benz Center to check if they are
suitable for further use. The failed tire must
be replaced in any case.
iWhen replacing individual or all tires on the
vehicle, make sure only tires marked
with“MOExtended” are mounted in the size
specified for your vehicle (
�page 434).
Page 428 of 473
427 Technical data
Parts service
Warranty coverage
Identification labels
Layout of poly-V-belt drive
Engine
Rims and tires
Electrical system
Main Dimensions
Weights
Fuels, coolants, lubricants, etc.
Page 435 of 473

434 Technical data
Rims and tires
!Only use tires which have been tested and
approved by Mercedes-Benz. Tires approved by
Mercedes-Benz are developed to provide best
possible performance in conjunction with the
driving safety systems on your vehicle such as
ABS or ESP
®. Tires specially developed for your
vehicle and tested and approved by
Mercedes-Benz can be identified by finding the
following on the tire’s sidewall:
�MO = Mercedes-Benz Original equipment
tires
AMG vehicles:
Does not apply to all approved tires on AMG
vehicles. For information on tested and
approved tires for AMG vehicles, contact an
authorized Mercedes-Benz Center.
�MOE = Mercedes-Benz Original Extended
(tires with limited run-flat characteristics)
original equipment tires
Using tires other than those approved by
Mercedes-Benz may result in damage that is not
covered by the Mercedes-Benz Limited
Warranty.
iFor information on driving with MOExtended
tires, see “MOExtended system*” (
�page 414).
!Using tires other than those approved by
Mercedes-Benz can have detrimental effects,
such as
�poor handling characteristics
�increased noise
�increased fuel consumption
Moreover, tires and rims not approved by
Mercedes-Benz may, under load, exhibit
dimensional variations and different tire defor-
mation characteristics that could cause them to
come into contact with the vehicle body or axle
parts. Damage to the tires or the vehicle may be
the result.
iFurther information on tires and rims is
available at any authorized Mercedes-Benz
Center. A placard with the recommended tire
inflation pressures is located on the driver’s door
B-pillar. Some vehicles may have supplemental
tire inflation pressure information for driving at
high speeds (
�page 313) or for vehicle loads
less than the maximum loaded vehicle condition
(
�page 313). If such information is provided, it
can be found on the placard located on the in-
side of the fuel filler flap.The tire inflation pressure should be checked
regularly and should only be adjusted on cold
tires. Follow tire manufacturer’s maintenance
recommendation included with vehicle.
iThe following pages also list the approved
wheel rim and tire sizes for equipping your
vehicles with winter tires. Winter tires are not
available as standard or optional factory
equipment, but can be purchased from an
authorized Mercedes-Benz Center.
Depending on vehicle model and the standard or
optional factory-equipped wheel rim/tire config-
uration on your vehicle (Performance Package,
Sport Package etc.), equipping your vehicle with
winter tires approved for your vehicle model may
also require the purchase of two or four wheel
rims of the recommended size for use with these
winter tires. Contact an authorized
Mercedes-Benz Center for more information.
Page 436 of 473
435 Technical data
Rims and tires
Same size tires
ModelSLK 280SLK 280
SLK 280 (Appearance Package*)
SLK 350
SLK 350 (Appearance Package*)
Rims (light alloy)7Jx16H27.5 J x 17 H2
Wheel offset1.34 in (34 mm)1.42 in (36 mm)
Winter tires1,2
1Radial-ply tires2Not available as factory equipment.
205/55 R16 91H M+S.225/45 R17 91H M+S.
Rims (light alloy) –7.5 J x 17 H2
Wheel offset –1.42 in (36 mm)
Winter tires*1,2,3
3Must be used in conjunction with Run Flat Indicator* only.
–225/45 R17 91H M+S.MOExtended
Page 437 of 473
436 Technical data
Rims and tires
ModelSLK 280 (Sport Package*)
SLK 350 (Sport Package*)
SLK 55 AMGSLK 55 AMG
SLK 55 AMG (Performance Package*)
Rims (light alloy)7.5 J x 17 H27.5 J x 18 H2
Wheel offset1.46 in (37 mm)1.46 in (37 mm)
Winter tires1,2,3
1Radial-ply tires2Not available as factory equipment.3For use with snow chains contact an authorized Mercedes-Benz Center.
205/50 R17 89H M+S.
or
225/45 R17 91H M+S.225/40 R18 92H XL (Extra Load) M+S.