Page 190 of 473

189 Controls in detail
Automatic climate control
The automatic climate control system
will correspondingly adjust the interior
air temperature.
Adjusting air distribution
Use air distribution controls1 and5
(�page 185) to separately adjust the air
distribution on each side of the passenger
compartment. The following symbols are
found on the controls:
�
Press control button 1 or 5
(�page 185) until the control button
sticks up slightly and the U symbol
on the control button is out.Automatic air distribution for the re-
spective side of the passenger com-
partment is switched off.
�
Turn control button to the desired sym-
bol.
The air distribution is adjusted accord-
ing to the chosen setting.
Opening the center air vents
�
Turn thumbwheel 7 (
�page 184) up-
ward to the first stop.
Center air vents 2 and 4
(
�page 184) are open.
Opening the cockpit air vent and center
air vents
�
Turn thumbwheel 7 (
�page 184) up-
ward all the way.
Cockpit air vent 3 and center air vents
2 and 4 (
�page 184) are open.Closing the cockpit air vent and center
air vents
�
Turn thumbwheel 7 (
�page 184)
downward.
Cockpit air vent 3 and center air vents
2 and 4 (
�page 184) are closed.
Opening the side air vents
�
Turn thumbwheel 6 and 8
(�page 184) upward.
The corresponding side air vent is
open.
Closing the side air vents
�
Turn thumbwheel 6 and 8
(�page 184) upward.
The corresponding side air vent is
closed.
Symbol
Function
h
Directs air through the cen-
ter and side air vents
j
Directs air to the windows
V
Directs air into the entire
vehicle interior
k
Directs air to the footwells
i
You can also turn the air distribution control
to a position between two symbols.
i
The air vents are continuously variable.
Page 191 of 473
 for
both automatic (
�page 187) and manual
air volume adjustment. Nine blower
speeds are ava")
190 Controls in detailAutomatic climate controlAdjusting air volume
Use air volume control9 (
�page 185) for
both automatic (
�page 187) and manual
air volume adjustment. Nine blower
speeds are available.
�
Press control button9 (
�page 185).
The control button sticks up slightly.
The U symbol on the control button
goes out. Automatic air volume control
is switched off. The air volume is ad-
justed corresponding to the set blower
speed.
Maximum cooling MAXCOOL
If the left and right air distribution controls
as well as the airflow volume control are
set to U and there is a high need for
cooling, MAXCOOL is activated.
“MAX COOL” appears on the temperature
controls 6 and b (
�page 185).
This provides the fastest possible cooling
of the vehicle interior (when retractable
hardtop is closed).
Automatic climate control panel with
MAXCOOL activated
Front defroster
You can use this setting to defrost the
windshield, for example if it is iced up.
You can also defog the windshield and the
side windows.i
Keep this setting selected only until the
windshield or the side windows are clear again.
Page 197 of 473

196 Controls in detailPower windowsOpening and closing the windows
The windows are opened and closed elec-
trically. The switches for all the windows
are on the driver’s door. The switch for the
passenger side windows is on the passen-
ger door.
1Left door and rear side windows
2Right door and rear side windows
�
Switch on the ignition (
�page 39).
Warning!
G
When closing the windows, make sure that
there is no danger of anyone being injured
by the closing procedure.
The closing of the door windows can be im-
mediately halted by releasing the switch or,
if the switch was pulled past the resistance
point and released, by either pressing or
pulling the respective switch.
The closing of the rear side windows can be
immediately halted by releasing the switch.
If a door window encounters an obstruction
that blocks its path in a circumstance where
you pulled the switch past the resistance
point and released it to close the door win-
dow, the automatic reversal function will
stop the door window and open it slightly.
If the door window encounters an obstruc-
tion that blocks its path in a circumstance
where you are closing the door window by
pulling and holding the switch, by pressing
and holding button ‹on the SmartKey,
by pressing and holding the lock button (ve-
hicles with KEYLESS-GO*) on an outside
door handle, by pressing and holding the re-
tractable hardtop switch, or by pressing and
holding button,on the climate control
panel, the automatic reversal function will
not operate.
When leaving the vehicle, always remove the
SmartKey or the SmartKey with
KEYLESS-GO* from the starter switch, take
it with you, and lock the vehicle. Do not
leave children unattended in the vehicle, or
with access to an unlocked vehicle. Unsu-
pervised use of vehicle equipment can
cause an accident and/or serious personal
injury.i
Depending on the current position, the win-
dows may also open or close when the air recir-
culation button, on the control panel of the
automatic climate control (
�page 191) is
pressed and held.
i
After switching off the ignition (
�page 39)
or removing the SmartKey from the starter
switch, the windows can be operated
�
until you open a door
�
for at least 5 minutes if no door was opened
Page 199 of 473
�
Pull switch1 or2 past the resis-
tance point and release.
The corresponding door window closes
completely.
If the u")
198 Controls in detailPower windowsFully closing the door windows
(Express-close)�
Pull switch1 or2 past the resis-
tance point and release.
The corresponding door window closes
completely.
If the upward movement of the door win-
dow is blocked during the closing proce-
dure, the door window will stop and open
slightly.
Stopping windows
�
Press or pull the respective switch
again.Closing the windows with
KEYLESS-GO*
�
Press and hold lock button on an out-
side door handle (
�page 64) until the
windows are closed.
Synchronizing power windows
The power window must be synchronized
each time�
after the battery has been disconnect-
ed
�
if the power windows cannot be fully
opened (Express-open) or closed
(Express-close)
Synchronizing the power windows
�
Switch on the ignition (
�page 39).
�
Pull the power window switches until
the side windows are closed.
Hold the switches for approximately
1 second.
The power windows are synchronized.
Warning!
G
Driver’s door only:
If within 5 seconds the switch is again
pulled past the resistance point and re-
leased, the automatic reversal will not
operate.
Warning!
G
When closing the windows make sure that
there is no danger of anyone being harmed
by the closing procedure.
The windows will not automatically re-open
if blocked during convenience closing.
If potential danger exists, proceed as fol-
lows:�
Release the lock button.
�
Pull on the door handle and hold firmly.
The side windows open for as long as
the door handle is held but the door not
opened.
Page 209 of 473
208 Controls in detailRetractable hardtop�
Fold retainer springs of tensioning
clasps downward and clip them into
holders on both sides (
�page 206).
�
Close tensioning clasps on both sides
by pressing them upward.
�
Pull handle of luggage cover towards
the rear.
�
Clip eyelets onto side trim panels.
�
Close the zipper completely
(�page 206).
�
Fold back the zipper’s cloth cover
across the entire length of the luggage
cover.Sunshade for panorama roof*
The sunshade protects you from excessive
sunlight coming in through the panorama
roof.
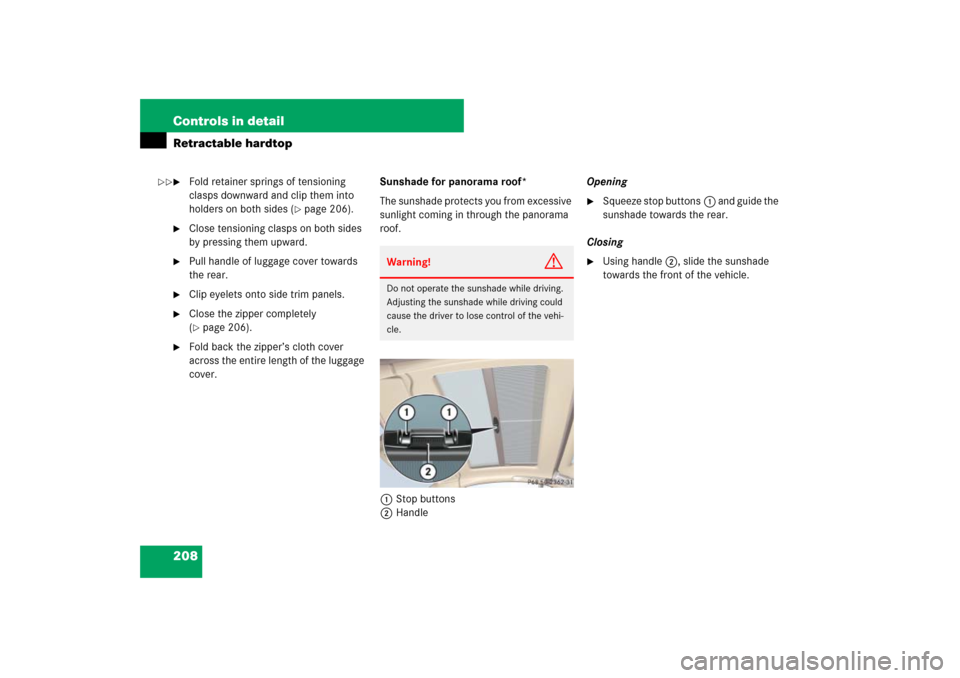
1Stop buttons
2HandleOpening
�
Squeeze stop buttons1 and guide the
sunshade towards the rear.
Closing
�
Using handle2, slide the sunshade
towards the front of the vehicle.
Warning!
G
Do not operate the sunshade while driving.
Adjusting the sunshade while driving could
cause the driver to lose control of the vehi-
cle.
��
Page 235 of 473
234 Controls in detailUseful featuresOpening�
Press release button 1.
Storage compartment lid 2 lid opens
upwards.
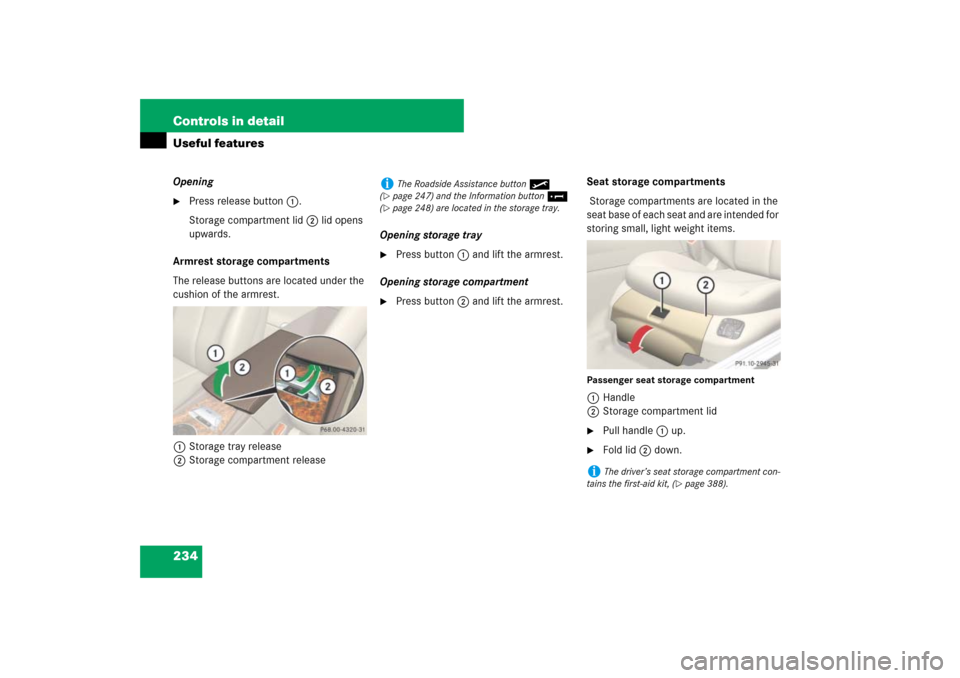
Armrest storage compartments
The release buttons are located under the
cushion of the armrest.
1Storage tray release
2Storage compartment releaseOpening storage tray
�
Press button1 and lift the armrest.
Opening storage compartment
�
Press button2 and lift the armrest.Seat storage compartments
Storage compartments are located in the
seat base of each seat and are intended for
storing small, light weight items.
Passenger seat storage compartment1Handle
2Storage compartment lid�
Pull handle 1 up.
�
Fold lid 2 down.
i
The Roadside Assistance button•
(
�page 247) and the Information button¡
(�page 248) are located in the storage tray.
i
The driver’s seat storage compartment con-
tains the first-aid kit, (
�page 388).
Page 237 of 473

236 Controls in detailUseful features�
Insert the mechanical key into the
glove box lock.
�
Turn the mechanical key to
position2.
The following storage compartments
will be locked. They remain locked,
even when the vehicle is unlocked with
the SmartKey or with the SmartKey
with KEYLESS-GO*:�
Glove box
�
Armrest storage compartments
�
Rear storage compartmentsUnlocking the storage compartments
separately
�
Insert the mechanical key into the
glove box lock.
�
Turn the mechanical key to
position1.
You can now open the storage com-
partments.Parcel net in passenger footwell
A small convenience parcel net is located
in the passenger footwell. It is for small
and light items, such as road maps, mail,
etc.
i
The separate locking status of these storage
compartments can only be canceled with the
mechanical key.
The storage compartments in the doors cannot
be locked.
i
If the glove box cannot be unlocked using
the SmartKey or SmartKey with KEYLESS-GO*,
see “Unlocking the glove box” (
�page 392).
Warning!
G
The parcel net is intended for storing
light-weight items only.
Heavy objects, objects with sharp edges or
fragile objects may not be transported in the
parcel net. In an accident, during hard brak-
ing, or sudden maneuvers, they could be
thrown around inside the vehicle and cause
injury to vehicle occupants.
The parcel net cannot protect transported
goods in the event of an accident.
��
Page 238 of 473
237 Controls in detail
Useful features
Parcel nets in trunk
There are three nets available in the trunk
to secure loads:�
a pocket net on each side of the right
and left trunk side walls
�
a trunk floor net
�
Pull the trunk floor net from the trunk
back wall towards the front over the
luggage.
�
Hang the hooks of the net on the eyes
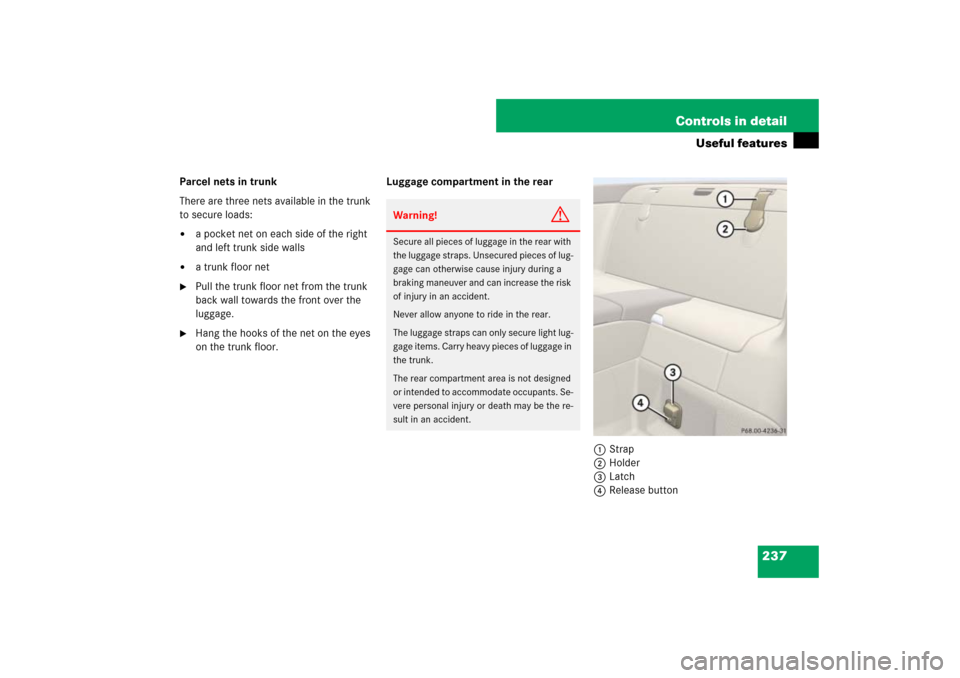
on the trunk floor.Luggage compartment in the rear
1Strap
2Holder
3Latch
4Release button
Warning!
G
Secure all pieces of luggage in the rear with
the luggage straps. Unsecured pieces of lug-
gage can otherwise cause injury during a
braking maneuver and can increase the risk
of injury in an accident.
Never allow anyone to ride in the rear.
The luggage straps can only secure light lug-
gage items. Carry heavy pieces of luggage in
the trunk.
The rear compartment area is not designed
or intended to accommodate occupants. Se-
vere personal injury or death may be the re-
sult in an accident.