Page 139 of 473

138 Controls in detailInstrument clusterTachometer
The red marking on the tachometer de-
notes excessive engine speed.
To help protect the engine, the fuel supply
is interrupted if the engine is operated
within the red marking.
Outside temperature indicator
The outside temperature is displayed in
the left or right multifunction display
(�page 26), depending on the setting
(�page 156).The temperature sensor is located in the
front bumper area. Due to its location, the
sensor can be affected by road or engine
heat during idling or slow driving. There-
fore, the accuracy of the displayed temper-
ature can only be verified by comparison to
a thermometer placed next the sensor, not
by comparison to external displays, e.g.
bank signs, etc.
When moving the vehicle into colder ambi-
ent temperatures (e.g. when leaving your
garage), you will notice a delay before the
lower temperature is displayed.
A delay also occurs when ambient temper-
atures rise. This prevents inaccurate tem-
perature indications caused by heat
radiated from the engine during idling or
slow driving.
!
Avoid driving at excessive engine speeds, as
it may result in serious engine damage that is not
covered by the Mercedes-Benz Limited
Warranty.
Warning!
G
The outside temperature indicator is not de-
signed to serve as an ice-warning device and
is therefore unsuitable for that purpose.
Indicated temperatures just above the freez-
ing point do not guarantee that the road sur-
face is free of ice. The road may still be icy,
especially in wooded areas or on bridges.
Page 144 of 473
143 Controls in detail
Control system
Menus, submenus and functions
Table continued on next page.
Menu 1
Menu 2
Menu 3
Menu 4
Menu 5
Standard display
AMG
1
AUDIO
NAV
Distronic*
(�page 145)
(�page 146)
(�page 149)
(�page 151)
(�page 151)
Commands/submenus
Digital speedome-
ter/Outside tempera-
ture
Engine oil temperature
Selecting radio station
Show route guidance
instructions, current
direction traveled
Calling up settings
Calling up maintenance
service indicator
Vehicle supply voltage
Selecting satellite radio
station
(USA only)
Checking tire inflation
pressure*
RACETIMER
Operating CD player
Checking engine oil lev-
el
Overall analysisLap analysis
1AMG vehicles only.
Page 146 of 473
145 Controls in detail
Control system
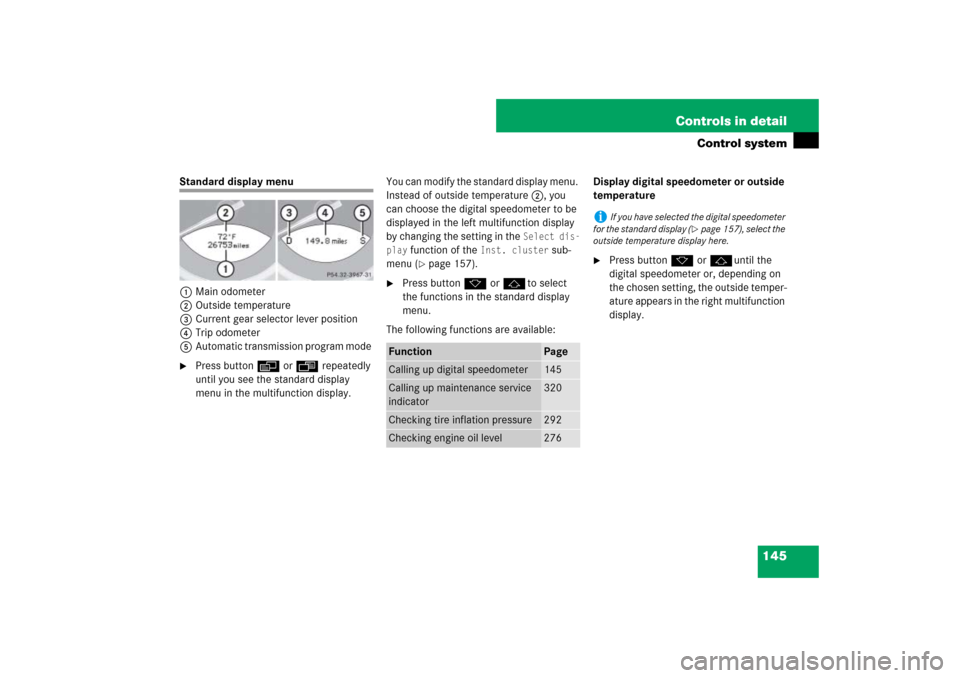
Standard display menu
1Main odometer
2Outside temperature
3Current gear selector lever position
4Trip odometer
5Automatic transmission program mode �
Press button è or ÿ repeatedly
until you see the standard display
menu in the multifunction display.You can modify the standard display menu.
Instead of outside temperature 2, you
can choose the digital speedometer to be
displayed in the left multifunction display
by changing the setting in the
Select dis-
play
function of the
Inst. cluster
sub-
menu (
�page 157).
�
Press button k or jto select
the functions in the standard display
menu.
The following functions are available:Display digital speedometer or outside
temperature
�
Press button k or juntil the
digital speedometer or, depending on
the chosen setting, the outside temper-
ature appears in the right multifunction
display.
Function
Page
Calling up digital speedometer
145
Calling up maintenance service
indicator
320
Checking tire inflation pressure
292
Checking engine oil level
276
i
If you have selected the digital speedometer
for the standard display (
�page 157), select the
outside temperature display here.
Page 147 of 473
146 Controls in detailControl systemAMG menu
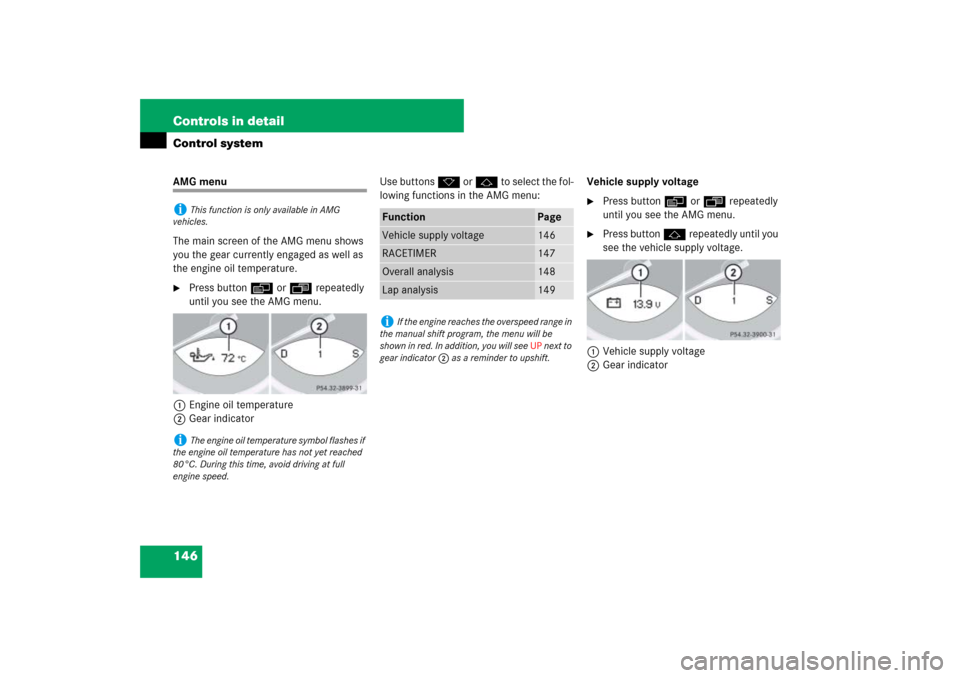
The main screen of the AMG menu shows
you the gear currently engaged as well as
the engine oil temperature.�
Press button è or ÿ repeatedly
until you see the AMG menu.
1Engine oil temperature
2Gear indicatorUse buttons k or j to select the fol-
lowing functions in the AMG menu:Vehicle supply voltage
�
Press button è or ÿ repeatedly
until you see the AMG menu.
�
Press button j repeatedly until you
see the vehicle supply voltage.
1Vehicle supply voltage
2Gear indicator
i
This function is only available in AMG
vehicles.
i
The engine oil temperature symbol flashes if
the engine oil temperature has not yet reached
80°C. During this time, avoid driving at full
engine speed.
Function
Page
Vehicle supply voltage
146
RACETIMER
147
Overall analysis
148
Lap analysis
149
i
If the engine reaches the overspeed range in
the manual shift program, the menu will be
shown in red. In addition, you will see UP next to
gear indicator 2 as a reminder to upshift.
Page 148 of 473
147 Controls in detail
Control system
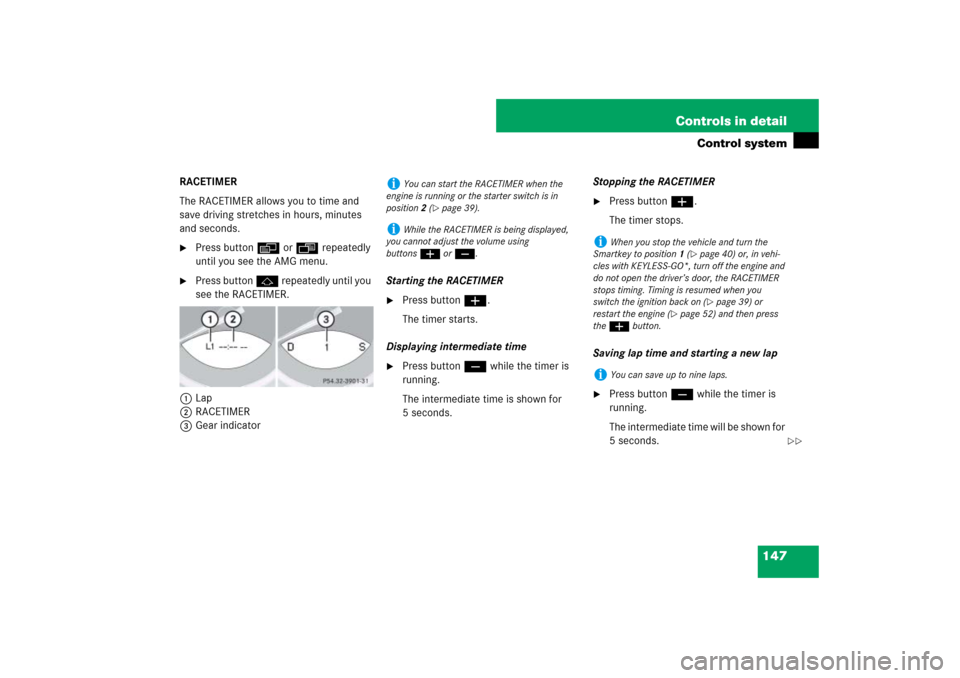
RACETIMER
The RACETIMER allows you to time and
save driving stretches in hours, minutes
and seconds.�
Press button è or ÿ repeatedly
until you see the AMG menu.
�
Press button j repeatedly until you
see the RACETIMER.
1Lap
2RACETIMER
3Gear indicatorStarting the RACETIMER
�
Press button æ.
The timer starts.
Displaying intermediate time
�
Press button ç while the timer is
running.
The intermediate time is shown for
5 seconds.Stopping the RACETIMER
�
Press button æ.
The timer stops.
Saving lap time and starting a new lap
�
Press button ç while the timer is
running.
The intermediate time will be shown for
5 seconds.
i
You can start the RACETIMER when the
engine is running or the starter switch is in
position2 (
�page 39).
i
While the RACETIMER is being displayed,
you cannot adjust the volume using
buttonsæ or ç.
i
When you stop the vehicle and turn the
Smartkey to position 1 (
�page 40) or, in vehi-
cles with KEYLESS-GO*, turn off the engine and
do not open the driver’s door, the RACETIMER
stops timing. Timing is resumed when you
switch the ignition back on (�page 39) or
restart the engine (
�page 52) and then press
the æbutton.
i
You can save up to nine laps.
��
Page 149 of 473
148 Controls in detailControl system�
Press button ç within the next
5 seconds.
The intermediate time shown will be
saved as a lap time.
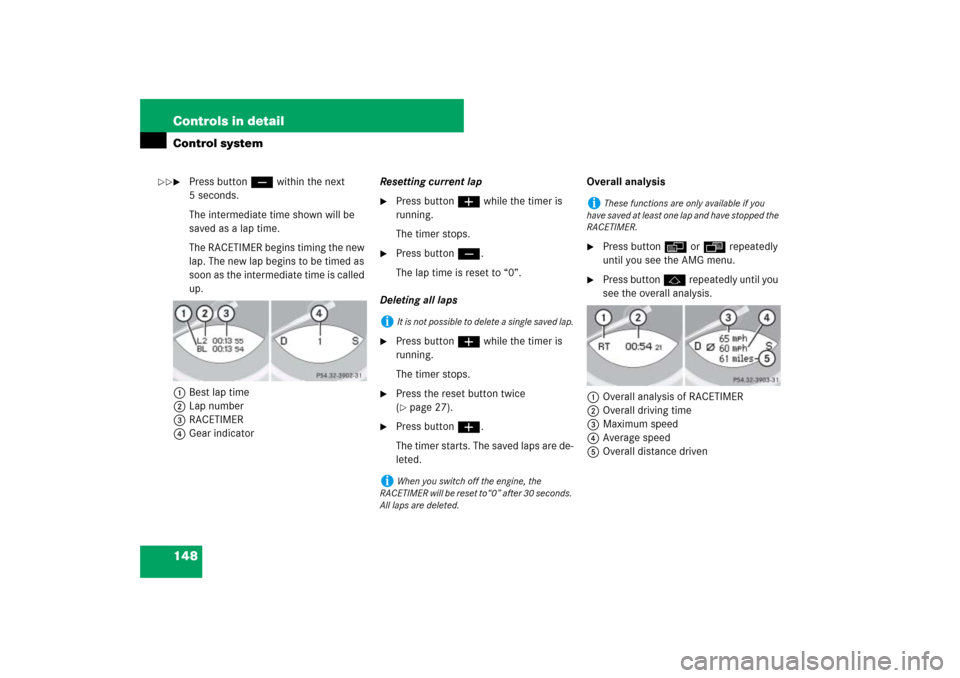
The RACETIMER begins timing the new
lap. The new lap begins to be timed as
soon as the intermediate time is called
up.
1Best lap time
2Lap number
3RACETIMER
4Gear indicatorResetting current lap
�
Press button æ while the timer is
running.
The timer stops.
�
Press button ç.
The lap time is reset to “0”.
Deleting all laps
�
Press button æ while the timer is
running.
The timer stops.
�
Press the reset button twice
(�page 27).
�
Press button æ.
The timer starts. The saved laps are de-
leted.Overall analysis
�
Press button è or ÿ repeatedly
until you see the AMG menu.
�
Press button j repeatedly until you
see the overall analysis.
1Overall analysis of RACETIMER
2Overall driving time
3Maximum speed
4Average speed
5Overall distance driven
i
It is not possible to delete a single saved lap.
i
When you switch off the engine, the
RACETIMER will be reset to“0” after 30 seconds.
All laps are deleted.
i
These functions are only available if you
have saved at least one lap and have stopped the
RACETIMER.
��
Page 154 of 473

153 Controls in detail
Control system
Should the vehicle’s system record any
conditions while driving, the number of
messages will reappear in the multifunc-
tion display�
when the SmartKey in the starter
switch is turned to position0 or re-
moved from the starter switch
or
�
when you turn off the engine by press-
ing the KEYLESS-GO* start/stop but-
ton on the gear selector lever once and
open the driver’s door (this puts the
starter switch in position 0, same as
with the SmartKey removed from the
starter switch)
Settings menu
In the
Settings
menu there are two func-
tions:
�
The function
Reset
, with which you can
reset most settings to those set at the
factory.
�
A collection of submenus with which
you can make individual settings for
your vehicle.
The following settings and submenus are
available:Resetting all settings
You can reset the functions of most of the
submenus to the factory settings.
For safety, the
Light circuit Headlamp
mode
submenu in the
Lighting
menu can
be reset with the vehicle at standstill only.
�
Press button è or ÿ repeatedly
until the
Settings...
menu appears in
the multifunction display.
i
The vehicle status message memory will be
cleared when you then turn the SmartKey in the
starter switch to position 1 or 2, or when you
press the KEYLESS-GO* start/stop button once
or twice without depressing the brake pedal. You
will then only see high priority messages in the
multifunction display (
�page 347).
Function
Page
Resetting all settings
153
Submenus in the Settings menu
154
Instrument cluster submenu
156
Time submenu
157
Lighting submenu
159
Vehicle submenu
162
Convenience submenu
162
��
Page 160 of 473
159 Controls in detail
Control system
Lighting submenu
Access the
Lighting
submenu via the
Settings
menu. Use the
Lighting
sub-
menu to change the lamp and lighting set-
tings on your vehicle. The following
functions are available:Setting daytime running lamp mode
(USA only)
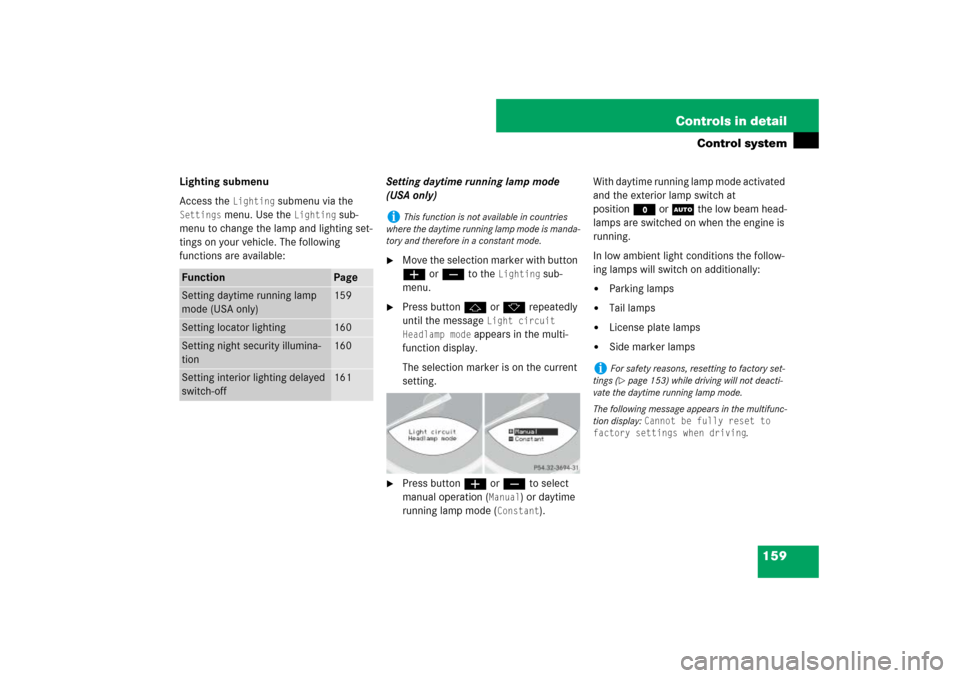
�
Move the selection marker with button
æ or ç to the
Lighting
sub-
menu.
�
Press button j or k repeatedly
until the message
Light circuit
Headlamp mode
appears in the multi-
function display.
The selection marker is on the current
setting.
�
Press button æ or ç to select
manual operation (
Manual
) or daytime
running lamp mode (
Constant
).With daytime running lamp mode activated
and the exterior lamp switch at
positionM or U the low beam head-
lamps are switched on when the engine is
running.
In low ambient light conditions the follow-
ing lamps will switch on additionally:
�
Parking lamps
�
Tail lamps
�
License plate lamps
�
Side marker lamps
Function
Page
Setting daytime running lamp
mode (USA only)
159
Setting locator lighting
160
Setting night security illumina-
tion
160
Setting interior lighting delayed
switch-off
161
i
This function is not available in countries
where the daytime running lamp mode is manda-
tory and therefore in a constant mode.
i
For safety reasons, resetting to factory set-
tings (�page 153) while driving will not deacti-
vate the daytime running lamp mode.
The following message appears in the multifunc-
tion display:
Cannot be fully reset to
factory settings when driving
.