Page 537 of 705

536 OperationVehicle careEngine cleaning
Prior to cleaning the engine compartment,
make sure to protect electrical compo-
nents and connectors from contact with
water and cleaning agents.
Corrosion protection, such as
MB Anticorrosion Wax, should be applied
to the engine compartment after every en-
gine cleaning. Before applying, all control
linkage bushings and joints should be lu-
bricated. The poly-V-belt and all pulleys
should be protected from any wax.
Vehicle washing
In the winter, thoroughly remove all traces
of road salt as soon as possible.
When washing the vehicle underbody, do
not forget to clean the inner sides of the
wheels.Hand-wash
Do not use hot water or wash your vehicle
in direct sunlight.
�
Only use a mild car wash detergent,
such as Mercedes-Benz approved Car
Shampoo.
�
Thoroughly spray the vehicle with a dif-
fused jet of water.
Direct only a very weak spray towards
the ventilation intake.
�
Use plenty of water and rinse the
sponge and chamois frequently.
�
Rinse with clean water and thoroughly
dry with a chamois.
Do not allow cleaning agents to dry on
the finish.
Automatic car wash
You can have your vehicle washed in an au-
tomatic car wash from the start. Automatic
car washes without brushes are prefera-
ble.If the vehicle is very dirty, prewash it be-
fore running it through the automatic car
wash.
i
Vehicles with KEYLESS-GO*:
If a door handle is hit by a strong jet of water, and
a SmartKey with KEYLESS-GO* is in close prox-
imity, i.e. within approximately 3 ft (approxi-
mately 1 m), the vehicle could be inadvertently
locked or unlocked.
!
Do not clean your vehicle in an automatic
touchless car wash which uses caustic spray.
Otherwise the caustic spray will damage the
paint or ornamental moldings.
!
Due to the width of the vehicle, fold in
exterior rear view mirrors prior to running the ve-
hicle through an automatic car wash to prevent
damage to the mirrors.
Make sure that the windshield wiper switch is set
to0 (�page 351). Otherwise, the rain sensor
could activate and cause the wipers to move un-
intentionally. This may lead to vehicle damage.
i
After running the vehicle through an auto-
matic car wash, wipe any wax off of the wind-
shield (
�page 540). This will prevent smears
and reduce wiping noise which can be caused by
residual wax on the windshield.
When leaving the car wash, make sure that the
mirrors are folded out. Otherwise they may vi-
brate.
Page 589 of 705
.
Display
Possible cause/consequence
Po")
588 Practical hintsWhat to do if …?
During severe operating conditions,
e.g. stop-and-go traffic, the coolant tem-
perature may rise close to 248°F (120°C).
Display
Possible cause/consequence
Possible solution
Coolant level
Stop vehicle!
Switch engine off
The coolant is too hot.
�
Stop the vehicle in a safe location or as soon
as it is saf e to do so and imm ediat ely turn of f
the engine.
�
Only start the engine again after the message
disappears. You could otherwise damage the
engine.
�
Observe the coolant temperature gauge in
the instrument cluster (
�page 28).
Warning!
G
�
Driving when your engine is overheated
can cause some fluids which may have
leaked into the engine compartment to
catch fire. You could be seriously
burned.
�
Steam from an overheated engine can
cause serious burns which can occur
just by opening the engine hood. Stay
away from the engine if you see or hear
steam coming from it.
Stop the vehicle in a safe location away from
other traffic. Turn off the engine, get out of
the vehicle and do not stand near the vehicle
until the engine has cooled down.
!
The engine should not be operated with the
coolant temperature above 248°F (120°C). Do-
ing so may cause serious engine damage which
is not covered by the Mercedes-Benz Limited
Warranty.
Page 612 of 705

611 Practical hints
Where will I find ...?
�Where will I find ...?
First aid kit
The first aid kit is located in the storage
compartment under the front passenger
seat.
1Tab
2Cover�
Pull tab1 upward.
�
Fold the covering forward in the direc-
tion of arrow.
�
Remove the first aid kit.
Vehicle jack, vehicle tool kit, luggage
bowl, Minispare wheel
The vehicle jack, Minispare wheel, the ve-
hicle tools, and the luggage bowl are
stored in the compartment underneath the
trunk floor.�
Lift up trunk floor cover and engage
trunk floor handle in upper edge of
trunk.
You can now remove the tools and ac-
cessories.The vehicle tool kit includes:
�
One towing eye bolt
�
One wheel bolt wrench with socket
wrench
�
One alignment bolt
�
One pair of gloves
�
One fuse extractor
�
One fuse chart for the main fuse box
�
Spare fuses
�
Collapsible wheel chock
�
Wheel bolts for Minispare wheel
!
Always keep the storage compartment un-
der the front passenger seat closed while the ve-
hicle is in motion.
i
Check expiration dates and contents for
completeness at least once a year and replace
missing/expired items.
!
To prevent damage, always disengage trunk
floor handle from trunk lid and lower trunk floor
before closing the trunk.
Page 613 of 705

612 Practical hintsWhere will I find ...?Vehicle jack
Storage position�
Remove vehicle jack from its
compartment.
�
Turn crank handle in direction of arrow
as far as it will go.
Operational position�
Turn crank handle clockwise.
Before storing the vehicle jack in its
compartment:
�
It should be fully collapsed.
�
The handle must be folded in (storage
position).
Warning!
G
The jack is designed exclusively for jacking
up the vehicle at the jack take-up brackets
built into both sides of the vehicle. To help
avoid personal injury, use the jack only to lift
the vehicle during a wheel change. Never
get beneath the vehicle while it is supported
by the jack. Keep hands and feet away from
the area under the lifted vehicle. Always
firmly set parking brake and block wheels
before raising vehicle with jack.
Do not disengage parking brake while the
vehicle is raised. Be certain that the jack is
always vertical (plumb line) when in use,
especially on hills. Always try to use the jack
on level surface. Make sure the jack arm is
fully seated in the jack take-up bracket.
Always lower the vehicle onto sufficient
capacity jackstands before working under
the vehicle.
Page 620 of 705

619 Practical hints
Replacing SmartKey batteries
�Replacing SmartKey batteries
If the batteries in the SmartKey or the
SmartKey with KEYLESS-GO* are dis-
charged, the vehicle can no longer be
locked or unlocked. It is recommended to
have the batteries replaced at an autho-
rized Mercedes-Benz Center.Batteries contain materials that can harm
the environment if disposed of improperly.
Recycling of batteries is the preferred
method of disposal. Many states require
sellers of batteries to accept old batteries
for recycling.SmartKey/SmartKey with
KEYLESS-GO*
Replacement batteries: Lithium, type
CR 2025 or equivalent.�
Remove the mechanical key out of the
SmartKey or the SmartKey with
KEYLESS-GO* (
�page 614).
1Mechanical key
2Battery compartment
�
Insert mechanical key 1 into opening.
�
Press mechanical key 1 in direction of
arrow.
The battery compartment is unlatched.
Warning!
G
Batteries contain poisonous and corrosive
substances. Therefore keep the batteries
out of reach of children.
If a battery is swallowed, seek medical help
immediately.
i
When inserting the batteries, make sure
they are clean and free of lint.
i
When changing batteries, always replace
both batteries.
The required replacement batteries are available
at any authorized Mercedes-Benz Center.
��
Page 621 of 705
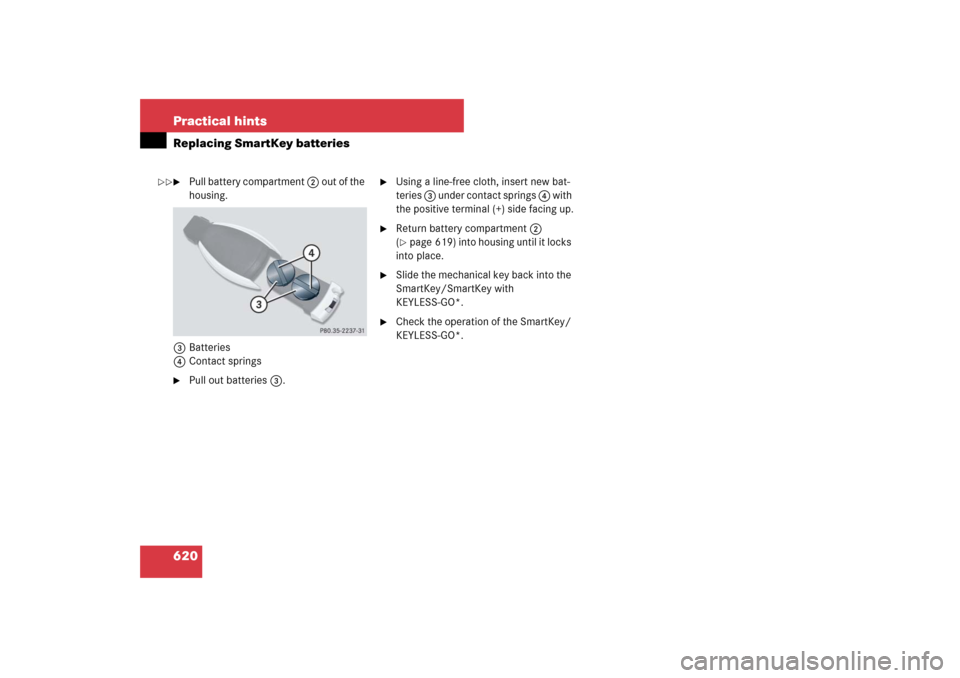
620 Practical hintsReplacing SmartKey batteries�
Pull battery compartment 2 out of the
housing.
3Batteries
4Contact springs
�
Pull out batteries3.
�
Using a line-free cloth, insert new bat-
teries 3 under contact springs 4 with
the positive terminal (+) side facing up.
�
Return battery compartment 2
(�page 619) into housing until it locks
into place.
�
Slide the mechanical key back into the
SmartKey/SmartKey with
KEYLESS-GO*.
�
Check the operation of the SmartKey/
KEYLESS-GO*.
��
Page 625 of 705

624 Practical hintsReplacing bulbs1Cover 1
2Cover 2
3Cover 3
Removing and installing washer fluid
reservoir on left-hand side
Vehicles with Airmatic*
You must remove the washer fluid reser-
voir in order to change the bulbs of the
front headlamp on the left-hand side. The
washer fluid reservoir is on the front
left-hand side of the engine compartment.
Washer fluid reservoir (example illustration
from S 550)1Retaining screw
Removing�
Turn retaining screw1 counterclock-
wise.
�
Take washer fluid reservoir out of
mounting.
�
Place washer fluid reservoir to the side
and do not disconnect any wires or ca-
bles.Installing
�
Guide washer fluid reservoir into
mounting so that the bottom retaining
lug slides into the rubber sleeve on the
longitudinal member.
�
Turn retaining screw1 clockwise.
Bi-Xenon headlampsWarning!
G
Do not remove the cover for the Bi-Xenon
headlamp. Because of high voltage in Xenon
lamps, it is dangerous to replace the bulb or
repair the lamp and its components. We rec-
om me n d tha t yo u hav e su ch work don e by a
qualified technician.
Page 635 of 705

�
The battery for electrical consumers
(located in the trunk)
The")
634 Practical hintsBatteriesYour vehicle is equipped with two batter-
ies:�
The starter battery (located in the en-
gine compartment)
�
The battery for electrical consumers
(located in the trunk)
The batteries should always be sufficiently
charged in order to achieve its rated ser-
vice life. Refer to Maintenance Booklet for
battery maintenance intervals.
If you use your vehicle mostly for short-dis-
tance trips, you will need to have the bat-
tery charge checked more frequently.
When replacing the batteries, always use
batteries approved by Mercedes-Benz.
If you do not intend to operate your vehicle
for an extended period of time, consult an
authorized Mercedes-Benz Center about
steps you need to observe.Batteries contain materials that can harm
the environment if disposed of improperly.
Large 12-volt storage batteries contain
lead. Recycling of batteries is the preferred
method of disposal. Many states require
sellers of batteries to accept old batteries
for recycling.
!
Do not tow-start the vehicle.
Warning!
G
Observe all safety instructions and precau-
tions when handling automotive batteries.
Risk of explosion.
Fire, open flames and smoking
are prohibited when handling
batteries. Avoid creating sparks.
Battery acid is caustic. Do not
allow it to come into contact
with skin, eyes or clothing.
Wear suitable protective cloth-
ing, especially gloves, apron and
faceguard.
Wear eye protection.
Rinse any acid spills immediate-
ly with clear water. Contact a
physician if necessary.
Keep children away.
Follow the instructions in this
Operator’s Manual.