Page 581 of 705
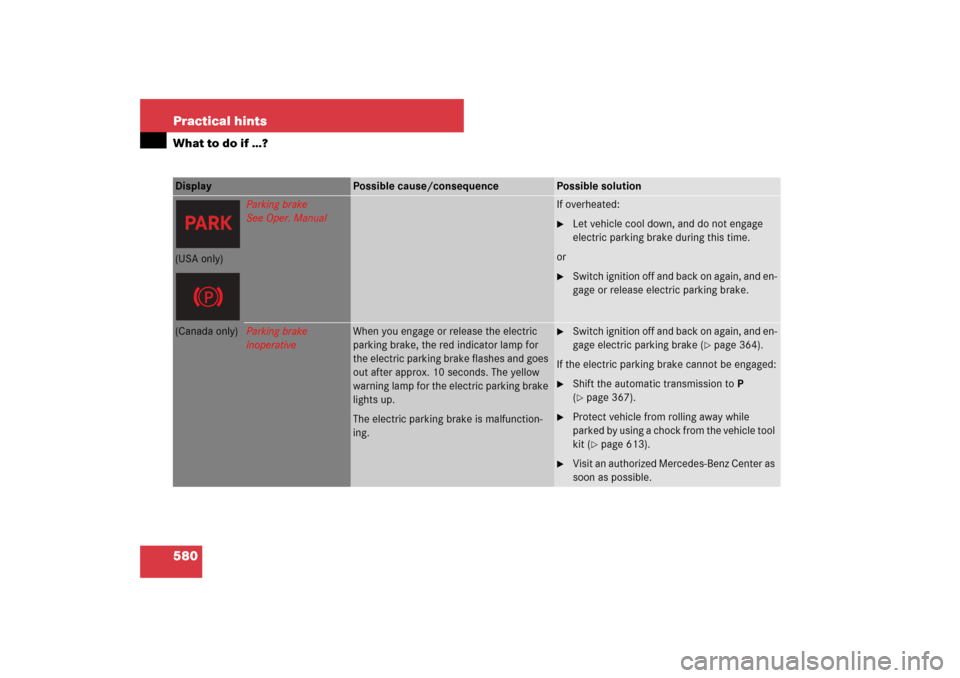
580 Practical hintsWhat to do if …?Display
Possible cause/consequence
Possible solution
Parking brake
See Oper. Manual
If overheated:�
Let vehicle cool down, and do not engage
electric parking brake during this time.
or
�
Switch ignition off and back on again, and en-
gage or release electric parking brake.
(USA only)(Canada only)
Parking brake
inoperative
When you engage or release the electric
parking brake, the red indicator lamp for
the electric parking brake flashes and goes
out after approx. 10 seconds. The yellow
warning lamp for the electric parking brake
lights up.
The electric parking brake is malfunction-
ing.
�
Switch ignition off and back on again, and en-
gage electric parking brake (
�page 364).
If the electric parking brake cannot be engaged:
�
Shift the automatic transmission to P
(�page 367).
�
Protect vehicle from rolling away while
parked by using a chock from the vehicle tool
kit (
�page 613).
�
Visit an authorized Mercedes-Benz Center as
soon as possible.
Page 582 of 705
581 Practical hints
What to do if …?
Display
Possible cause/consequence
Possible solution
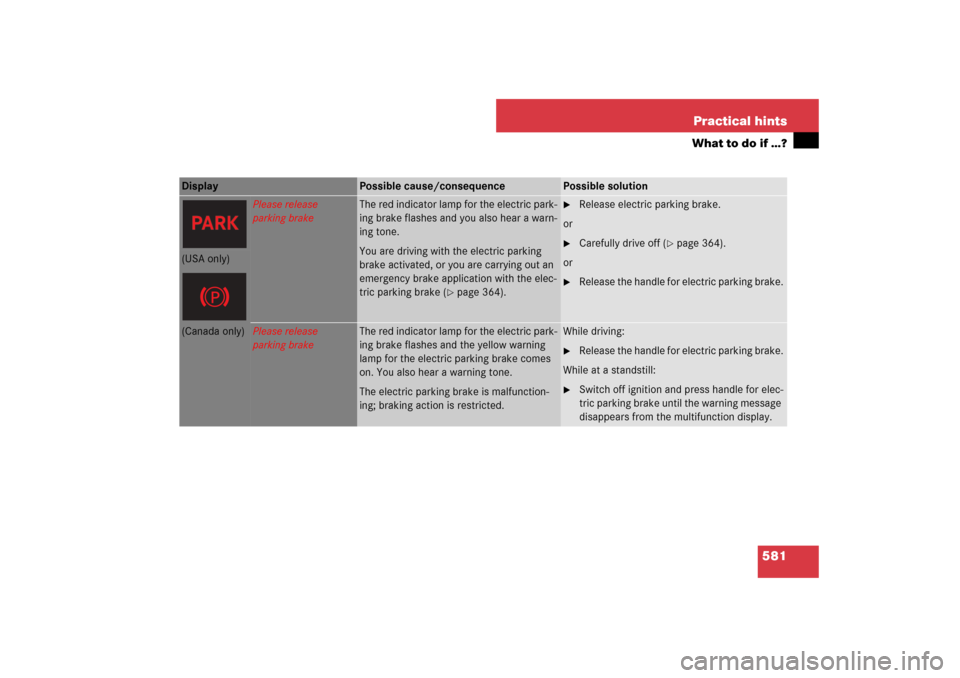
Please release
parking brake
The red indicator lamp for the electric park-
ing brake flashes and you also hear a warn-
ing tone.
You are driving with the electric parking
brake activated, or you are carrying out an
emergency brake application with the elec-
tric parking brake (
�page 364).
�
Release electric parking brake.
or
�
Carefully drive off (
�page 364).
or
�
Release the handle for electric parking brake.
(USA only)(Canada only)
Please release
parking brake
The red indicator lamp for the electric park-
ing brake flashes and the yellow warning
lamp for the electric parking brake comes
on. You also hear a warning tone.
The electric parking brake is malfunction-
ing; braking action is restricted.
While driving:�
Release the handle for electric parking brake.
While at a standstill:
�
Switch off ignition and press handle for elec-
tric parking brake until the warning message
disappears from the multifunction display.
Page 583 of 705
582 Practical hintsWhat to do if …?Display
Possible cause/consequence
Possible solution
Turn on the ignition
to release the
parking brake
The yellow indicator lamp for the electric
parking brake comes on.
You have tried to release the electric park-
ing brake, but the ignition was not switched
on.
�
Switch on the ignition (
�page 315).
(USA only)(Canada only)
Inoperative
See Oper. Manual
ESP
® as well as PRE-SAFE
® are switched off
due to a malfunction. In addition, the v
warning lamp in the instrument cluster
comes on.
The ABS is still operational.
�
Continue driving with added caution.
�
Have the system checked at an authorized
Mercedes-Benz Center as soon as possible.
Failure to follow these instructions increases the
risk of an accident.
Page 613 of 705
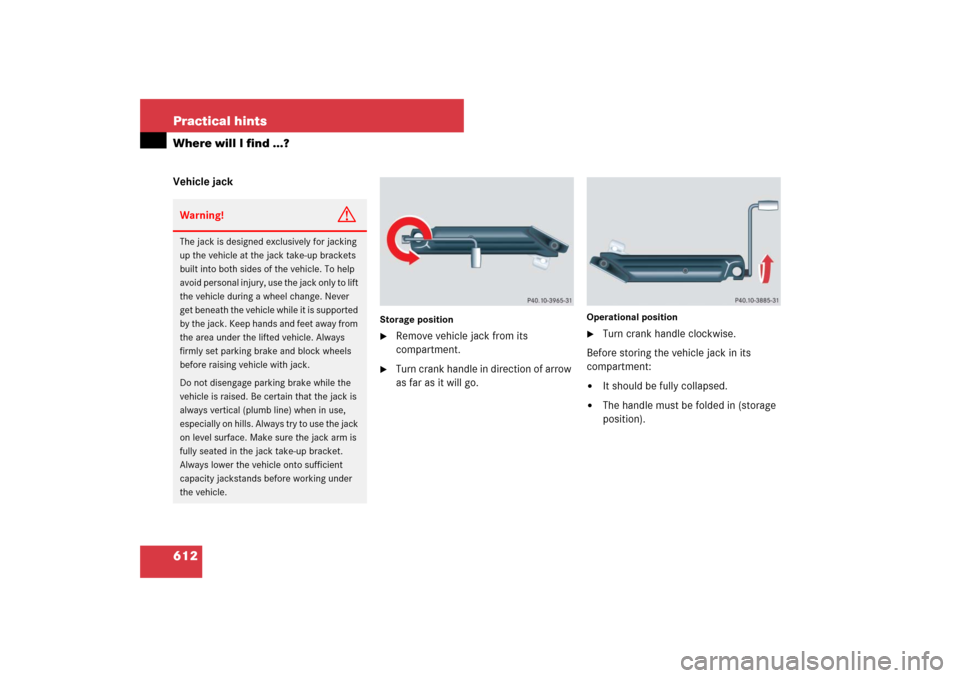
612 Practical hintsWhere will I find ...?Vehicle jack
Storage position�
Remove vehicle jack from its
compartment.
�
Turn crank handle in direction of arrow
as far as it will go.
Operational position�
Turn crank handle clockwise.
Before storing the vehicle jack in its
compartment:
�
It should be fully collapsed.
�
The handle must be folded in (storage
position).
Warning!
G
The jack is designed exclusively for jacking
up the vehicle at the jack take-up brackets
built into both sides of the vehicle. To help
avoid personal injury, use the jack only to lift
the vehicle during a wheel change. Never
get beneath the vehicle while it is supported
by the jack. Keep hands and feet away from
the area under the lifted vehicle. Always
firmly set parking brake and block wheels
before raising vehicle with jack.
Do not disengage parking brake while the
vehicle is raised. Be certain that the jack is
always vertical (plumb line) when in use,
especially on hills. Always try to use the jack
on level surface. Make sure the jack arm is
fully seated in the jack take-up bracket.
Always lower the vehicle onto sufficient
capacity jackstands before working under
the vehicle.
Page 617 of 705
616 Practical hintsUnlocking/locking in an emergencyMechanically releasing the electric parking brake
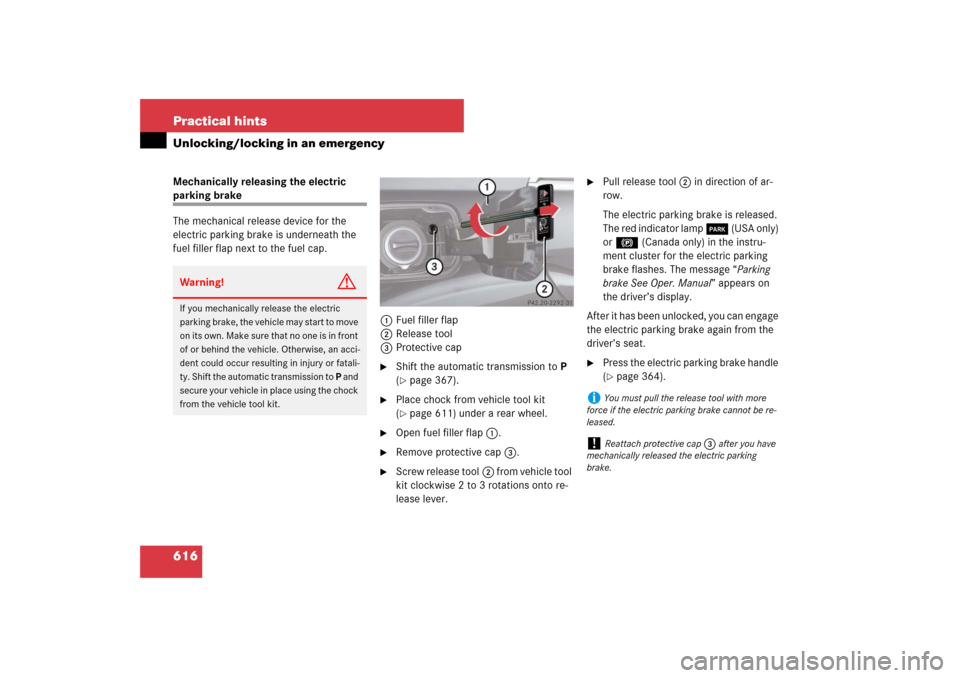
The mechanical release device for the
electric parking brake is underneath the
fuel filler flap next to the fuel cap.
1Fuel filler flap
2Release tool
3Protective cap
�
Shift the automatic transmission to P
(�page 367).
�
Place chock from vehicle tool kit
(�page 611) under a rear wheel.
�
Open fuel filler flap1.
�
Remove protective cap3.
�
Screw release tool2 from vehicle tool
kit clockwise 2 to 3 rotations onto re-
lease lever.
�
Pull release tool2 in direction of ar-
row.
The electric parking brake is released.
The red indicator lamp 0 (USA only)
or ! (Canada only) in the instru-
ment cluster for the electric parking
brake flashes. The message “Parking
brake See Oper. Manual” appears on
the driver’s display.
After it has been unlocked, you can engage
the electric parking brake again from the
driver’s seat.
�
Press the electric parking brake handle
(�page 364).
Warning!
G
If you mechanically release the electric
parking brake, the vehicle may start to move
on its own. Make sure that no one is in front
of or behind the vehicle. Otherwise, an acci-
dent could occur resulting in injury or fatali-
ty. Shift the automatic transmission to P and
secure your vehicle in place using the chock
from the vehicle tool kit.
i
You must pull the release tool with more
force if the electric parking brake cannot be re-
leased.
!
Reattach protective cap
3
after you have
mechanically released the electric parking
brake.
Page 622 of 705
621 Practical hints
Replacing bulbs
�Replacing bulbs
Safe vehicle operation depends on proper
exterior lighting and signaling. It is there-
fore essential that all bulbs and lamp as-
semblies are in good working order at all
times.
Correct headlamp adjustment is extremely
important. Have headlamps checked and
readjusted at regular intervals and when a
bulb has been replaced. See an authorized
Mercedes-Benz Center for headlamp ad-
justment.
i
If the headlamps or front fog lamps are
fogged up on the inside as a result of high humid-
ity, driving the vehicle a distance with the lights
on should clear up the fogging.
i
Substitute bulbs will be brought into use
when the following lamps malfunction:
�
Brake lamps
�
Rear fog lamps
�
Front parking lamps
�
Tail lamps
�
Turn signal lamps
Observe the messages in the multifunction dis-
play (�page 557).
Page 623 of 705
622 Practical hintsReplacing bulbsBulbs Front lamps Rear lamps
Lamp
Type
1
Bi-Xenon headlamp:
Low and high beam
1
1Bi-Xenon headlamps: Low beam and high beam
use the same D1S-35W lamp. Do not replace the
Bi-Xenon bulbs yourself. Contact an authorized
Mercedes-Benz Center.
D1S-35 W
2
Additional turn signal
lamp
LED
3
Parking and standing
lamp
W5W
4
Side marker lamp
W5W
5
Bi-Xenon headlamp:
High beam flasher lamp
H7-55 W
IR emitter* (for Night
View Assist*)
H11-55 W
6
Corner-illuminating
lamp
H7-55 W
7
Fog lamp
H11-55 W
8
Turn signal lamp
PY 24 W
Lamp
Type
9
High mounted brake
lamp
LED
a
Turn signal lamp
HiP 16 W
b
Brake lamp/tail lamp
and standing lamp
LED
c
License plate lamp
W5W
d
Backup lamp
HiP 16 W
e
Side marker lamp
LED
f
Rear fog lamp (driver’s
side only)
HiP 16 W
Page 624 of 705
623 Practical hints
Replacing bulbs
Notes on bulb replacement
�
Only use 12-volt-bulbs of the same
type and with the specified watt rating.
�
Switch lights off before changing a bulb
to prevent short circuits.
�
Always use a clean lint-free cloth when
handling bulbs.
�
Your hands should be dry and free of oil
and grease.
�
If the newly installed bulb does not
come on, visit an authorized
Mercedes-Benz Center.
Have the LEDs and bulbs for the following
lamps replaced by an authorized
Mercedes-Benz Center.
�
the Bi-Xenon lamps
�
the front turn signal lamps
�
the front fog lamps
�
the additional turn signal lamps in the
exterior rear view mirrors
�
the parking and standing lamps
�
the front side marker lamps
�
the high mounted brake lamps
�
the brake, tail and rear standing lamps
�
the rear side marker lamps
�
the rear fog lamp
�
the rear turn signal lamps
�
the rear side marker lamps
�
the license plate lamps
Replacing bulbs for front lamps
Before you start to replace a bulb for a
front lamp, do the following first:�
Turn the exterior lamp switch to M
(�page 342).
�
Open the hood (
�page 492) (except
for side marker lamps).
Warning!
G
Keep bulbs out of reach of children.
Bulbs and bulb sockets can be very hot. Al-
low the lamp to cool down before changing
a bulb.
Halogen lamps contain pressurized gas. A
bulb can explode if you:�
touch or move it when hot
�
drop the bulb
�
scratch the bulb
Wear eye and hand protection.
Because of high voltage in Xenon lamps, it is
dangerous to replace the bulb or repair the
lamp and its components. We recommend
that you have such work done by a qualified
technician.
i
Have the headlamp adjustment checked
regularly.