Page 256 of 705
255 Control systems
Instrument cluster control system
Daytime driving lamps mode on/off
(USA only)�
Press ( or & to select the “Set-
tings” menu.
�
Press % or $ to select the “Day-
time driving lamps” function.
�
Press #.
�
Press # again if you would like to
change the current status.
Depending on the previous status, the
daytime driving lamps will be switched
on or off.With “Daytime driving lamps” mode select-
ed and the exterior lamp switch at position
M or *, the low beam headlamps
are switched on when the engine is run-
ning.
In low ambient light conditions the follow-
ing lamps will switch on additionally:
�
Parking lamps
�
Tail lamps
�
License plate lamps
�
Side marker lamps
For more information on the daytime run-
ning lamp mode (
�page 344).Showing or hiding additional speedom-
eter
You can have an additional digital speed-
ometer shown on the multifunction dis-
play. The speed is shown in the unit of
kilometers/hour (USA) or miles/hour
(CAN).
�
Press ( or & to select the “Set-
tings” menu.
�
Press % or $ to select the “Add.
speedometer” function.
�
Press #.
�
Press # again if you would like to
change the current status.
Depending on the previous status, the
additional speedometer will be
switched on or off.
i
This function is not available in countries
where the “Daytime driving lamps” mode is man-
datory and therefore in a constant mode.
i
If you turn the exterior lamp switch to anoth-
er position, the corresponding lamp(s) will
switch on.
i
Make sure that the light switch is set
toB
or
*
when you switch off the day-
time driving lamps while driving at night.
Page 270 of 705
269 Control systems
Voice Control* navigation
�Voice Control* navigation
Important notesWarning!
G
For safety reasons, you should only select a
destination when the vehicle is stationary.
While the navigation system provides direc-
tional assistance, the driver must remain fo-
cused on safe driving behavior, especially
attention to traffic and street signs, and
should utilize the system’s audio cues while
driving.
The navigation system does not supply any
information on stop signs, yield signs, traffic
regulations or traffic safety rules. Their ob-
servance always remains in the driver’ per-
sonal responsibility. DVD maps do not cover
all areas nor all routes within an area.
Traffic regulations always have priority over
any route recommendations given.
Bear in mind that at a speed of just 30 mph
(approximately 50 km/h), your vehicle is
covering a distance of 44 feet
(approximately 13.5 m) every second.
During route guidance, you will not receive
information on:�
traffic lights
�
stop and yield signs
�
parking or stopping zones
�
one-way streets
�
narrow bridges, or
�
other traffic regulation data.
You should therefore always strictly observe
traffic regulations while driving. Drive care-
fully and always obey traffic laws and road
signs, even if they contradict navigation sys-
tem instructions.
Warning!
G
Please do not use the Voice Control System
in an emergency, as the tone of your voice
may change in a stressful situation. This
could cause a delay in completing your
phone call in a timely manner. This could
distract you in an emergency situation and
cause you to be involved in an accident.
Warning!
G
Navigation announcements are intended to
direct you while driving without diverting
your attention from the road and driving.
Please always use this feature instead of
consulting the map display for directions.
Consulting the symbols or map display for
directions may cause you to divert your at-
tention from driving and increase your risk
of an accident.
Page 274 of 705

273 Control systems
Voice Control* navigation
“Next POI”
With the commands�
“Next gas station”
�
“Next parking lot”
�
“Next Mercedes-Benz service”
�
“Next restaurant”
�
“Next hospital”
you can select POIs in your vicinity.
Sample dialog:
s
Next gas station
u
The system shows a numbered list
of gas stations on the COMAND dis-
play.
t
Please select a line number
s
Number one
t
Number one accepted
t
Do you want to start route guid-
ance?
s
YesThe system calculates the route and, upon
completing route calculation, starts route
guidance.
“Last destinations”
Use the command “Last destinations” to
select a destination from among a number
of destinations last navigated to.
“Save destination”
Use the command “Save destination” to
save the current destination in the address
book. Sample dialog:
s
Save destination
t
Please say the name
s
John Smith
t
Please repeat the name
s
John Smith
t
Where do you want to save: home
or work?
s
Work
t
The destination has been saved
i
The Voice Control System may recognize
names even if not saved in your voice. For best
possible call-up performance, however, you
should speak and save the names you intend to
use yourself.
If an entry is already available in the address
book, the system will ask you if you would like to
add the address to the available entry.
Page 294 of 705
293 Control systems
Voice Control* command list
Address book commands�
next Mercedes service center
�
next Mercedes-Benz service point
�
next Mercedes-Benz service center
�
next service point
�
next service center
�
next hospital
�
next parking lot
�
next restaurant
�
address book (on)
�
address list (on)
�
addresses (on)
�
list address book
�
read out address book
�
play address book
�
get address book
�
recall address book
�
delete address book
�
spell entry
�
spell name
�
spell heading
�
search entry
�
search name
�
search heading
�
open entry
�
show entry
�
list entry
�
select entry
�
get entry
�
open entry
�
open page
�
open item
�
open name
�
open
�
delete name
�
delete
�
list destination memory
�
read out destination memory
�
play destination memory
�
get destination memory
�
recall destination memory
�
�
car
�
car phone
�
land line
�
phone
�
telephone
�
cell phone
�
mobile phone
�
cellular phone
�
call
�
call work
�
call office
�
call business
�
call company
�
home
Page 304 of 705
303 Controls in detail
Locking and unlocking
Starter switch positions
Seats
Steering wheel
Mirrors
Memory function
Fastening the seat belts
Lighting
Windshield wipers
Power windowsDriving and parking
Automatic transmission
Instrument cluster
Driving systems
Automatic climate control
Trunk
Power tilt/sliding sunroof
Panorama roof with power
tilt/sliding panel*
Loading and storing
Useful features
Page 308 of 705
307 Controls in detail
Locking and unlocking
Warning!
G
When leaving the vehicle, always take the
SmartKey with KEYLESS-GO* with you and
lock the vehicle. Do not leave children unat-
tended in the vehicle, or with access to an
unlocked vehicle. It is possible for children
to open a locked door from the inside, which
could result in an accident and/or serious
personal injury.
They could start the vehicle with a valid
SmartKey with KEYLESS-GO left in the vehi-
cle or with the KEYLESS-GO button on the
starter switch, or they could release the
electric parking brake, thereby putting
themselves and others in danger. Switch off
the engine and take the SmartKey with
KEYLESS-GO with you even if you are only
leaving the vehicle for a short while.
Warning!
G
To prevent possible personal injury, always
keep hands and fingers away from the door
or trunk lid opening when closing a door or
the trunk. Be especially careful when small
children are around.
Before closing doors, make sure there is no
possibility of someone getting caught in a
door during closing.i
USA only:
This device complies with Part 15 of the FCC
Rules. Operation is subject to the following two
conditions:
(1) This device may not cause harmful interfer-
ence, and
(2) this device must accept any interference re-
ceived, including interference that may
cause undesired operation.
Any unauthorized modification to this device
could void the user’s authority to operate the
equipment.
i
Canada only:
This device complies with RSS-210 of Industry
Canada. Operation is subject to the following
two conditions:
(1) This device may not cause interference, and
(2) this device must accept any interference re-
ceived, including interference that may
cause undesired operation of the device.
Any unauthorized modification to this device
could void the user’s authority to operate the
equipment.
i
You can also open and close the door win-
dows and tilt/sliding sunroof, or the tilt/ sliding
panel* using the SmartKey with KEYLESS-GO
(
�page 355).
Page 336 of 705
335 Controls in detail
Mirrors
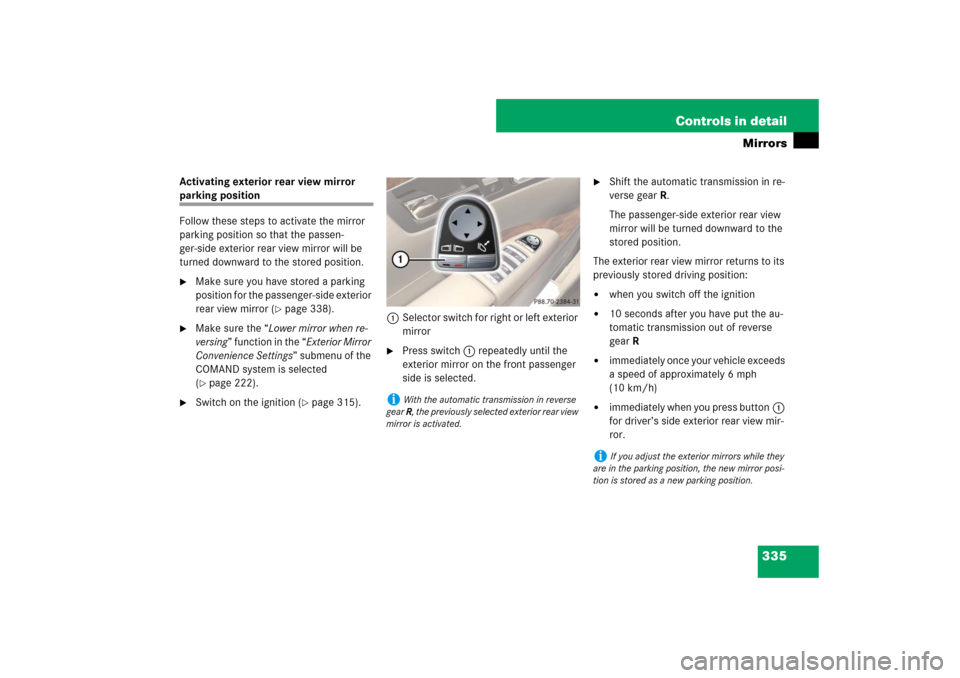
Activating exterior rear view mirror parking position
Follow these steps to activate the mirror
parking position so that the passen-
ger-side exterior rear view mirror will be
turned downward to the stored position.�
Make sure you have stored a parking
position for the passenger-side exterior
rear view mirror (
�page 338).
�
Make sure the “Lower mirror when re-
versing” function in the “Exterior Mirror
Convenience Settings” submenu of the
COMAND system is selected
(�page 222).
�
Switch on the ignition (
�page 315).1Selector switch for right or left exterior
mirror
�
Press switch1 repeatedly until the
exterior mirror on the front passenger
side is selected.
�
Shift the automatic transmission in re-
verse gearR.
The passenger-side exterior rear view
mirror will be turned downward to the
stored position.
The exterior rear view mirror returns to its
previously stored driving position:
�
when you switch off the ignition
�
10 seconds after you have put the au-
tomatic transmission out of reverse
gearR
�
immediately once your vehicle exceeds
a speed of approximately 6 mph
(10 km/h)
�
immediately when you press button1
for driver’s side exterior rear view mir-
ror.
i
With the automatic transmission in reverse
gear R, the previously selected exterior rear view
mirror is activated.
i
If you adjust the exterior mirrors while they
are in the parking position, the new mirror posi-
tion is stored as a new parking position.
Page 339 of 705
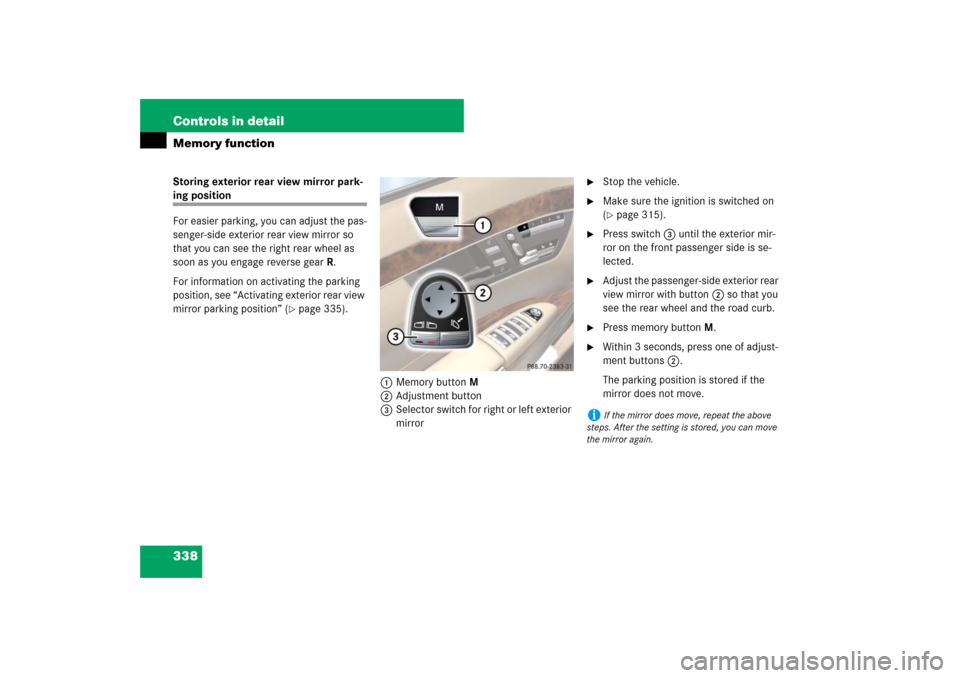
338 Controls in detailMemory functionStoring exterior rear view mirror park-ing position
For easier parking, you can adjust the pas-
senger-side exterior rear view mirror so
that you can see the right rear wheel as
soon as you engage reverse gearR.
For information on activating the parking
position, see “Activating exterior rear view
mirror parking position” (
�page 335).
1Memory button M
2Adjustment button
3Selector switch for right or left exterior
mirror
�
Stop the vehicle.
�
Make sure the ignition is switched on
(�page 315).
�
Press switch3 until the exterior mir-
ror on the front passenger side is se-
lected.
�
Adjust the passenger-side exterior rear
view mirror with button2 so that you
see the rear wheel and the road curb.
�
Press memory button M.
�
Within 3 seconds, press one of adjust-
ment buttons2.
The parking position is stored if the
mirror does not move.
i
If the mirror does move, repeat the above
steps. After the setting is stored, you can move
the mirror again.