Page 454 of 705
453 Controls in detail
Loading and storing
Vehicles with control panel* in rear armrest1Compartment for cup holder�
Opening: Press front of cup holder1.
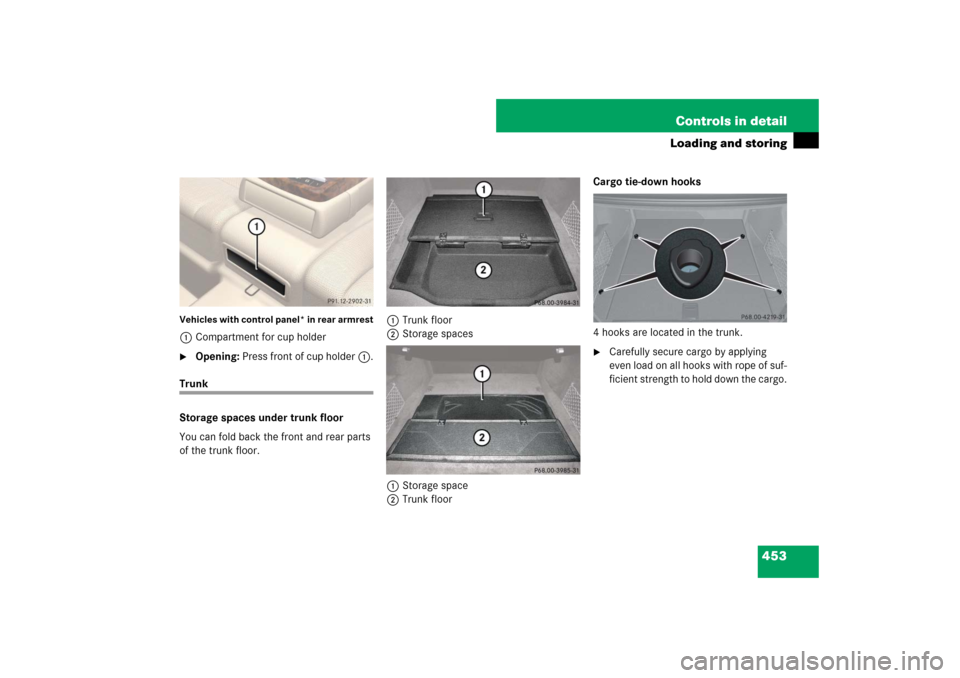
Trunk
Storage spaces under trunk floor
You can fold back the front and rear parts
of the trunk floor.1Trunk floor
2Storage spaces
1Storage space
2Trunk floorCargo tie-down hooks
4 hooks are located in the trunk.
�
Carefully secure cargo by applying
even load on all hooks with rope of suf-
ficient strength to hold down the cargo.
Page 455 of 705
454 Controls in detailLoading and storingRetaining hooks
Two hooks are located on the upper edge
of the trunk and can be used to attach car-
go items such as bags.�
Pull tab1 of retaining hook2 down.
Parcel net in trunk
There is a pocket net on each side of the
right and left trunk side walls to secure
loads.Retainer for Operator’s Manual pouch
Use Velcro strap1 to fasten Operator’s
Manual pouch2 in place.
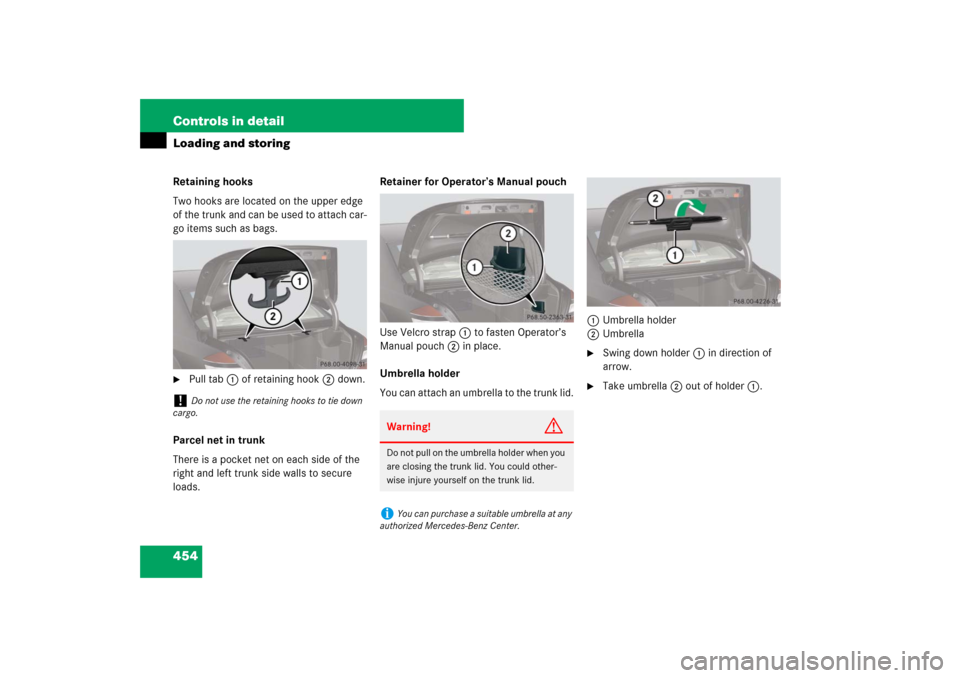
Umbrella holder
You can attach an umbrella to the trunk lid.1Umbrella holder
2Umbrella
�
Swing down holder1 in direction of
arrow.
�
Take umbrella2 out of holder 1.
!
Do not use the retaining hooks to tie down
cargo.
Warning!
G
Do not pull on the umbrella holder when you
are closing the trunk lid. You could other-
wise injure yourself on the trunk lid.i
You can purchase a suitable umbrella at any
authorized Mercedes-Benz Center.
Page 456 of 705

455 Controls in detail
Useful features
�Useful features
Sun visors
1Sun visor
2Vanity mirror cover
3Vanity mirror lamp
4Document holderGlare from front
�
Swing sun visor1 down.
Glare from front and sides
�
Disengage sun visor1 from the
mounting.
�
Pivot sun visor1 to the side.
Vanity mirror in sun visor
�
To use vanity mirror, lift up cover2.
Vanity mirror lamp3 comes on.
Document holder
You can use the plastic tab of document
holder4 to hold admission tickets, park-
ing passes, or similar items in place.
Vanity mirror in rear�
Opening: Press mark1.
The vanity mirror swings down in the di-
rection of the arrow.
�
Closing: Swing vanity mirror up until it
engages.
Warning!
G
Do not use the vanity mirror while driving.
Keep the vanity mirrors in the sun visors
closed while vehicle is in motion. Reflected
glare can endanger you and others.
!
Close vanity mirror cover2 (if open) before
you disengage sun visor1 from the mounting
and pivot it to the side.
i
If you disengage sun visor1 from the
mounting, vanity mirror lamp2 will switch off.
Page 457 of 705
 or via
the favo")
456 Controls in detailUseful featuresRear window sunshade
The switches are on the rear doors.
1Opening
2Closing
You can also operate the rear window sun-
shade via COMAND (
�page 227) or via
the favorite button (
�page 216).
�
Switch on the ignition (
�page 315).
�
Press upper part 1 of the rocker
switch briefly to extend the sunshade.
�
Press lower part 2 of the rocker
switch briefly to retract the sunshade.
Ashtrays
Center console ashtray
1Button for disengaging ashtray
2Cover plate
i
Operating the rear window sunshade from
the rear is not possible if you activate the over-
ride switch (
�page 67).
i
If you operate the rear window sunshade via
COMAND or via the favorite button, this takes
precedence over the rear window sunshade but-
tons on the rear doors.
i
The rear window sunshade is switched off at
temperatures below -4°F (-20°C).
Warning!
G
Remove ashtray only with vehicle standing
still. Set the parking brake to secure vehicle
from movement. Set automatic transmis-
sion toP. With the automatic transmission
set toP, turn off the engine.
Page 458 of 705

457 Controls in detail
Useful features
Opening ashtray�
Press mark on cover plate2 forward.
Removing ashtray insert
�
Push sliding button1 to the left.
The ashtray is disengaged and slides
out a short way.
�
Remove the insert from the ashtray
frame.
Reinstalling ashtray insert
�
Install the insert by pushing it back into
the frame until it engages.
Closing ashtray
�
Briefly press mark on cover plate2
forward.
Rear door ashtray
Opening ashtray
�
Lift up the cover.Removing ashtray insert
1Insert
�
Press the open cover outwards beyond
the stop.
Ashtray insert1 pops out of the hold-
er.
�
Remove insert by pulling it upward.
Reinstalling ashtray insert
�
Install the insert by pushing it back into
the frame until it engages.
Cigarette lightersWarning!
G
Never touch the heating element or sides of
the lighter; they are extremely hot. Hold the
knob only.
Make sure that any children traveling with
you do not injure themselves or start a fire
with the hot cigarette lighter.
When leaving the vehicle, always remove the
SmartKey or SmartKey with KEYLESS-GO*
from the starter switch, take it with you, and
lock the vehicle. Do not leave children unat-
tended in the vehicle, or with access to an
unlocked vehicle. Unsupervised use of vehi-
cle equipment may cause an accident
and/or serious personal injury.
To avoid possible injury to children sitting in
the rear seat, activate the override switch
(�page 67). Activation of the override
switch deactivates the rear center console
lighter.
Page 459 of 705
.
�
Push in cigarette lighter1.The lighter will pop out automat")
458 Controls in detailUseful features1Center console cigarette lighter
1Rear center console lighter�
Switch on the ignition (
�page 315).
�
Push in cigarette lighter1.The lighter will pop out automatically
when hot.
Power outlet
The power outlet is located in the rear cen-
ter console.�
Switch on the ignition (
�page 315).
�
Flip up cover1 and insert electrical
plug (cigarette lighter type).
!
The lighter socket can be used to accommo-
date 12V DC electrical accessories (up to a max-
imum of 85 W) designed for use with the
standard “cigarette lighter” plug type. Keep in
mind, however, that connecting accessories to
the lighter socket (for example extensive con-
necting and disconnecting, or using plugs that do
not fit properly) can damage the lighter socket.
With the socket damaged, the lighter may no
longer be able to be placed in the heating
(pushed-in) position, or the lighter may pop out
too early with the lighter not hot enough.
To help avoid damaging the cigarette lighter
socket, we recommend connecting 12V DC elec-
trical accessories designed for use with a stan-
dard “cigarette lighter” plug type to the 12V
power outlets (
�page 458) in your vehicle
whenever possible.
i
Operation of the rear door lighters is only
possible, if the override switch (
�page 67) is de-
activated.
i
If the engine is off and the cigarette lighter is
being used extensively, the vehicle battery may
become discharged.
i
The power outlet can be used to
accommodate 12V DC electrical accessories
(e.g. air pump, auxiliary lamps) up to a maximum
of 180 W.
If the engine is off and the outlet is being used
extensively, the vehicle battery may become dis-
charged.
Page 460 of 705

459 Controls in detail
Useful features
Telephone*
Radio transmitters, such as a portable tele-
phone or a citizens band unit, should only
be used inside the vehicle if they are con-
nected to an antenna that is installed on
the outside of the vehicle.
The external antenna must be approved by
Mercedes-Benz. Please contact an autho-
rized Mercedes-Benz Center for informa-
tion on the installation of an approved
external antenna. Refer to the radio trans-
mitter operation instructions regarding use
of an external antenna.When the mobile phone is inserted in the
cradle, you can operate the telephone us-
ing the following devices:
�
mobile phone keypad
�
COMAND telephone keypad
(�page 115)
�
buttonss andt on the steering
wheel (
�page 249)
�
Voice Control* (
�page 262)
�
Bluetooth headset (
�page 217)
See also separate operating manual for in-
structions on how to use the mobile phone.
Warning!
G
Never operate radio transmitters equipped
with a built-in or attached antenna (i.e. with-
out being connected to an external antenna)
from inside the vehicle while the engine is
running. Doing so could lead to a malfunc-
tion of the vehicle’s electronic system, pos-
sibly resulting in an accident and/or serious
personal injury.
Warning!
G
Please do not forget that your primary re-
sponsibility is to drive the vehicle. A driver’s
attention to the road must always be
his/her primary focus when driving. For
your safety and the safety of others, we rec-
ommend that you pull over to a safe location
and stop before placing or taking a tele-
phone call.
If you choose to use the telephone
1 while
driving, please use the hands-free device
and only use the telephone when road,
weather and traffic conditions permit. Some
jurisdictions prohibit the driver from using a
mobile telephone while driving a vehicle.
Only operate the COMAND (Cockpit Man-
agement and Data System)
1 if road, weather
and traffic conditions permit.
Bear in mind that at a speed of just 30 mph
(approximately 50 km/h), your vehicle is
covering a distance of 44 feet (approximate-
ly 14 m) every second.
1Observe all legal requirements.
i
Various mobile phone cradles can be in-
stalled in the cockpit. These mobile phone cra-
dles can be obtained from an authorized
Mercedes-Benz Center.
The functions and services available to you while
using the mobile phone depend on your service
provider and the type of mobile phone you are
using.
Page 461 of 705
.
Inserting mobile phone in mobile phone
cradle
Once the mobile phone has bee")
460 Controls in detailUseful featuresThe cradle is located in the center armrest.�
Open telephone compartment
(�page 448).
Inserting mobile phone in mobile phone
cradle
Once the mobile phone has been inserted
in the mobile phone cradle, calls can only
be made via the hands-free system* or
Bluetooth headset*.
�
If applicable, remove the cover for the
external antenna connection from the
back of the mobile phone and store it in
a safe place. Be sure to comply with the
mobile phone’s operating instructions,
as well.
Example illustration1Insert the mobile phone
2Connector contact
3Mobile phone cradle�
Slide the lower end of the mobile phone
into connector contact 2 on
cradle3.
�
Push the top of the mobile phone in di-
rection of arrow 1, until the lug on the
mobile phone release button engages.
The mobile phone is connected to the
network via the external antenna. The mobile phone is linked to the
hands-free device and the multifunc-
tion steering wheel.
The battery is charged depending on its
charge status and the position of the
SmartKey in the starter switch. The
charge procedure will be indicated in
the mobile phone’s display.
You can place or receive phone calls. You
can control other functions of the mobile
phone via the control system (
�page 249)
or COMAND (
�page 115).
!
Do not try to remove the mobile phone along
with the cradle. You could otherwise damage the
mobile phone cradle.
i
When you take the SmartKey or SmartKey
with KEYLESS-GO* out of the starter switch, the
mobile phone remains switched on for approx.
10 minutes. If you place or receive a call during
this time, the mobile phone switches off 10 min-
utes after the call has been completed.