Page 446 of 705

445 Controls in detail
Panorama roof with power tilt/sliding panel*
The tilt/sliding panel only operates with
the roller sunblinds extended.
Roof panel switch1Push back to slide roof panel open
2Push forward to slide roof panel closed
3Push up to raise roof panel
4Pull down to lower roof panel�
Switch on the ignition (
�page 315).
�
To open, close, raise, or lower the
tilt/sliding panel, move the roof panel
switch to resistance point in the re-
quired direction of arrows1 to4.
Release the roof panel switch when the
tilt/sliding panel has reached the de-
sired position.
�
Express-opening: Move the roof panel
switch past the resistance point in di-
rection of arrow1 and release.
The tilt/sliding panel opens
completely.
�
Express-raising: Move the roof panel
switch past the resistance point in di-
rection of arrow3 and release.
The tilt/sliding panel raises
completely.
�
Stopping during Express-operation:
Move the roof panel switch in any di-
rection.
i
When the panorama roof with power
tilt/sliding panel is open, resonance noises may
result in addition to the usual wind noises. They
are caused by minimal pressure changes in the
passenger compartment. To reduce or eliminate
these noises, change the position of the panora-
ma roof with power tilt/sliding panel or open a
side window slightly.
i
You can also open or close the tilt/sliding
panel using the SmartKey, see “Summer open-
ing feature” (
�page 355) and “Convenience
closing feature” (�page 356).
Depending on current position, the tilt/sliding
panel may also open or close when the air recir-
culation button, in the control panel of the
climate control (
�page 424), is pressed and
held for 2 seconds.
i
If the front roller sunblind is retracted while
being raised, it will extend first.
i
You cannot automatically close and lower
the panorama roof with power tilt/sliding panel.
Page 447 of 705

446 Controls in detailPanorama roof with power tilt/sliding panel*Synchronizing
The tilt/sliding panel and front roller sun-
blinds must be synchronized�
after the tilt/sliding panel has been
closed manually (
�page 617)
�
after a malfunction
�
if the panorama roof with power
tilt/sliding panel can only be opened
with a jerking motion
Tilt/sliding panel and front roller sun-
blind
�
Switch on the ignition (
�page 315).
�
Move and hold the roof panel switch in
direction of arrow2 until the front
roller sunblind is fully retracted.
�
Keep holding the roof panel switch in
direction of arrow2 for approximately
1 second.
�
Move and hold the roof panel switch in
direction of arrow1 until the front
roller sunblind is fully extended.
�
Move and hold the roof panel switch in
direction of arrow1 until the tilt/slid-
ing panel is slightly opened.
�
Move and hold the roof panel switch in
direction of arrow2 until the tilt/slid-
ing panel is fully closed.
�
Keep holding the roof panel switch in
direction of arrow2 for approximately
1 second.
�
Check the Express-open feature of the
tilt/sliding panel (
�page 445).
If the tilt/sliding panel opens com-
pletely, the roof is synchronized. Other-
wise repeat the above steps.Rear roller sunblind
�
Switch on the ignition (
�page 315).
�
Press button1 until the rear roller
sunblind is fully retracted.
�
Keep holding button1 for approxi-
mately 1 second.
Page 448 of 705

447 Controls in detail
Loading and storing
�Loading and storing
Roof rack*
�
Flip the covers upward.
�
Only attach the roof-rack system to the
anchorage points under the covers.
Observe manufacturer’s instructions
for installation.
Loading instructions
The total load weight including vehicle oc-
cupants and luggage/cargo should not ex-
ceed the load limit or vehicle capacity
weight as indicated on the corresponding
placard located on the driver’s door B-pillar
(�page 503).
Warning!
G
Only use roof racks approved by
Mercedes-Benz for your vehicle model to
avoid damage to the vehicle.
Follow the manufacturer’s installation
instructions. Otherwise, an improperly
attached roof rack system or its load could
become detached from the vehicle.
Do not exceed the maximum roof load of
220 lb (100 kg).
Take into consideration that when the roof
rack is loaded, the handling characteristics
are different from those when operating the
vehicles without the roof rack loaded.
!
Load the roof rack in such a way that the ve-
hicle cannot be damaged while driving.
Make sure
�
you can fully raise tilt/sliding sunroof or the
panorama roof with tilt/sliding panel*
�
you can fully open the trunk
Warning!
G
Always fasten items being carried as secure-
ly as possible using cargo tie-down hooks
and fastening materials appropriate for the
weight and size of the load.
In an accident, during hard braking or sud-
den maneuvers, loose items will be thrown
around inside the vehicle and can cause in-
jury to vehicle occupants unless the items
are securely fastened in the vehicle.
To help avoid personal injury during a colli-
sion or sudden maneuver, exercise care
when transporting cargo. Put luggage or car-
go in the trunk if possible.
��
Page 449 of 705

448 Controls in detailLoading and storingStorage compartmentsStorage compartments in the front pas-
senger compartment
Glove box
1Glove box lid release
2Unlocking glove box
3Locking glove box
The glove box can be unlocked and locked
with the mechanical key (
�page 614).
�
Opening: Press glove box lid
release1.
�
Closing: Push the lid up.
�
Locking: Insert the mechanical key
into the glove box lock and turn it
clockwise to position3.
�
Unlocking: Insert the mechanical key
into the glove box lock and turn it coun-
terclockwise to position2.
Storage compartments in the front arm-
rest
1Storage tray/telephone compartment
2Storage compartment (not with rear
climate control system*)
Do not pile luggage or cargo higher than the
seat backs. Do not place anything on the
rear-window shelf.
Never drive vehicle with trunk open. Deadly
carbon monoxide (CO) gases may enter ve-
hicle interior resulting in unconsciousness
and death.Warning!
G
To help avoid personal injury during a colli-
sion or sudden maneuver, exercise care
when storing objects in the vehicle. Put lug-
gage or cargo in the trunk if possible. Do not
pile luggage or cargo higher than the seat
backs.
Parcel nets cannot secure hard or heavy ob-
jects.
Keep compartment lids closed. This will help
to prevent stored objects from being thrown
about and injuring vehicle occupants during�
braking
�
vehicle maneuvers or
�
an accident.
��
Page 450 of 705
449 Controls in detail
Loading and storing
�
Opening storage tray/telephone
compartment: Press button1 and
swing armrest to left or right side.
�
Opening storage compartment:
Press button2 and swing center arm-
rest upward.
Storage compartments below the front
seats
�
Opening: Pull tab1 upward and fold
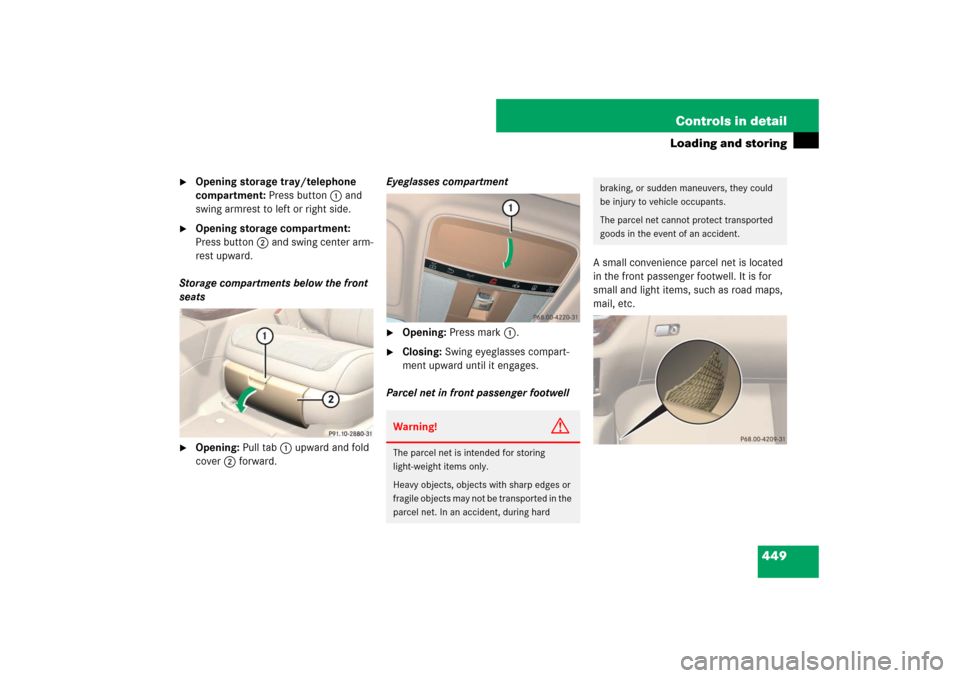
cover2 forward.Eyeglasses compartment
�
Opening: Press mark1.
�
Closing: Swing eyeglasses compart-
ment upward until it engages.
Parcel net in front passenger footwellA small convenience parcel net is located
in the front passenger footwell. It is for
small and light items, such as road maps,
mail, etc.Warning!
G
The parcel net is intended for storing
light-weight items only.
Heavy objects, objects with sharp edges or
fragile objects may not be transported in the
parcel net. In an accident, during hard
braking, or sudden maneuvers, they could
be injury to vehicle occupants.
The parcel net cannot protect transported
goods in the event of an accident.
Page 451 of 705
450 Controls in detailLoading and storingStorage compartments in rear passen-
ger compartment
Armrest with integrated storage com-
partmentVehicles without control panel* in rear arm-
rest�
Opening: Pull release catch1 and
swing the cover upward.
Vehicles with control panel* in rear armrest�
Opening: Press button1 and swing
the cover upward.Storage compartment between rear
seats
Vehicles without rear center seat*�
Opening: Pull handle1 backward in
direction of arrow.
!
Before storing the armrest in the backrest,
close the storage compartment cover.
!
Do not sit on or lean your body weight
against the armrest when it is folded down, as
you could otherwise damage it.
Page 452 of 705

451 Controls in detail
Loading and storing
Rear storage box�
Opening: Fold down rear center arm-
rest and swing down cover1.Ruffled storage pockets
Ruffled storage pockets 1 are located on
the back of the front seats.
!
Do not sit on or lean your body weight
against the armrest when it is folded down, as
you could otherwise damage it.
i
When the rear seats are in their basic posi-
tion, you can open the cover more easily.
Warning!
G
Do not place objects with a combined
weight of more than 4.4 lbs (2 kg) into the
ruffled storage pocket. Otherwise, the Occu-
pant Classification System OCS (
�page 50)
may not be able to properly approximate the
occupant weight category.
The ruffled storage pocket is intended for
storing light-weight items only.
Heavy objects, objects with sharp edges or
fragile objects may not be transported in the
ruffled storage pocket. In an accident, dur-
i n g h a r d b r a k i n g , o r s u d d e n m a n e u v e r s , t h e y
could be thrown around inside the vehicle
and cause injury to vehicle occupants.
The ruffled storage pocket cannot protect
transported goods in the event of an acci-
dent.
Page 453 of 705

452 Controls in detailLoading and storingCup holders
Cup holder in front center console
1Mark
2Handle
�
Opening: Press mark1 on the front.
�
Closing: Fold cover in until it engages.
�
Removing: Pull cup holder out by pull-
ing silver handle2 upward in direction
of arrow.
�
Inserting: Press downward until it en-
gages. While doing so, make sure that
the word “Front” is in the proper instal-
lation position.
Cup holder in rear
Vehicles without control panel* in rear arm-
rest1Compartment for cup holder�
Opening: Press mark1 on the front.
Warning!
G
In order to help prevent spilling liquids on
vehicle occupants and/or vehicle equip-
ment, only use containers that fit into the
cup holder. Use lids on open containers and
do not fill containers to a height where the
contents, especially hot liquids, could spill
during braking, vehicle maneuvers, or in an
accident. Liquids spilled on vehicle occu-
pants may cause serious personal injury.
Liquids spilled on vehicle equipment may
cause damage not covered by the
Mercedes-Benz Limited Warranty.
When not in use, keep the cup holders
closed. An open cup holder may cause injury
to you or others when contacted during
braking, vehicle maneuvers, or in an acci-
dent.
Keep in mind that objects placed in the cup
holder may come loose during braking, vehi-
cle maneuvers, or in an accident and be
thrown around in the vehicle interior.
Objects thrown around in the vehicle interi-
or may cause an accident and/or serious
personal injury.
i
You can remove the cup holder to clean it.
Only clean it using clear, lukewarm water.