Page 28 of 705

27 At a glance
Cockpit
Item
Page
1
Combination switch�
Turn signals
�
Windshield wipers
�
High beam
�
Cornering lamps
362
351
346
347
2
Lever for�
Cruise control
�
DISTRONIC Plus*
380
385
3
Horn
4
Multifunction steering wheel
242
5
Instrument cluster
28
6
Steering wheel gearshift con-
trol
375
7
Gear selector lever for
automatic transmission
359
Item
Page
8
Control panel with�
Front passenger front
air bag indicator lamp
�
Vehicle level control
switch
�
Electronic Stability Pro-
gram (ESP
®) switch
�
Parktronic*/Park Assist*
deactivation switch
�
Swivel COMAND display
�
COMAND/instrument
cluster illumination
53
401,
403
73
408,
408
81
378
9
COMAND display
79
a
Overhead control panel
37
b
Automatic climate control
Center console, upper part
424
32
Item
Page
c
Glove box lock
448
d
Cover of compartment with�
CD changer
�
PCMCIA card slot
107
108
e
Center console, lower part
33
f
Starter switch
KEYLESS-GO* start/stop but-
ton
315
316
g
Steering wheel adjustment
Heated steering wheel*
330
331
h
Headlamp washer button
346
j
Parking brake
364
k
Hood lock release
492
l
Door control panel
39
m
Night View Assist*
420
n
Exterior lamp switch
342
Page 30 of 705
29 At a glance
Instrument cluster
Item
Page
1
Coolant temperature gauge
378
2
Fuel gauge with:
Fuel tank reserve warning
lamp
AHigh beam headlamp
indicator lamp
-ABS indicator lamp
=SRS indicator lamp
550
346
544
552
3
Parktronic*/Park Assist*
warning indicator for left
front area
407,
411
4
Speedometer with:0
USA only
!
Canada only
Parking brake
warning or indi-
cator lamps
546
Item
Page
;
USA only
3
Canada only
Brake warning
lamp
545
550
HCombination low tire
pressure*/TPMS mal-
function telltale*
553
L
Left/right turn
signal indicator
lamps
362
KvESP
® warning lamp
549
lDistance warning
lamp*
397,
549
5
Parktronic*/Park Assist*
warning indicator for right
front area
407,
411
Item
Page
6
Gear position/range indica-
tor
370
7
Tachometer with:±Engine malfunction
indicator lamp
547
8
Selected program mode indi-
cator
370
9
Main menu for control sys-
tem, multifunction display
241
a
Outside temperature
379
b
Display with:Additional speedometer
255
:Distance warner*
397,
252
Page 32 of 705
31 At a glance
Control systems
Item
Page
1
Lback/to deactivate
Voice Control*
242
260
2
$scroll up
%scroll down
&scroll to the right
(scroll to the left
#confirm selection
3
Multifunction display
241
Item
Page
4
sto take a call
to dial a number
tto end a call
to reject an incoming
call
ævolume up
çvolume down
Fmute function
249
249
5
!to accept a call/
to activate Voice
Control*
124
260
Item
Page
6
Instrument cluster illumina-
tion
378
7
Swivel COMAND display
81
8
COMAND display illumination
378
9
COMAND display
80
a
CD changer
107
b
PCMCIA card slot
108
c
COMAND shortcut buttons
80
d
COMAND controller
82
Page 52 of 705

51 Safety and Security
Occupant safety
Both driver and the front passenger should
always use the 59indicator
lamp as an indication of whether or not the
front passenger is properly positioned.Warning!
G
If the 59indicator lamp illumi-
nates when an adult or someone larger than
a small individual is in the front passenger
seat, have the front passenger re-position
himself or herself in the seat until the
59indicator lamp goes out, or
check whether objects are caught under or
around the seat.
More information about air bag display mes-
sages (
�page 562).
In the event of a collision, the air bag control
unit will not allow front passenger front air
bag deployment when the OCS classified
the front passenger seat occupant as being
up to or less than the weight of a typical
12-month-old child in a standard child re-
straint or if the front passenger seat is
sensed as being empty.
When the OCS senses that the front passen-
ger seat occupant is classified as being up
to or less than the weight of a typical
12-month-old child in a standard child
restraint, the 59indicator
lamp will illuminate when the engine is start-
ed and remain illuminated, indicating that
the front passenger front air bag is deacti-
vated.
When the OCS senses that the front passen-
ger seat is classified as being empty, the
59indicator lamp will illumi-
nate when the engine is started and remain
illuminated, indicating that the front
passenger front air bag is deactivated.
When the OCS senses that the front passen-
ger seat occupant is classified as being
heavier than the weight of a typical
12-month-old child seated in a standard
child restraint or as being a small individual
(such as a young teenager or a small adult),
the 59indicator lamp will illu-
minate for approximately 6 seconds when
the engine is started and then, depending on
occupant weight sensor readings from
the seat, remain illuminated or go out. With
the 59indicator lamp illumi-
nated, the front passenger front air bag is
deactivated. With the 59 indi-
cator lamp out, the front passenger front air
bag is activated.
When the OCS senses that the front passen-
ger seat occupant is classified as an adult or
someone larger than a small individual, the
59indicator lamp will illumi-
nate for approximately 6 seconds when the
engine is started and then go out, indicating
that the front passenger front air bag is
activated.
If the 59indicator lamp is illu-
minated, the front passenger front air bag is
deactivated and will not be deployed.
If the 59indicator lamp is not
illuminated, the front passenger front air
bag is activated and will be deployed:�
in the event of certain frontal impacts
�
if impact exceeds a preset deployment
threshold
��
Page 74 of 705
 and (
�page 582).
ETS
The Electronic Traction System is a compo-
nent of ESP
®.
The")
73 Safety and Security
Driving safety systems
For more information, see “Practical hints”
section (
�page 549) and (
�page 582).
ETS
The Electronic Traction System is a compo-
nent of ESP
®.
The Electronic Traction System (ETS) im-
proves the vehicle’s ability to utilize avail-
able traction, especially under slippery road conditions. The brakes are applied to
the spinning wheel and power is trans-
ferred to the wheel(s) with traction.
The ESP
® warning lampvin the instru-
ment cluster starts to flash at any vehicle
speed, as soon as a tire loses traction and
the wheel begins to spin.
When you switch off the ESP
®, the ETS is
still enabled.Switching off the ESP
®
To improve the vehicle’s traction, turn off
the ESP
® in driving situations where it
would be advantageous to have the drive
wheels spin and thus cut into surfaces for
better grip such as:
�
when driving with snow chains
�
in deep snow
�
in sand or gravel
i
The ESP
® will only function properly if you
use wheels of the recommended tire size
(
�page 655).
!
Because of the ESP’s
® automatic operation,
the engine and ignition must be shut off
(SmartKey in starter switch position0 or1 or
KEYLESS-GO start/stop button* in position0
or1) when
�
the parking brake is being tested on a brake
test dynamometer
�
the vehicle is being towed with the
front/rear axle raised
Active braking action through the ESP
® may oth-
erwise seriously damage the brake system.
Warning!
G
If you are driving too fast, the Electronic
Traction System cannot reduce the risk of
an accident.
The ETS cannot prevent the natural laws of
physics from acting on the vehicle.i
If the yellow ESP
® warning lampv
comes on while driving, the ETS is being
switched off temporarily to prevent overheating
of the drive wheel brakes. In addition, the mes-
sage “ESP Currently unavailable See Oper. Man-
ual” appears in the multifunction display.
Warning!
G
The ESP
® should not be switched off during
normal driving other than in the circum-
stances described below. Disabling of the
system will reduce vehicle stability in stan-
dard driving maneuvers.
!
Turn the ESP
® on immediately if the afore-
mentioned circumstances do not apply anymore.
i
DISTRONIC Plus* cannot be activated when
the ESP
® has been switched off.
Page 80 of 705

79 Control systems
COMAND introduction
�COMAND introduction
Availability of functions while the vehi-cle is in motion
For safety reasons, certain COMAND func-
tions are not available while the vehicle is
in motion or they are only available to a
limited extent. You will notice this, for ex-
ample, by the fact that certain menu items
cannot be selected or that the COMAND
display shows a corresponding message.
Switching COMAND on or off�
Press the o shortcut button in the
center console (
�page 80).
COMAND calls up the menu last select-
ed.
COMAND components
In your vehicle, COMAND can be used to
operate:�
audio functions
�
the navigation system
�
the telephone* and communication
functions (SMS*)
�
various vehicle settings
COMAND consists of the following:
�
COMAND shortcut buttons
�
COMAND display
�
telephone* keypad
�
COMAND controller
i
When you switch off COMAND, you also
switch off the currently playing audio source.
During a telephone call, you cannot switch off
COMAND.
Page 81 of 705
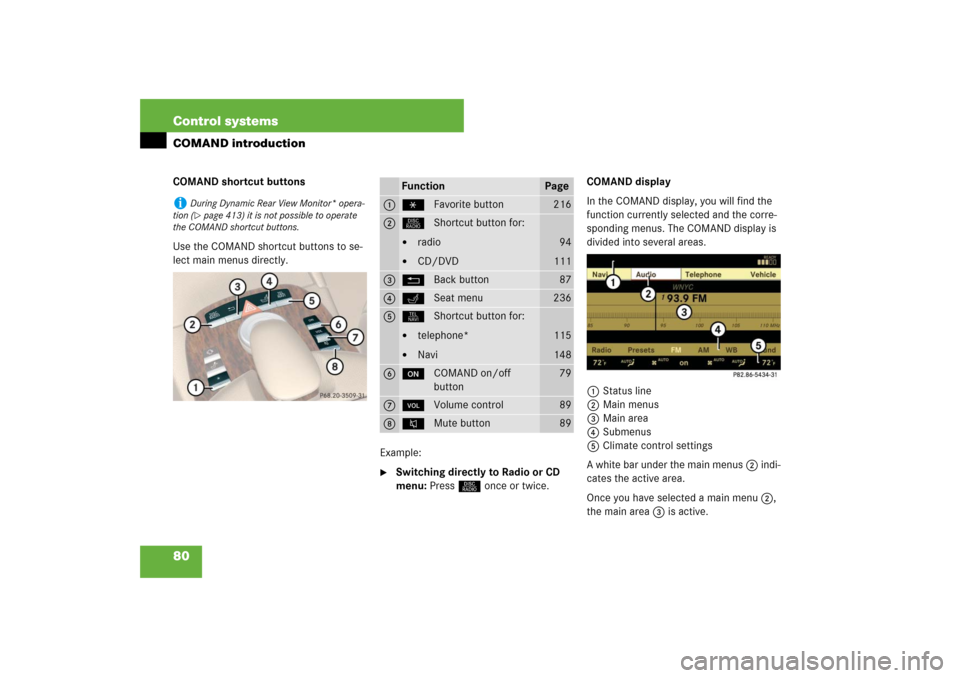
80 Control systemsCOMAND introductionCOMAND shortcut buttons
Use the COMAND shortcut buttons to se-
lect main menus directly.
Example:
�
Switching directly to Radio or CD
menu: Press M once or twice.COMAND display
In the COMAND display, you will find the
function currently selected and the corre-
sponding menus. The COMAND display is
divided into several areas.
1Status line
2Main menus
3Main area
4Submenus
5Climate control settings
A white bar under the main menus 2 indi-
cates the active area.
Once you have selected a main menu 2,
the main area 3 is active.
i
During Dynamic Rear View Monitor* opera-
tion (�page 413) it is not possible to operate
the COMAND shortcut buttons.
Function
Page
1
PFavorite button
216
2
MShortcut button for:�
radio
�
CD/DVD
94
111
3
LBack button
87
4
OSeat menu
236
5
NShortcut button for:�
telephone*
�
Navi
115
148
6
oCOMAND on/off
button
79
7
,Volume control
89
8
FMute button
89
Page 82 of 705

81 Control systems
COMAND introduction
Instrument cluster multifunction
display
This section describes features and con-
trols via the COMAND controller, display
and shortcut buttons only.
Please refer to the “Instrument cluster
control system” section of this manual
(�page 241) for function descriptions and
operation of the instrument cluster multi-
function display and multifunction steering
wheel buttons as they relate to COMAND
features described in this section.Adjusting COMAND display and instru-
ment cluster illumination
1To adjust instrument cluster illumina-
tion and multifunction display
2To adjust COMAND display
�
Brightening illumination: Turn
knob1 or2 clockwise.
�
Dimming illumination: Turn knob1
or2 counterclockwise.Swiveling COMAND display
1Button for swiveling display to the left
2Button for swiveling display to the right
You can swivel the COMAND display to the
left or right. The buttons are on the
right-hand side of the instrument cluster.
i
The layout of the menus may vary depending
on your vehicle’s equipment. This manual shows
the menus for a fully equipped vehicle.