Page 462 of 570
461 Practical hints
What to do if …
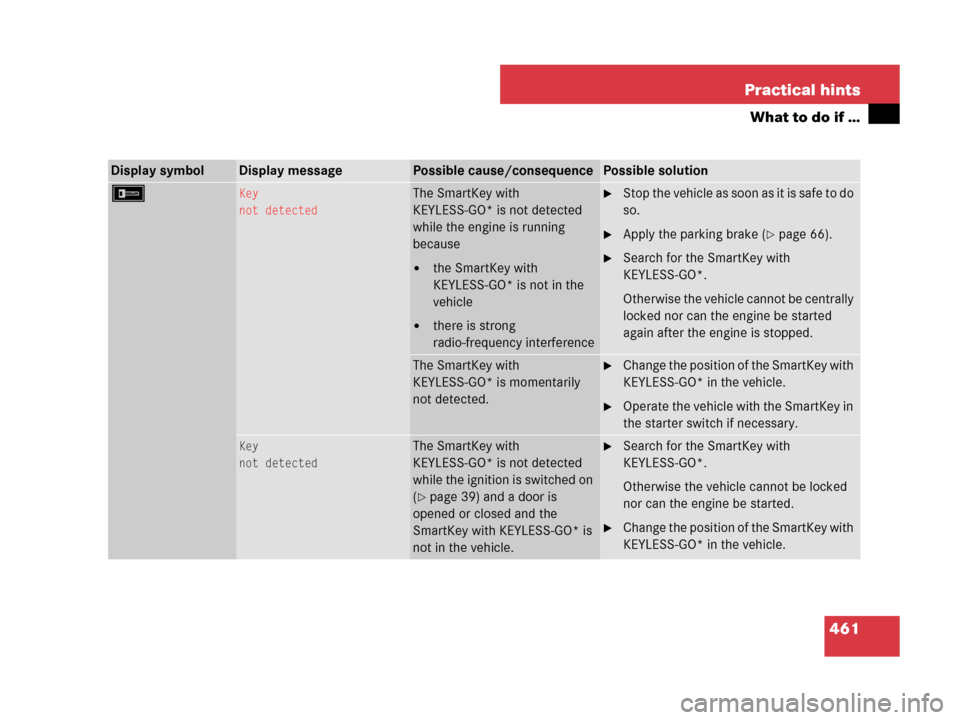
Display symbolDisplay messagePossible cause/consequencePossible solution
FKey
not detectedThe SmartKey with
KEYLESS-GO* is not detected
while the engine is running
because
�the SmartKey with
KEYLESS-GO* is not in the
vehicle
�there is strong
radio-frequency interference
�Stop the vehicle as soon as it is safe to do
so.
�Apply the parking brake (�page 66).
�Search for the SmartKey with
KEYLESS-GO*.
Otherwise the vehicle cannot be centrally
locked nor can the engine be started
again after the engine is stopped.
The SmartKey with
KEYLESS-GO* is momentarily
not detected.�Change the position of the SmartKey with
KEYLESS-GO* in the vehicle.
�Operate the vehicle with the SmartKey in
the starter switch if necessary.
Key
not detectedThe SmartKey with
KEYLESS-GO* is not detected
while the ignition is switched on
(
�page 39) and a door is
opened or closed and the
SmartKey with KEYLESS-GO* is
not in the vehicle.
�Search for the SmartKey with
KEYLESS-GO*.
Otherwise the vehicle cannot be locked
nor can the engine be started.
�Change the position of the SmartKey with
KEYLESS-GO* in the vehicle.
Page 463 of 570
462 Practical hints
What to do if …
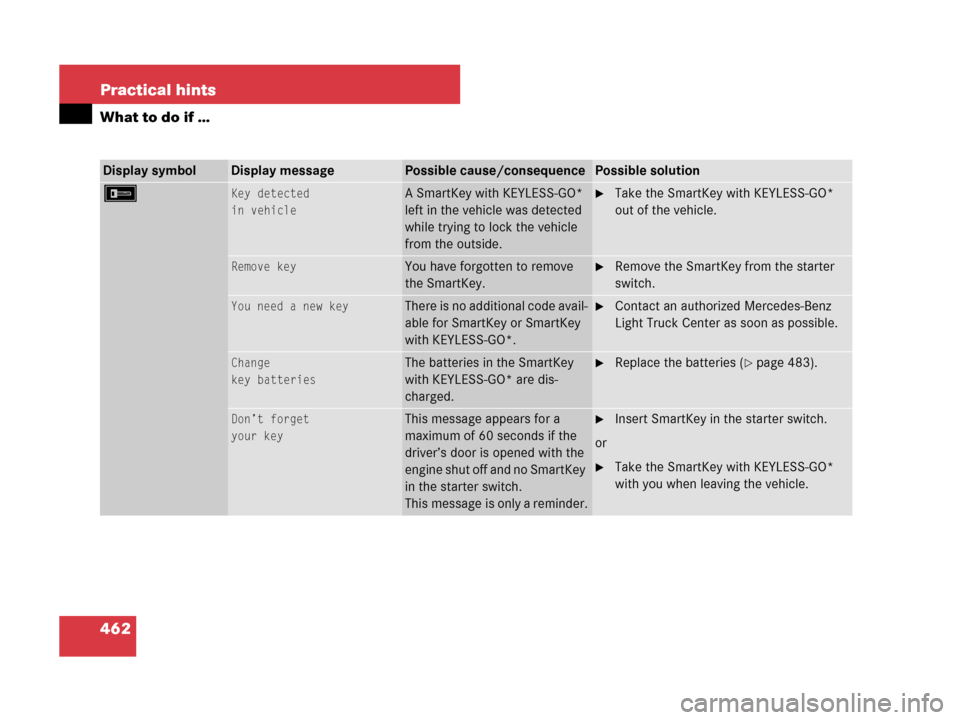
Display symbolDisplay messagePossible cause/consequencePossible solution
FKey detected
in vehicleA SmartKey with KEYLESS-GO*
left in the vehicle was detected
while trying to lock the vehicle
from the outside.�Take the SmartKey with KEYLESS-GO*
out of the vehicle.
Remove keyYou have forgotten to remove
the SmartKey.�Remove the SmartKey from the starter
switch.
You need a new keyThere is no additional code avail-
able for SmartKey or SmartKey
with KEYLESS-GO*.�Contact an authorized Mercedes-Benz
Light Truck Center as soon as possible.
Change
key batteriesThe batteries in the SmartKey
with KEYLESS-GO* are dis-
charged.�Replace the batteries (�page 483).
Don’t forget
your keyThis message appears for a
maximum of 60 seconds if the
driver’s door is opened with the
engine shut off and no SmartKey
in the starter switch.
This message is only a reminder.�Insert SmartKey in the starter switch.
or
�Take the SmartKey with KEYLESS-GO*
with you when leaving the vehicle.
Page 479 of 570
478 Practical hints
Unlocking / locking in an emergency
Unlocking the vehicle
If you cannot unlock the vehicle with the
SmartKey or KEYLESS-GO*, open the
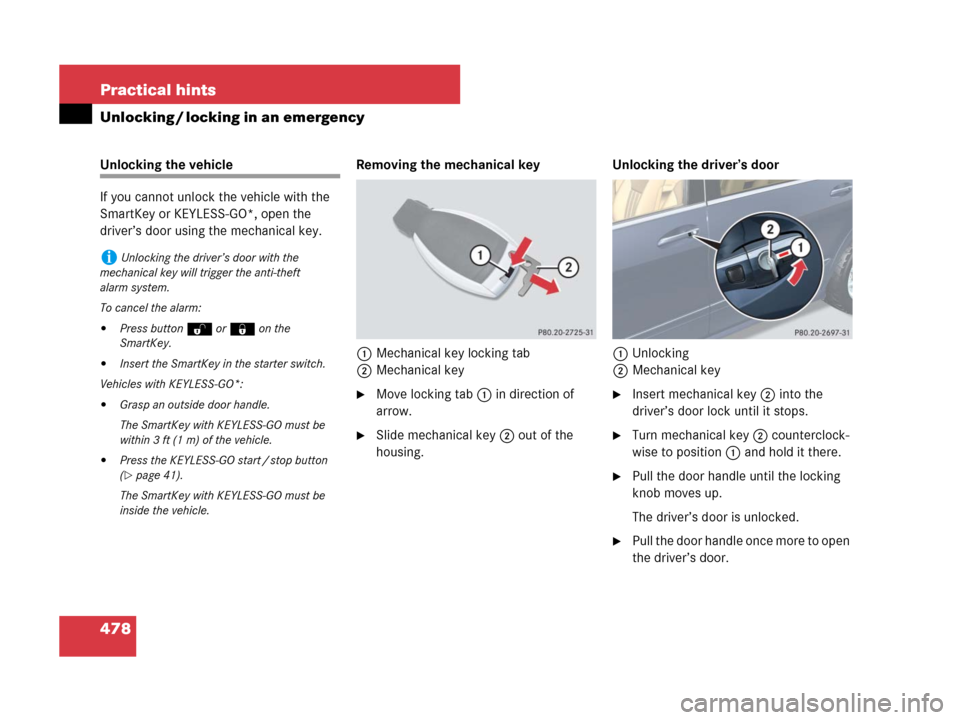
driver’s door using the mechanical key.Removing the mechanical key
1Mechanical key locking tab
2Mechanical key
�Move locking tab1 in direction of
arrow.
�Slide mechanical key2 out of the
housing.Unlocking the driver’s door
1Unlocking
2Mechanical key
�Insert mechanical key 2 into the
driver’s door lock until it stops.
�Turn mechanical key 2 counterclock-
wise to position1 and hold it there.
�Pull the door handle until the locking
knob moves up.
The driver’s door is unlocked.
�Pull the door handle once more to open
the driver’s door.
iUnlocking the driver’s door with the
mechanical key will trigger the anti-theft
alarm system.
To cancel the alarm:
�Press buttonŒ or‹on the
SmartKey.
�Insert the SmartKey in the starter switch.
Vehicles with KEYLESS-GO*:
�Grasp an outside door handle.
The SmartKey with KEYLESS-GO must be
within 3 ft (1 m) of the vehicle.
�Press the KEYLESS-GO start / stop button
(
�page 41).
The SmartKey with KEYLESS-GO must be
inside the vehicle.
Page 480 of 570
479 Practical hints
Unlocking / locking in an emergency
Locking the vehicle
If you cannot lock the vehicle with the
SmartKey or KEYLESS-GO*, lock the
vehicle carrying out the following steps.
�Close the front passenger door, the
rear right door and the tailgate.
�Open the driver’s door and the rear left
door.
�Press the central locking switch on the
driver’s door (
�page 130).
The locking knobs of the front passen-
ger door and the rear doors move
down.
If the vehicle battery is disconnected or
drained:
�Press down the locking knobs of
the front passenger door and the
rear doors manually.
�Exit the vehicle.
�Close the driver’s door.
�Enter the vehicle through the rear left
door.
�Press down the locking knob of the
driver’s door.
�Exit the vehicle.
�Close the rear left door.
The vehicle is locked.
Fuel filler flap
�Open the tailgate (�page 123).
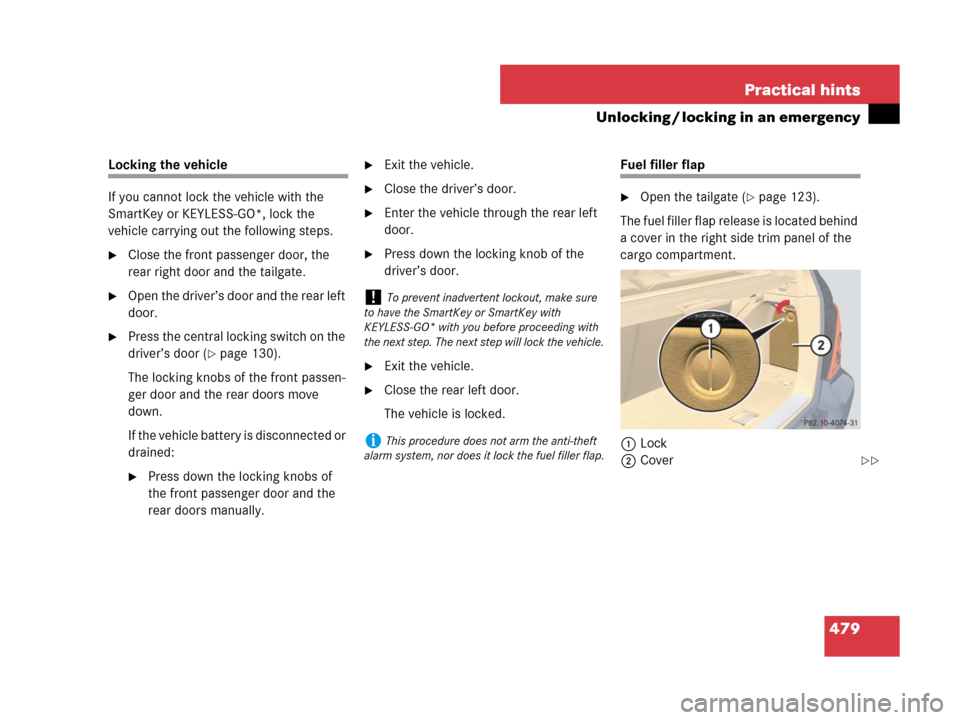
The fuel filler flap release is located behind
a cover in the right side trim panel of the
cargo compartment.
1Lock
2Cover
!To prevent inadvertent lockout, make sure
to have the SmartKey or SmartKey with
KEYLESS-GO* with you before proceeding with
the next step. The next step will lock the vehicle.
iThis procedure does not arm the anti-theft
alarm system, nor does it lock the fuel filler flap.
��
Page 482 of 570
481 Practical hints
Opening / closing in an emergency
�Opening / closing in an emergency
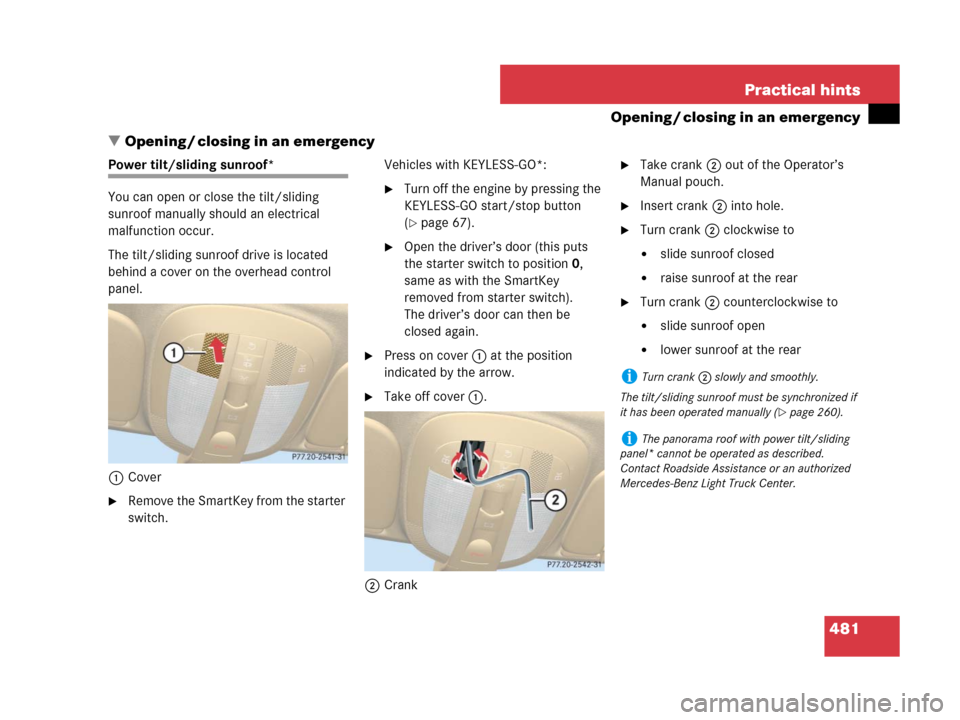
Power tilt/sliding sunroof*
You can open or close the tilt/sliding
sunroof manually should an electrical
malfunction occur.
The tilt/sliding sunroof drive is located
behind a cover on the overhead control
panel.
1Cover
�Remove the SmartKey from the starter
switch.Vehicles with KEYLESS-GO*:
�Turn off the engine by pressing the
KEYLESS-GO start/stop button
(
�page 67).
�Open the driver’s door (this puts
the starter switch to position0,
same as with the SmartKey
removed from starter switch).
The driver’s door can then be
closed again.
�Press on cover1 at the position
indicated by the arrow.
�Take off cover 1.
2Crank
�Take crank 2 out of the Operator’s
Manual pouch.
�Insert crank2 into hole.
�Turn crank2 clockwise to
�slide sunroof closed
�raise sunroof at the rear
�Turn crank2 counterclockwise to
�slide sunroof open
�lower sunroof at the rear
iTurn crank2 slowly and smoothly.
The tilt/sliding sunroof must be synchronized if
it has been operated manually (
�page 260).
iThe panorama roof with power tilt/sliding
panel* cannot be operated as described.
Contact Roadside Assistance or an authorized
Mercedes-Benz Light Truck Center.
Page 514 of 570

513 Practical hints
Battery
�Connect the positive lead to the posi-
tive terminal and fasten it’s cover
(
�page 512).
�Connect the negative lead to the nega-
tive terminal (
�page 512).
Charging the battery
If the battery is discharged, the battery can
be charged using the jump-start contacts
located in the engine compartment
(
�page 515).
�Charge the battery in accordance with
the instructions of the battery charger
manufacturer.
Batteries contain materials that can harm
the environment if disposed of improperly.
Large 12-volt storage batteries contain
lead. Recycling of batteries is the preferred
method of disposal. Many states require
sellers of batteries to accept old batteries
for recycling.
!Never invert the terminal connections!
iThe following procedures must be carried
out following any interruption of battery power
(e.g. due to disconnection):
�Set the clock (�page 181).
Vehicles with COMAND system with naviga-
tion module*: Time and date are set auto-
matically.
�Synchronize the door windows
(
�page 254).
�Synchronize the power tilt/sliding sunroof*
(
�page 260).
�Synchronize the power tilt/sliding panel*
(
�page 264).
�Synchronize the power folding exterior rear
view mirrors* (
�page 214).
Warning!G
Never charge a battery while still installed in
the vehicle unless the accessory battery
charge unit approved by Mercedes-Benz is
being used. Gases may escape during charg-
ing and cause explosions that may result in
paint damage, corrosion or personal injury.
An accessory battery charge unit specially
adapted for Mercedes-Benz vehicles and
tested and approved by Mercedes-Benz is
available, permitting the charging of the
battery in its installed position. Contact an
authorized Mercedes-Benz Light Truck
Center for information and availability.
Charge battery in accordance with the
separate instructions for the accessory
battery charger.
Page 519 of 570
518 Practical hints
Towing the vehicle
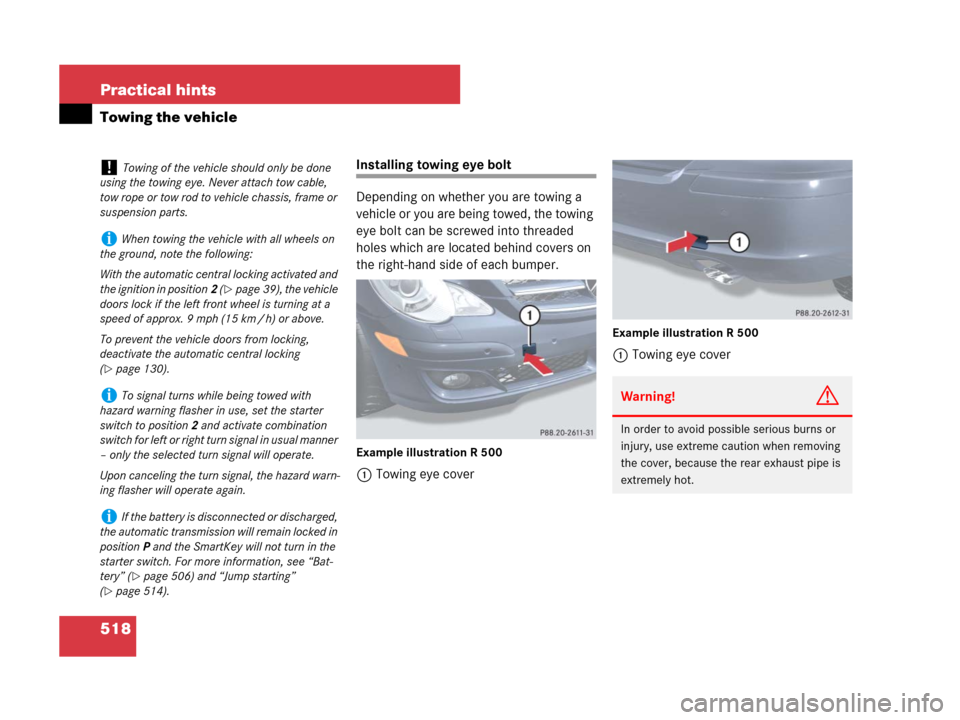
Installing towing eye bolt
Depending on whether you are towing a
vehicle or you are being towed, the towing
eye bolt can be screwed into threaded
holes which are located behind covers on
the right-hand side of each bumper.
Example illustration R 500
1Towing eye cover
Example illustration R 500
1Towing eye cover
!Towing of the vehicle should only be done
using the towing eye. Never attach tow cable,
tow rope or tow rod to vehicle chassis, frame or
suspension parts.
iWhen towing the vehicle with all wheels on
the ground, note the following:
With the automatic central locking activated and
the ignition in position2 (
�page 39), the vehicle
doors lock if the left front wheel is turning at a
speed of approx. 9 mph (15 km / h) or above.
To prevent the vehicle doors from locking,
deactivate the automatic central locking
(
�page 130).
iTo signal turns while being towed with
hazard warning flasher in use, set the starter
switch to position2 and activate combination
switch for left or right turn signal in usual manner
– only the selected turn signal will operate.
Upon canceling the turn signal, the hazard warn-
ing flasher will operate again.
iIf the battery is disconnected or discharged,
the automatic transmission will remain locked in
positionP and the SmartKey will not turn in the
starter switch. For more information, see “Bat-
tery” (
�page 506) and “Jump starting”
(
�page 514).
Warning!G
In order to avoid possible serious burns or
injury, use extreme caution when removing
the cover, because the rear exhaust pipe is
extremely hot.
Page 550 of 570

549 Index
Beverage holder see Cup holder
Bleeding the fuel system
(diesel engine) 505
Bolts, Spare wheel 500
Bottle opener 317
Brake Assist System see BAS
Brake fluid 541
Checking 362
Messages in the multifunction
display 454
Brake lamp
Cleaning lenses 413
Messages in the multifunction
display 463–468
Replacing bulbs 484
Brake pads 348
Messages in the multifunction
display 452
Brakes 348
High-performance brake system
(AMG vehicles only) 350
Warning lamp 421
Break-in the vehicle 346
Bulbs, replacing see Replacing bulbsC
California retail buyers and lessees,
Important notice for 11
Call priority, Tele Aid* 336
Can holder see Cup holder
Capacities and recommended
fuel/lubricants 538
Card holder 32, 317
Cargo compartment
Tie-down rings 299
Cargo compartment cover blind* 306
Cargo tie-down rings 299
Carpets, Cleaning 417
Catalytic converter
(gasoline engine) 357
CD changer* 172, 311
CD player 172
Center console 31
Central locking 189
Automatic 130
Locking/unlocking from the
inside 130
Central locking switch 130Certification label 526, 527
CHECK ENGINE malfunction
indicator lamp 423, 424
Checking tire pressure electronically
Advanced Tire Pressure Monitoring
System (Advanced TPMS)*,
(Canada only) 388
Tire Pressure Monitoring System
(TPMS), (USA only) 385
Child safety
Infant and child restraint systems 85
Children in the vehicle 84
Air bags 75, 86
Blocking rear door window
operation 97
Indicator lamp, Front passenger front
air bag 92
Infant and child restraint
systems 93, 95
LATCH-type child seat anchors 93
Occupant Classification System
(OCS) 88
Cigarette lighter* 321