Page 512 of 570
511 Practical hints
Battery
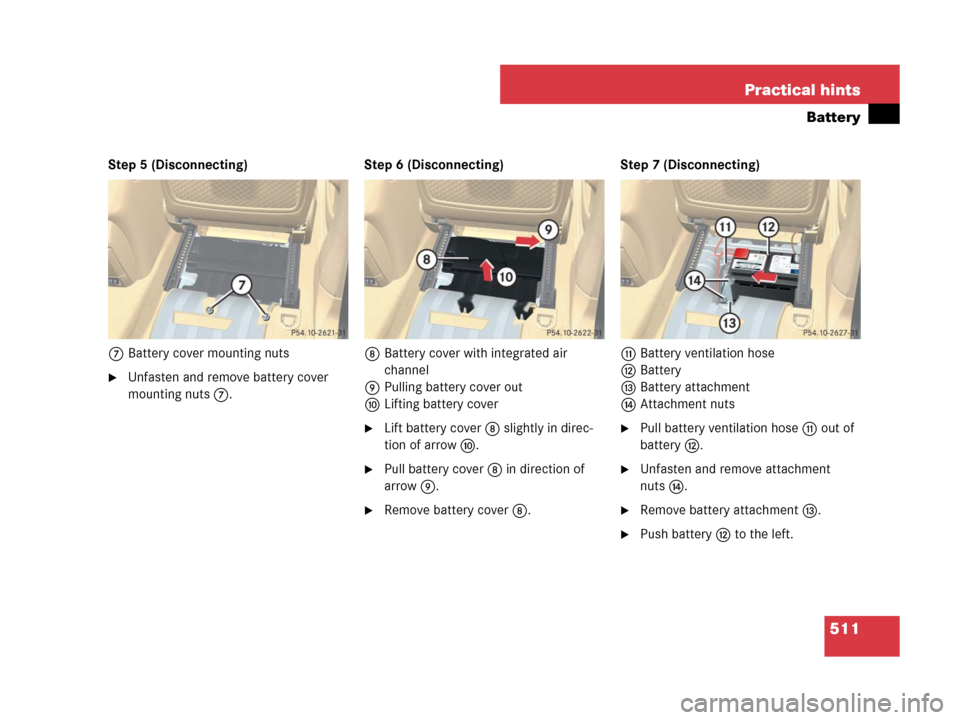
Step 5 (Disconnecting)
7Battery cover mounting nuts
�Unfasten and remove battery cover
mounting nuts 7.Step 6 (Disconnecting)
8Battery cover with integrated air
channel
9Pulling battery cover out
aLifting battery cover
�Lift battery cover 8 slightly in direc-
tion of arrow a.
�Pull battery cover 8 in direction of
arrow 9.
�Remove battery cover 8.Step 7 (Disconnecting)
bBattery ventilation hose
cBattery
dBattery attachment
eAttachment nuts
�Pull battery ventilation hose b out of
battery c.
�Unfasten and remove attachment
nutse.
�Remove battery attachment d.
�Push battery c to the left.
Page 514 of 570
.
�Connect the negative lead to the nega-
tive terminal (
�page 512).
Charging th")
513 Practical hints
Battery
�Connect the positive lead to the posi-
tive terminal and fasten it’s cover
(
�page 512).
�Connect the negative lead to the nega-
tive terminal (
�page 512).
Charging the battery
If the battery is discharged, the battery can
be charged using the jump-start contacts
located in the engine compartment
(
�page 515).
�Charge the battery in accordance with
the instructions of the battery charger
manufacturer.
Batteries contain materials that can harm
the environment if disposed of improperly.
Large 12-volt storage batteries contain
lead. Recycling of batteries is the preferred
method of disposal. Many states require
sellers of batteries to accept old batteries
for recycling.
!Never invert the terminal connections!
iThe following procedures must be carried
out following any interruption of battery power
(e.g. due to disconnection):
�Set the clock (�page 181).
Vehicles with COMAND system with naviga-
tion module*: Time and date are set auto-
matically.
�Synchronize the door windows
(
�page 254).
�Synchronize the power tilt/sliding sunroof*
(
�page 260).
�Synchronize the power tilt/sliding panel*
(
�page 264).
�Synchronize the power folding exterior rear
view mirrors* (
�page 214).
Warning!G
Never charge a battery while still installed in
the vehicle unless the accessory battery
charge unit approved by Mercedes-Benz is
being used. Gases may escape during charg-
ing and cause explosions that may result in
paint damage, corrosion or personal injury.
An accessory battery charge unit specially
adapted for Mercedes-Benz vehicles and
tested and approved by Mercedes-Benz is
available, permitting the charging of the
battery in its installed position. Contact an
authorized Mercedes-Benz Light Truck
Center for information and availability.
Charge battery in accordance with the
separate instructions for the accessory
battery charger.
Page 515 of 570

514 Practical hints
Jump starting
If the battery is discharged, the engine can
be started with jumper cables and the bat-
tery of another vehicle. Observe the follow-
ing:
�Jump starting should only be performed
using the jump-start contacts in the en-
gine compartment (
�page 515).
�Jump starting should only be performed
when the engine and catalytic
converter
1 are cold.
�Do not start the engine if the battery is
frozen. Let the battery thaw out first.
�Only jump start from batteries with the
same voltage rating (12 V). Jump start-
ing with a more powerful battery could
damage the vehicle’s electrical system,
which will not be covered by the
Mercedes-Benz Limited Warranty.
�Use only jumper cables with sufficient
cross-section and insulated terminal
clamps.
�Always make sure the jumper cables
are not on or near pulleys, fans or other
parts that move when the engine is
started or running.
Warning!G
Failure to follow these directions will cause
damage to the electronic components, and
can lead to a battery explosion and severe
injury or death.
Never lean over batteries while connecting
or jump starting, you might get injured.
Battery fluid contains sulfuric acid. Do not
allow this fluid to come in contact with eyes,
skin or clothing. In case it does, immediately
flush affected area with water, and seek
medical help if necessary.
A battery will also produce hydrogen gas,
which is flammable and very explosive. Keep
flames or sparks away from battery, avoid
improper connection of jumper cables,
smoking, etc.
Attempting to jump start a frozen battery
can result in it exploding, causing personal
injury.
Read all instructions before proceeding.
1Vehicles with gasoline engine only.
!Do not tow-start the vehicle.
!Avoid repeated and lengthy starting
attempts.
Do not attempt to start the engine using a
battery quick charge unit.
If the engine does not run after several unsuc-
cessful starting attempts, have it checked at the
nearest authorized Mercedes-Benz Light Truck
Center.
Excessive unburned fuel generated by repeated
failed starting attempts may damage the cata-
lytic converter
1.
Make sure the jumper cables do not have loose
or missing insulation.
Make sure the cable clamps do not touch any
other metal part while the other end is still at-
tached to a battery.
Page 517 of 570
516 Practical hints
Jump starting
�Connect positive terminals2 and 4
with the jumper cable. Clamp cable to
charged battery 4 first.
�Start engine of the vehicle with the
charged battery and run at idle speed.
�Connect negative terminals1 and 3
of the batteries with the jumper cable.
Clamp cable to charged battery 3
first.
�Start the engine of the disabled vehi-
cle.You can now turn on the electrical con-
sumers. Do not switch on the headlamps
under any circumstances.
�Remove the jumper cables first from
negative terminals1 and 3 and then
from the positive terminals2 and 4.
You can now switch on the headlamps.
�Have the battery checked at the
nearest authorized Mercedes-Benz
Light Truck Center.
!Never invert the terminal connections!
��
Page 521 of 570

520 Practical hints
Fuses
The electrical fuses in your vehicle serve to
switch off malfunctioning power circuits.
If a fuse is blown, the components and
systems secured by that fuse will stop
operating.If a newly inserted fuse blows again, have
the cause determined and rectified by an
authorized Mercedes-Benz Center.
The following aids are available to help you
replace fuses. They are included with the
vehicle tool kit (
�page 473):
�Fuse chart
The fuse chart explains the fuse alloca-
tion and fuse amperages.
�Spare fuses
�Fuse extractor
The electrical fuses are located in different
fuse boxes:
�on the passenger side of the engine
compartment (
�page 521)
�in the cargo compartment
(
�page 521)
�in the passenger compartment
(
�page 522)Before replacing fuses:
�Apply the parking brake (�page 66).
�Make sure automatic transmission is
set to position P (
�page 199).
The gear position indicator in the
multifunction display should be on
P.
�Turn off all electrical consumers.
�Turn off the engine (�page 67).
�Remove the SmartKey from the starter
switch.
Vehicles with KEYLESS-GO*:
�Open the driver’s door (this puts
the starter switch to position0,
same as with the SmartKey re-
moved from starter switch). The
driver’s door can then be closed
again.
Warning!G
Only use fuses approved by Mercedes-Benz
with the specified amperage for the system
in question and do not attempt to repair or
bridge a blown fuse. Using other than
approved fuses or using repaired or bridged
fuses may cause an overload leading to a
fire, and/or cause damage to electrical
components and/or systems. Have the
cause determined and remedied by an
authorized Mercedes-Benz Light Truck
Center
iA blown fuse must be replaced by an appro-
priate spare fuse (recognizable by its color or the
fuse rating given on the fuse) of the amperage
recommended in the fuse chart.
Any Mercedes-Benz Light Truck Center will be
glad to advise you on this subject.
Page 526 of 570
525 Technical data
Warranty coverage
�Warranty coverage
Your vehicle is covered under the terms of
the warranties printed in the Service and
Warranty Information booklet. Your
authorized Mercedes-Benz Light Truck
Center will exchange or repair any defec-
tive parts originally installed on the vehicle
in accordance with the terms of the follow-
ing warranties:
�New Vehicle Limited Warranty
�Emission System Warranty
�Emission Performance Warranty
�California, Maine, Massachusetts, and
Vermont Emission Control Systems
WarrantyReplacement parts and accessories are
covered by the Mercedes-Benz Parts and
Accessories warranties, copies of which
are available at any Mercedes-Benz Light
Truck Center.Loss of Service and Warranty
Information Booklet
Should you lose your Service and Warranty
Information booklet, have an authorized
Mercedes-Benz Light Truck Center arrange
for a replacement. It will be mailed to you.
Page 531 of 570
530 Technical data
Engine
ModelR 320 CDI (251.122)1R 350 (251.165)1
1The quoted data apply only to the standard vehicle. See an authorized Mercedes-Benz Light Truck Center for the corresponding data of all special bodies and special
equipment.
Engine642272
Mode of operationDiesel 4-stroke engine4-stroke engine, gasoline injection
No. of cylinders66
Bore3.27 in (83.00 mm)3.66 in (92.90 mm)
Stroke3.62 in (92.00 mm)3.39 in (86.00 mm)
Total piston displacement182 cu in (2 987 cm3)213cuin (3498cm3)
Compression ratio16.5:110.7:1
Output acc. to SAE J 1349221 hp/3 800 rpm
(165 kW/3 800 rpm)268 hp/6 000 rpm2
(200 kW/6 000 rpm)
2Premium fuel required. Performance may vary with fuel octane rating.
Maximum torque acc. to SAE J 1349398 lb-ft/1 600 - 2 400 rpm
(540 Nm/1 600 - 2 400 rpm)258 lb-ft/2 400 - 5 000 rpm
(350 Nm/2 400 - 5 000 rpm)
Maximum engine speed4 500 rpm6500 rpm
Firing order1-4-2-5-3-61-4-3-6-2-5
Poly-V-belt2 035 mm2404 mm
Page 532 of 570
531 Technical data
Engine
ModelR 500 (251.175)1
1The quoted data apply only to the standard vehicle. See an authorized Mercedes-Benz Light Truck Center for the corresponding data of all special bodies and special
equipment.
R 63 AMG (251.177)1
Engine113156
Mode of operation4-stroke engine, gasoline injection4-stroke engine, gasoline injection
No. of cylinders88
Bore3.82 in (97.00 mm)4.02 in (102.20 mm)
Stroke3.31 in (84.00 mm)3.72 in (94.60 mm)
Total piston displacement303 cu in (4 966 cm3)379 cu in (6 208 cm3)
Compression ratio10:111.3:1
Output acc. to SAE J 1349302 hp/5 600 rpm2
(225 kW/5 600 rpm)
2Premium fuel required. Performance may vary with fuel octane rating.
503 hp/6 800 rpm2
(375 kW/6 800 rpm)
Maximum torque acc. to SAE J 1349339 lb-ft/2 700 - 4 750 rpm
(460 Nm/2 700 - 4 750 rpm)465 lb-ft/5 200 rpm
(630 Nm/5 200 rpm)
Maximum engine speed6300 rpm7 200 rpm
Firing order1-5-4-2-6-3-7-81-5-4-2-6-3-7-8
Poly-V-belt2370 mm2369 mm

1R 350 (251.165)1
1The quoted data apply only to the standard vehicle. See an authorized Mercedes-Benz Light Truck Center for the corresponding data o")
1
1The quoted data apply only to the standard vehicle. See an authorized Mercedes-Benz Light Truck Center for the corresponding data of all special bodies")