Page 176 of 570

175 Controls in detail
Control system
�Press buttonè orÿ repeatedly
until the vehicle status message
memory appears in the multifunction
display.If conditions have occurred causing status
messages to be recorded, the number of
messages appears in the multifunction
display:
�Press buttonk orj.
The stored messages will now be
displayed in the order in which they
have occurred. For malfunctions and
warning messages, see “Vehicle status
messages in the multifunction display”
(
�page 433).Should the vehicle’s system record any
conditions while driving, the number of
messages will reappear in the multifunc-
tion display
�when the SmartKey in the starter
switch is turned to position0 or
removed from the starter switch
or
�when you turn off the engine by
pressing the KEYLESS-GO* start/stop
button (
�page 67) in the starter
switch once and open the driver’s door
(this puts the starter switch in
position0, same as with the SmartKey
removed from the starter switch)
Warning!G
Malfunction and warning messages are only
indicated for certain systems and are inten-
tionally not very detailed. The malfunction
and warning messages are simply a remind-
er with respect to the operation of certain
systems and do not replace the owner’s
and/or driver’s responsibility to maintain
the vehicle’s operating safety by having all
required maintenance and safety checks
performed on the vehicle and by bringing
the vehicle to an authorized Mercedes-Benz
Light Truck Center to address the malfunc-
tion and warning messages (
�page 433).
iAfter you have scrolled through all recorded
status messages, the first recorded message
appears again.
iThe vehicle status message memory will
be cleared when you turn the SmartKey in the
starter switch to position1 or2, or when you
press the KEYLESS-GO* start/stop button once
or twice without depressing the brake pedal. You
will then only see high priority messages in the
multifunction display (
�page 433).
Page 177 of 570

176 Controls in detail
Control system
Settings menu
In the
Settings menu there are two
functions:
�The function Reset to factory
settings?
, with which you can reset all
the settings to the original factory
settings.
�A collection of submenus with which
you can make individual settings for
your vehicle.
�Press buttonè orÿ repeatedly
until the
Settings menu appears in the
multifunction display.The following settings and submenus are
available in the
Settings menu:Resetting all settings
You can reset the functions of all
submenus to the factory settings.
�Press the reset button in the
instrument cluster (
�page 156) for
approximately 3 seconds.
The request to press the reset button
once more to confirm appears in the
multifunction display.
�Press the reset button once more.
The functions of all the submenus will
reset to factory settings.
FunctionPage
Resetting all settings176
Submenus in the Settings menu177
Instrument cluster submenu179
Time/date submenu181
Lighting submenu183
Vehicle submenu186
Comfort submenu*189
Page 178 of 570

177 Controls in detail
Control system
Submenus in the Settings menu
�Press buttonj.
The collection of the submenus
appears in the multifunction display.
�Press buttonç.
The selection marker moves to the next
submenu.
The submenus are arranged by hierarchy.
Scroll down with buttonç, scroll up
with buttonæ.With the selection marker on the desired
submenu, use thej button to access
the individual functions within that sub-
menu. Once within that submenu, you can
use thejbutton to move to the next
function or thekbutton to move to the
previous function within that submenu.
The settings themselves are made with
buttonæ orç.
iThe settings you have changed will not be
reset unless you confirm the action by pressing
the reset button a second time.
After approximately 5 seconds, the
Settings
menu reappears in the multifunction display
(
�page 176).
iFor safety reasons, the function
Light circuit headlamp in the Lighting
submenu cannot be reset while driving.
The following message appears in the multifunc-
tion display:
Settings
Cannot be
completely reset
to factory settings
while driving
Page 179 of 570
178 Controls in detail
Control system
The table below shows what settings can
be changed within the various menus.
Detailed instructions on making individual
settings can be found on the following
pages.
INSTRUMENT CLUSTERTIME/DATELIGHTINGVEHICLECOMFORT*
(�page 179)(�page 181)(�page 183)(�page 186)(�page 189)
Selecting speedometer display
modeSetting the time
(hour)Setting daytime running
lamp mode (USA only)Calling up the compassActivating
easy-entry/exit feature*
Selecting languageSetting the time
(minutes)Setting locator lightingCompass adjustmentSetting fold-in function
for exterior rear view
mirrors*
Selecting display (digital
speedometer or outside
temperature) for status indicatorSetting the date
(month)Setting night security
illuminationCompass calibration
Setting the date
(day)Setting interior lighting
delayed shut-offAudio search function
Setting the date
(year)Setting automatic
locking
Limiting opening height
of tailgate*
Page 180 of 570

179 Controls in detail
Control system
Instrument cluster submenu
Access the
Instr. cluster submenu via
the
Settings menu. Use the Instr.
cluster
submenu to change the instru-
ment cluster display settings.
The following functions are available:Selecting speedometer display mode
�Move the selection marker with
buttonæ orç to the
Instr.
cluster
submenu.
�Press buttonj ork repeatedly
until the message
Display unit
Digital speedometer
appears in the
multifunction display.
The selection marker is on the current
setting.
�Press buttonæ orç to set
speedometer unit to
km or miles.Selecting language
�Move the selection marker with
buttonæ orç to the
Instr.
cluster
submenu.
�Press buttonj ork repeatedly
until the message
Language appears in
the multifunction display.
The selection marker is on the current
setting.
�Press buttonæ orç to select
the language to be used for the
multifunction display messages.
FunctionPage
Selecting speedometer display
mode179
Selecting language179
Selecting display (digital
speedometer or outside
temperature) for status indicator180
Page 181 of 570
180 Controls in detail
Control system
Available languages:
�German
�English
�French
�Italian
�Spanish
�Dutch
�Danish
�Swedish
�Portuguese
�Turkish
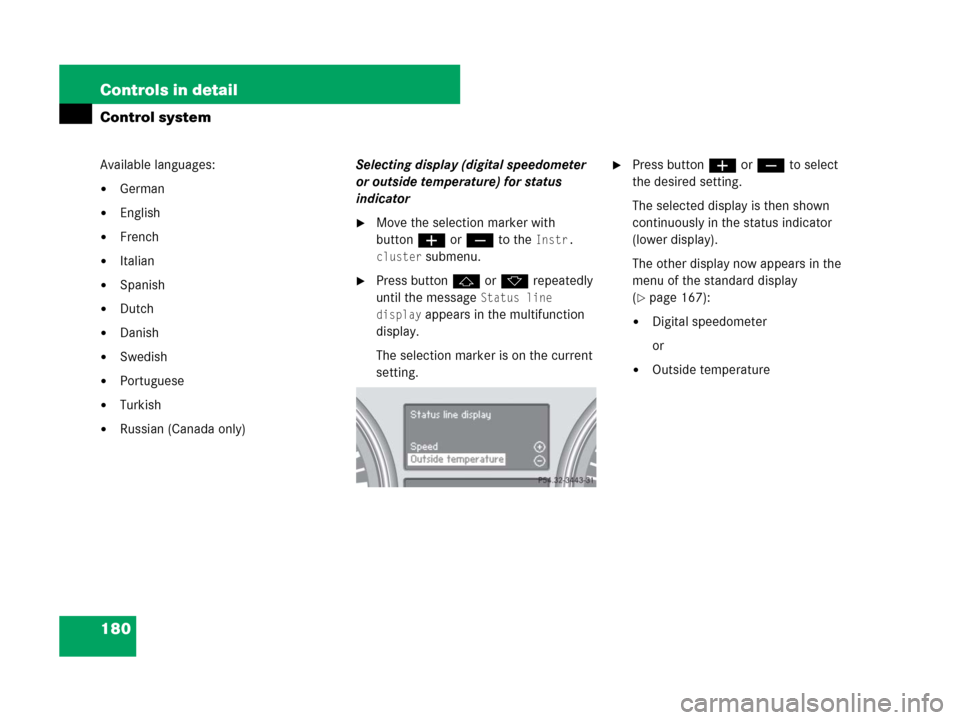
�Russian (Canada only)Selecting display (digital speedometer
or outside temperature) for status
indicator
�Move the selection marker with
buttonæ orç to the
Instr.
cluster
submenu.
�Press buttonj ork repeatedly
until the message
Status line
display
appears in the multifunction
display.
The selection marker is on the current
setting.
�Press buttonæ orç to select
the desired setting.
The selected display is then shown
continuously in the status indicator
(lower display).
The other display now appears in the
menu of the standard display
(
�page 167):
�Digital speedometer
or
�Outside temperature
Page 182 of 570

181 Controls in detail
Control system
Time/Date submenu
Access the
Time/Date submenu via the
Settings menu. Use the Time/Date
submenu to change the time and date
settings.
The following functions are available:Setting the time (hour)
This function is not available if your vehicle
is equipped with the COMAND system and
navigation module*.
�Move the selection marker with
buttonæ orçto the
Time/Date
submenu.
�Press buttonj ork repeatedly
until the message
Clock Set hour
appears in the multifunction display.
The selection marker is on the hour
setting.
�Press buttonæ orç to set the
hour.Setting the time (minutes)
This function is not available if your vehicle
is equipped with the COMAND system and
navigation module*.
�Move the selection marker with
buttonæ orçto the
Time/Date
submenu.
�Press buttonj ork repeatedly
until the message
Clock Set minute(s) appears in the
multifunction display.
The selection marker is on the minute
setting.
�Press buttonæ orç to set the
minutes.
FunctionPage
Setting the time (hours)181
Setting the time (minutes)181
Setting the date (month)182
Setting the date (day)182
Setting the date (year)182
iIf your vehicle is equipped with the
COMAND system and navigation module*, see
separate COMAND operating instructions for
information on how to set the date and time.
Page 183 of 570

This function is not available if your vehicle
is equipped with the COMAND system and
navigation module*.
�Move the selection marker wi")
182 Controls in detail
Control system
Setting the date (month)
This function is not available if your vehicle
is equipped with the COMAND system and
navigation module*.
�Move the selection marker with
buttonæ orç to the
Time/Date
submenu.
�Press buttonj ork repeatedly
until the message
Date Set month
appears in the multifunction display.
The selection marker is on the month
setting.
�Press buttonæ orç to set the
month.Setting the date (day)
This function is not available if your vehicle
is equipped with the COMAND system and
navigation module*.
�Move the selection marker with
buttonæ orç to the
Time/Date
submenu.
�Press buttonj ork repeatedly
until the message
Date Set day
appears in the multifunction display.
The selection marker is on the day
setting.
�Press buttonæ orç to set the
day.Setting the date (year)
This function is not available if your vehicle
is equipped with the COMAND system and
navigation module*.
�Move the selection marker with
buttonæ orç to the
Time/Date
submenu.
�Press buttonj ork repeatedly
until the message
Date Set year
appears in the multifunction display.
The selection marker is on the year
setting.
�Press buttonæ orç to set the
year.