Page 323 of 570

�in the second-row footwell
(
�page 323)
�on")
322 Controls in detail
Useful features
Power outletsPower outlets are located
�in the additional storage compartment
in front center console (
�page 322)
�in the second-row footwell
(
�page 323)
�on the right-hand side of the cargo
compartment (
�page 323)Power outlet in front center console
1Cover plate
2Power outlet cover
�Open cover plate1 (�page 312).
�Switch on the ignition (�page 39).
�Pull out cover 2 and insert electrical
plug (cigarette lighter type).
!If you use all power outlets in the vehicle,
make sure that the maximum current drawn
does not exceed 55 A.
iThe power outlets can be used to
accommodate 12V DC electrical accessories
(e.g. air pump, auxiliary lamps) up to a maximum
of 240 W.
If the engine is off and the power outlets are
being used extensively, the vehicle battery may
become discharged.
iYou can use the power outlets in the cargo
compartment or in the second seat row even if
the ignition is switched off.
An emergency shut-off feature ensures that the
vehicle’s electrical voltage does not fall below a
minimum level. If the voltage drops to this mini-
mum level, the power outlets are automatically
switched off. This ensures that enough power
remains to start the engine.
iIf your vehicle is equipped with a smoking
package*, the storage compartment contains an
ashtray with cigarette lighter (
�page 319)
instead.
Page 324 of 570
323 Controls in detail
Useful features
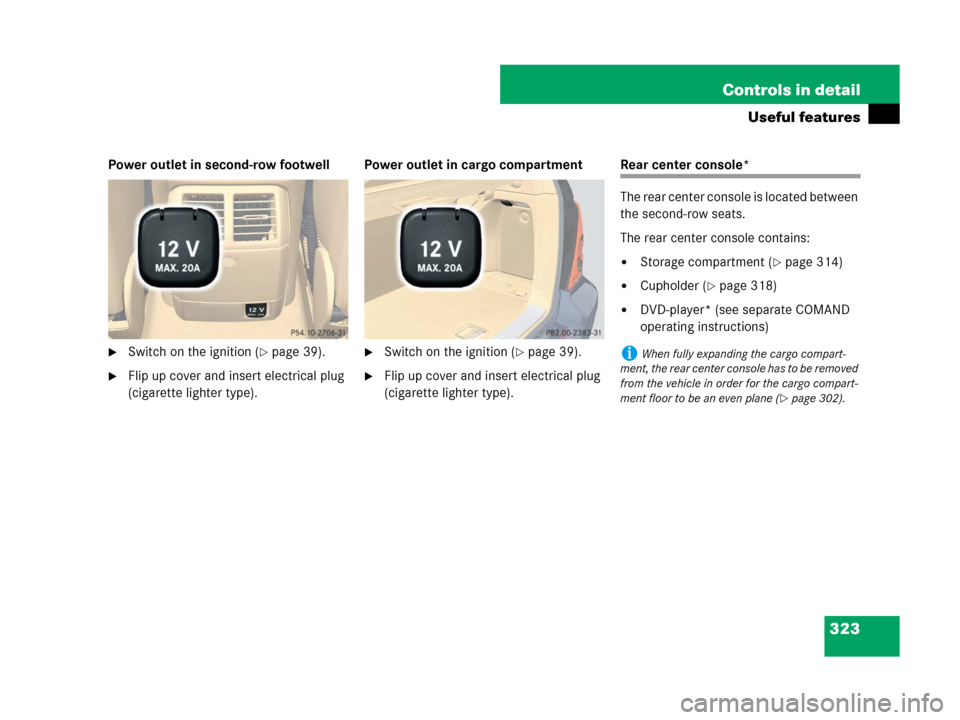
Power outlet in second-row footwell
�Switch on the ignition (�page 39).
�Flip up cover and insert electrical plug
(cigarette lighter type).Power outlet in cargo compartment
�Switch on the ignition (�page 39).
�Flip up cover and insert electrical plug
(cigarette lighter type).
Rear center console*
The rear center console is located between
the second-row seats.
The rear center console contains:
�Storage compartment (�page 314)
�Cupholder (�page 318)
�DVD-player* (see separate COMAND
operating instructions)
iWhen fully expanding the cargo compart-
ment, the rear center console has to be removed
from the vehicle in order for the cargo compart-
ment floor to be an even plane (
�page 302).
Page 325 of 570

324 Controls in detail
Useful features
Removing
1Rear center console
2Release handle
3Rear center console base
4Folding back
5Handle
6Anchorage points�Pull release handle 2.
The front part of center console 1 is
released from base 3.
�Lift center console 1 in direction of
arrow 4 and hold it there.
�While holding center console 1 up,
grip handle 5.
�Lift center console 1 at rear
handle5 to release the center con-
sole from anchorage points 6.
�Take center console 1 out of the vehi-
cle.
Warning!G
Remove all containers that may be stored in
the cupholders of the rear center console.
Otherwise liquids could spill on vehicle
occupants and/or vehicle equipment. Hot
liquids spilled on vehicle occupants may
cause serious personal injury. Liquids
spilled on vehicle equipment may cause
damage not covered by the Mercedes-Benz
Limited Warranty.
!To prevent damage to the rear center
console and/or its components, make sure the
storage compartment (
�page 314) and the
DVD-console lid* (see separate COMAND oper-
ating instructions) are closed before removing
the rear center console.
iRemove all items from the storage compart-
ment (
�page 314) of the rear center console to
reduce the weight of the rear center console.
iRear center console base 3 cannot be
removed.
Page 326 of 570
 you can expand
the cargo compartment")
325 Controls in detail
Useful features
Installing
You can install the rear center console in
two different positions. In the most for-
ward position (position 1) you can expand
the cargo compartment fully (
�page 302)
without removing the rear center console.1Latch (position 1)
2Latch (position 0)
3Rear center console base
4Anchorage point (position 1)
5Anchorage point (position 0)3Rear center console base
6Rear center console
�Position center console 6 above
base3.
�Insert the tabs at rear of center
console6into anchorage points4
or 5 on base 3.
�Guide front of center console6 down
towards base 3.
Center console 6 must rest on
base3.
�Press down on front of center
console6 until it audibly engages in
latch1or2.
Warning!G
The rear center console must be properly in-
stalled on the center console base. Driving
with the rear center console not properly in-
stalled on the rear center console base may
cause the rear center console to come loose
and be thrown around in the vehicle interior,
causing injury to vehicle occupants during
�braking
�vehicle maneuvers
�an accident
iThe storage compartment and the cuphold-
ers in the rear center console are only illuminat-
ed, when the rear center console is installed in
the most rearward position (position 0).
Page 432 of 570
431 Practical hints
What to do if …
Lamp in center console
ProblemPossible cause/consequenceSuggested solution
59The front passenger
front air bag off indicator
lamp illuminates and re-
mains illuminated with
the weight of a typical
adult or someone larger
than a small individual on
the front passenger seat.The system is malfunctioning.�Have the system checked as soon as
possible by an authorized
Mercedes-Benz Light Truck Center.
�Also read and observe any messages
in the multifunction display and follow
corrective steps (
�page 445).
Warning!G
If the59indicator lamp
illuminates and remains illuminated with the
weight of a typical adult or someone larger
than a small individual on the front passen-
ger seat, do not have any passenger use the
front passenger seat until the system has
been repaired.
Page 447 of 570

446 Practical hints
What to do if …
Display messagePossible
cause/consequencePossible solution
Front passenger airbag
enabled
See Operator’s ManualMonitor the 59indicator lamp on the center console (�page 92) and
the multifunction display in the instrument cluster (
�page 26) for the following:
With the seat unoccupied and the ignition turned on,
�the 59indicator lamp on the center console should illuminate and
remain illuminated, indicating that the OCS (
�page 88) has deactivated the air
bag.
�the message Front passenger airbag enabled See Operator’s Manual or the
message
Front passenger airbag disabled See Operator’s Manual should
not appear in the multifunction display at any time the seat is unoccupied. Wait
at last 60 seconds for the system to complete the necessary check cycles and
to make sure neither message appears in the multifunction display.
If above conditions are met, you can occupy the front passenger seat again.
Depending on the front passenger classification sensed by the OCS (
�page 88),
the 59indicator lamp will remain illuminated or go out.
If above conditions are not met, the system is not working properly. Have the
system checked as soon as possible by an authorized Mercedes-Benz Light Truck
Center.
Warning!G
If the 59 indicator lamp re-
mains out even after performing the above
corrective steps, do not have any children
12 years old and under and other small individuals use the front passenger seat
until the system has been repaired.
Page 449 of 570

448 Practical hints
What to do if …
Display messagePossible
cause/consequencePossible solution
Front passenger airbag
disabled
see Operator’s ManualMonitor the 59indicator lamp on the center console (�page 92) and
the multifunction display in the instrument cluster (
�page 26) for the following:
With the seat unoccupied and the ignition turned on,
�the 59indicator lamp on the center console should illuminate and
remain illuminated, indicating that the OCS (
�page 88) has deactivated the air
bag.
�the message Front passenger airbag enabled see Operator’s Manual or the
message
Front passenger airbag disabled see Operator’s Manual should
not appear in the multifunction display at any time the seat is unoccupied. Wait
at last 60 seconds for the system to complete the necessary check cycles and
to make sure neither message appears in the multifunction display.
If above conditions are met, you can occupy the front passenger seat again.
Depending on the front passenger classification sensed by the OCS (
�page 88),
the 59indicator lamp will remain illuminated or go out.
If above conditions are not met, the system is not working properly. Have the
system checked as soon as possible by an authorized Mercedes-Benz Light Truck
Center.
Warning!G
If the 59indicator lamp re-
mains out even after performing the above
corrective steps, do not have any children
12 years old and under and other small individuals use the front passenger seat
until the system has been repaired.
Page 550 of 570
 505
Bolts, Spare wheel 500
Bottle opener 317
Brake Assist System see BAS
Brake fluid 541
Checking 362
Messages in the")
549 Index
Beverage holder see Cup holder
Bleeding the fuel system
(diesel engine) 505
Bolts, Spare wheel 500
Bottle opener 317
Brake Assist System see BAS
Brake fluid 541
Checking 362
Messages in the multifunction
display 454
Brake lamp
Cleaning lenses 413
Messages in the multifunction
display 463–468
Replacing bulbs 484
Brake pads 348
Messages in the multifunction
display 452
Brakes 348
High-performance brake system
(AMG vehicles only) 350
Warning lamp 421
Break-in the vehicle 346
Bulbs, replacing see Replacing bulbsC
California retail buyers and lessees,
Important notice for 11
Call priority, Tele Aid* 336
Can holder see Cup holder
Capacities and recommended
fuel/lubricants 538
Card holder 32, 317
Cargo compartment
Tie-down rings 299
Cargo compartment cover blind* 306
Cargo tie-down rings 299
Carpets, Cleaning 417
Catalytic converter
(gasoline engine) 357
CD changer* 172, 311
CD player 172
Center console 31
Central locking 189
Automatic 130
Locking/unlocking from the
inside 130
Central locking switch 130Certification label 526, 527
CHECK ENGINE malfunction
indicator lamp 423, 424
Checking tire pressure electronically
Advanced Tire Pressure Monitoring
System (Advanced TPMS)*,
(Canada only) 388
Tire Pressure Monitoring System
(TPMS), (USA only) 385
Child safety
Infant and child restraint systems 85
Children in the vehicle 84
Air bags 75, 86
Blocking rear door window
operation 97
Indicator lamp, Front passenger front
air bag 92
Infant and child restraint
systems 93, 95
LATCH-type child seat anchors 93
Occupant Classification System
(OCS) 88
Cigarette lighter* 321