Page 122 of 570
121 Controls in detail
Locking and unlocking
Unlocking and opening the tailgate
(Vehicles with power tailgate*)
You can unlock and open the tailgate sep-
arately.
A minimum height clearance of 7.2 ft
(2.20 m) is required to open the tailgate.
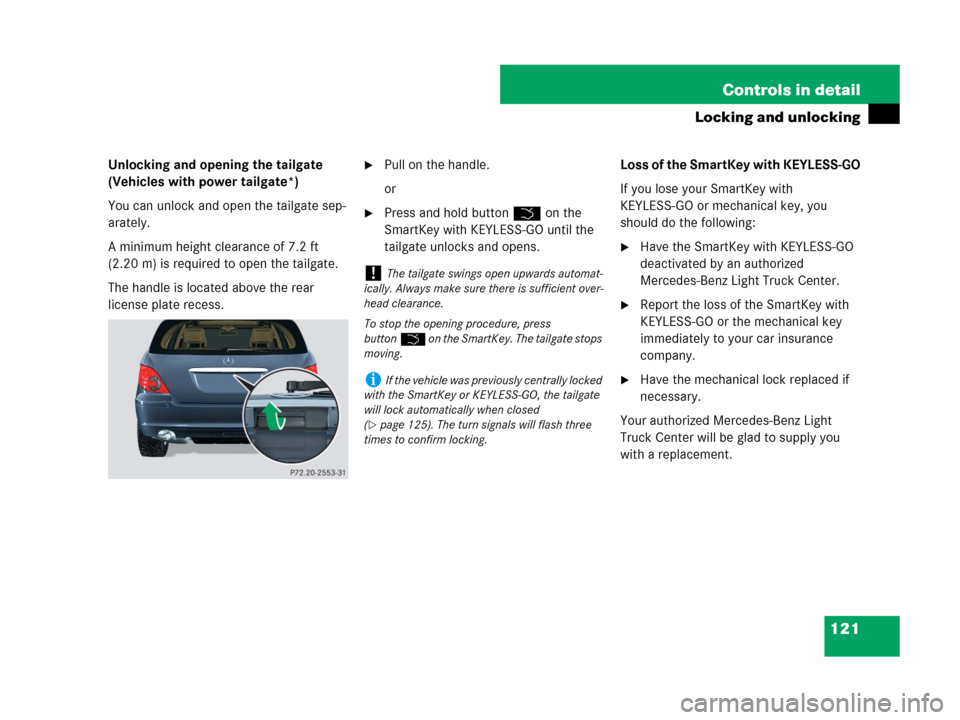
The handle is located above the rear
license plate recess.�Pull on the handle.
or
�Press and hold buttonŠ on the
SmartKey with KEYLESS-GO until the
tailgate unlocks and opens.Loss of the SmartKey with KEYLESS-GO
If you lose your SmartKey with
KEYLESS-GO or mechanical key, you
should do the following:
�Have the SmartKey with KEYLESS-GO
deactivated by an authorized
Mercedes-Benz Light Truck Center.
�Report the loss of the SmartKey with
KEYLESS-GO or the mechanical key
immediately to your car insurance
company.
�Have the mechanical lock replaced if
necessary.
Your authorized Mercedes-Benz Light
Truck Center will be glad to supply you
with a replacement.
!The tailgate swings open upwards automat-
ically. Always make sure there is sufficient over-
head clearance.
To stop the opening procedure, press
buttonŠ on the SmartKey. The tailgate stops
moving.
iIf the vehicle was previously centrally locked
with the SmartKey or KEYLESS-GO, the tailgate
will lock automatically when closed
(
�page 125). The turn signals will flash three
times to confirm locking.
Page 124 of 570
123 Controls in detail
Locking and unlocking
Opening the tailgate
Opening the tailgate from the outside
A minimum height clearance of
7.2 ft (2.20 m) is required to open the
tailgate.
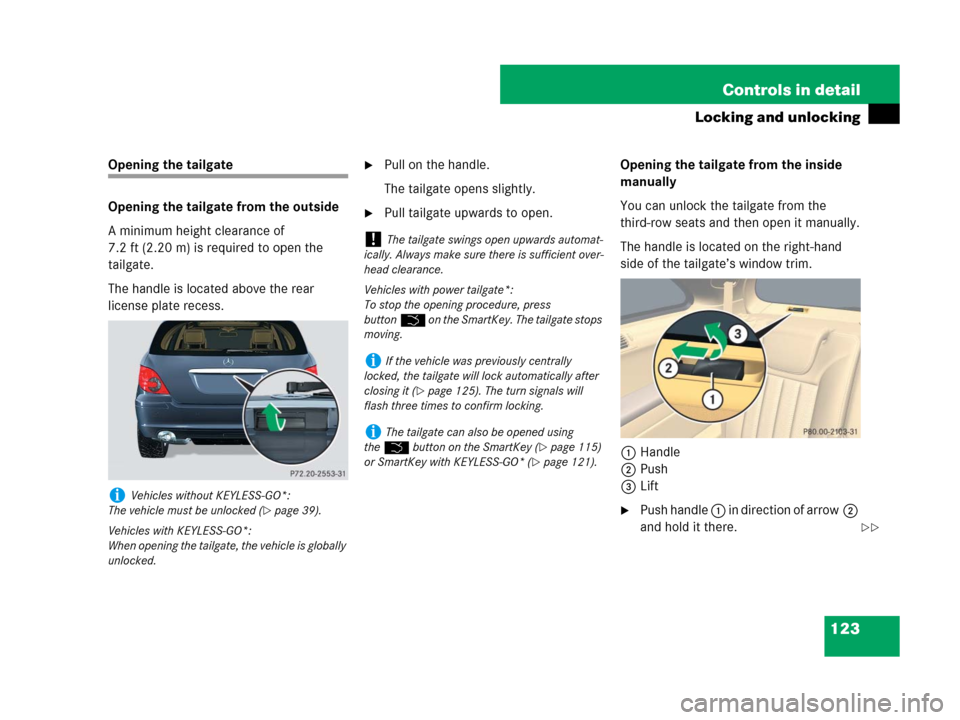
The handle is located above the rear
license plate recess.�Pull on the handle.
The tailgate opens slightly.
�Pull tailgate upwards to open.Opening the tailgate from the inside
manually
You can unlock the tailgate from the
third-row seats and then open it manually.
The handle is located on the right-hand
side of the tailgate’s window trim.
1Handle
2Push
3Lift
�Push handle 1 in direction of arrow2
and hold it there.iVehicles without KEYLESS-GO*:
The vehicle must be unlocked (
�page 39).
Vehicles with KEYLESS-GO*:
When opening the tailgate, the vehicle is globally
unlocked.
!The tailgate swings open upwards automat-
ically. Always make sure there is sufficient over-
head clearance.
Vehicles with power tailgate*:
To stop the opening procedure, press
buttonŠ on the SmartKey. The tailgate stops
moving.
iIf the vehicle was previously centrally
locked, the tailgate will lock automatically after
closing it (
�page 125). The turn signals will
flash three times to confirm locking.
iThe tailgate can also be opened using
theŠ button on the SmartKey (
�page 115)
or SmartKey with KEYLESS-GO* (
�page 121).
��
Page 133 of 570
132 Controls in detail
Seats
For information on seat adjustment, see
the “Getting started” section (
�page 44).
For more information on folding the seats,
see “Loading” (
�page 297).
Easy-entry/exit feature
Easy-entry/exit feature for driver’s
seat*
This feature allows for easier entry into and
exit from the vehicle. When entering and
exiting the vehicle, the steering wheel is in
its uppermost position.
The easy-entry/exit feature can be
activated or deactivated in the
Comfort
submenu of the control system
(
�page 190).With the easy-entry/exit feature activated,
the steering wheel will return to the last set
position when you
�close the driver’s door with the ignition
switched on
or
�insert the SmartKey into the starter
switch or press the KEYLESS-GO*
start/stop button (
�page 41) once
with the driver’s door closed
Warning!G
You must make sure no one can become
trapped or injured by the moving steering
wheel when the easy-entry/exit feature is
activated.
To stop steering wheel movement, do one of
the following:
�Move steering wheel adjustment stalk*
(
�page 47).
�Press one of the memory position
buttons or memory buttonM*
(
�page 145).
Do not leave children unattended in the ve-
hicle, or with access to an unlocked vehicle.
Children could open the driver’s door and
unintentionally activate the easy-entry/exit
feature, which could result in an accident
and/or serious personal injury.
iThe last set steering wheel position is
stored when
�the ignition is switched off(�page 39)
�the position is stored into memory
(
�page 145)
Page 146 of 570
145 Controls in detail
Memory function*
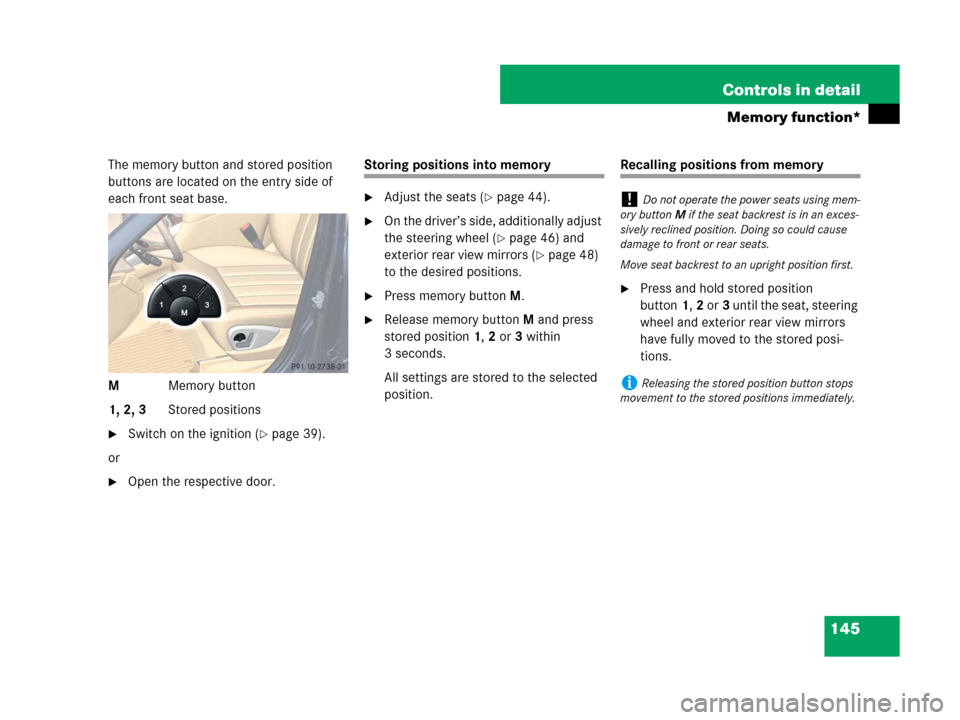
The memory button and stored position
buttons are located on the entry side of
each front seat base.
MMemory button
1, 2, 3Stored positions
�Switch on the ignition (�page 39).
or
�Open the respective door.
Storing positions into memory
�Adjust the seats (�page 44).
�On the driver’s side, additionally adjust
the steering wheel (
�page 46) and
exterior rear view mirrors (
�page 48)
to the desired positions.
�Press memory buttonM.
�Release memory button M and press
stored position 1, 2 or 3 within
3 seconds.
All settings are stored to the selected
position.
Recalling positions from memory
�Press and hold stored position
button1,2 or3 until the seat, steering
wheel and exterior rear view mirrors
have fully moved to the stored posi-
tions.
!Do not operate the power seats using mem-
ory button M if the seat backrest is in an exces-
sively reclined position. Doing so could cause
damage to front or rear seats.
Move seat backrest to an upright position first.
iReleasing the stored position button stops
movement to the stored positions immediately.
Page 161 of 570
160 Controls in detail
Control system
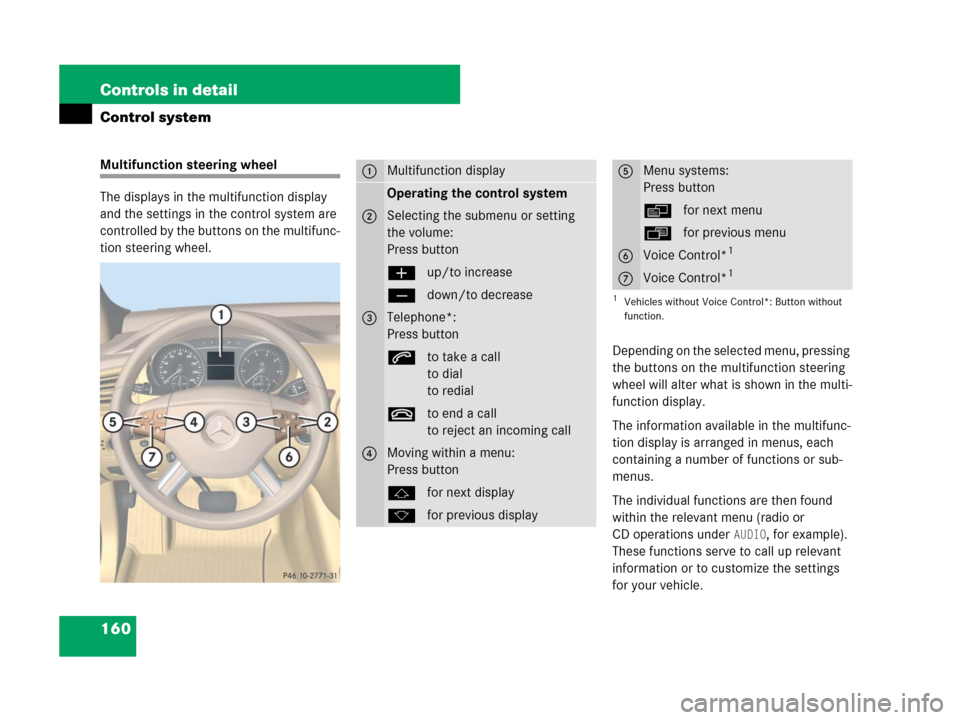
Multifunction steering wheel
The displays in the multifunction display
and the settings in the control system are
controlled by the buttons on the multifunc-
tion steering wheel.
Depending on the selected menu, pressing
the buttons on the multifunction steering
wheel will alter what is shown in the multi-
function display.
The information available in the multifunc-
tion display is arranged in menus, each
containing a number of functions or sub-
menus.
The individual functions are then found
within the relevant menu (radio or
CD operations under
AUDIO, for example).
These functions serve to call up relevant
information or to customize the settings
for your vehicle.
1Multifunction display
Operating the control system
2Selecting the submenu or setting
the volume:
Press button
æup/to increase
çdown/to decrease
3Telephone*:
Press button
sto take a call
to dial
to redial
tto end a call
to reject an incoming call
4Moving within a menu:
Press button
jfor next display
kfor previous display
5Menu systems:
Press button
èfor next menu
ÿfor previous menu
6Voice Control*1
1Vehicles without Voice Control*: Button without
function.
7Voice Control*1
Page 169 of 570
168 Controls in detail
Control system
AMG menu
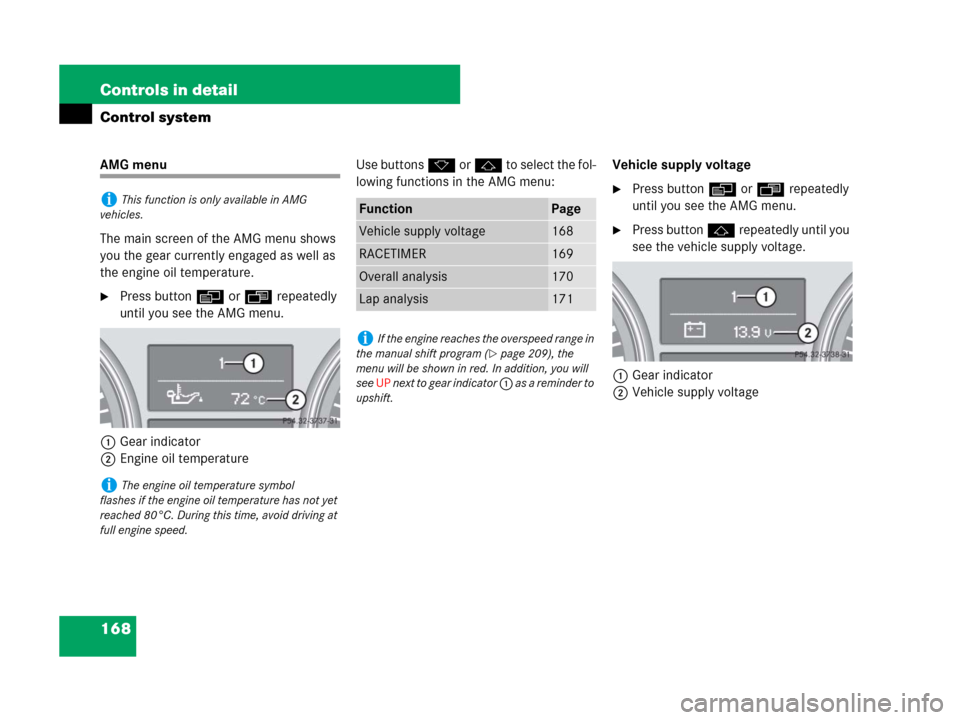
The main screen of the AMG menu shows
you the gear currently engaged as well as
the engine oil temperature.
�Press button è or ÿ repeatedly
until you see the AMG menu.
1Gear indicator
2Engine oil temperatureUse buttons k or j to select the fol-
lowing functions in the AMG menu:Vehicle supply voltage
�Press button è or ÿ repeatedly
until you see the AMG menu.
�Press button j repeatedly until you
see the vehicle supply voltage.
1Gear indicator
2Vehicle supply voltage
iThis function is only available in AMG
vehicles.
iThe engine oil temperature symbol
flashes if the engine oil temperature has not yet
reached 80°C. During this time, avoid driving at
full engine speed.
FunctionPage
Vehicle supply voltage168
RACETIMER169
Overall analysis170
Lap analysis171
iIf the engine reaches the overspeed range in
the manual shift program (
�page 209), the
menu will be shown in red. In addition, you will
see UP next to gear indicator 1 as a reminder to
upshift.
Page 170 of 570
169 Controls in detail
Control system
RACETIMER
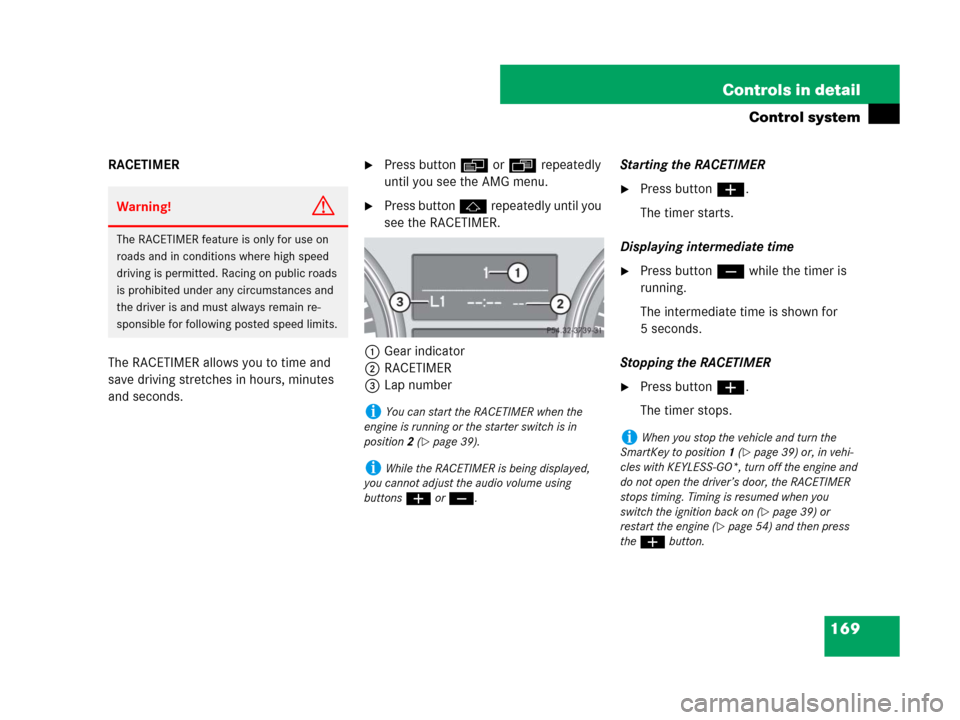
The RACETIMER allows you to time and
save driving stretches in hours, minutes
and seconds.�Press button è or ÿ repeatedly
until you see the AMG menu.
�Press button j repeatedly until you
see the RACETIMER.
1Gear indicator
2RACETIMER
3Lap numberStarting the RACETIMER
�Press button æ.
The timer starts.
Displaying intermediate time
�Press button ç while the timer is
running.
The intermediate time is shown for
5 seconds.
Stopping the RACETIMER
�Press button æ.
The timer stops.
Warning!G
The RACETIMER feature is only for use on
roads and in conditions where high speed
driving is permitted. Racing on public roads
is prohibited under any circumstances and
the driver is and must always remain re-
sponsible for following posted speed limits.
iYou can start the RACETIMER when the
engine is running or the starter switch is in
position2 (
�page 39).
iWhile the RACETIMER is being displayed,
you cannot adjust the audio volume using
buttonsæ or ç.
iWhen you stop the vehicle and turn the
SmartKey to position 1 (
�page 39) or, in vehi-
cles with KEYLESS-GO*, turn off the engine and
do not open the driver’s door, the RACETIMER
stops timing. Timing is resumed when you
switch the ignition back on (
�page 39) or
restart the engine (
�page 54) and then press
the æbutton.
Page 191 of 570
190 Controls in detail
Control system
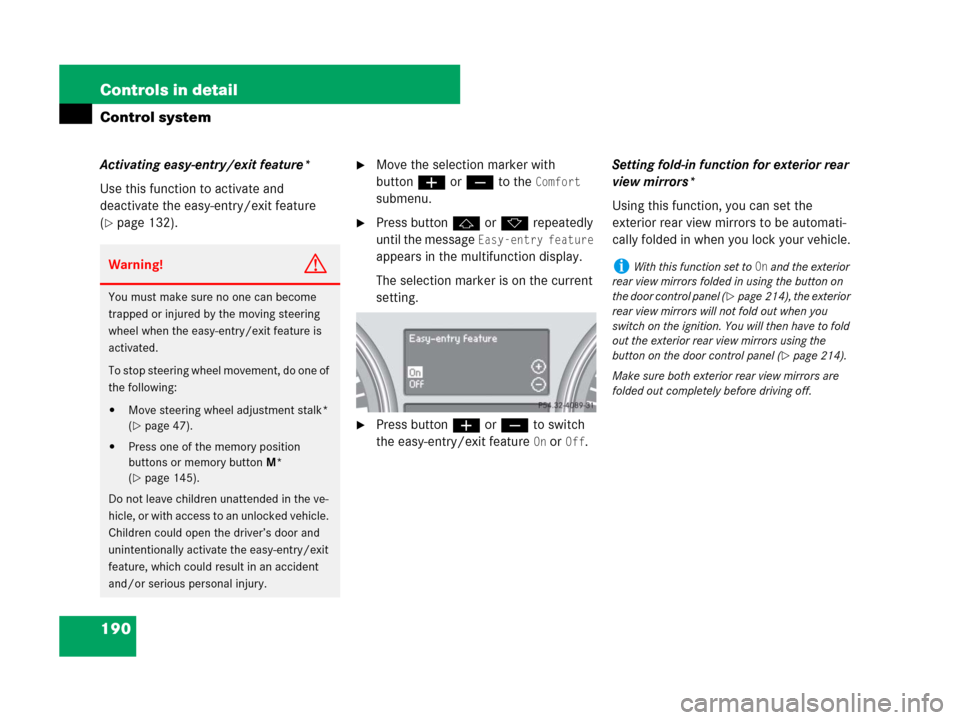
Activating easy-entry/exit feature*
Use this function to activate and
deactivate the easy-entry/exit feature
(
�page 132).
�Move the selection marker with
buttonæ orç to the
Comfort
submenu.
�Press buttonj ork repeatedly
until the message
Easy-entry feature
appears in the multifunction display.
The selection marker is on the current
setting.
�Press buttonæ orç to switch
the easy-entry/exit feature
On or Off.Setting fold-in function for exterior rear
view mirrors*
Using this function, you can set the
exterior rear view mirrors to be automati-
cally folded in when you lock your vehicle.
Warning!G
You must make sure no one can become
trapped or injured by the moving steering
wheel when the easy-entry/exit feature is
activated.
To stop steering wheel movement, do one of
the following:
�Move steering wheel adjustment stalk*
(
�page 47).
�Press one of the memory position
buttons or memory button M*
(
�page 145).
Do not leave children unattended in the ve-
hicle, or with access to an unlocked vehicle.
Children could open the driver’s door and
unintentionally activate the easy-entry/exit
feature, which could result in an accident
and/or serious personal injury.
iWith this function set to On and the exterior
rear view mirrors folded in using the button on
the door control panel (
�page 214), the exterior
rear view mirrors will not fold out when you
switch on the ignition. You will then have to fold
out the exterior rear view mirrors using the
button on the door control panel (
�page 214).
Make sure both exterior rear view mirrors are
folded out completely before driving off.