Page 193 of 242
.
�Press any soft key to activate the soft
key display.")
191 Navigation*
During route guidance
The system can save the current position
as a destination in the
Last
destinations
memory (�page 197).
�Press any soft key to activate the soft
key display. Press the
Memory soft key.
The current location is saved.
�Activate the soft key display
(
�page 184).
�Press the Display soft key.
The Settings menu will appear.
Settings menu
You can now use the soft keys to
activate other menus.
�Icons soft key:
Brings you to the POI Icons display
settings (
�page 192).
�View soft key:
Brings you to the map orientation
settings (
�page 193).
�Map soft key:
Brings you to the Display in Map
settings (
�page 195).
�Automap soft key:
Brings you to the Split screen
settings (
�page 195).
�Trail soft key:
Brings you to the Trail settings
(
�page 196).
Saving the current location
i
Such destinations are marked in the
Last destinations memory with _
(
�page 197).
If a destination is to be saved for later
or repeated use, the current location
can be stored in the standard
destination memory (
�page 198).
Defining route guidance displays
Page 197 of 242
195 Navigation*
During route guidance
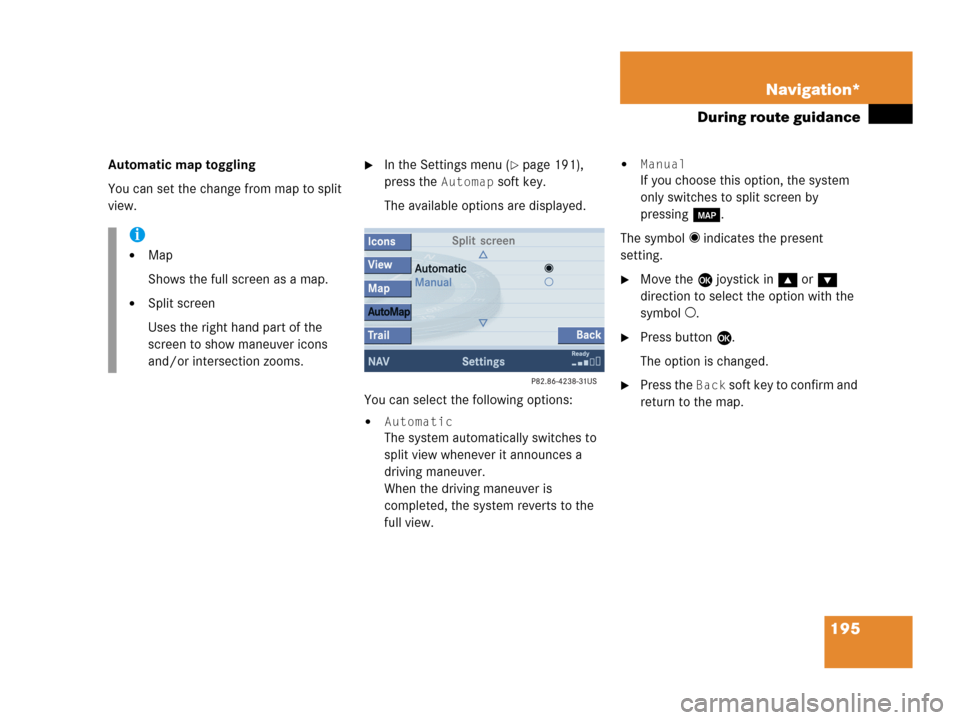
Automatic map toggling
You can set the change from map to split
view.�In the Settings menu (�page 191),
press the
Automap soft key.
The available options are displayed.
You can select the following options:
�Automatic
The system automatically switches to
split view whenever it announces a
driving maneuver.
When the driving maneuver is
completed, the system reverts to the
full view.
�Manual
If you choose this option, the system
only switches to split screen by
pressing c.
The symbol _ indicates the present
setting.
�Move the E joystick in g or G
direction to select the option with the
symbol -.
�Press button E.
The option is changed.
�Press the Back soft key to confirm and
return to the map.
i
�Map
Shows the full screen as a map.
�Split screen
Uses the right hand part of the
screen to show maneuver icons
and/or intersection zooms.
Page 198 of 242
196 Navigation*
During route guidance
Trail settings
With this function is active, the COMAND
records a trail every time the vehicle is in
an OFF ROAD area (more than 0.25 miles
away from a digitized road).
The system places trail dots on the screen
until it matches to a digitized road again.
�In the Settings menu (�page 191),
press the
Trail soft key.
The options
On and Off are displayed.
1Percentage of used memoryThe symbol _ indicates the present
setting.
�Move the E joystick in g or G
direction to select the option with the
symbol -.
�Press E.
Depending on the previous setting, the
Trail is switched on or off.
�Press the Back soft key to confirm and
return to the map.
Delete a trail
If there is a trail in memory, you can delete
it.
�Press the Clear soft key.
The message
Are you sure you
want to clear all trails?
will
appear in a window.
�Push the joystick to H to select Yes.
�Press E.
The trail is deleted.
If you don’t want to delete a trail
�Press E to confirm No.
Page 202 of 242

200 Navigation*
Last destinations and destination memory
Category Others
At the end of the letter list follows the
category
Others.
�Press * to access.
Category
Others includes entries
without names or names starting with a
special character (e.g. +, !, * etc.).
Selecting a destination
�Push the joystick to g or G to
select a destination in the listing.
�Use the Page soft keys to scroll page-
wise through the list (if available).Now you can
�start route guidance to the selected
destination
�add the selected entry to today’s plan
(
�page 207)
�Press the Plan soft key.
�view details on the selected
destination (if available)
�To do this, press the Details soft
key.
�delete the selected destinationStarting route guidance to a destination
from the destination memory
�Select a destination from the
destination memory.
�Press E.
The Start route guidance menu will
appear (
�page 173).
Deleting a destination in the destination
memory
�Select a destination from the
destination memory.
�Press the Delete soft key.
A prompt message appears.
�Push the joystick to H to select Yes.
�Press E.
The system deletes the navigation
entry from the destination memory.
Page 211 of 242

209 Navigation*
Today’s plan
Display details for starting position
�Push the joystick to G to select
Starting position.
�Press the Details soft key.
The address information will appear.
Selecting a destination from the
today’s plan
�Activate the today’s plan.
�Push the joystick to G or g to
select an entry.
�Use the Page soft keys to scroll page-
wise through the list (if available).
�Press E.
The Start route guidance menu will
appear (
�page 173).Saving a today’s plan entry in the
destination memory
�Activate the today’s plan.
�Press the Save soft key.
The Destination memory input menu
will appear (
�page 198).
Deleting a today’s plan entry
�Activate the today’s plan.
�Push the joystick to G or g to
select an entry.
�Press the Delete soft key.
A prompt message will appear.
�Push the joystick to H to select Yes.
If you do not want to delete the entry:
�Press E to confirm No.
�Press E.
The system deletes the destination in
the today’s plan. The entries below the
destination deleted move up by one
position.Deleting all the today’s plan entries
�Activate the today’s plan.
�Press the Del. all soft key.
A prompt message will appear.
�Push the joystick to H to select Yes.
If you do not want to delete the entries:
�Press E to confirm No.
�Press E.
The system deletes all the destination
entries in the today’s plan.
i
When you reach the destination, route
guidance ends and the system deletes
the today’s plan entry.
Page 213 of 242

211 Navigation*
Software Updates
1Ejecting DVD
2Opening/closing the display unit
3Warning message
Press EJECT to
close
You can update the system with a new
navigation DVD. The DVD may include new
map/road information.Starting an update
DVDs are loaded and ejected at the
navigation module.
�Switch the COMAND on (�page 34).Ejecting
�Press l.
The display unit moves forward and
then tilts down. The DVD NAVIGATION
slot is visible.
�Press the l button left of the
DVD NAVIGATION slot.
The navigation module ejects the DVD.
The message
No DVD in drive.
Please insert Navigation DVD.
will appear.
�Remove the DVD from the slot.
WarningG
The display unit can cause injury if
contacted when open. Please close after
inserting a navigation DVD.
!
Do not place anything on the lowered
display panel (i.e. do not use as a shelf).
Placing objects on the lowered display
panel may result in damage to the
display or COMAND
unit which is not covered by the
Mercedes-Benz Limited Warranty.
i
Updating may take several minutes.
During updating, the operation of
COMAND is restricted. You cannot
switch off the system.
i
The navigation module is located
behind the display unit of the COMAND
(
�page 210).
i
There are two l buttons. One is on
the display unit 2. The other is located
left of the DVD NAVIGATION slot 1
behind the display.
Page 214 of 242

212 Navigation*
Software Updates
Loading
�Insert the new navigation DVD into the
DVD slot with the label side up.
The message
Navigation is
initializing. Please wait.
will
appear.
�Press l on the display unit to return
the display unit to its closed position.
The display unit tilts up and then moves
to the rear.After that, the COMAND loads the
software on the DVD.
Shortly after that, the progress bar
appears. After some time, the progress
bar reaches 100%.
The update is completed. You can now
operate the navigation system again.
i
Inserting a second DVD with another
DVD still loaded will cause damage to
the DVD drive which is not covered by
the Mercedes-Benz Limited Warranty.
i
The message Press EJECT to
close
will appear. If l on the
display unit is not pressed within 20
seconds, eight successive series of two
beep tones will sound to remind you to
return the display to its closed position
by pressing l on the display unit.
If you do not do so, the COMAND
returns the display unit to its closed
position.
Page 220 of 242

218 Service
Tele Aid*
If the connection is made, the message
Call Connected appears on the status
bar.
During activation of a Roadside Assistance
call
�it is possible to switch to navigation
�you can initiate an Emergency call.
Terminating the connection
�Press K.
COMAND reverts to the system last
active before Tele Aid was activated.A call to the Response Center will be
initiated by pressing the corresponding
button. Information regarding the opera-
tion of your vehicle, the nearest authorized
Mercedes-Benz Center or Mercedes-Benz
USA products and services is available to
you. Refer to your vehicle Operator’s
Manual for additional information.
When an information call is initiated,
Connecting call and theß symbol will
appear on the status bar. All active
connections are terminated except
Emergency call and Roadside Assistance
call.When the connection is made, the
message Call Connected appears on
the status bar.
During activation of an Information call
�it is possible to switch to navigation
�you can initiate an Emergency call or
Roadside Assistance call.
Terminating the connection
�Press K.
COMAND reverts to the system last
active before Tele Aid was activated.
Information