Page 427 of 595

426 Operation
Vehicle care
Your vehicle has been treated at the facto-
ry with a wax-base rustproofing in the body
cavities which will last for the lifetime of
the vehicle. Post-production treatment is
neither necessary nor recommended by
Mercedes-Benz because of the possibility
of incompatibility between materials used
in the production process and others ap-
plied later.
We have selected car-care products and
compiled recommendations which are
specially matched to our vehicles and
which always reflect the latest technology.
You can obtain Mercedes-Benz approved
car-care products at an authorized
Mercedes-Benz Light Truck Center.
Scratches, corrosive deposits, corrosion or
damage due to negligent or incorrect care
cannot always be removed or repaired with
the car-care products recommended here.
In such cases it is best to seek aid at an
authorized Mercedes-Benz Light Truck
Center.The following topics deal with the cleaning
and care of your vehicle and give important
“how-to” information as well as references
to Mercedes-Benz approved car-care
products.
Power washerTar stains
Quickly remove tar stains before they dry
and become more difficult to remove. A tar
remover is recommended.
Paintwork, painted body components
Mercedes-Benz approved Paint Care
should be applied when water drops on the
paint surface do not “bead up”. This should
normally be done every 3 to 5 months,
depending on the climate and washing
detergent used.
Mercedes-Benz approved Paint Cleaner
should be applied if the paint surface
shows signs of dirt embedding (i.e. loss of
gloss).
!Follow the instructions provided by the
power washer manufacturer on maintaining a
distance between the vehicle and the nozzle of
the power washer.
Never use a round nozzle to power-wash tires.
The intense jet of water can result in damage to
the tire.
Always replace a damaged tire.
Always keep the jet of water moving across the
surface. Do not aim directly at electrical parts,
electrical connectors, seals, or other rubber
parts.
iVehicles with KEYLESS-GO*:
If a door handle is hit by a strong jet of water, and
a SmartKey with KEYLESS-GO* is in close
proximity, i.e. within approximately 3 ft (approxi-
mately 1 m), the vehicle could be inadvertently
locked or unlocked.
!Affixing stickers, adhesive tape or similar
materials to painted body components may
damage the paintwork.
Page 428 of 595

427 Operation
Vehicle care
Do not apply any of these products or wax
if your vehicle is parked in the sun or if the
hood is still hot.
�Use the appropriate MB-Touch-Up
Stick for quick and provisional repairs
of minor paint damage (i.e. chips from
stones, vehicle doors, etc.).
Engine cleaning
Prior to cleaning the engine compartment
make sure to protect electrical compo-
nents and connectors from the intrusion of
water and cleaning agents.
Corrosion protection, such as
MB Anticorrosion Wax, should be applied
to the engine compartment after every en-
gine cleaning. Before applying, all control
linkage bushings and joints should be lu-
bricated. The poly-V-belt and all pulleys
should be protected from any wax.Vehicle washing
In the winter, thoroughly remove all traces
of road salt as soon as possible.
When washing the vehicle underbody, do
not forget to clean the inner sides of the
wheels.
Hand-wash
Do not use hot water or wash your vehicle
in direct sunlight.
�Only use a mild car wash detergent,
such as Mercedes-Benz approved Car
Shampoo.
�Thoroughly spray the vehicle with a dif-
fused jet of water.
Direct only a very weak spray towards
the ventilation intake.
�Use plenty of water and rinse the
sponge and chamois frequently.
�Rinse with clean water and thoroughly
dry with a chamois.
Do not allow cleaning agents to dry on
the finish.iVehicles with KEYLESS-GO*:
If a door handle is hit by a strong jet of water, and
a SmartKey with KEYLESS-GO* is in close
proximity, i.e. within approximately 3 ft (approxi-
mately 1 m), the vehicle could be inadvertently
locked or unlocked.
!Do not use scouring agents on these parts.
Never apply strong force and only use a soft,
non-sratching cloth when cleaning the vehicle.
Do not attempt to wipe the surface with a dry
cloth or sponge.
Otherwise you may scratch or damage the paint.
Page 479 of 595
478 Practical hints
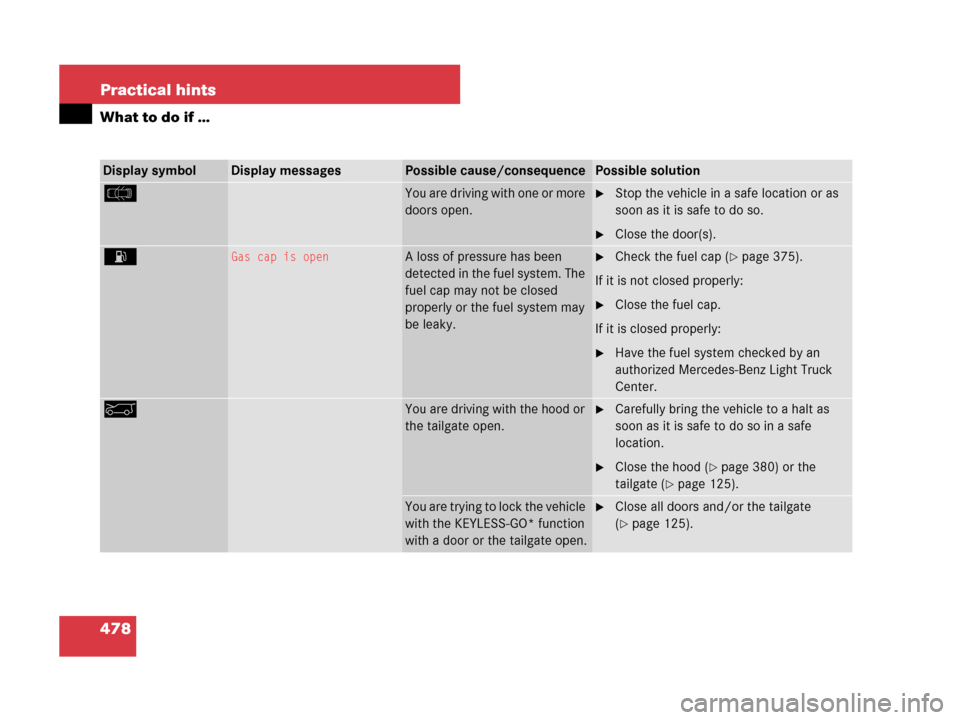
What to do if …
Display symbolDisplay messagesPossible cause/consequencePossible solution
c You are driving with one or more
doors open.�Stop the vehicle in a safe location or as
soon as it is safe to do so.
�Close the door(s).
AGas cap is openA loss of pressure has been
detected in the fuel system. The
fuel cap may not be closed
properly or the fuel system may
be leaky.�Check the fuel cap (�page 375).
If it is not closed properly:
�Close the fuel cap.
If it is closed properly:
�Have the fuel system checked by an
authorized Mercedes-Benz Light Truck
Center.
aYou are driving with the hood or
the tailgate open.�Carefully bring the vehicle to a halt as
soon as it is safe to do so in a safe
location.
�Close the hood (�page 380) or the
tailgate (
�page 125).
You are trying to lock the vehicle
with the KEYLESS-GO* function
with a door or the tailgate open.�Close all doors and/or the tailgate
(
�page 125).
Page 480 of 595

479 Practical hints
What to do if …
Display symbolDisplay messagesPossible cause/consequencePossible solution
FKey
not detectedThe SmartKey with
KEYLESS-GO* is not recognized
while the engine is running
because
�the SmartKey with
KEYLESS-GO* is not in the
vehicle
�there is strong
radio-frequency interference
�Stop the vehicle in a safe location or as
soon as it is safe to do so.
�Apply the parking brake (�page 68).
�Search for the SmartKey with
KEYLESS-GO*.
Otherwise the vehicle cannot be centrally
locked nor can the engine be started
again after the engine is stopped.
The SmartKey with
KEYLESS-GO* is momentarily
not recognized.�Change the position of the SmartKey with
KEYLESS-GO* in the vehicle.
�Operate the vehicle with the SmartKey in
the starter switch if necessary.
Key
not detectedThe SmartKey with
KEYLESS-GO* is not recognized
while the ignition is switched on
(
�page 41) and a door is
opened or closed and the
SmartKey with KEYLESS-GO* is
not in the vehicle.
�Search for the SmartKey with
KEYLESS-GO*.
Otherwise the vehicle cannot be locked
nor can the engine be started.
�Change the position of the SmartKey with
KEYLESS-GO* in the vehicle.
Page 481 of 595

480 Practical hints
What to do if …
Display symbolDisplay messagesPossible cause/consequencePossible solution
FKey detected
in vehicleA SmartKey with KEYLESS-GO*
left in the vehicle was detected
while trying to lock the vehicle
from the outside.�Take the SmartKey with KEYLESS-GO*
out of the vehicle.
Remove keyYou have forgotten to remove
the SmartKey.�Remove the SmartKey from the starter
switch.
You need a new keyThere is no additional code avail-
able for SmartKey or SmartKey
with KEYLESS-GO*.�Visit an authorized Mercedes-Benz Light
Truck Center as soon as possible.
Change
key batteriesThe batteries in the SmartKey
with KEYLESS-GO* are dis-
charged.�Replace the batteries (�page 506).
Don’t forget
your keyThis message appears for a
maximum of 60 seconds if the
driver’s door is opened with the
engine shut off and no SmartKey
in the starter switch.
This message is only a reminder.�Insert the SmartKey in the starter switch
(
�page 42).
or
�Take the SmartKey with KEYLESS-GO*
with you when leaving the vehicle.
Page 501 of 595
500 Practical hints
Unlocking/locking in an emergency
Unlocking the vehicle
If you cannot unlock the vehicle with the
SmartKey or KEYLESS-GO*, open the
driver’s door using the mechanical key.Removing the mechanical key
1Mechanical key locking tab
2Mechanical key
�Move locking tab1 in direction of
arrow.
The mechanical key2 comes out.
�Slide mechanical key2 out of the
housing.Unlocking the driver’s door
�Insert mechanical key2 into the
driver’s door lock until it stops.
�Turn mechanical key2 counterclock-
wise to position1 and hold it there.
�Pull the door handle until the locking
knob moves up (
�page 122).
The driver’s door is unlocked.
�Pull the door handle once more to open
the driver’s door.
iUnlocking the driver’s door with the
mechanical key will trigger the anti-theft alarm
system.
To cancel the alarm, insert the SmartKey or
SmartKey with KEYLESS-GO* in the starter
switch.
1Unlocking
2Mechanical key
Page 502 of 595

501 Practical hints
Unlocking/locking in an emergency
Locking the vehicle
If you cannot lock the vehicle with the
SmartKey or KEYLESS-GO*, lock the vehi-
cle carrying out the following steps.
�Close the front passenger door, the
rear right door and the tailgate.
�Open the driver’s door and the rear left
door.
�Press the central locking switch on the
driver’s door (
�page 130).
The locking knobs of the front passen-
ger door and the rear doors move
down.
If the vehicle battery is disconnected or
drained:
�Press down the locking knobs of
the front passenger door and the
rear doors manually.
�Exit the vehicle.
�Close the driver’s door.
�Enter the vehicle through the rear left
door.
�Press down the locking knob of the
driver’s door.
�Exit the vehicle.
�Close the rear left door.
The vehicle is locked.
Fuel filler flap
�Open the tailgate (�page 124).
The fuel filler flap release is located behind
a cover in the right side trim panel of the
cargo compartment.
1Lock
2Cover
!To prevent inadvertent lockout, make sure
to have the SmartKey or SmartKey with
KEYLESS-GO* with you before proceeding with
the next step. The next step will lock the vehicle.
iThis procedure does not arm the anti-theft
alarm system, nor does it lock the fuel filler flap.
��
Page 504 of 595

503 Practical hints
Opening/closing in an emergency
�Opening/closing in an emergency
Power tilt/sliding sunroof*
You can open or close the tilt/sliding
sunroof manually should an electrical
malfunction occur.
The tilt/sliding sunroof drive is located
behind a cover on the overhead control
panel.
1Cover
�Remove the SmartKey from the starter
switch.Vehicles with KEYLESS-GO*:
�Turn off the engine by pressing the
KEYLESS-GO* start/stop button
(
�page 70).
�Open the driver’s door (this puts
the starter switch in position 0, same
as with the SmartKey removed from
the starter switch). The driver’s door
can then be closed again.
�Press on cover1 at the position indi-
cated by the arrow.
�Take off cover1.
2Crank
�Take crank2 out of the Operator’s
Manual pouch.
�Insert crank2 into hole.
�Turn crank2 clockwise to
�slide sunroof closed
�raise sunroof at the rear
�Turn crank2 counterclockwise to
�slide sunroof open
�lower sunroof at the rear
iThe hole may be covered by a noise
reduction padding. You will then have to push the
crank through the padding at the perforated
mark.
iTurn crank2 slowly and smoothly.
The tilt/sliding sunroof must be synchronized if
it has been operated manually (
�page 255).