Page 469 of 595

468 Practical hints
What to do if …
Display messagePossible cause/consequencePossible solution
Tire pressure monitor
inoperativeThe TPMS or Advanced TPMS* is
malfunctioning.�Have the TPMS or Advanced TPMS* checked by an
authorized Mercedes-Benz Light Truck Center.
Tire pressure monitor
inoperative
No wheel sensorsThere are wheels without appropriate wheel
sensors mounted (e.g. winter tires).�Have the TPMS or Advanced TPMS* checked by an
authorized Mercedes-Benz Light Truck Center.
�Have the wheel sensors installed by an authorized
Mercedes-Benz Light Truck Center.
Tire pressure monitor
Wheel sensor missingOne or more sensors defect (e.g. battery is
empty).
One or more wheels without appropriate
wheel sensors mounted (e.g. spare tire).�Have the TPMS or Advanced TPMS* checked by an
authorized Mercedes-Benz Light Truck Center.
�Have the wheel sensors installed by an authorized
Mercedes-Benz Light Truck Center.
Vehicles with Advanced TPMS*:
The tire pressure for the respective tire is shown in
the multifunction display.
Tire pressure monitor
currently
unavailableThe TPMS or Advanced TPMS* is unable to
monitor the tire pressure due to
�a nearby radio interference source.
�excessive wheel sensor temperatures.
�As soon as the causes of the malfunction have been
removed, the TPMS or Advanced TPMS* automati-
cally becomes active again after a few minutes driv-
ing.
Page 496 of 595
495 Practical hints
Where will I find ...?
�Where will I find ...?
First aid kit
The first aid kit is located on the driver’s
side in the cargo compartment behind the
cover.
1Lock
2Cover in left side trim panel
�Turn lock1 90° in direction of arrow.
�Fold down cover2.
The first aid kit can be removed.
Vehicle tool kit
The vehicle tool kit is stored under the
cargo compartment floor.
The vehicle tool kit includes:
�Towing eye bolt
�Wheel wrench
�Alignment bolt
�Vehicle jack
�Fuse chart
�Spare fuses
�Fuse extractor
�Collapsible wheel chock
�Wheel bolts for spare wheel1Cargo compartment floor, lowered
2Handle cover
�Open the tailgate (�page 124).
�Push in handle cover2 as indicated
by arrow and pull handle.
�Lift cargo compartment floor1.
iCheck expiration dates and contents for
completeness at least once a year and replace
missing/expired items.
��
Page 497 of 595
496 Practical hints
Where will I find ...?
3Securing hook
�Release securing hook3 (located be-
low the floor handle) from holder.3Securing hook
4Cargo compartment floor, raised
5Upper cargo compartment lip
�Engage securing hook3 on upper
cargo compartment lip5.
You can now access the vehicle tool kit. To
remove the vehicle tool kit storage well
casing, proceed as described on
(
�page 499).6Alignment bolt
7Towing eye bolt
8Wheel wrench
9Velcro strap
aVehicle jack
bWheel bolts for 18" light alloy rims or
Minispare wheel
cCollapsible wheel chock
dSpare fuses, fuse chart, fuse extractor
eVehicle tool kit storage well casing
�To remove vehicle jacka, loosen vel-
cro strap9.
!With the cargo compartment cover blind
installed behind the third-row seats
(
�page 312), disengage cargo compartment
cover blind and flip it forward. Otherwise the
strap of the securing hook could damage the
cargo compartment cover blind.
��
Page 500 of 595
499 Practical hints
Where will I find ...?
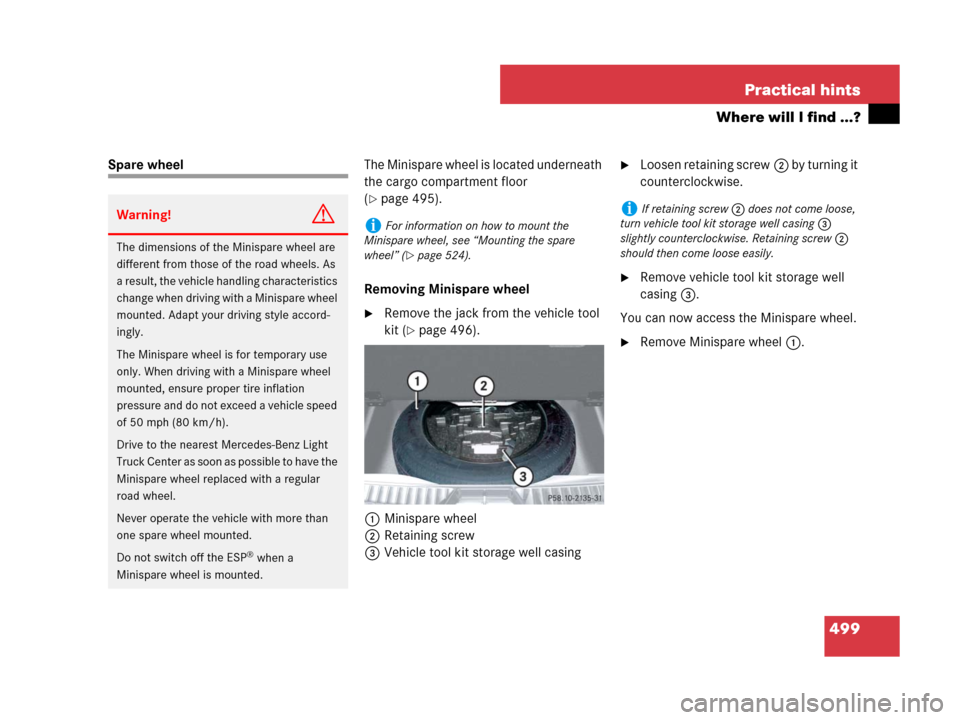
Spare wheelThe Minispare wheel is located underneath
the cargo compartment floor
(
�page 495).
Removing Minispare wheel
�Remove the jack from the vehicle tool
kit (
�page 496).
1Minispare wheel
2Retaining screw
3Vehicle tool kit storage well casing
�Loosen retaining screw2 by turning it
counterclockwise.
�Remove vehicle tool kit storage well
casing3.
You can now access the Minispare wheel.
�Remove Minispare wheel1.
Warning!G
The dimensions of the Minispare wheel are
different from those of the road wheels. As
a result, the vehicle handling characteristics
change when driving with a Minispare wheel
mounted. Adapt your driving style accord-
ingly.
The Minispare wheel is for temporary use
only. When driving with a Minispare wheel
mounted, ensure proper tire inflation
pressure and do not exceed a vehicle speed
of 50 mph (80 km/h).
Drive to the nearest Mercedes-Benz Light
Truck Center as soon as possible to have the
Minispare wheel replaced with a regular
road wheel.
Never operate the vehicle with more than
one spare wheel mounted.
Do not switch off the ESP
® when a
Minispare wheel is mounted.
iFor information on how to mount the
Minispare wheel, see “Mounting the spare
wheel” (
�page 524).
iIf retaining screw2 does not come loose,
turn vehicle tool kit storage well casing3
slightly counterclockwise. Retaining screw2
should then come loose easily.
Page 524 of 595
523 Practical hints
Flat tire
�Flat tire
Preparing the vehicle
�Park the vehicle in a safe distance from
moving traffic on a hard, flat surface
when possible.
�Turn on the hazard warning flasher
(
�page 151).
�Turn the steering wheel so that the
front wheels are in a straight-ahead
position.
�Set the parking brake (�page 60).
�Set the automatic transmission to park
positionP (
�page 194).
�Turn off the engine (�page 41).
�Remove the SmartKey from the starter
switch.
Vehicles with KEYLESS-GO*:
�Turn off the engine by pressing the
KEYLESS-GO* button once
(
�page 70).
�Open the driver’s door (this puts
the starter switch in position0,
same as with the SmartKey re-
moved from the starter switch). The
driver’s door then can be closed
again.
�Remove the KEYLESS-GO*
start/stop button from the starter
switch (
�page 43).
�Have any passenger exit the vehicle at
a safe distance from the roadway.
Warning!G
The dimensions of the Minispare wheel are
different from those of the road wheels. As
a result, the vehicle handling characteristics
change when driving with a Minispare wheel
mounted. Adapt your driving style accord-
ingly.
The Minispare wheel is for temporary use
only. When driving with a Minispare wheel
mounted, ensure proper tire pressure and
do not exceed a vehicle speed of
50 mph (80 km/h).
Drive to the nearest Mercedes-Benz Light
Truck Center as soon as possible to have the
Minispare wheel replaced with a regular
road wheel.
Never operate the vehicle with more than
one spare wheel mounted.
Do not switch off the ESP
® when a
Minispare wheel is mounted.
Warning!G
Your vehicle is equipped with air suspen-
sion. Do not open or close any doors or the
tailgate while mounting a spare wheel. The
vehicle could rise or lower to a previously se-
lected level. You or others could be injured
as a result.
iOpen door only when conditions are safe to
do so.
Page 525 of 595
524 Practical hints
Flat tire
Mounting the spare wheel
Preparing the vehicle
�Prepare the vehicle as described
(
�page 523).
�Take the wheel wrench, the collapsible
wheel chock, and the vehicle jack out
of the cargo compartment
(
�page 495).
�Take the Minispare wheel out of the
cargo compartment (
�page 499).Lifting the vehicle
�Prevent the vehicle from rolling away
by blocking wheels with wheel chocks
or other sizeable objects.
One collapsible wheel chock is includ-
ed with the vehicle tool kit
(
�page 495). For information on set-
ting up the collapsible wheel chock,
see (
�page 498).
When changing wheel on a level surface:
�Place one wheel chock in front of and
another sizeable object behind the
wheel that is diagonally opposite to the
wheel being changed.
Always try lifting the vehicle using the jack
on a level surface. However, should
circumstances require you to do so on a
hill, place the wheel chock and another
sizeable object as follows:
�Place the wheel chock and another
sizeable object on the downhill side
blocking both wheels of the axle not
being worked on.
!Vehicles with factory-mounted
running-boards*:
Your vehicle is equipped with a scissors-type
jack (located under the cargo compartment
floor) designed for use with factory-mounted
running boards. Only use this jack when jacking
up vehicles with factory-mounted running boards
as otherwise the vehicle’s underbody can be
damaged. See separate instructions for
scissors-type jack.
Warning!G
The jack is designed exclusively for jacking
up the vehicle at the jack take-up brackets
built into both sides of the vehicle. To help
avoid personal injury, use the jack only to lift
the vehicle during a wheel change. Never
get beneath the vehicle while it is supported
by the jack. Keep hands and feet away from
the area under the lifted vehicle. Always
firmly set parking brake and block wheels
before raising vehicle with jack.
Do not disengage parking brake while the
vehicle is raised. Be certain that the jack is
always vertical (plumb line) when in use,
especially on hills. Always try to use the jack
on level surface. Make sure that the jack
arm is fully seated in the jack take-up brack-
et. Always lower the vehicle onto sufficient
capacity jackstands before working under
the vehicle.
Page 527 of 595
526 Practical hints
Flat tire
Removing the wheel
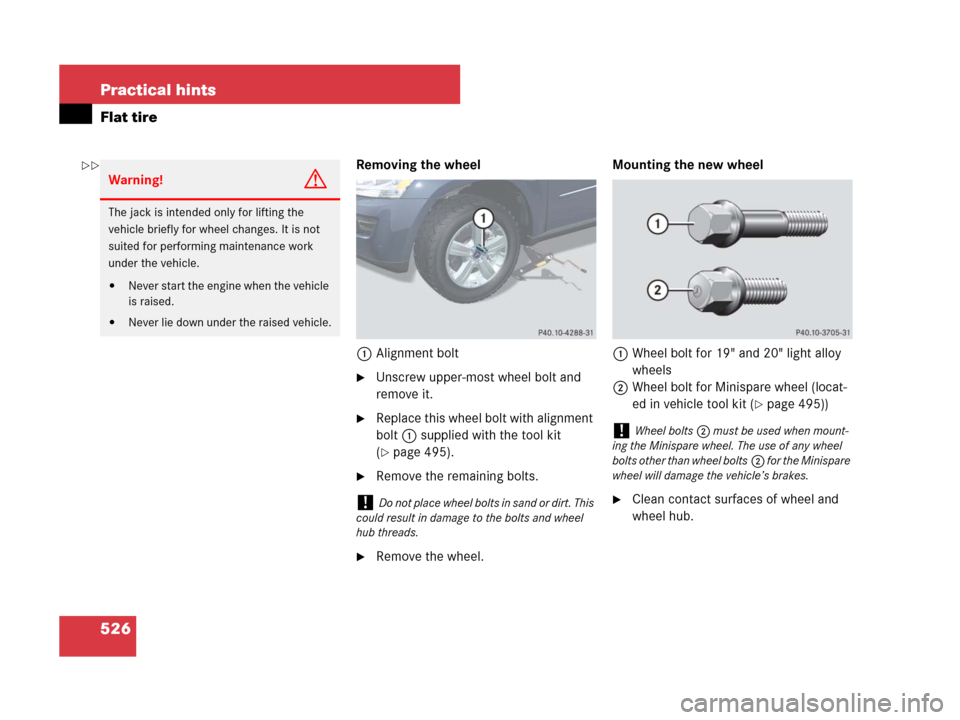
1Alignment bolt
�Unscrew upper-most wheel bolt and
remove it.
�Replace this wheel bolt with alignment
bolt1 supplied with the tool kit
(
�page 495).
�Remove the remaining bolts.
�Remove the wheel.Mounting the new wheel
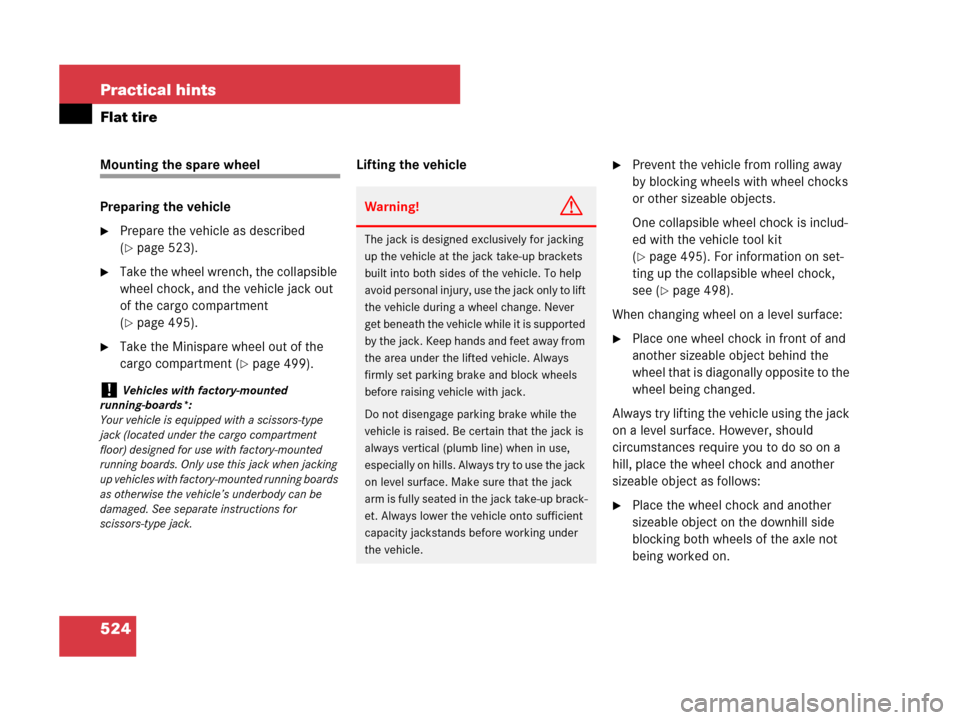
1Wheel bolt for 19" and 20" light alloy
wheels
2Wheel bolt for Minispare wheel (locat-
ed in vehicle tool kit (
�page 495))
�Clean contact surfaces of wheel and
wheel hub.
Warning!G
The jack is intended only for lifting the
vehicle briefly for wheel changes. It is not
suited for performing maintenance work
under the vehicle.
�Never start the engine when the vehicle
is raised.
�Never lie down under the raised vehicle.
!Do not place wheel bolts in sand or dirt. This
could result in damage to the bolts and wheel
hub threads.
!Wheel bolts2 must be used when mount-
ing the Minispare wheel. The use of any wheel
bolts other than wheel bolts2 for the Minispare
wheel will damage the vehicle’s brakes.
��
Page 528 of 595
527 Practical hints
Flat tire
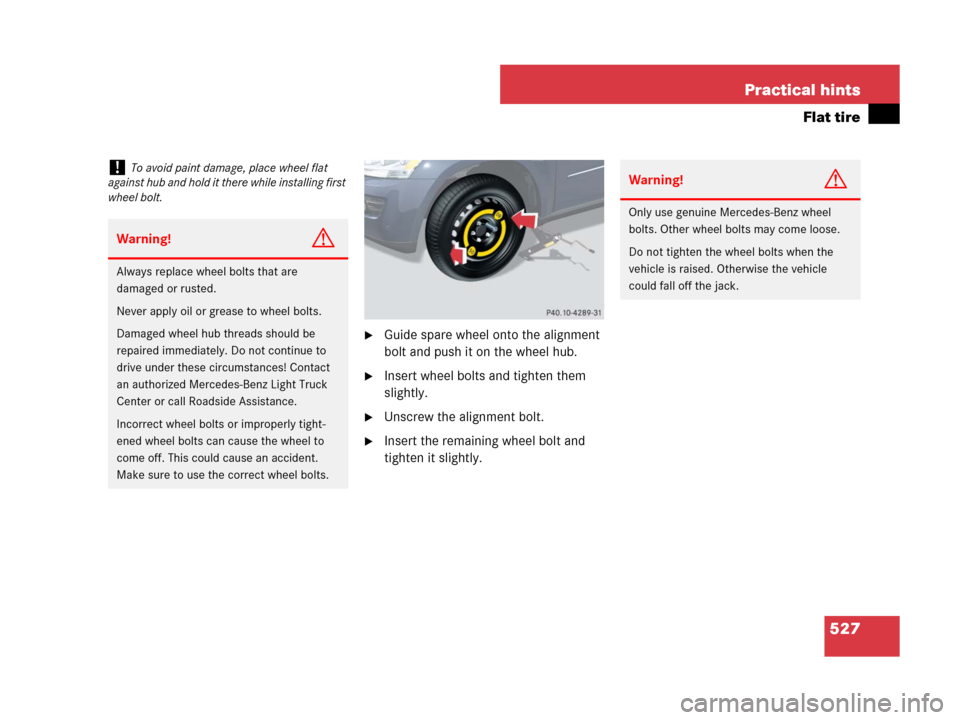
�Guide spare wheel onto the alignment
bolt and push it on the wheel hub.
�Insert wheel bolts and tighten them
slightly.
�Unscrew the alignment bolt.
�Insert the remaining wheel bolt and
tighten it slightly.
!To avoid paint damage, place wheel flat
against hub and hold it there while installing first
wheel bolt.
Warning!G
Always replace wheel bolts that are
damaged or rusted.
Never apply oil or grease to wheel bolts.
Damaged wheel hub threads should be
repaired immediately. Do not continue to
drive under these circumstances! Contact
an authorized Mercedes-Benz Light Truck
Center or call Roadside Assistance.
Incorrect wheel bolts or improperly tight-
ened wheel bolts can cause the wheel to
come off. This could cause an accident.
Make sure to use the correct wheel bolts.
Warning!G
Only use genuine Mercedes-Benz wheel
bolts. Other wheel bolts may come loose.
Do not tighten the wheel bolts when the
vehicle is raised. Otherwise the vehicle
could fall off the jack.