Page 490 of 595
489 Practical hints
What to do if …
Display symbolDisplay messagesPossible cause/consequencePossible solution
HTire pressure
Check tiresThe tire pressure in one or more tires is
already below the minimum value.�Carefully bring the vehicle to a halt,
avoiding abrupt steering and braking
maneuvers.
�Check and adjust tire pressure as
required.
�If necessary, change the wheel.
Check tiresVehicles with Advanced TPMS*:
The tire pressure in one or more tires is
already below the minimum value.
The respective tire is shown in the
multifunction display.�Carefully bring the vehicle to a halt,
avoiding abrupt steering and braking
maneuvers.
�Check and adjust tire pressure as
required.
�If necessary, change the wheel.
Warning!G
Do not drive with a flat tire. A flat tire affects
the ability to steer or brake the vehicle.
You may lose control of the vehicle. Contin-
ued driving with a flat tire will cause exces-
sive heat build-up and possibly a fire.
Page 494 of 595

493 Practical hints
What to do if …
Display symbolDisplay messagesPossible cause/consequencePossible solution
kDiff. lock system malfunct.
Visit workshopThe differential locks* are
malfunctioning.�Do not drive faster than 50 mph
(80 km/h).
�Have the vehicle checked at an autho-
rized Mercedes-Benz Light Truck
Center.
Diff. Lock System
overheated. Wait briefly.The differential locks* are too hot
and have been deactivated as a re-
sult.�Continue driving with added caution.
The lock function is unavailable.
�Wait for the lock system to cool down.
The differential locks will be reactivat-
ed as soon as they have cooled off.
mStop vehicle
Engage parking brakeA shifting procedure could not be
completed. LOW RANGE* is in neu-
tral position. There is no connection
between the engine and the drive
wheels.�Do not attempt to continue driving.
You could otherwise damage the
vehicle’s drivetrain.
�Let the vehicle coast to a halt.
� Engage the parking brake.
�Perform the shifting procedure again
(
�page 204).
Page 495 of 595

494 Practical hints
What to do if …
Display symbolDisplay messagesPossible cause/consequencePossible solution
mStop vehicle
Engage parking brakeThe LOW RANGE system* could only
partially carry out the shifting proce-
dure or it could not carry out the
shifting procedure at all. The system
is in idle mode. No power is being
transmitted to the drive wheels.�Do not continue driving.
�Carefully let the vehicle coast to a
stop.
�Firmly depress the parking brake.
�Shift gears again in HIGH RANGE or
LOW RANGE (
�page 204).
Visit workshop
If parked engage pk. brakeThe LOW RANGE system* is
malfunctioning.�Do not drive faster than 50 mph
(80 km/h).
�Engage the parking brake if parked.
�Visit an authorized Mercedes-Benz
Light Truck Center as soon as possi-
ble.
max. speed 25 mphSpeed too high for shifting proce-
dure.�Continue driving more slowly.
max. speed 40 mphSpeed too high for shifting proce-
dure.�Continue driving more slowly.
shift briefly
into NYou have reduced engine speed. You
may now carry out a shifting proce-
dure.�Briefly shift automatic transmission
to positionN.
Shifting procress canceled
ReactivateThe shifting procedure was not car-
ried out.�Repeat the shifting procedure if
desired.
Page 498 of 595

497 Practical hints
Where will I find ...?
Vehicle jackThe vehicle jack is located underneath the
cargo compartment floor.
Storage position
�Remove vehicle jack from its storage
compartment (
�page 496).
�Turn crank handle in the direction of ar-
row as far as it will go.
!Vehicles with factory-mounted
running-boards*:
Your vehicle is equipped with a scissors-type
jack (located under the cargo compartment
floor) designed for use with factory-mounted
running boards. Only use this jack when jacking
up vehicles with factory-mounted running boards
as otherwise the vehicle’s underbody can be
damaged. See separate instructions for scis-
sors-type jack.
!To prevent damage, always disengage the
strap of the securing hook and lower the cargo
compartment floor (
�page 495) before closing
the tailgate.
Warning!G
The jack is designed exclusively for jacking
up the vehicle at the jack take-up brackets
built into both sides of the vehicle. To help
avoid personal injury, use the jack only to lift
the vehicle during a wheel change. Never
get beneath the vehicle while it is supported
by the jack. Keep hands and feet away from
the area under the lifted vehicle. Always
firmly set parking brake and block wheels
before raising vehicle with jack.
Do not disengage the parking brake while
the vehicle is raised. Be certain that the jack
is always vertical (plumb line) when in use,
especially on hills. Always try to use the jack
on a level surface.
Make sure that the jack arm is fully seated
in the jack take-up bracket. Always lower
the vehicle onto jackstands of sufficient
capacity before working under the vehicle.
��
Page 509 of 595
508 Practical hints
Replacing bulbs
Bulbs
Safe vehicle operation depends on proper
exterior lighting and signaling. It is there-
fore essential that all bulbs and lamp as-
semblies are in good working order at all
times.
Correct headlamp adjustment is extremely
important. Have headlamps checked and
readjusted at regular intervals and when a
bulb has been replaced. See an authorized
Mercedes-Benz Light Truck Center for
headlamp adjustment.iIf the headlamps or front fog lamps are
fogged up on the inside as a result of high humid-
ity, driving the vehicle a distance with the lights
on should clear up the fogging.iSubstitute bulbs will be brought into use
when the following lamps malfunction:
�Turn signal lamps
�Brake lamps
�Parking lamps
�Tail lamps
Read and observe the messages in the multi-
function display (
�page 481).
Page 510 of 595
509 Practical hints
Replacing bulbs
Front lamps
Rear lamps
LampType
1Parking and standing
lampW5W
2Headlamps:
High beam/high beam
flasher
H7 (55 W)
Bi-Xenon headlamps*:
High beam/high beam
flasher spot lamp
H7 (55 W)
3Headlamps:
Low beam
H7 (55 W)
Bi-Xenon headlamps*:
Low beam1
1Vehicles with Bi-Xenon* headlamps: Do not re-
place the Bi-Xenon bulbs yourself. Contact an
authorized Mercedes-Benz Light Truck Center.
D2S-35 W
4Additional turn signal
lampLED
5Side marker lampWY 5 W
LampType
6Turn signal lamp3457 AK
S-8
(30/2.2 cp
bulb)
7Front fog lampH11 (55 W)
Corner-illuminating
front fog lamp*
H11 (55 W)
LampType
8High mounted brake
lamp
LED
9Backup lampP21W
aTail, brake, parking,
standing, side marker
lampP21/4W
bTurn signal lampPY 21 W
cRear fog lamp (driver’s
side only)P21/4W
dLicense plate lampsC5W
Page 511 of 595

510 Practical hints
Replacing bulbs
Notes on bulb replacement
�Only use 12-volt bulbs of the same type
and with the specified watt rating.
�Switch lights off before changing a bulb
to prevent short circuits.
�Always use a clean lint-free cloth when
handling bulbs.
�Your hands should be dry and free of oil
and grease.
�If the newly installed bulb does not
come on, visit an authorized
Mercedes-Benz Light Truck Center.Have the LEDs and bulbs for the following
lamps replaced by an authorized
Mercedes-Benz Light Truck Center:
�the additional turn signal lamps in the
exterior rear view mirrors
�the high mounted brake lamp
�the Bi-Xenon* low beam lamps
�the Bi-Xenon high beam flasher spot-
light*
Warning!G
Bulbs and bulb sockets can be very hot.
Allow the lamp to cool down before chang-
ing a bulb.
Keep bulbs out of reach of children.
Halogen lamps contain pressurized gas.
A bulb can explode if you:
�touch or move it when hot
�drop the bulb
�scratch the bulb
Wear eye and hand protection.
Because of high voltage in Xenon lamps, it is
dangerous to replace the bulb or repair the
lamp and its components. We recommend
that you have such work done by a qualified
technician.
!Do not replace the LEDs yourself. You could
otherwise damage the LEDs or parts of the vehi-
cle. Only have the LEDs replaced by a an autho-
rized Mercedes-Benz Light Truck Center.
iReplacing the bulbs for the front lamps is a
technically complex process. For your conve-
nience, we recommend that you have this work
carried out by an authorized Mercedes-Benz
Light Truck Center.
Have the headlamp adjustment checked
regularly.
Page 518 of 595
517 Practical hints
Replacing bulbs
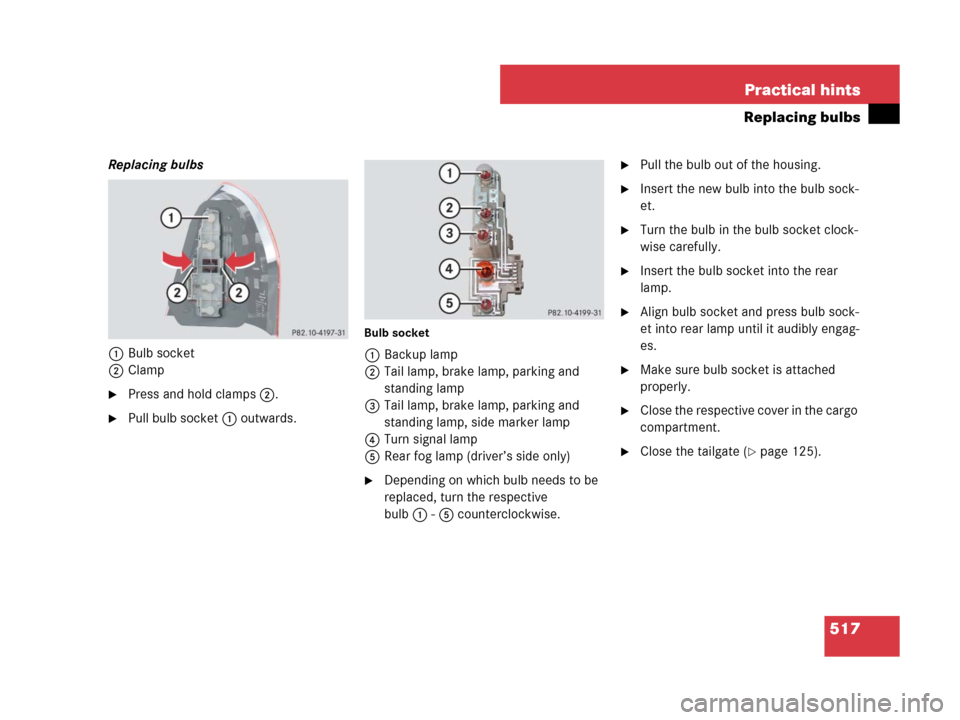
Replacing bulbs
1Bulb socket
2Clamp
�Press and hold clamps2.
�Pull bulb socket1 outwards.
Bulb socket
1Backup lamp
2Tail lamp, brake lamp, parking and
standing lamp
3Tail lamp, brake lamp, parking and
standing lamp, side marker lamp
4Turn signal lamp
5Rear fog lamp (driver’s side only)
�Depending on which bulb needs to be
replaced, turn the respective
bulb1-5 counterclockwise.
�Pull the bulb out of the housing.
�Insert the new bulb into the bulb sock-
et.
�Turn the bulb in the bulb socket clock-
wise carefully.
�Insert the bulb socket into the rear
lamp.
�Align bulb socket and press bulb sock-
et into rear lamp until it audibly engag-
es.
�Make sure bulb socket is attached
properly.
�Close the respective cover in the cargo
compartment.
�Close the tailgate (�page 125).


Bi-Xenon headlamps*:
High beam/high beam
flasher")