Page 482 of 595

481 Practical hints
What to do if …
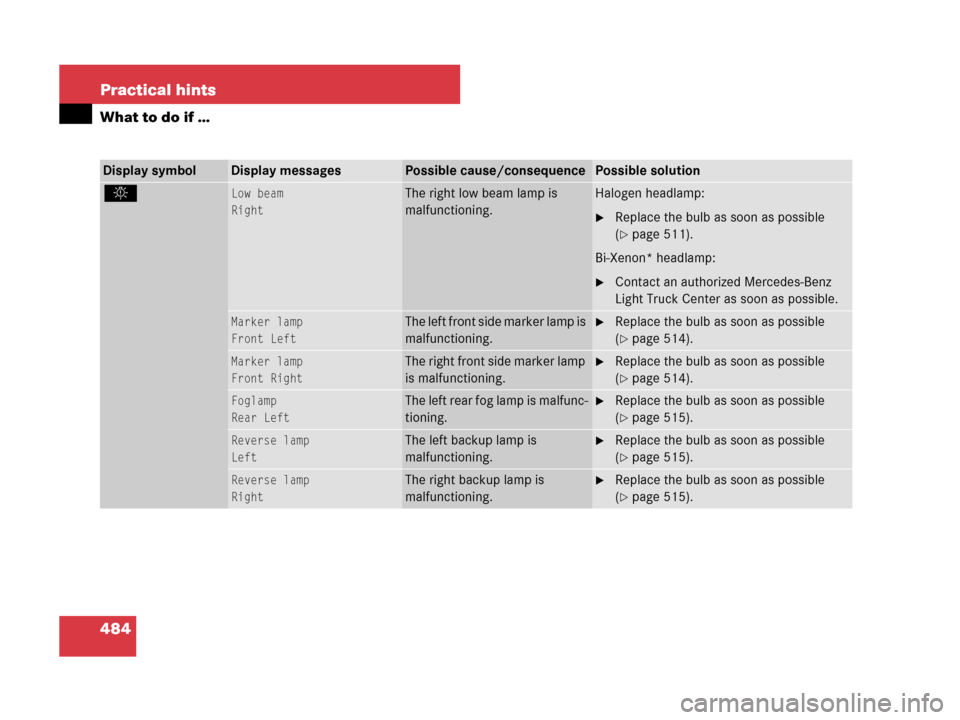
Display symbolDisplay messagesPossible cause/consequencePossible solution
. 3rd brake lampThe high mounted brake lamp is
malfunctioning. This message
will only appear if a critical num-
ber of LEDs have stopped work-
ing.�Contact an authorized Mercedes-Benz
Light Truck Center as soon as possible.
Active headlamps
inoperativeThe active Bi-Xenon* headlamps
system is malfunctioning.�Contact an authorized Mercedes-Benz
Light Truck Center as soon as possible.
Brake lamp
LeftThe left brake lamp is malfunc-
tioning. A substitute bulb is
being used.�Replace the bulb as soon as possible
(
�page 515).
Brake lamp
RightThe right brake lamp is malfunc-
tioning. A substitute bulb is
being used.�Replace the bulb as soon as possible
(
�page 515).
Display malfunction
Visit workshopThe display for the lamps or the
system is malfunctioning.�Contact an authorized Mercedes-Benz
Light Truck Center as soon as possible.
Front foglamp
LeftThe left front fog lamp is
malfunctioning.�Replace the bulb as soon as possible
(
�page 514).
Front foglamp
RightThe right front fog lamp is
malfunctioning.�Replace the bulb as soon as possible
(
�page 514).
Page 485 of 595
484 Practical hints
What to do if …
Display symbolDisplay messagesPossible cause/consequencePossible solution
. Low beam
RightThe right low beam lamp is
malfunctioning.Halogen headlamp:
�Replace the bulb as soon as possible
(
�page 511).
Bi-Xenon* headlamp:
�Contact an authorized Mercedes-Benz
Light Truck Center as soon as possible.
Marker lamp
Front LeftThe left front side marker lamp is
malfunctioning.�Replace the bulb as soon as possible
(
�page 514).
Marker lamp
Front RightThe right front side marker lamp
is malfunctioning.�Replace the bulb as soon as possible
(
�page 514).
Foglamp
Rear LeftThe left rear fog lamp is malfunc-
tioning.�Replace the bulb as soon as possible
(
�page 515).
Reverse lamp
LeftThe left backup lamp is
malfunctioning.�Replace the bulb as soon as possible
(
�page 515).
Reverse lamp
RightThe right backup lamp is
malfunctioning.�Replace the bulb as soon as possible
(
�page 515).
Page 509 of 595
508 Practical hints
Replacing bulbs
Bulbs
Safe vehicle operation depends on proper
exterior lighting and signaling. It is there-
fore essential that all bulbs and lamp as-
semblies are in good working order at all
times.
Correct headlamp adjustment is extremely
important. Have headlamps checked and
readjusted at regular intervals and when a
bulb has been replaced. See an authorized
Mercedes-Benz Light Truck Center for
headlamp adjustment.iIf the headlamps or front fog lamps are
fogged up on the inside as a result of high humid-
ity, driving the vehicle a distance with the lights
on should clear up the fogging.iSubstitute bulbs will be brought into use
when the following lamps malfunction:
�Turn signal lamps
�Brake lamps
�Parking lamps
�Tail lamps
Read and observe the messages in the multi-
function display (
�page 481).
Page 510 of 595
509 Practical hints
Replacing bulbs
Front lamps
Rear lamps
LampType
1Parking and standing
lampW5W
2Headlamps:
High beam/high beam
flasher
H7 (55 W)
Bi-Xenon headlamps*:
High beam/high beam
flasher spot lamp
H7 (55 W)
3Headlamps:
Low beam
H7 (55 W)
Bi-Xenon headlamps*:
Low beam1
1Vehicles with Bi-Xenon* headlamps: Do not re-
place the Bi-Xenon bulbs yourself. Contact an
authorized Mercedes-Benz Light Truck Center.
D2S-35 W
4Additional turn signal
lampLED
5Side marker lampWY 5 W
LampType
6Turn signal lamp3457 AK
S-8
(30/2.2 cp
bulb)
7Front fog lampH11 (55 W)
Corner-illuminating
front fog lamp*
H11 (55 W)
LampType
8High mounted brake
lamp
LED
9Backup lampP21W
aTail, brake, parking,
standing, side marker
lampP21/4W
bTurn signal lampPY 21 W
cRear fog lamp (driver’s
side only)P21/4W
dLicense plate lampsC5W
Page 515 of 595
514 Practical hints
Replacing bulbs
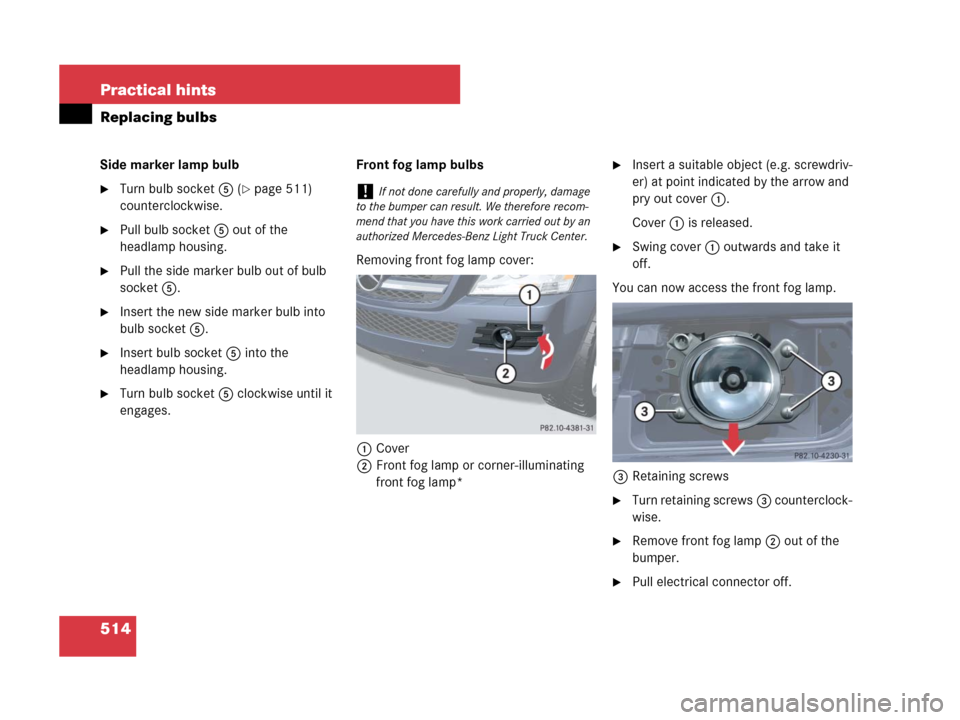
Side marker lamp bulb
�Turn bulb socket5 (�page 511)
counterclockwise.
�Pull bulb socket5 out of the
headlamp housing.
�Pull the side marker bulb out of bulb
socket5.
�Insert the new side marker bulb into
bulb socket5.
�Insert bulb socket5 into the
headlamp housing.
�Turn bulb socket5 clockwise until it
engages.Front fog lamp bulbs
Removing front fog lamp cover:
1Cover
2Front fog lamp or corner-illuminating
front fog lamp*
�Insert a suitable object (e.g. screwdriv-
er) at point indicated by the arrow and
pry out cover1.
Cover1 is released.
�Swing cover1 outwards and take it
off.
You can now access the front fog lamp.
3Retaining screws
�Turn retaining screws3 counterclock-
wise.
�Remove front fog lamp2 out of the
bumper.
�Pull electrical connector off.
!If not done carefully and properly, damage
to the bumper can result. We therefore recom-
mend that you have this work carried out by an
authorized Mercedes-Benz Light Truck Center.
Page 516 of 595

515 Practical hints
Replacing bulbs
4Bulb socket of front fog lamp bulb
�Turn bulb socket4 counterclockwise.
�Pull bulb socket4 out of the housing.
�Pull the front fog lamp bulb out of bulb
socket4.
�Insert the new front fog lamp bulb into
bulb socket4.
�Insert bulb socket4 into the housing.
�Turn bulb socket4 clockwise until it
engages.
�Plug in the electrical connector.
�Insert front fog lamp2 back into
bumper.
�Fasten retaining screws3.
�Reinsert cover1 and press it in until it
engages.
Additional turn signal lamps bulbs
The additional turn signal lamps in the
exterior rear view mirrors have LEDs.
If a malfunction occurs or L EDs f a il to f unc -
tion, the entire turn signal unit must be re-
placed. Have the turn signal unit replaced
by an authorized Mercedes-Benz Light
Truck Center.
Replacing bulbs for rear lamps
Before you start to replace a bulb for a rear
lamp, do the following first:
�Turn the exterior lamp switch to
positionM (
�page 145).
Tail lamp unit
�Open the tailgate (�page 124).
iTo access the bulb socket, you have to
remove the cover in the corresponding side trim
panel of the cargo compartment.
Page 571 of 595
* 230
Air conditioning refrigerant 561
Air conditioning, Cooling 241
Air distribution, Front 236
Air distribution, Rear 245
Air recirculation mode 239
Air v")
570 Index
Automatic climate control (3-zone)* 230
Air conditioning refrigerant 561
Air conditioning, Cooling 241
Air distribution, Front 236
Air distribution, Rear 245
Air recirculation mode 239
Air vents*, second-row seats 246
Air vents*, third-row seats 247
Air vents, Front 236
Air volume 237
Control panel, Front 232
Control panel, Rear 243
Deactivating system 234
Defogging 237
Defrosting 237
Maximum cooling, MAXCOOL 239
Rear passenger compartment 243
Rear window defroster 215
Residual engine heat (REST) 242
Using driver-side settings for
all temperature zones 242Automatic headlamp mode 146
Automatic lighting control,
Interior lighting 152
Automatic locking when driving 130
Automatic transmission 58
Accelerator position 198
Emergency operation
(limp-home mode) 202
Gear ranges 200
Gear selector lever 58, 192
Gear selector lever position 195
Gear shifting malfunctions 202
Hill start assist system 199
Kickdown 198
Shifting procedure 195
Starting the engine 57
Steering wheel gearshift control 201
Towing a trailer 200
Transmission fluid level 382
Transmission positions 196
Automatic Transmission Fluid see ATFB
BabySmartTM
Air bag deactivation system 87, 450
Self-test 87
Backrest
Seat 46
Seat, Lumbar support 139
Seat, Multicontour* 140
Backup lamps
Messages in the
multifunction display 481
Replacing bulbs 515
Bar 416
BAS 105
Lamps in instrument cluster 436
Messages in the
multifunction display 453
Basic cross bars* 297
Batteries, SmartKey
Check lamp 114, 117
Checking battery condition 122
Messages in the
multifunction display 469
Replacing 506
Page 574 of 595

573 Index
Corner-illuminating front fog lamps* 150
Messages in the
multifunction display 481
Replacing bulbs 514
Crossing obstacles 363
Cruise control 257
Activating 259
Messages in the
multifunction display 454
Cup holders 321
Cleaning 322
Front center console 322
Front center console,
Removing/Installing 322
Rear armrest 321
Curb weight 416
D
Date display, Setting 176, 177
Daytime running lamp mode 147
Setting 178
Deep water see Standing water
Defogging windshield 223, 237
Defrosting, Front 223, 237
Defrosting, Rear 215Delayed shut-off
Exterior lamps 179
Interior lighting 180
Department of Transportation see DOT
Diesel engine
Preglow indicator lamp 29
Differential locks* 206
A few words about 206
Messages in the
multifunction display 493
Switching 207
Difficulties
While driving 66
While starting 60
Digital clock see Clock
Digital speedometer 157, 165
Dimensions, Vehicle 558
Direction of rotation (tires) 388
Displays
Digital speedometer 157, 165
Distronic* 265
Maintenance service indicator 422
Messages in the
multifunction display 451
Multifunction display 157Outside temperature 157, 165
Selecting 175
Symbol messages 469
Text messages 453
Vehicle status message 170, 451
Vehicle system settings, Control
system 161, 163, 170
Distance to empty (range), Trip
Computer 187
Distronic* 262
Activating 268
Cleaning system sensor 430
Control system 266
Deactivating 270
Distance warning function* 274
Distance warning function*
activating/deactivating 186
Driving hints 272
Messages in the
multifunction display 455
Sensor cover 430
Warning and indicator lamps 265


Bi-Xenon headlamps*:
High beam/high beam
flasher")