Page 305 of 595

304 Controls in detail
Loading
The gross vehicle weight which is the
weight of the vehicle including fuel, tools,
spare wheel, installed accessories, pas-
sengers and luggage/cargo must never
exceed the load limit and Gross Vehicle
Weight Rating (GVWR) for your vehicle as
specified on the placard located on the
driver’s door B-pillar (
�page 550). In addi-
tion, the load must be distributed in such a
way so that the weight on each axle never
exceeds the Gross Axle Weight Rating
(GAWR) for the front and rear axle. The
GVWR and GAWR for your vehicle are indi-
cated on the certification label which can
be found on the driver’s door B-pillar
(
�page 550).
For more information, see “Tire and Load-
ing Information” (
�page 389).
The handling characteristics of a fully load-
ed vehicle depend greatly on the load dis-
tribution. It is therefore recommended to
load the vehicle according to the illustra-
tions shown, with the heaviest items being
placed towards the front of the vehicle.Please pay attention to and comply with
the following instructions when loading the
vehicle and transporting cargo:
�Always place items being carried
against front or rear seat backrests,
and fasten them as securely as possi-
ble.
�The heaviest portion of the cargo
should always be kept as low as possi-
ble against front or rear seat backrests.
For additional safety when transporting
cargo while the rear seats are unoccupied,
fasten the outer seat belts crosswise into
the opposite side buckles.
Cargo tie-down rings
Your vehicle is equipped with eight cargo
tie-down rings.
Carefully secure cargo by applying even
load on all rings with rope of sufficient
strength to hold down the cargo.
iThe cargo compartment is the preferred
place to carry objects. The expanded cargo com-
partment (
�page 306) should only be used for
items which do not fit in the cargo compartment
alone.
iWhile the cargo net* (�page 313) will help
protect you from smaller objects, it cannot pre-
vent the movement of large, heavier objects into
the passenger compartment in an accident, dur-
ing hard braking or sudden maneuvers. Such
items must be properly secured using the cargo
tie-down rings in the cargo compartment floor.
Page 307 of 595

306 Controls in detail
Loading
Hooks
Two hooks are located on the rear com-
partment trim panels, one on each side.
1Hook
Use the hooks to secure light weight items
only. The maximum permissible weight per
hook is 9 lb (4 kg).Expanding cargo compartment
You can separately fold the left and right
rear seat backrests to expand the cargo
compartment.
Warning!G
When expanding the cargo compartment,
always fully fold the corresponding seats
and, if so equipped, always use the
cargo net* (
�page 313) when transporting
cargo.
Unless you are transporting cargo, the back-
rests must remain properly locked in the up-
right position.
In an accident, during hard braking or sud-
den maneuvers, loose items will be thrown
around inside the vehicle, and can cause
injury to vehicle occupants unless the items
are securely fastened in the vehicle.
Always use the cargo tie down rings
(
�page 304).
Warning!G
Never drive the vehicle with the tailgate
open. Deadly carbon monoxide (CO) gases
may enter vehicle interior resulting in un-
consciousness and death.
!When the second-row seats are folded for-
ward, the front seats may not be moved to the
rearmost position. Otherwise you could damage
the front and second-row seats.
Page 310 of 595
309 Controls in detail
Loading
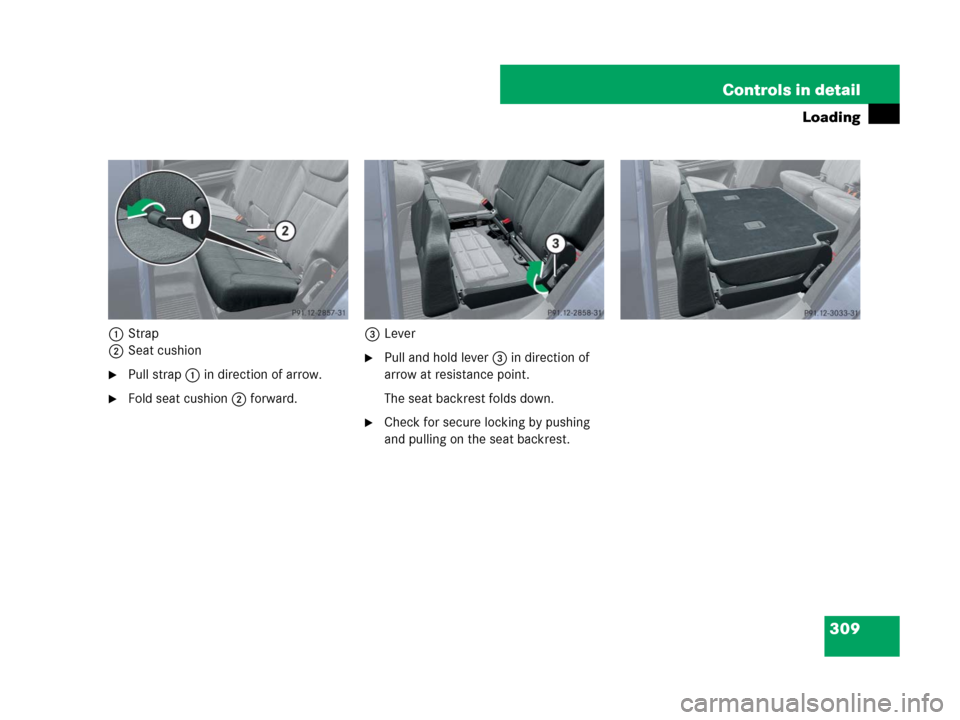
1Strap
2Seat cushion
�Pull strap1 in direction of arrow.
�Fold seat cushion2 forward.3Lever
�Pull and hold lever3 in direction of
arrow at resistance point.
The seat backrest folds down.
�Check for secure locking by pushing
and pulling on the seat backrest.
Page 312 of 595
.
Step 2:
1Seat backrest
2Lever
�Pull and hold lever2 in")
311 Controls in detail
Loading
Returning seats to their original positionStep 1:
�Return third-row seats to its original
position (
�page 310).
Step 2:
1Seat backrest
2Lever
�Pull and hold lever2 in direction of
arrow at resistance point.
�Fold seat backrest1 rearward until it
engages.
�Check for secure locking by pushing
and pulling on seat backrest1.3Seat cushion
�Fold seat cushion3 rearward until it
locks into position.
Warning!G
Make sure all seats are properly locked in
position before driving off. Do not drive with
seats not properly locked.
Never ride in a moving vehicle with the seat
not properly locked as this can be danger-
ous. The seat could move forward and the
seat backrest could fold. You could slide un-
der the seat belt during braking, vehicle ma-
neuvers, or in an accident. If you slide under
it, the belt would apply force at the abdomen
or neck. That could cause serious or even fa-
tal injuries.
The seat backrest and seat belt provide the
best restraint when the wearer is in a nearly
upright position and the belt is properly po-
sitioned on the body.
Page 314 of 595

313 Controls in detail
Loading
�Pull blind2 to the left against the
spring pressure until the spring in the
cover audibly engages.
�Remove the blind.
Installing blind
Cover from the mounts behind second-row
seats
3Cover
�Press on cover3 at its upper edge as
indicated by arrow.
�Remove cover3 by pulling its lower
edge out of the side trim.
�Place left side of blind2 (�page 312)
in left mount.
�Position right side of blind2 over right
mount.
�Press release button1 (�page 312)
and guide cover2 into mount.
�Make sure the cargo compartment
cover blind is securely fastened.
Cargo net*
iBefore installing cargo compartment cover
blind behind the second-row seats, fold the
third-row seats forward (
�page 307).
iBefore installing cargo compartment cover
blind behind the third-row seats, fold the left or
right third-row seat forward (
�page 307). After-
wards, return the left or right third-row seat into
its original position.
iTo avoid loss of the mount covers, insert the
mount covers into the mounts currently not in
use.
Warning!G
Make sure the cargo net is properly engaged
top and bottom position and the tightening
belts are securely fastened.
Never use a damaged cargo net.
To help avoid personal injury from smaller
objects being thrown around in the occu-
pant compartment during a collision or sud-
den maneuver, always use cargo net when
transporting cargo.
The cargo net cannot prevent the movement
of large, heavier objects into the passenger
compartment in an accident. Such items
must be properly secured using the cargo
tie-down rings (
�page 304) in the cargo
compartment floor.
Passenger use of seats behind installed
cargo net is restricted because of the
footwell being taken up by the net.
Page 317 of 595

316 Controls in detail
Useful features
Storage compartments Glove box/CD changer
1Glove box lid release
2Glove box lid
Opening the glove box
�Pull lid release1 in direction of arrow.
Glove box lid2 opens downward.
Closing the glove box
�Push glove box lid2 up to close.Releasing CD changer
1Release button
2AUX-socket (Vehicles without Rear
Seat Entertainment System*)
3CD changer
�Open the glove box (�page 316).
�Press release button1.
CD changer3 is released and swings
down automatically.
For information on CD changer operation,
see separate COMAND system operating
instructions.
Warning!G
To help avoid personal injury during a colli-
sion or sudden maneuver, exercise care
when storing objects in the vehicle. Put lug-
gage or cargo in the cargo compartment if
possible. Do not pile luggage or cargo higher
than the seat backs.
If so equipped, always use the cargo net*
when transporting cargo. The cargo net*
cannot secure hard or heavy objects.
Parcel nets cannot secure hard or heavy ob-
jects.
Keep compartment lids closed. This will help
to prevent stored objects from being thrown
about and injuring vehicle occupants during
�braking
�vehicle maneuvers
�an accident
Page 324 of 595

323 Controls in detail
Useful features
Opening the ashtray
�Briefly touch cover plate2.
The ashtray opens automatically.
Removing ashtray insert
�Grip the ashtray insert1 on the sides
and pull it out upwards.
Reinstalling ashtray insert
�Install ashtray insert1.
�Close ashtray cover plate2.Rear center console ashtray
(second-row)
1Ashtray
2Ashtray coverOpening rear ashtray
�Briefly press ashtray cover2.
The ashtray1 opens automatically.
Removing rear ashtray insert
�Grip the insert on the sides and pull it
out upwards.
Reinstalling rear ashtray insert
�Install ashtray insert.
�Close the ashtray.
Cigarette lighter
�Switch on the ignition (�page 42).
�Push in cigarette lighter.
The cigarette lighter will pop out auto-
matically when hot.
Warning!G
Remove ashtray only with vehicle standing
still. Set the parking brake to secure vehicle
from movement. Set automatic transmis-
sion toP. With the automatic transmission
set toP, turn off the engine.
!Close the ashtray when not in use and be-
fore folding the second-row seats
Page 327 of 595
326 Controls in detail
Useful features
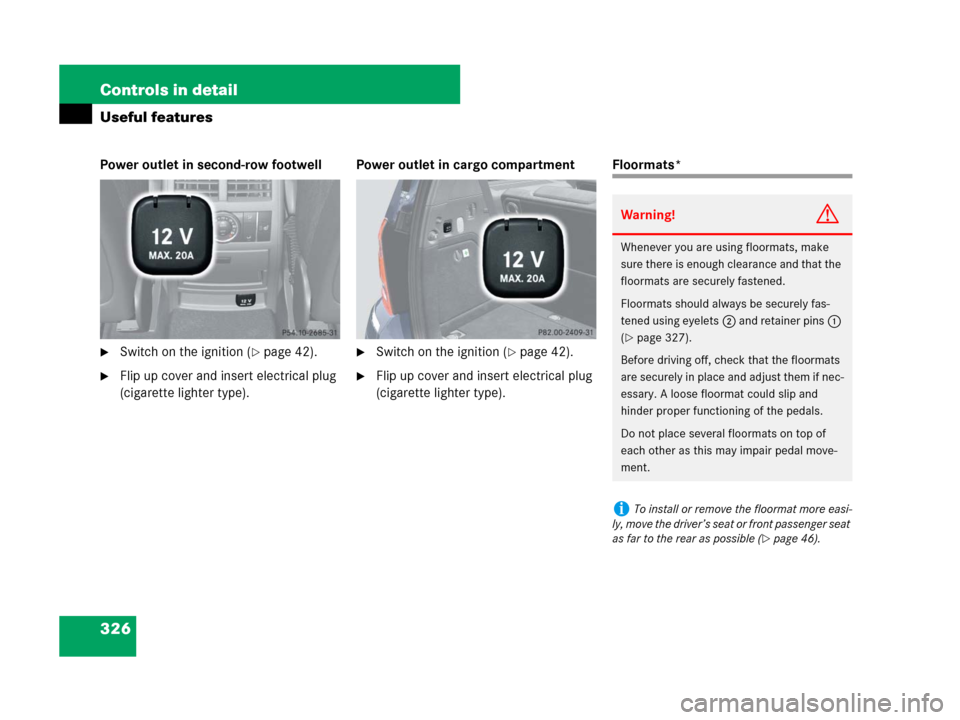
Power outlet in second-row footwell
�Switch on the ignition (�page 42).
�Flip up cover and insert electrical plug
(cigarette lighter type).Power outlet in cargo compartment
�Switch on the ignition (�page 42).
�Flip up cover and insert electrical plug
(cigarette lighter type).
Floormats*
Warning!G
Whenever you are using floormats, make
sure there is enough clearance and that the
floormats are securely fastened.
Floormats should always be securely fas-
tened using eyelets2 and retainer pins1
(
�page 327).
Before driving off, check that the floormats
are securely in place and adjust them if nec-
essary. A loose floormat could slip and
hinder proper functioning of the pedals.
Do not place several floormats on top of
each other as this may impair pedal move-
ment.
iTo install or remove the floormat more easi-
ly, move the driver’s seat or front passenger seat
as far to the rear as possible (
�page 46).