Page 498 of 595

497 Practical hints
Where will I find ...?
Vehicle jackThe vehicle jack is located underneath the
cargo compartment floor.
Storage position
�Remove vehicle jack from its storage
compartment (
�page 496).
�Turn crank handle in the direction of ar-
row as far as it will go.
!Vehicles with factory-mounted
running-boards*:
Your vehicle is equipped with a scissors-type
jack (located under the cargo compartment
floor) designed for use with factory-mounted
running boards. Only use this jack when jacking
up vehicles with factory-mounted running boards
as otherwise the vehicle’s underbody can be
damaged. See separate instructions for scis-
sors-type jack.
!To prevent damage, always disengage the
strap of the securing hook and lower the cargo
compartment floor (
�page 495) before closing
the tailgate.
Warning!G
The jack is designed exclusively for jacking
up the vehicle at the jack take-up brackets
built into both sides of the vehicle. To help
avoid personal injury, use the jack only to lift
the vehicle during a wheel change. Never
get beneath the vehicle while it is supported
by the jack. Keep hands and feet away from
the area under the lifted vehicle. Always
firmly set parking brake and block wheels
before raising vehicle with jack.
Do not disengage the parking brake while
the vehicle is raised. Be certain that the jack
is always vertical (plumb line) when in use,
especially on hills. Always try to use the jack
on a level surface.
Make sure that the jack arm is fully seated
in the jack take-up bracket. Always lower
the vehicle onto jackstands of sufficient
capacity before working under the vehicle.
��
Page 499 of 595
498 Practical hints
Where will I find ...?
Operational position
�Turn crank handle clockwise.
Before storing the vehicle jack in its stor-
age compartment:
�The vehicle jack should be fully col-
lapsed.
�The handle must be folded in (storage
position).Setting up the collapsible wheel chock
The collapsible wheel chock serves to ad-
ditionally secure the vehicle, e.g. while
changing the wheel.
1Tilt the plate upward
2Fold the lower plate outward
3Insert the plate
�Tilt both plates upward1.
�Fold the lower plate outward2.
�Guide the tabs of the lower plate all the
way into the openings of base plate3.
For information on where to place wheel
chocks when changing a wheel, see “Lift-
ing the vehicle” (
�page 524).
��
Page 522 of 595

521 Practical hints
Replacing wiper blades
Installing
1Installing
2Tab
3Attachment
4Guide tab
5Cover
�Slide the wiper blade into
attachment3 in direction of
arrow1.
�Make sure guide tab4 will be placed
under cover5 when fully inserting the
wiper blade into attachment.
�Let tab2 latch into both recesses of
attachment3.
�Check if the wiper blade is securely
fastened.
�Fold the wiper arm backward to rest on
the windshield.
Make sure you hold on to the wiper arm
when folding it back.
Rear wiper blade
Warning!G
For safety reasons, switch off wipers and
remove SmartKey from starter switch
(vehicles with KEYLESS-GO*: Make sure the
vehicle’s on-board electronics have
status
0) before replacing a wiper blade.
Otherwise the motor could suddenly turn on
and cause injury.
!Hold on to the wiper when folding the wiper
arm back. If released, the force of the impact
from the tensioning spring could crack the rear
window.
Do not allow the wiper arm to contact the rear
window glass without a wiper blade inserted.
Make sure the wiper blade is properly installed.
Improperly installed wiper blades may cause
rear window damage.
For your convenience, we recommend that you
have this work carried out by an authorized
Mercedes-Benz Light Truck Center.
Page 523 of 595
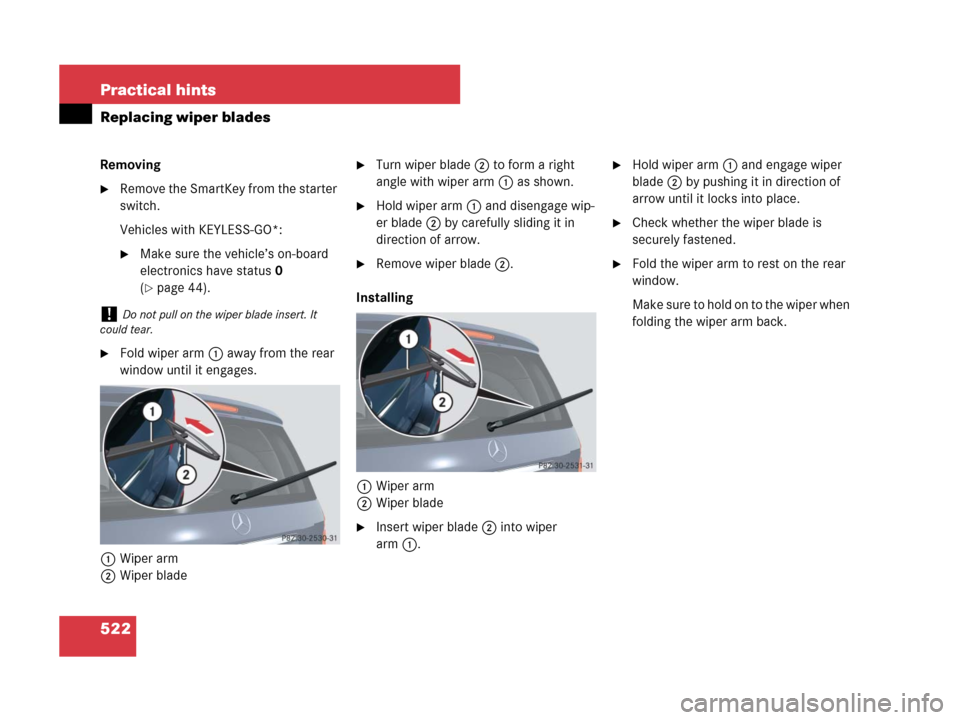
522 Practical hints
Replacing wiper blades
Removing
�Remove the SmartKey from the starter
switch.
Vehicles with KEYLESS-GO*:
�Make sure the vehicle’s on-board
electronics have status0
(
�page 44).
�Fold wiper arm1 away from the rear
window until it engages.
1Wiper arm
2Wiper blade
�Turn wiper blade2 to form a right
angle with wiper arm1 as shown.
�Hold wiper arm1 and disengage wip-
er blade2 by carefully sliding it in
direction of arrow.
�Remove wiper blade2.
Installing
1Wiper arm
2Wiper blade
�Insert wiper blade2 into wiper
arm1.
�Hold wiper arm1 and engage wiper
blade2 by pushing it in direction of
arrow until it locks into place.
�Check whether the wiper blade is
securely fastened.
�Fold the wiper arm to rest on the rear
window.
M a k e s u r e t o h o l d o n t o t h e w i p e r w h e n
folding the wiper arm back.
!Do not pull on the wiper blade insert. It
could tear.
Page 532 of 595
 battery, also referred to as “fleece” bat-
tery. Such batteries do not require topping-up of
the electrolyte level.")
531 Practical hints
Battery
!The battery is a valve-regulated lead acid
(VRLA) battery, also referred to as “fleece” bat-
tery. Such batteries do not require topping-up of
the electrolyte level. VRLA batteries therefore do
not have cell caps and the battery cover is
non-removable. Do not attempt to open the bat-
tery as otherwise the battery will be damaged.
Even though VRLA batteries do not require top-
ping-up of the electrolyte level and cannot be
opened to check the electrolyte level, the bat-
tery condition must be checked periodically by
performing a battery conductance test. Refer to
Maintenance Booklet for battery condition test-
ing intervals.
As with any other battery, the battery may dis-
charge if the vehicle is not operated for an ex-
tended period of time. You can connect a battery
maintenance charge unit tested and approved
for use on your vehicle model or disconnect the
battery to prevent battery discharge. Contact an
authorized Mercedes-Benz Light Truck Center
for more information.!The factory-equipped VRLA battery is
leak-proofed. Only use a battery as replacement
that has the same security features and is of
identical size, voltage, and capacity as the
factory-equipped battery.
The battery, the battery ventilation hose
(
�page 536) and the lateral plug (�page 536)
must always be securely installed when the
vehicle is in operation.
Warning!G
Jump starting must only be done using the
jump-start contacts located in the engine
compartment (
�page 538).
Warning!G
Failure to follow these instructions can re-
sult in severe injury or death.
Observe all safety instructions and precau-
tions when handling automotive batteries
(
�page 530).
Never lean over batteries while connecting,
you might get injured.
Battery fluid contains sulfuric acid. Do not
allow this fluid to come in contact with eyes,
skin or clothing. In case it does, immediately
flush affected area with water and seek
medical help if necessary.
A battery will also produce hydrogen gas,
which is flammable and explosive. Keep
flames or sparks away from battery, avoid
improper connection of jumper cables,
smoking etc.
Page 537 of 595

cBattery
�Tilt the batteryc with the negative
terminal side upwards.
�Take out the battery maintaining its
tilted position in the direction of the
arro")
536 Practical hints
Battery
Step 8 (Removing)
cBattery
�Tilt the batteryc with the negative
terminal side upwards.
�Take out the battery maintaining its
tilted position in the direction of the
arrow.Step 9 (Reinstalling)
�Carry out step 8 in reverse order
(
�page 536).
Battery, shown removed for illustration
9Battery ventilation hose
dVent plug
�Carry out step 10 to reconnect the
battery (
�page 536).
�Follow steps 5 to 1 in reverse order to
completely reinstall the battery
(
�page 535) to (�page 532).
Step 10 (Reconnecting)
�If the battery has been removed, first
carry out step 8 in reverse order
(
�page 536).
�Open the driver’s door.
�Make sure all electrical consumers are
turned off.
�Make sure the SmartKey is removed
from the starter switch.
Vehicles with KEYLESS-GO*:
�Make sure the vehicle’s on-board
electronics have status0 (Open the
driver’s door. With the driver’s door
open, the vehicle’s on-board elec-
tronics have status0, same as with
the SmartKey removed from the
starter switch (
�page 41)).
!The battery, the battery ventilation hose9
and the lateral plugd (
�page 536) must
always be securely installed when the vehicle is
in operation.
Page 543 of 595

542 Practical hints
Towing the vehicle
Installing towing eye bolt
Depending on whether you are towing a
vehicle or you are being towed, the towing
eye bolt can be screwed into threaded
holes which are located behind covers on
the right-hand side of each bumper.
1Cover1CoverRemoving cover
�Press mark on cover1 as indicated by
the arrow.
�Lift off cover1 to reveal the threaded
hole for towing eye bolt.
Installing towing eye bolt
�Take the towing eye bolt and wheel
wrench from the vehicle tool kit
(
�page 495).
�Screw towing eye bolt in clockwise to
its stop and tighten with wheel wrench.
Removing towing eye bolt
�Loosen towing eye bolt counterclock-
wise with wheel wrench.
�Unscrew towing eye bolt.
�Store the towing eye bolt and wheel
wrench back into the vehicle tool kit
(
�page 495).
Warning!G
In order to avoid possible serious burns or
injury, use extreme caution when removing
the rear cover, because the rear exhaust
pipe is extremely hot.
iThe cover1 is secured to the bumper by a
plastic cord.
Page 545 of 595

544 Practical hints
Fuses
The electrical fuses in your vehicle serve to
switch off malfunctioning power circuits.
If a fuse is blown, the components and sys-
tems secured by that fuse will stop operat-
ing.If a newly inserted fuse blows again, have
the cause determined and rectified by an
authorized Mercedes-Benz Light Truck
Center.
The following aids are available to help you
replace fuses. They are included with the
vehicle tool kit (
�page 495):
�Fuse chart
The fuse chart explains the fuse alloca-
tion and fuse amperages.
�Spare fuses
�Fuse extractor
The electrical fuses are located in different
fuse boxes:
�Fuse box in engine compartment
(
�page 545)
�Fuse box in cargo compartment
(
�page 545)
�Fuse box in passenger compartment
(
�page 546)Before replacing fuses:
�Apply parking brake (�page 68).
�Make sure the automatic transmission
is set toP (
�page 194).
The gear position indicator in the multi-
function display should be on
P.
�Turn off all electrical consumers.
�Turn off the engine (�page 41).
�Remove the SmartKey from the starter
switch.
Vehicles with KEYLESS-GO*:
�Open the driver’s door (this puts
the starter switch in position0,
same as with the SmartKey re-
moved from the starter switch). The
driver’s door then can be closed
again.
Warning!G
Only use fuses approved by Mercedes-Benz
with the specified amperage for the system
in question and do not attempt to repair or
bridge a blown fuse. Using other than ap-
proved fuses or using repaired or bridged
fuses may cause an overload leading to a
fire, and/or cause damage to electrical
components and/or systems. Have the
cause determined and remedied by an au-
thorized Mercedes-Benz Light Truck Center.
iA blown fuse must be replaced by an appro-
priate spare fuse (recognizable by its color or the
fuse rating given on the fuse) of the amperage
recommended in the fuse chart. Any
Mercedes-Benz Light Truck Center will be glad to
advise you on this subject.