539 Practical hints
Jump starting
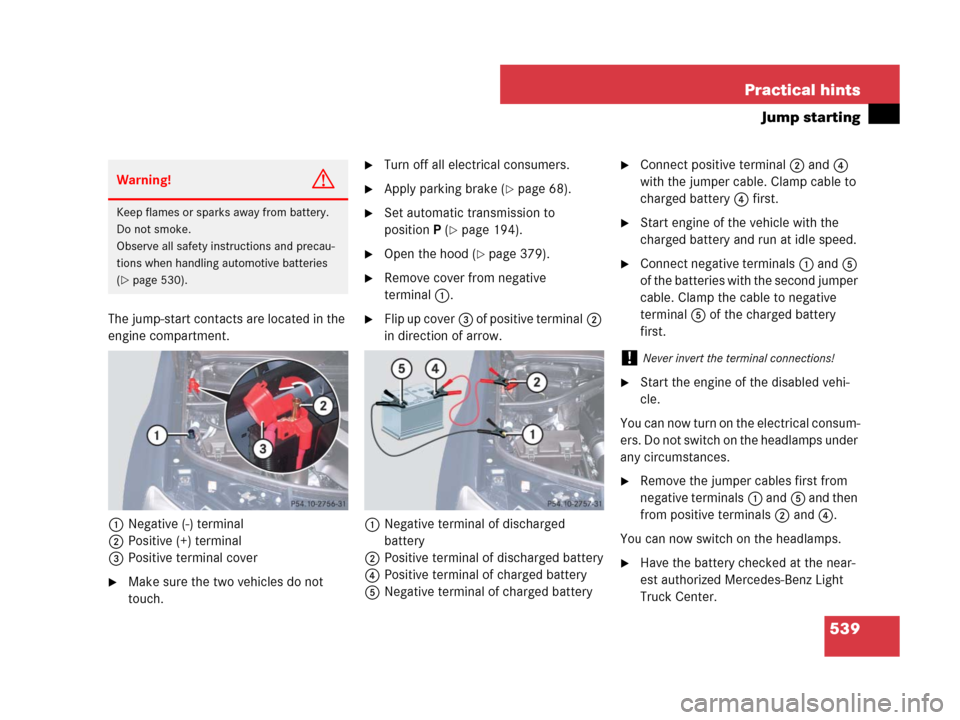
The jump-start contacts are located in the
engine compartment.
1Negative (-) terminal
2Positive (+) terminal
3Positive terminal cover
�Make sure the two vehicles do not
touch.
�Turn off all electrical consumers.
�Apply parking brake (�page 68).
�Set automatic transmission to
positionP (
�page 194).
�Open the hood (�page 379).
�Remove cover from negative
terminal1.
�Flip up cover3 of positive terminal2
in direction of arrow.
1Negative terminal of discharged
battery
2Positive terminal of discharged battery
4Positive terminal of charged battery
5Negative terminal of charged battery
�Connect positive terminal2 and4
with the jumper cable. Clamp cable to
charged battery4 first.
�Start engine of the vehicle with the
charged battery and run at idle speed.
�Connect negative terminals1 and5
of the batteries with the second jumper
cable. Clamp the cable to negative
terminal5 of the charged battery
first.
�Start the engine of the disabled vehi-
cle.
You can now turn on the electrical consum-
ers. Do not switch on the headlamps under
any circumstances.
�Remove the jumper cables first from
negative terminals1 and5 and then
from positive terminals2 and4.
You can now switch on the headlamps.
�Have the battery checked at the near-
est authorized Mercedes-Benz Light
Truck Center.
Warning!G
Keep flames or sparks away from battery.
Do not smoke.
Observe all safety instructions and precau-
tions when handling automotive batteries
(
�page 530).
!Never invert the terminal connections!
545 Practical hints
Fuses
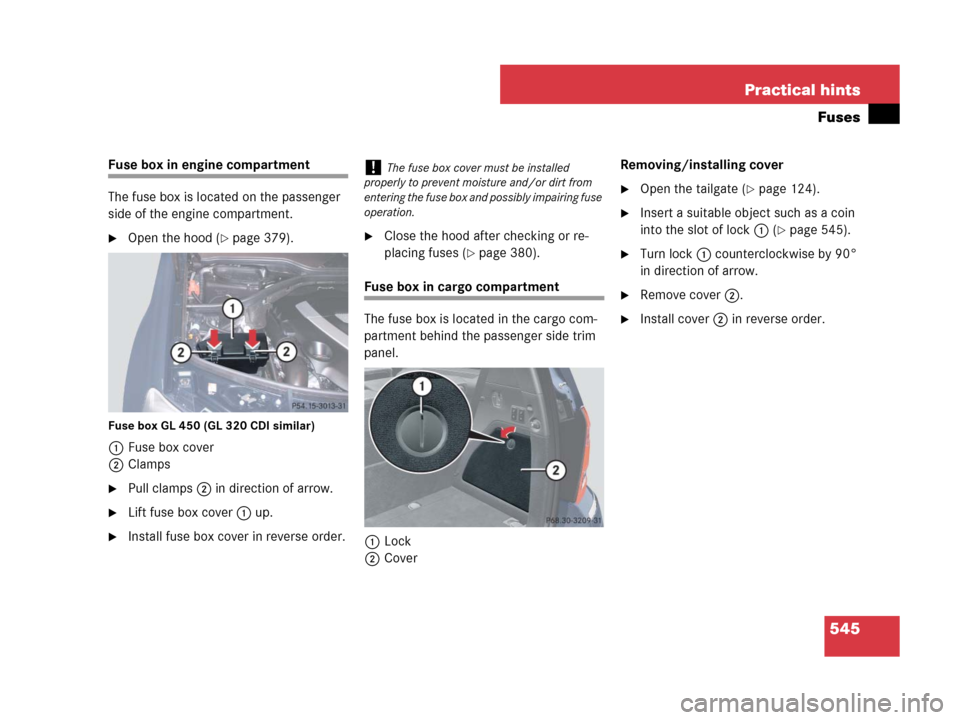
Fuse box in engine compartment
The fuse box is located on the passenger
side of the engine compartment.
�Open the hood (�page 379).
Fuse box GL 450 (GL 320 CDI similar)
1Fuse box cover
2Clamps
�Pull clamps2 in direction of arrow.
�Lift fuse box cover1 up.
�Install fuse box cover in reverse order.
�Close the hood after checking or re-
placing fuses (
�page 380).
Fuse box in cargo compartment
The fuse box is located in the cargo com-
partment behind the passenger side trim
panel.
1Lock
2CoverRemoving/installing cover
�Open the tailgate (�page 124).
�Insert a suitable object such as a coin
into the slot of lock1 (
�page 545).
�Turn lock1 counterclockwise by 90°
in direction of arrow.
�Remove cover2.
�Install cover2 in reverse order.
!The fuse box cover must be installed
properly to prevent moisture and/or dirt from
entering the fuse box and possibly impairing fuse
operation.
578 Index
Headlamps
Automatic headlamp mode 146
Bi-Xenon* 481, 512
Cleaning lenses 429
Cleaning system* 210, 384
Halogen 511
High beam see High beam flasher
High beam see High beam headlamps
Light sensor, Messages in the
multifunction display 483
Low beam see Low beam headlamps
Manual headlamp mode 146
Messages in the
multifunction display 481, 482,
483, 484, 485, 486
Replacing bulbs 508, 509
Switch 62, 145
Heated seats see Seat heating*
Heated steering wheel* 328
Height adjustment
Vehicle level control
(Vehicles with Air suspension
package) 283
Vehicle level control
(Vehicles with enhanced Off-road
Package*) 285High beam flasher 63, 149
High beam headlamps
Indicator lamp 29
Messages in the
multifunction display 482
Replacing bulbs 509, 511, 512
Switching on 63, 149
High mounted brake lamp 509
Hill start assist system 199
Hinged quarter windows* see
Power windows
Hood 379
Messages in the
multifunction display 478
Opening 379
Hooks
Loading 306
Horn 25
HVAC see Climate control or
automatic climate control (3-zone)*
Hydroplaning 354I
Identification labels see Labels
Ignition 42, 44, 59
Immobilizer 111
Indicator lamps see Lamps, Indicator and
warning
Infant and child restraint systems see
Children in the vehicle
Inflation pressure see Tires,
Inflation pressures
Information button see Tele Aid
Infrared reflecting windshield* 345
Inside door handle 122
Instrument cluster 26, 28, 155
Illumination brightness 155
Lamps 436
Messages in display see Multifunction
display messages
Multifunction display 157
Outside temperature indicator 156
Selecting language 174
Instrument lighting see Instrument cluster,
Illumination brightness
Instrument panel see Instrument cluster