Page 540 of 595
 terminal
2Positive (+) terminal
3Positive terminal cover
�Make sure the two vehicles do")
539 Practical hints
Jump starting
The jump-start contacts are located in the
engine compartment.
1Negative (-) terminal
2Positive (+) terminal
3Positive terminal cover
�Make sure the two vehicles do not
touch.
�Turn off all electrical consumers.
�Apply parking brake (�page 68).
�Set automatic transmission to
positionP (
�page 194).
�Open the hood (�page 379).
�Remove cover from negative
terminal1.
�Flip up cover3 of positive terminal2
in direction of arrow.
1Negative terminal of discharged
battery
2Positive terminal of discharged battery
4Positive terminal of charged battery
5Negative terminal of charged battery
�Connect positive terminal2 and4
with the jumper cable. Clamp cable to
charged battery4 first.
�Start engine of the vehicle with the
charged battery and run at idle speed.
�Connect negative terminals1 and5
of the batteries with the second jumper
cable. Clamp the cable to negative
terminal5 of the charged battery
first.
�Start the engine of the disabled vehi-
cle.
You can now turn on the electrical consum-
ers. Do not switch on the headlamps under
any circumstances.
�Remove the jumper cables first from
negative terminals1 and5 and then
from positive terminals2 and4.
You can now switch on the headlamps.
�Have the battery checked at the near-
est authorized Mercedes-Benz Light
Truck Center.
Warning!G
Keep flames or sparks away from battery.
Do not smoke.
Observe all safety instructions and precau-
tions when handling automotive batteries
(
�page 530).
!Never invert the terminal connections!
Page 541 of 595

540 Practical hints
Towing the vehicle
Mercedes-Benz recommends that the
vehicle be transported with all wheels off
the ground using flatbed or appropriate
wheel lift/dolly equipment. This method is
preferable to other types of towing.If circumstances do not permit the recom-
mended towing methods, the vehicle may
be towed with all wheels on the ground
only so far as necessary to have the vehicle
moved to a safe location where the recom-
mended towing methods can be employed.
When towing the vehicle with all wheels on
the ground, the vehicle may be towed only
for distances up to 30 miles (50 km) and at
a speed not to exceed 30 mph (50 km/h).
!Do not tow-start the vehicle.
!Use flatbed or wheel lift/dolly equipment,
with the SmartKey in starter switch turned to
position0.
Do not tow with sling-type equipment. Towing
with sling-type equipment over bumpy roads will
damage radiator and supports.
To prevent damage during transport, do not tie
down vehicle by its chassis or suspension parts.
Use the towing eyes.
Switch off the ESP
® (�page 107) and the
automatic central locking (
�page 130).
!Do not tow with one axle raised. Doing so
could damage the transfer case, which is not
covered by the Mercedes-Benz Limited
Warranty.
All wheels must be on or off the ground. Observe
instructions for towing the vehicle with all
wheels on the ground.
Warning!G
If circumstances require towing the vehicle
with all wheels on the ground, always tow
with a tow bar if
�the engine will not run
�there is a malfunction in the brake
system
�there is a malfunction in the power
supply or in the vehicle’s electrical
system
as that will be necessary to adequately
control the towed vehicle.
Prior to towing the vehicle with all wheels on
the ground, make sure the starter switch is
in position2 (
�page 42).
Page 542 of 595

541 Practical hints
Towing the vehicle
Warning!G
With the engine not running, there is no
power assistance for the brake and steering
systems. In this case, it is important to keep
in mind that a considerably higher degree of
effort is necessary to brake and steer the
vehicle. Adapt your driving accordingly.
!When towing the vehicle with all wheels on
the ground:
�The automatic transmission must be in
positionN (
�page 193).
�The starter switch must be in position2
(
�page 41).
Keep in mind that it is important that the
starter switch is in position2. As soon as the
SmartKey is removed from the starter
switch or the engine is turned off with
KEYLESS-GO* and you open the driver’s
door or the front passenger door, the auto-
matic transmission will shift to park
positionP, see “Starter switch positions”
(
�page 41).
�The battery must be connected and charged.
Otherwise, the starter switch cannot be set
to position2 and the automatic transmission
will remain locked in positionP.
!Towing of the vehicle should only be done
using the properly installed towing eye bolt.
Never attach a tow cable, tow rope or tow rod to
the vehicle chassis, frame or suspension parts.
iWhen towing the vehicle with all wheels on
the ground, note the following:
With the automatic central locking activated and
the starter switch in position2 (
�page 41), the
vehicle doors lock if a wheel is turning at a speed
of approximately 9 mph (15 km/h) or above.
To prevent the vehicle doors from locking,
deactivate the automatic central locking
(
�page 130).
iTo signal turns while being towed with
hazard warning flasher in use, set the starter
switch to position2 and activate combination
switch for left or right turn signal in usual manner
– only the selected turn signal will operate.
Upon canceling the turn signal, the hazard
warning flasher will operate again.
Page 545 of 595

544 Practical hints
Fuses
The electrical fuses in your vehicle serve to
switch off malfunctioning power circuits.
If a fuse is blown, the components and sys-
tems secured by that fuse will stop operat-
ing.If a newly inserted fuse blows again, have
the cause determined and rectified by an
authorized Mercedes-Benz Light Truck
Center.
The following aids are available to help you
replace fuses. They are included with the
vehicle tool kit (
�page 495):
�Fuse chart
The fuse chart explains the fuse alloca-
tion and fuse amperages.
�Spare fuses
�Fuse extractor
The electrical fuses are located in different
fuse boxes:
�Fuse box in engine compartment
(
�page 545)
�Fuse box in cargo compartment
(
�page 545)
�Fuse box in passenger compartment
(
�page 546)Before replacing fuses:
�Apply parking brake (�page 68).
�Make sure the automatic transmission
is set toP (
�page 194).
The gear position indicator in the multi-
function display should be on
P.
�Turn off all electrical consumers.
�Turn off the engine (�page 41).
�Remove the SmartKey from the starter
switch.
Vehicles with KEYLESS-GO*:
�Open the driver’s door (this puts
the starter switch in position0,
same as with the SmartKey re-
moved from the starter switch). The
driver’s door then can be closed
again.
Warning!G
Only use fuses approved by Mercedes-Benz
with the specified amperage for the system
in question and do not attempt to repair or
bridge a blown fuse. Using other than ap-
proved fuses or using repaired or bridged
fuses may cause an overload leading to a
fire, and/or cause damage to electrical
components and/or systems. Have the
cause determined and remedied by an au-
thorized Mercedes-Benz Light Truck Center.
iA blown fuse must be replaced by an appro-
priate spare fuse (recognizable by its color or the
fuse rating given on the fuse) of the amperage
recommended in the fuse chart. Any
Mercedes-Benz Light Truck Center will be glad to
advise you on this subject.
Page 546 of 595
545 Practical hints
Fuses
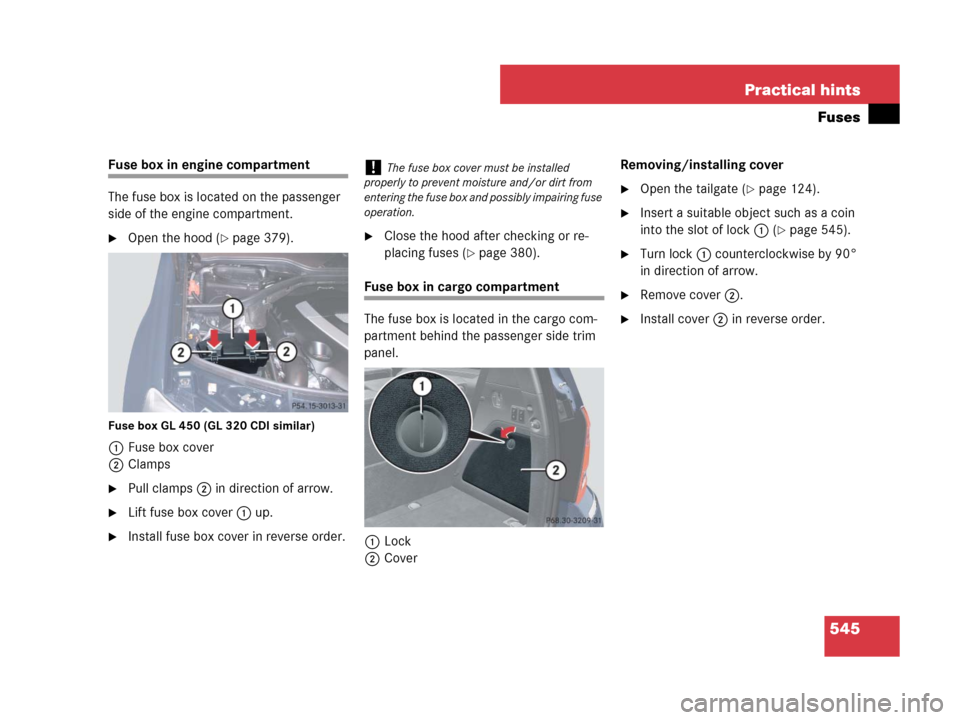
Fuse box in engine compartment
The fuse box is located on the passenger
side of the engine compartment.
�Open the hood (�page 379).
Fuse box GL 450 (GL 320 CDI similar)
1Fuse box cover
2Clamps
�Pull clamps2 in direction of arrow.
�Lift fuse box cover1 up.
�Install fuse box cover in reverse order.
�Close the hood after checking or re-
placing fuses (
�page 380).
Fuse box in cargo compartment
The fuse box is located in the cargo com-
partment behind the passenger side trim
panel.
1Lock
2CoverRemoving/installing cover
�Open the tailgate (�page 124).
�Insert a suitable object such as a coin
into the slot of lock1 (
�page 545).
�Turn lock1 counterclockwise by 90°
in direction of arrow.
�Remove cover2.
�Install cover2 in reverse order.
!The fuse box cover must be installed
properly to prevent moisture and/or dirt from
entering the fuse box and possibly impairing fuse
operation.
Page 547 of 595

546 Practical hints
Fuses
Fuse box in passenger compartment
The fuse box is located behind a cover in
the dashboard on the front passenger side.
1CoverOpening
�Open the front passenger door.
�Open the glove box (�page 316).
�Insert flat, blunt object as a lever into
the edge of the cover1 at the position
indicated by the arrow.
�Loosen cover1 from dashboard using
lever.
�Using your hands, pull cover1 out
and remove.
Closing
�Hook cover1 into the opening at the
front.
�Press cover1 back on until it engag-
es.
Emergency engine shut-down
If the engine cannot be turned off as de-
scribed in the “Getting started” section
(
�page 69), you may use the following
emergency procedure.
�Take the fuse chart from the vehicle
tool kit (
�page 496).
�Open the fuse box in engine compart-
ment (
�page 545).
�Use the fuse extractor to remove
fuse 120. Find its location in the fuse
chart.
!Do not use sharp objects such as a screw-
driver to open the fuse box cover1 in the dash-
board, as this could damage the fuse box cover
or the dashboard.
Page 548 of 595
547 Technical data
Parts service
Warranty coverage
Identification labels
Layout of poly-V-belt drive
Engine
Rims and tires
Electrical system
Main Dimensions
Weights
Fuels, coolants, lubricants
Page 552 of 595
551 Technical data
Identification labels
Second-row seat
4VIN
�Fold the carpet forwards.
The VIN4 is now visible.5Emission control information label,
includes both federal and California
certification exhaust emission
standards
6Engine number (engraved on engine)
7Vacuum line routing diagram label
8VIN, visible (lower edge of windshield)
iWhen ordering parts, please specify vehicle
identification and engine numbers.