Page 491 of 595
490 Practical hints
What to do if …
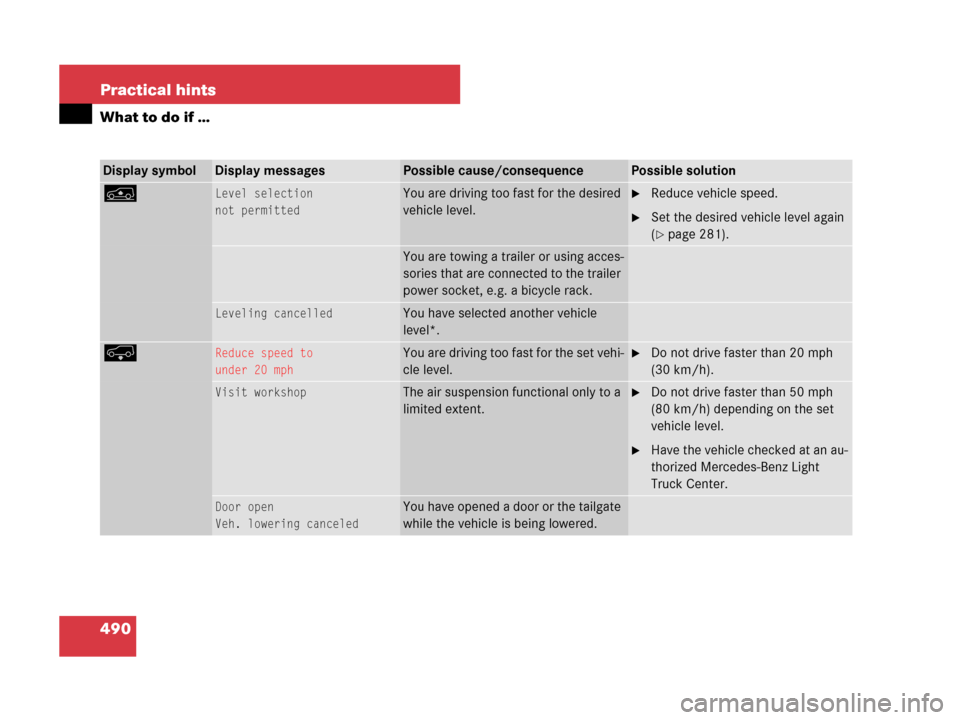
Display symbolDisplay messagesPossible cause/consequencePossible solution
nLevel selection
not permittedYou are driving too fast for the desired
vehicle level.�Reduce vehicle speed.
�Set the desired vehicle level again
(
�page 281).
You are towing a trailer or using acces-
sories that are connected to the trailer
power socket, e.g. a bicycle rack.
Leveling cancelledYou have selected another vehicle
level*.
pReduce speed to
under 20 mphYou are driving too fast for the set vehi-
cle level.�Do not drive faster than 20 mph
(30 km/h).
Visit workshopThe air suspension functional only to a
limited extent.�Do not drive faster than 50 mph
(80 km/h) depending on the set
vehicle level.
�Have the vehicle checked at an au-
thorized Mercedes-Benz Light
Truck Center.
Door open
Veh. lowering canceledYou have opened a door or the tailgate
while the vehicle is being lowered.
Page 492 of 595
491 Practical hints
What to do if …
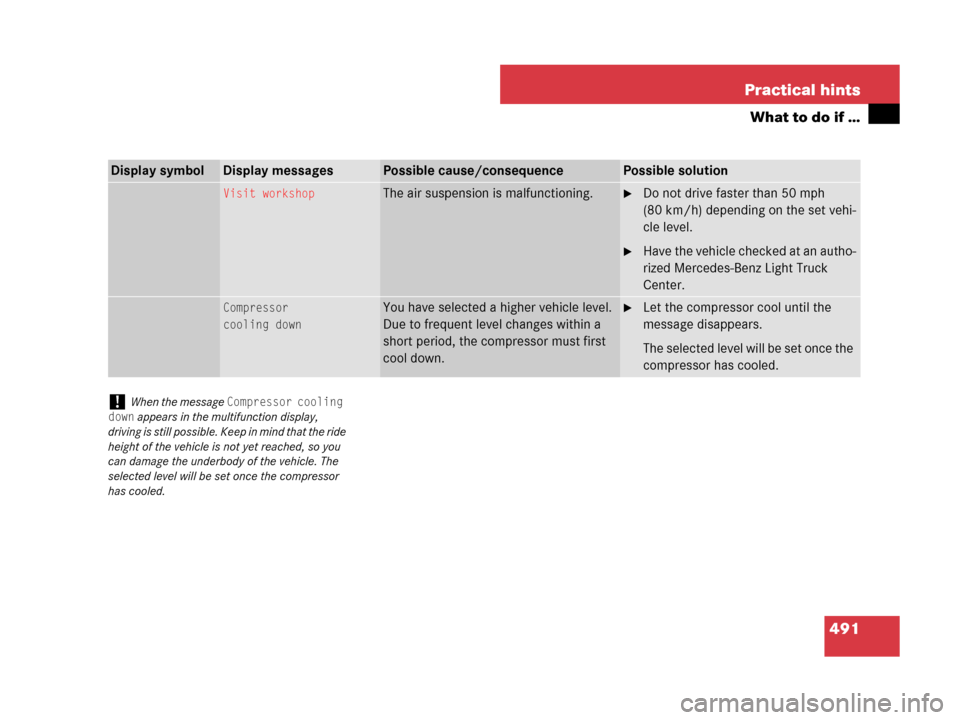
Display symbolDisplay messagesPossible cause/consequencePossible solution
Visit workshopThe air suspension is malfunctioning.�Do not drive faster than 50 mph
(80 km/h) depending on the set vehi-
cle level.
�Have the vehicle checked at an autho-
rized Mercedes-Benz Light Truck
Center.
Compressor
cooling downYou have selected a higher vehicle level.
Due to frequent level changes within a
short period, the compressor must first
cool down.�Let the compressor cool until the
message disappears.
The selected level will be set once the
compressor has cooled.
!When the message Compressor cooling
down
appears in the multifunction display,
driving is still possible. Keep in mind that the ride
height of the vehicle is not yet reached, so you
can damage the underbody of the vehicle. The
selected level will be set once the compressor
has cooled.
Page 493 of 595

492 Practical hints
What to do if …
Display symbolDisplay messagesPossible cause/consequencePossible solution
nVehicle rising
Max. 20 mphThe vehicle is adjusting to off-road
level 3.�Do not drive faster than 20 mph
(30 km/h).
Max. 20 mphYou are driving while using off-road
level 3*. The message reminds you of the
maximum speed at which you may drive
with off-road level 3.�Do not drive faster than 20 mph
(30 km/h).
pReduce speed to
under 20 mphYou are driving too fast for the set vehicle
level.�Do not drive faster than 20 mph
(30 km/h).
being lowered
Max. 20 mphThe vehicle is being lowered from off-road
level 3 to off-road level 2.�Do not drive faster than 20 mph
(30 km/h) until the off-road level 2 is
reached.
Warning!G
Adapt your driving style to the modified driv-
ing conditions. Avoid extreme, quick steer-
ing movements. Please keep in mind that
the driving characteristics of the vehicle
have been modified. You should thereforedrive in off-road level 3 with particular cau-
tion as it could otherwise lead to an accident
and/or serious injury to you or others.
Page 494 of 595

493 Practical hints
What to do if …
Display symbolDisplay messagesPossible cause/consequencePossible solution
kDiff. lock system malfunct.
Visit workshopThe differential locks* are
malfunctioning.�Do not drive faster than 50 mph
(80 km/h).
�Have the vehicle checked at an autho-
rized Mercedes-Benz Light Truck
Center.
Diff. Lock System
overheated. Wait briefly.The differential locks* are too hot
and have been deactivated as a re-
sult.�Continue driving with added caution.
The lock function is unavailable.
�Wait for the lock system to cool down.
The differential locks will be reactivat-
ed as soon as they have cooled off.
mStop vehicle
Engage parking brakeA shifting procedure could not be
completed. LOW RANGE* is in neu-
tral position. There is no connection
between the engine and the drive
wheels.�Do not attempt to continue driving.
You could otherwise damage the
vehicle’s drivetrain.
�Let the vehicle coast to a halt.
� Engage the parking brake.
�Perform the shifting procedure again
(
�page 204).
Page 495 of 595

494 Practical hints
What to do if …
Display symbolDisplay messagesPossible cause/consequencePossible solution
mStop vehicle
Engage parking brakeThe LOW RANGE system* could only
partially carry out the shifting proce-
dure or it could not carry out the
shifting procedure at all. The system
is in idle mode. No power is being
transmitted to the drive wheels.�Do not continue driving.
�Carefully let the vehicle coast to a
stop.
�Firmly depress the parking brake.
�Shift gears again in HIGH RANGE or
LOW RANGE (
�page 204).
Visit workshop
If parked engage pk. brakeThe LOW RANGE system* is
malfunctioning.�Do not drive faster than 50 mph
(80 km/h).
�Engage the parking brake if parked.
�Visit an authorized Mercedes-Benz
Light Truck Center as soon as possi-
ble.
max. speed 25 mphSpeed too high for shifting proce-
dure.�Continue driving more slowly.
max. speed 40 mphSpeed too high for shifting proce-
dure.�Continue driving more slowly.
shift briefly
into NYou have reduced engine speed. You
may now carry out a shifting proce-
dure.�Briefly shift automatic transmission
to positionN.
Shifting procress canceled
ReactivateThe shifting procedure was not car-
ried out.�Repeat the shifting procedure if
desired.
Page 498 of 595

497 Practical hints
Where will I find ...?
Vehicle jackThe vehicle jack is located underneath the
cargo compartment floor.
Storage position
�Remove vehicle jack from its storage
compartment (
�page 496).
�Turn crank handle in the direction of ar-
row as far as it will go.
!Vehicles with factory-mounted
running-boards*:
Your vehicle is equipped with a scissors-type
jack (located under the cargo compartment
floor) designed for use with factory-mounted
running boards. Only use this jack when jacking
up vehicles with factory-mounted running boards
as otherwise the vehicle’s underbody can be
damaged. See separate instructions for scis-
sors-type jack.
!To prevent damage, always disengage the
strap of the securing hook and lower the cargo
compartment floor (
�page 495) before closing
the tailgate.
Warning!G
The jack is designed exclusively for jacking
up the vehicle at the jack take-up brackets
built into both sides of the vehicle. To help
avoid personal injury, use the jack only to lift
the vehicle during a wheel change. Never
get beneath the vehicle while it is supported
by the jack. Keep hands and feet away from
the area under the lifted vehicle. Always
firmly set parking brake and block wheels
before raising vehicle with jack.
Do not disengage the parking brake while
the vehicle is raised. Be certain that the jack
is always vertical (plumb line) when in use,
especially on hills. Always try to use the jack
on a level surface.
Make sure that the jack arm is fully seated
in the jack take-up bracket. Always lower
the vehicle onto jackstands of sufficient
capacity before working under the vehicle.
��
Page 500 of 595
.
Removing Minispare wheel
�Remove the jack from the vehicle t")
499 Practical hints
Where will I find ...?
Spare wheelThe Minispare wheel is located underneath
the cargo compartment floor
(
�page 495).
Removing Minispare wheel
�Remove the jack from the vehicle tool
kit (
�page 496).
1Minispare wheel
2Retaining screw
3Vehicle tool kit storage well casing
�Loosen retaining screw2 by turning it
counterclockwise.
�Remove vehicle tool kit storage well
casing3.
You can now access the Minispare wheel.
�Remove Minispare wheel1.
Warning!G
The dimensions of the Minispare wheel are
different from those of the road wheels. As
a result, the vehicle handling characteristics
change when driving with a Minispare wheel
mounted. Adapt your driving style accord-
ingly.
The Minispare wheel is for temporary use
only. When driving with a Minispare wheel
mounted, ensure proper tire inflation
pressure and do not exceed a vehicle speed
of 50 mph (80 km/h).
Drive to the nearest Mercedes-Benz Light
Truck Center as soon as possible to have the
Minispare wheel replaced with a regular
road wheel.
Never operate the vehicle with more than
one spare wheel mounted.
Do not switch off the ESP
® when a
Minispare wheel is mounted.
iFor information on how to mount the
Minispare wheel, see “Mounting the spare
wheel” (
�page 524).
iIf retaining screw2 does not come loose,
turn vehicle tool kit storage well casing3
slightly counterclockwise. Retaining screw2
should then come loose easily.
Page 516 of 595

515 Practical hints
Replacing bulbs
4Bulb socket of front fog lamp bulb
�Turn bulb socket4 counterclockwise.
�Pull bulb socket4 out of the housing.
�Pull the front fog lamp bulb out of bulb
socket4.
�Insert the new front fog lamp bulb into
bulb socket4.
�Insert bulb socket4 into the housing.
�Turn bulb socket4 clockwise until it
engages.
�Plug in the electrical connector.
�Insert front fog lamp2 back into
bumper.
�Fasten retaining screws3.
�Reinsert cover1 and press it in until it
engages.
Additional turn signal lamps bulbs
The additional turn signal lamps in the
exterior rear view mirrors have LEDs.
If a malfunction occurs or L EDs f a il to f unc -
tion, the entire turn signal unit must be re-
placed. Have the turn signal unit replaced
by an authorized Mercedes-Benz Light
Truck Center.
Replacing bulbs for rear lamps
Before you start to replace a bulb for a rear
lamp, do the following first:
�Turn the exterior lamp switch to
positionM (
�page 145).
Tail lamp unit
�Open the tailgate (�page 124).
iTo access the bulb socket, you have to
remove the cover in the corresponding side trim
panel of the cargo compartment.