Page 105 of 522
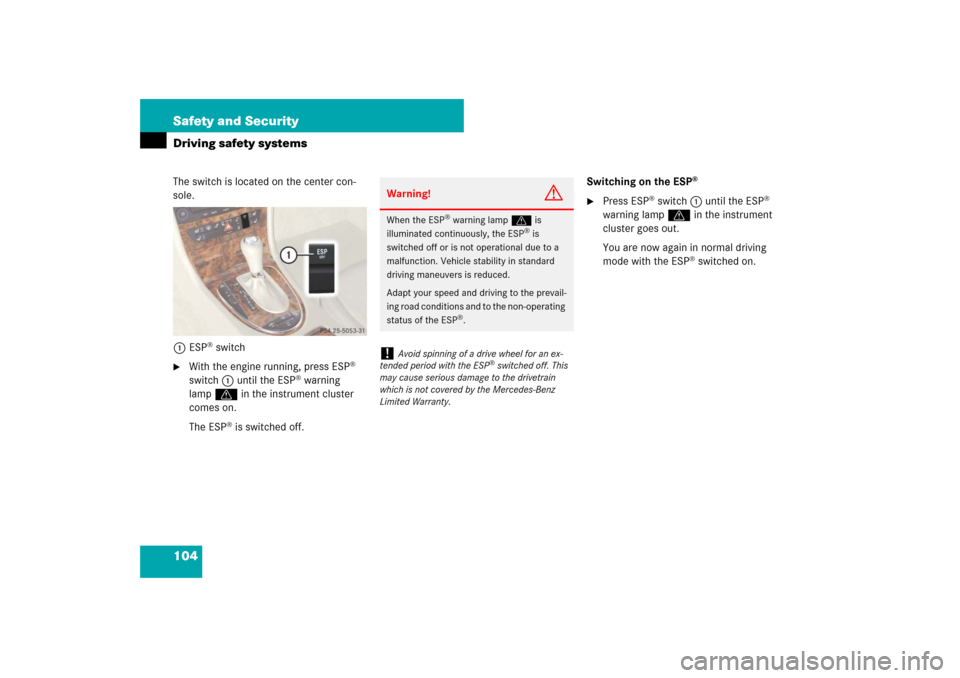
104 Safety and SecurityDriving safety systemsThe switch is located on the center con-
sole.
1ESP
® switch
�
With the engine running, press ESP
®
switch1 until the ESP
® warning
lampv in the instrument cluster
comes on.
The ESP
® is switched off.Switching on the ESP
®
�
Press ESP
® switch1 until the ESP
®
warning lamp v in the instrument
cluster goes out.
You are now again in normal driving
mode with the ESP
® switched on.
Warning!
G
When the ESP
® warning lamp v is
illuminated continuously, the ESP
® is
switched off or is not operational due to a
malfunction. Vehicle stability in standard
driving maneuvers is reduced.
Adapt your speed and driving to the prevail-
ing road conditions and to the non-operating
status of the ESP
®.
!
Avoid spinning of a drive wheel for an ex-
tended period with the ESP
® switched off. This
may cause serious damage to the drivetrain
which is not covered by the Mercedes-Benz
Limited Warranty.
Page 106 of 522
 with the ESP
®
Models with all-wheel-drive only.
The 4MATIC improves the vehicle’s ability
to use avai")
105 Safety and Security
Driving safety systems
Four wheel electronic traction system (4MATIC) with the ESP
®
Models with all-wheel-drive only.
The 4MATIC improves the vehicle’s ability
to use available traction, e.g. during winter
operation in mountains under slippery road
conditions, by applying power to all four
wheels.Warning!
G
If you see the ESP
® warning lampv
flashing in the instrument cluster, proceed
as follows:
�
While driving off, apply as little throttle
as possible.
�
While driving, ease up on the accelera-
tor.
�
Adapt your speed and driving style to
the prevailing road conditions.
Failure to observe these guidelines could
cause the vehicle to skid.
The ESP
® cannot prevent accidents result-
ing from excessive speed.
!
Do not tow with one axle raised.
Otherwise the transfer case can be damaged,
which is not covered by the Mercedes-Benz
Limited Warranty.
!
Performance testing must only be conduct-
ed on a two-axle dynamometer.
Otherwise the transfer case can be damaged,
which is not covered by the Mercedes-Benz
Limited Warranty.
!
Because the ESP
® operates automatically,
the engine and the ignition must be shut off
(SmartKey in starter switch position0 or 1 or
KEYLESS-GO start/stop button* in position0
or1) when the parking brake is being tested on a
brake test dynamometer.
Active braking action through the ESP
® may oth-
erwise seriously damage the brake system.
Operational tests with the engine running can
only be conducted on a two-axle dynamometer.
Page 107 of 522

106 Safety and SecurityAnti-theft systemsImmobilizer
The immobilizer prevents unauthorized
persons from starting your vehicle.
Activating
With the SmartKey�
Remove the SmartKey from the starter
switch.
With KEYLESS-GO*
�
Turn off the engine by means of the
start/stop button on the gear selector
lever.
�
Open the driver’s door.Deactivating
With the SmartKey
�
Switch on the ignition (
�page 38).
With KEYLESS-GO*
�
Start the engine by means of the
start/stop button on the gear selector
lever.
Anti-theft alarm system
Once the alarm system has been armed, a
visual and audible alarm is triggered when
someone opens:�
a door
�
the trunk
�
the hood
The alarm will stay on, even if the activat-
ing element (a door, for example) is imme-
diately closed.
The alarm system will also be triggered
when
�
the vehicle is opened using the
mechanical key
�
someone opens a door from the inside
i
In case the engine cannot be started (yet the
vehicle’s battery is charged), the system is not
operational. Contact an authorized
Mercedes-Benz Center or call
1-800-FOR-MERCedes (in the USA), or
1-800-387-0100 (in Canada).
i
If the alarm stays on for more than
30 seconds, a call to the Response Center is ini-
tiated automatically by the Tele Aid system*
(
�page 294) provided Tele Aid service was sub-
scribed to and properly activated, and that nec-
essary cellular service and GPS coverage are
available.
Page 108 of 522

107 Safety and Security
Anti-theft systems
Arming the alarm system
The indicator lamp located in the central
locking switch in the center console.
1Indicator lamp�
Lock the vehicle with the SmartKey or
KEYLESS-GO*.
The turn signal lamps flash three times
to indicate that the alarm system is
armed. The indicator lamp1 begins to
flash after approximately 30 seconds
after arming the alarm system.Disarming the alarm system
�
Unlock the vehicle with the SmartKey
or KEYLESS-GO*.
The turn signal lamps flash once to
indicate that the alarm system is
disarmed.Canceling the alarm
With the SmartKey
�
Insert the SmartKey in the starter
switch.
or
�
Press button Œ or ‹ on the
SmartKey.
With KEYLESS-GO*
�
Pull an outside door handle.
The SmartKey with KEYLESS-GO must
be within 3 ft (1 m) of the vehicle.
or
�
Press the KEYLESS-GO* start/stop
button (
�page 39).
The SmartKey with KEYLESS-GO must
be inside the vehicle.
i
If the turn signal lamps do not flash three
times, one of the following elements may not be
properly closed:
�
a door
�
the trunk
Close the respective element and lock the vehi-
cle again.
i
The alarm system will rearm automatically
after approximately 40 seconds if neither a door
nor the trunk was opened.
Page 120 of 522

or (
�page 114) comes on briefl")
119 Controls in detail
Locking and unlocking
Checking batteries in the SmartKey or SmartKey with KEYLESS-GO*�
Press button‹ orŒ.
The battery check lamp (
�page 110)
or (
�page 114) comes on briefly to in-
dicate that the SmartKey or SmartKey
with KEYLESS-GO batteries are in or-
der.Loss of the SmartKey or SmartKey with
KEYLESS-GO*
If you lose your SmartKey, SmartKey with
KEYLESS-GO or mechanical key, you
should do the following:�
Have the SmartKey or SmartKey with
KEYLESS-GO deactivated by an autho-
rized Mercedes-Benz Center.
�
Report the loss of the SmartKey,
SmartKey with KEYLESS-GO or the me-
chanical key immediately to your car
insurance company.
�
Have the mechanical lock replaced if
necessary.
Your authorized Mercedes-Benz Center
will be glad to supply you with a replace-
ment.
Opening the doors from the inside
You can open a locked door from the in-
side. Open door only when conditions are
safe to do so.
1Locking knob
2Inside door handle
!
If the battery check lamp does not come on
briefly during check, the SmartKey or SmartKey
with KEYLESS-GO batteries are discharged.
Replace the batteries (
�page 441).
You can obtain the required batteries at any au-
thorized Mercedes-Benz Center.
i
If the batteries are checked within signal
range of the vehicle, pressing button‹ or
Πwill lock or unlock the vehicle accordingly.
Page 128 of 522

127 Controls in detail
Locking and unlocking
�
Turn the mechanical key clockwise to
position2 to lock the trunk.
The trunk remains locked even when the
vehicle is centrally unlocked.
�
Insert the mechanical key in the trunk
lid lock.
�
Turn the mechanical key counterclock-
wise to neutral position1 to unlock the
trunk.
You can now open the trunk
(�page 120).
Automatic central locking
The doors and the trunk automatically lock
when the ignition is switched on and the
wheels are turning at vehicle speeds of ap-
proximately 9 mph (15 km / h) or more.
The locking knobs in the doors move down.
You can open a locked door from the in-
side. Open door only when conditions are
safe to do so.
You can deactivate the automatic locking
mode using the control system
(�page 176).
Locking and unlocking from the inside
You can lock or unlock the doors and the
trunk from inside using the central locking
switch. This can be useful, for example, if
you want to lock the vehicle before starting
to drive.
The fuel filler flap cannot be locked or un-
locked with the central locking switch.
i
You can only cancel the separate trunk lock-
ing mode by means of the mechanical key.
i
The doors are designed to unlock automati-
cally after an accident if the force of the impact
exceeds a preset threshold. The vehicle locks au-
tomatically when the ignition is switched on and
the wheels are turning at vehicle speeds of ap-
proximately 9 mph (15 km/h) or more. You could
therefore lock yourself out when the vehicle
�
is pushed or towed
�
is on a test stand
Warning!
G
When leaving the vehicle, always remove the
SmartKey or SmartKey with KEYLESS-GO*
from the starter switch, take it with you, and
lock the vehicle. Do not leave children unat-
tended in the vehicle, or with access to an
unlocked vehicle. A child’s unsupervised ac-
cess to a vehicle could result in an accident
and/or serious personal injury.
Page 129 of 522
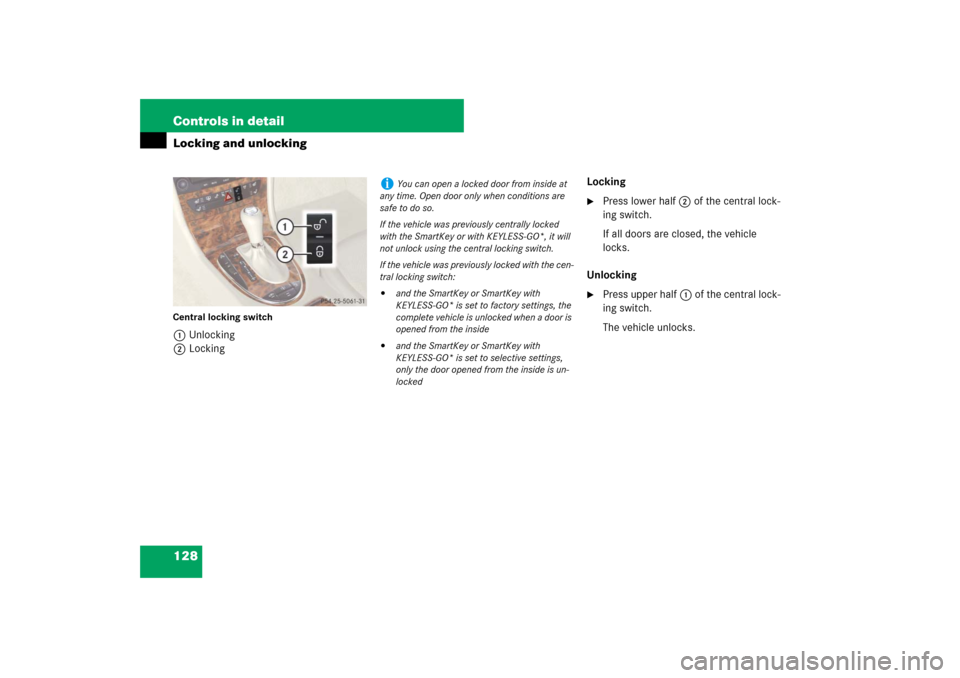
128 Controls in detailLocking and unlockingCentral locking switch1Unlocking
2LockingLocking
�
Press lower half 2 of the central lock-
ing switch.
If all doors are closed, the vehicle
locks.
Unlocking
�
Press upper half1 of the central lock-
ing switch.
The vehicle unlocks.
i
You can open a locked door from inside at
any time. Open door only when conditions are
safe to do so.
If the vehicle was previously centrally locked
with the SmartKey or with KEYLESS-GO*, it will
not unlock using the central locking switch.
If the vehicle was previously locked with the cen-
tral locking switch:
�
and the SmartKey or SmartKey with
KEYLESS-GO* is set to factory settings, the
complete vehicle is unlocked when a door is
opened from the inside
�
and the SmartKey or SmartKey with
KEYLESS-GO* is set to selective settings,
only the door opened from the inside is un-
locked
Page 135 of 522

134 Controls in detailMemory functionPrior to operating the vehicle, the driver
should check and adjust the seat height,
seat position fore and aft, and seat back-
rest angle if necessary, to ensure adequate
control, reach and comfort. The head re-
straint should also be adjusted for proper
height. See also the section on air bags
(�page 70) for more information on prop-
er seat positioning.
In addition, adjust the steering wheel to
ensure adequate control, reach, operation
and comfort. Both the interior and exterior
rear view mirrors should be adjusted for
adequate rear vision.
Fasten seat belts. Infants and small chil-
dren should be seated in a properly se-
cured restraint system that complies with
U.S. Federal Motor Vehicle Safety Stan-
dards 213 and 225 and Canadian Motor
Vehicle Safety Standards 213 and 210.2.With the memory function you can store up
to three different settings.
Each stored position on the driver’s side
includes the following settings:
�
Driver’s seat, backrest, head restraint
position
�
Multicontour seat*: previously saved
setting
�
Steering wheel position
�
Exterior rear view mirrors’ positionEach stored position on the front
passenger side includes the following
settings:
�
Front passenger seat, backrest, head
restraint position
�
Multicontour seat*: previously saved
setting
Warning!
G
Do not activate the memory function while
driving. Activating the memory function
while driving could cause the driver to lose
control of the vehicle.