Page 419 of 522

418 Practical hintsWhat to do if …When the message
Check oil level at
next refueling
appears while the engine
is running and at operating temperature,
the engine oil level has dropped to approx-
imately the minimum level.
When this occurs, the warning will first
come on intermittently and then stay on if
the oil level drops further.
Visually check for oil leaks. If no obvious oil
leaks are noted, drive to the nearest ser-
vice station where the engine oil should be
topped to the required level with an ap-
proved engine oil.For information on approved engine oils,
refer to the Factory Approved Service
Products pamphlet (USA only) or contact
an authorized Mercedes-Benz Center.
Display symbol
Display message
Possible cause/consequence
Possible solution
:
Check oil level
at next refueling
The engine oil has dropped to a critical
level.
�
Check the engine oil level
(�page 328) and add oil as required
(�page 329).
�
If you must add engine oil frequently,
have the engine checked for possible
leaks.
!
The engine oil level warnings should not be
ignored. Extended driving with the symbol dis-
played could result in serious engine damage
that is not covered by the Mercedes-Benz
Limited Warranty.
Page 420 of 522
419 Practical hints
What to do if …
Display symbol
Display message
Possible cause/consequence
Possible solution
A
Reserve fuel
The fuel level has dropped below the re-
serve mark.
�
Refuel at the next gas station
(�page 321).
Gas cap is open
A loss of pressure has been detected in
the fuel system. The fuel cap may not be
closed properly or the fuel system may be
leaky.
�
Check the fuel cap (
�page 321).
If it is not closed properly:
�
Close the fuel cap.
If it is closed properly:
�
Have the fuel system checked by an au-
thorized Mercedes-Benz Center.
»
Replace air cleaner
The air cleaner is clogged.
�
Have the air cleaner checked by an au-
thorized Mercedes-Benz Center.
[
Clean fuel filter
Diesel engine:
There is water in the fuel filter.
�
Have the water drained by an autho-
rized Mercedes-Benz Center as soon as
possible.
Page 421 of 522
420 Practical hintsWhat to do if …Display symbol
Display message
Possible cause/consequence
Possible solution
F
Key
still in vehicle
A SmartKey with KEYLESS-GO* left in the
vehicle was recognized while locking the
vehicle from the outside.
�
Take the SmartKey with
KEYLESS-GO* out of the vehicle.
Please don't
forget your key
This display appears (for a maximum of
60 seconds) if the driver’s door is opened
with the engine shut off and no SmartKey
in the starter switch.
This message is only a reminder.
�
Take the SmartKey or SmartKey with
KEYLESS-GO* with you when leaving
the vehicle.
Remove key
You have forgotten to remove the
SmartKey.
�
Remove the SmartKey from the
starter switch.
Get a new key
The SmartKey is malfunctioning.
�
Contact an authorized
Mercedes-Benz Center.
Page 422 of 522
421 Practical hints
What to do if …
Display symbol
Display message
Possible cause/consequence
Possible solution
F
Change
key batteries
The SmartKey with KEYLESS-GO* batter-
ies are discharged.
�
Replace the batteries (
�page 441).
Key
not recognized
The SmartKey with KEYLESS-GO* is not
recognized while the engine is running
because�
the SmartKey with KEYLESS-GO* is
not in the vehicle
�
there is strong radio-frequency inter-
ference
�
Stop the vehicle as soon as it is safe
to do so.
�
Search for the SmartKey with
KEYLESS-GO*.
Otherwise the vehicle cannot be cen-
trally locked nor can the engine be
started again after the engine is
stopped.
Key
not recognized
The SmartKey with KEYLESS-GO* is mo-
mentarily not recognized.
�
Change the position of the SmartKey
in the vehicle.
�
Operate the vehicle with the
SmartKey in the starter switch if nec-
essary.
Page 452 of 522
451 Practical hints
Replacing wiper blades
Vehicles with KEYLESS-GO*�
Turn off the engine (
�page 64).
With the driver’s door closed, the start-
er switch is now in position1.
�
Turn combination switch to wiper
setting U (
�page 58).
�
With wiper arms in the vertical position,
open the driver’s door.
The starter switch is set to position0,
same as SmartKey removed from start-
er switch.
�
Turn combination switch to wiper
setting0 (
�page 58).
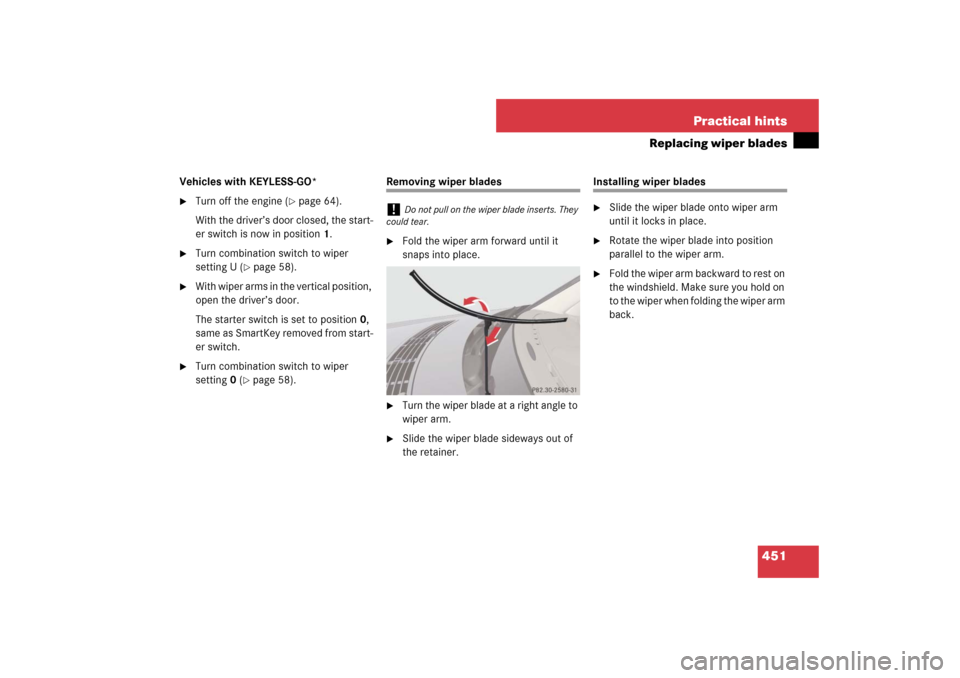
Removing wiper blades�
Fold the wiper arm forward until it
snaps into place.
�
Turn the wiper blade at a right angle to
wiper arm.
�
Slide the wiper blade sideways out of
the retainer.
Installing wiper blades�
Slide the wiper blade onto wiper arm
until it locks in place.
�
Rotate the wiper blade into position
parallel to the wiper arm.
�
Fold the wiper arm backward to rest on
the windshield. Make sure you hold on
to the wiper when folding the wiper arm
back.
!
Do not pull on the wiper blade inserts. They
could tear.
Page 453 of 522
.
�")
452 Practical hintsFlat tirePreparing the vehicle�
Park the vehicle in a safe distance from
moving traffic on a hard, flat surface
when possible.
�
Turn on the hazard warning flasher
(�page 144).
�
Turn the steering wheel so that the
front wheels are in a straight ahead po-
sition.
�
Set the parking brake (
�page 62).
�
Move the gear selector lever toP.
Vehicles with SmartKey:
�
Turn off the engine (
�page 63).
�
Remove the SmartKey from the starter
switch.Vehicles with SmartKey with
KEYLESS-GO*:
�
Turn off the engine by pressing the
KEYLESS-GO* start/stop button on the
gear selector lever once (
�page 64).
�
Open the driver’s door (this puts the ig-
nition in position0, same as with the
SmartKey removed from the starter
switch). The driver’s door then can be
closed again.
�
Have any passenger exit the vehicle at
a safe distance from the roadway.
Mounting the spare wheel
i
Open door only when conditions are safe to
do so.
Warning!
G
The dimensions of the spare wheel
(Minispare or collapsible tire) are different
from those of the road wheels. As a result,
the vehicle handling characteristics change
when driving with a spare wheel mounted.
Adapt your driving style accordingly.
The spare wheel is for temporary use only.
When driving with spare wheel mounted,
ensure proper tire pressure and do not ex-
ceed a vehicle speed of 50 mph (80 km/h).
Drive to the nearest Mercedes-Benz Center
as soon as possible to have the spare wheel
replaced with a regular road wheel.
Never operate the vehicle with more than
one spare wheel mounted.
Do not switch off the ESP
® when a
Minispare or collapsible tire is mounted.
Page 455 of 522
454 Practical hintsFlat tire�
On wheel to be changed, loosen but do
not yet remove the wheel bolts (ap-
proximately one full turn with wrench). The jack take-up brackets are located di-
rectly behind the front wheel housings and
in front of the rear wheel housings.
1Jack take-up bracket
2Jack
�
Place jack2 on firm ground.
�
Position jack2 under take-up
bracket1 so that it is always vertical
(plumb-line) as seen from the side,
even if the vehicle is parked on an
incline.
�
Jack up the vehicle until the wheel is a
maximum of 1.2 in (3 cm) from the
ground. Never start engine while
vehicle is raised.Warning!
G
Position the jack only on the jack take-up
brackets designed for this purpose.
If the jack is not properly positioned, the ve-
hicle may slip off of the jack.
��
Page 456 of 522

455 Practical hints
Flat tire
Removing the wheel
1Alignment bolt�
Unscrew upper-most wheel bolt and re-
move.
�
Replace this wheel bolt with alignment
bolt1 supplied in the tool kit.
�
Remove the remaining bolts.
�
Remove the wheel.Mounting the spare wheel
�
Clean contact surfaces of wheel and
wheel hub.
�
Guide the spare wheel onto the align-
ment bolt and push it on.
Warning!
G
The jack is intended only for lifting the
vehicle briefly for wheel changes. It is not
suited for performing maintenance work
under the vehicle.�
Never start the engine when the vehicle
is raised.
�
Never lie down under the raised vehicle.
!
Do not place wheel bolts in sand or dirt. This
could result in damage to the bolt and wheel hub
threads.
!
To avoid paint damage, place wheel flat
against hub and hold it there while installing first
wheel bolt.
Warning!
G
Always replace wheel bolts that are dam-
aged or rusted.
Never apply oil or grease to wheel bolts.
Damaged wheel hub threads should be re-
paired immediately. Do not continue to drive
under these circumstances! Contact an au-
thorized Mercedes-Benz Center or call
Roadside Assistance.
Incorrect wheel bolts or improperly tight-
ened wheel bolts can cause the wheel to
come off. This could cause an accident. Be
sure to use the correct wheel bolts.
��