Page 153 of 514
.
1Reset button
The instrument clus")
152 Controls in detailInstrument clusterA full view illustration of the instrument
cluster can be found in the “At a glance”
section of this manual (
�page 26).
1Reset button
The instrument cluster is activated when
you
�
open a door
�
switch on the ignition (
�page 37)
�
press the reset button1
�
switch on the exterior lamps
You can modify the instrument cluster set-
tings in the instrument cluster submenu of
the control system (
�page 172).Adjusting instrument cluster illumina-
tion
Use the reset button1 to adjust the illu-
mination brightness for the instrument
cluster.
To brighten illumination�
Turn the reset button1 in the instru-
ment cluster clockwise.
The instrument cluster illumination will
brighten.
To dim illumination
�
Turn the reset button1 in the instru-
ment cluster counterclockwise.
The instrument cluster illumination will
dim.
Warning!
G
No messages will be displayed if either the
instrument cluster or the multifunction dis-
play is inoperative.
As a result, you will not be able to see infor-
mation about your driving conditions, such
as speed or outside temperature, warning/
indicator lamps, malfunction/warning mes-
sages or the failure of any systems. Driving
characteristics may be impaired.
If you must continue to drive, please do so
with added caution. Visit an authorized
Mercedes-Benz Center as soon as possible.
i
The instrument cluster illumination is
dimmed or brightened automatically to suit am-
bient light conditions.
The instrument cluster illumination will also be
adjusted automatically when you switch on the
vehicle’s exterior lamps.
Page 164 of 514
163 Controls in detail
Control system
Displaying intermediate time�
Press button ç while the timer is
running.
The intermediate time is shown for
5 seconds.
Stopping the RACETIMER
�
Press button æ.
The timer stops.Saving lap time and starting a new lap
�
Press button ç while the timer is
running.
The intermediate time will be shown for
5 seconds.
�
Press button ç within the next
5 seconds.
The intermediate time shown will be
saved as a lap time.
The RACETIMER begins timing the new
lap. The new lap begins to be timed as
soon as the intermediate time is called
up.
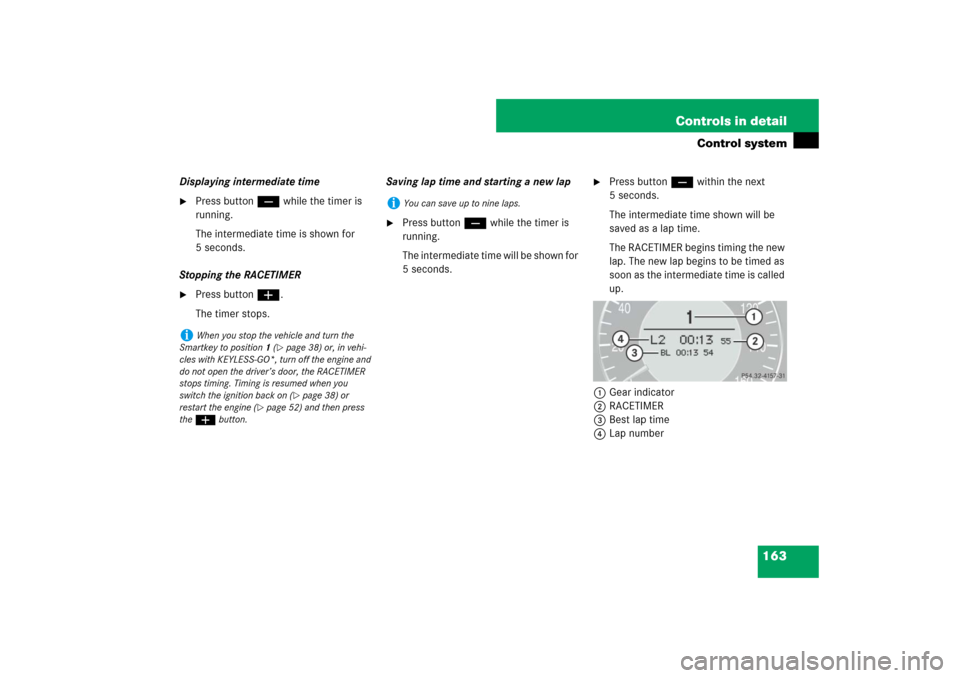
1Gear indicator
2RACETIMER
3Best lap time
4Lap number
i
When you stop the vehicle and turn the
Smartkey to position 1 (
�page 38) or, in vehi-
cles with KEYLESS-GO*, turn off the engine and
do not open the driver’s door, the RACETIMER
stops timing. Timing is resumed when you
switch the ignition back on (�page 38) or
restart the engine (
�page 52) and then press
theæbutton.
i
You can save up to nine laps.
Page 201 of 514
.
Headlamp cleaning system*
The button is located on the left side of the
dashboard.")
200 Controls in detailGood visibilityFor information on windshield wipers, see
“Windshield wipers” (
�page 57).
Headlamp cleaning system*
The button is located on the left side of the
dashboard.
1Headlamp cleaning button�
Switch on the ignition (
�page 37).
�
Press button1.
The headlamps are cleaned with a
high-pressure water jet.For information on filling up the washer
reservoir, see “Windshield/rear window
washer system and headlamp cleaning
system*” (
�page 331).
Rear view mirrors
For more information on setting the rear
view mirrors, see “Mirrors” (
�page 47).
Auto-dimming mirrors
The reflection brightness of the exterior
rear view mirror on the driver’s side and
the interior rear view mirror will respond
automatically to glare when
�
the ignition is switched on
and
�
incoming light from headlamps falls on
the sensor in the interior rear view mir-
ror
The rear view mirrors will not react if
�
reverse gear R is engaged
�
the interior lighting is turned on
i
The headlamps will automatically be
cleaned when you have
�
switched on the headlamps
and
�
operated the windshield wipers with wind-
shield washer fluid fifteen times
When you switch off the ignition, the counter re-
sets.
Page 203 of 514

202 Controls in detailGood visibilityActivating exterior rear view mirror
parking position
Follow these steps to activate the mirror
parking position so that the passen-
ger-side exterior rear view mirror will be
turned downward to the stored position.
The buttons are located on the driver’s
door.
1Driver’s side exterior rear view mirror
button
2Adjustment button
3Passenger-side exterior rear view
mirror button
�
Switch on the ignition (
�page 37).
�
Vehicles equipped with
Mirror
adjust. parking aid function in the
Convenience
submenu (
�page 182):
Make sure the
Mirror adjust. park-
ing aid
function in the
Convenience
submenu of the control system is
switched to
On.
�
Make sure you have stored a parking
position for the passenger-side exterior
rear view mirror (
�page 140).
�
Press button3 for the passenger-side
exterior rear view mirror.
�
Place the gear selector lever in reverse
gearR.
The passenger-side exterior rear view
mirror will be turned downward to the
stored position.The exterior rear view mirror returns to its
previously stored driving position:
�
10 seconds after you put the gear se-
lector lever out of positionR
�
immediately once your vehicle exceeds
a speed of approximately 6 mph
(10 km/h)
�
immediately when you press button1
for driver’s side mirror.
Page 205 of 514
204 Controls in detailGood visibilityRoller sunblind in the rear doors*�
Pull the roller sunblind out using the
hooks.
�
Attach the hooks at the top.
Rear window defroster
The rear window defroster uses a large
amount of power. To keep the battery
drain to a minimum, switch off the
defroster as soon as the rear window is
clear. The defroster is automatically
deactivated after approximately 6 to
17 minutes of operation depending on the
outside temperature.�
Switch on the ignition (
�page 37).Activating
�
Press button1(
�page 208) or
(
�page 224) or buttonF
(�page 209) or (
�page 225) on the
respective climate control panel.
The indicator lamp on the button
comes on.
!
Always guide the sunblind by hand. Do not
let it snap back, as the retractor could be dam-
aged.
Warning!
G
Any accumulation of snow and ice should be
removed from the rear window before
driving. Visibility could otherwise be
impaired, endangering you and others.
Page 212 of 514
 or
(
�page 209).
Reactivating
�
Make sure the ignition is")
211 Controls in detail
Dual-zone automatic climate control
Deactivating the climate control system
Deactivating�
Press button´ (
�page 208) or
(
�page 209).
Reactivating
�
Make sure the ignition is switched on.
�
Press button´ (
�page 208) or
(
�page 209) again.
The previous settings are once again in
effect.Operating the climate control system
in automatic modeActivating
�
Press buttonU (
�page 208) or
(
�page 209) while the engine is run-
ning.
The indicators for automatic air volume
and air distribution in display4
(�page 208) or (
�page 209) come
on. Air volume and air distribution are
automatically controlled
�
Use temperature controls1 and7
(�page 208) or (
�page 209) to sepa-
rately adjust the air temperature on
each side of the passenger compart-
ment.
The temperature of the vehicle interior
is adjusted automatically.
Warning!
G
When the climate control is switched off, the
outside air supply and circulation are also
switched off. Only choose this setting for a
short time. Otherwise the windows could
fog up, impairing visibility and endangering
you and others.
i
To switch the system on, you can also press
another button, with the exception of 1 or
F.
i
When operating the climate control system
in automatic mode, you will only rarely need to
adjust the temperature, air volume and air distri-
bution.
In automatic mode, cooling with dehumidify is
switched on. This function can be switched off.Warning!
G
If you switch off the cooling function the
windows can fog up more quickly. Window
fogging may impair visibility and endanger
you and others.
Page 221 of 514
.
REST
in the display4 (
�page 209)
comes on.
Deactivating
�
Press buttonT (")
220 Controls in detailDual-zone automatic climate controlActivating�
Switch off the ignition.
�
Press buttonT (
�page 209).
REST
in the display4 (
�page 209)
comes on.
Deactivating
�
Press buttonT (
�page 209) again.
REST
in the display4 (
�page 209)
goes out.Rear passenger compartment
adjustable air vents
The air conditioning for the rear passenger
compartment is controlled via the climate
control panel (
�page 208).The air vents for the rear passenger
compartment are located in the rear
center console.
1Left center air vent, adjustable
2Right center air vent, adjustable
3Thumbwheel for air volume control for
right rear center air vent
4Thumbwheel for air volume control for
left rear center air vent
i
The residual heat is automatically turned off:
�
when the ignition is switched on
�
after about 30 minutes
�
if the battery voltage drops
�
if the coolant temperature is too low
i
The temperature at the center air vents1
and2 for the rear passenger compartment is
nearly the same as at the dashboard center air
vents.
Page 229 of 514
 or
(
�page 225) again.
The previous settings are once again in")
228 Controls in detail4-zone automatic climate controlReactivating�
Make sure the ignition is switched on.
�
Press button´ (
�page 224) or
(
�page 225) again.
The previous settings are once again in
effect.Operating the climate control system
in automatic modeActivating
�
Press buttonU (
�page 224) or
(
�page 225) while the engine is run-
ning.
The indicator lamp on the button
comes on.
AUTO
appears in the
display4 (
�page 224) or
(
�page 225). The air volume and air
distribution are adjusted automatically.
�
Use temperature rocker switches3
and5 (
�page 224) or (
�page 225)
to separately adjust the air tempera-
ture on each side of the passenger
compartment.
The temperature of the vehicle interior
is adjusted automatically.
i
To switch the system on, you can also press
another button, with the exception of 1
(USA only) (
�page 224) or F and T
(Canada only) (�page 225).
i
When operating the climate control system
in automatic mode, you will only rarely need to
adjust the temperature, air volume and air distri-
bution.
In automatic mode, cooling with dehumidify is
switched on. This function can be switched off.Warning!
G
If you switch off the cooling function the
windows can fog up more quickly. Window
fogging may impair visibility and endanger
you and others.i
You can switch the automatic climate con-
trol system on and off for each side of the pas-
senger compartment as desired.