Page 370 of 522

369 Operation
Vehicle care
�Vehicle care
Cleaning and care of vehicle
While in operation, even while parked, your
vehicle is subjected to varying external in-
fluences which, if gone unchecked, can at-
tack the paintwork as well as the vehicle
underbody and cause lasting damage.Such damage is caused not only by ex-
treme and varying climatic conditions, but
also by:
�
Air pollution
�
Road salt
�
Tar
�
Gravel and stone chipping
To avoid paint damage, you should imme-
diately remove:
�
Grease and oil
�
Fuel
�
Coolant
�
Brake fluid
�
Bird droppings
�
Insects
�
Tree resins etc.
Frequent washing reduces and/or elimi-
nates the aggressiveness and potency of
the above adverse influences.More frequent washings are necessary to
deal with unfavorable conditions:
�
near the ocean
�
in industrial areas (smoke, exhaust
emissions)
�
during winter operation
You should check your vehicle from time to
time for stone chipping or other damage.
Any damage should be repaired as soon as
possible to prevent corrosion.
In doing so, do not neglect the underbody
of the vehicle. A prerequisite for a thor-
ough check is a washing of the underbody
followed by a thorough inspection. Dam-
aged areas need to be re-undercoated.
Your vehicle has been treated at the facto-
ry with a wax-base rustproofing in the body
cavities which will last for the lifetime of
the vehicle. Post-production treatment is
neither necessary nor recommended by
Mercedes-Benz because of the possibility
of incompatibility between materials used
in the production process and others ap-
plied later.
Warning!
G
Many cleaning products can be hazardous.
Some are poisonous, others are flammable.
Always follow the instructions on the partic-
ular container. Always open your vehicle’s
doors or windows when cleaning the inside.
Never use fluids or solvents that are not de-
signed for cleaning your vehicle.
Always lock away cleaning products and
keep them out of reach of children.
Page 371 of 522

370 OperationVehicle careWe have selected car-care products and
compiled recommendations which are
specially matched to our vehicles and
which always reflect the latest technology.
You can obtain Mercedes-Benz approved
car-care products at an authorized
Mercedes-Benz Center.
Scratches, corrosive deposits, corrosion or
damage due to negligent or incorrect care
cannot always be removed or repaired with
the car-care products recommended here.
In such cases it is best to seek aid at an au-
thorized Mercedes-Benz Center.
The following topics deal with the cleaning
and care of your vehicle and give important
“how-to” information as well as references
to Mercedes-Benz approved car-care prod-
ucts.Power washer
Tar stains
Quickly remove tar stains before they dry
and become more difficult to remove. A tar
remover is recommended.Paintwork, painted body components
Mercedes-Benz approved Paint Care
should be applied when water drops on the
paint surface do not “bead up”. This should
normally be done every 3 to 5 months, de-
pending on the climate and washing deter-
gent used.
Mercedes-Benz approved Paint Cleaner
should be applied if the paint surface
shows signs of embedded dirt (i.e. loss of
gloss).
Do not apply any of these products or wax
if your vehicle is parked in the sun or if the
hood is still hot.
�
Use the appropriate MB-Touch-Up
Stick for quick and provisional repairs
of minor paint damage (i.e. chips from
stones, vehicle doors, etc.).
!
Follow the instructions provided by the pow-
er washer manufacturer on maintaining a dis-
tance between the vehicle and the nozzle of the
power washer.
Never use a round nozzle to power-wash tires.
The intense jet of water can result in damage to
the tire.
Always replace a damaged tire.
Always keep the jet of water moving across the
surface. Do not aim directly at electrical parts,
electrical connectors, seals, or other rubber
parts.
i
Vehicles with KEYLESS-GO*:
If a door handle is hit by a strong jet of water, and
a SmartKey with KEYLESS-GO* is in close prox-
imity, i.e. within approximately 3 ft (approxi-
mately 1 m), the vehicle could be inadvertently
locked or unlocked.
!
Affixing stickers, magnets, adhesive tape or
similar materials to painted body components
may damage the paintwork.
Page 372 of 522

371 Operation
Vehicle care
Engine cleaning
Prior to cleaning the engine compartment,
make sure to protect electrical compo-
nents and connectors from contact with
water and cleaning agents.
Corrosion protection, such as MB Anticor-
rosion Wax should be applied to the engine
compartment after every engine cleaning.
Before applying, all control linkage bush-
ings and joints should be lubricated. The
poly-V-belt and all pulleys should be pro-
tected from any wax.
Vehicle washing
In the winter, thoroughly remove all traces
of road salt as soon as possible.
When washing the vehicle underbody, do
not forget to clean the inner sides of the
wheels.Hand-wash
Do not use hot water or wash your vehicle
in direct sunlight.
�
Only use a mild car wash detergent,
such as Mercedes-Benz approved Car
Shampoo.
�
Thoroughly spray the vehicle with a dif-
fused jet of water.
Direct only a very weak spray towards
the ventilation intake.
�
Use plenty of water and rinse the
sponge and chamois frequently.
�
Rinse with clean water and thoroughly
dry with a chamois.
Do not allow cleaning agents to dry on
the finish.Automatic car wash
You can have your car washed in an auto-
matic car wash from the start. Automatic
car washes without brushes are prefera-
ble.
�
To protect the filter system, switch the
automatic climate control to air recir-
culation mode (
�page 214) or
(
�page 231).
If the vehicle is very dirty, prewash it be-
fore running it through the automatic car
wash.
i
Vehicles with KEYLESS-GO*:
If a door handle is hit by a strong jet of water, and
a SmartKey with KEYLESS-GO* is in close prox-
imity, i.e. within approximately 3 ft (approxi-
mately 1 m), the vehicle could be inadvertently
locked or unlocked.
!
Do not use scouring agents on these parts.
Never apply strong force and only use a soft,
non-scratching cloth when cleaning the vehicle.
Do not attempt to wipe the surface with a dry
cloth or sponge.
Otherwise you may scratch or damage the paint.
!
Do not clean your vehicle in an automatic
touchless car wash which uses caustic spray.
Otherwise the caustic spray will damage the
paint or ornamental moldings.
Page 421 of 522
420 Practical hintsWhat to do if …Display symbol
Display message
Possible cause/consequence
Possible solution
F
Key
still in vehicle
A SmartKey with KEYLESS-GO* left in the
vehicle was recognized while locking the
vehicle from the outside.
�
Take the SmartKey with
KEYLESS-GO* out of the vehicle.
Please don't
forget your key
This display appears (for a maximum of
60 seconds) if the driver’s door is opened
with the engine shut off and no SmartKey
in the starter switch.
This message is only a reminder.
�
Take the SmartKey or SmartKey with
KEYLESS-GO* with you when leaving
the vehicle.
Remove key
You have forgotten to remove the
SmartKey.
�
Remove the SmartKey from the
starter switch.
Get a new key
The SmartKey is malfunctioning.
�
Contact an authorized
Mercedes-Benz Center.
Page 437 of 522
436 Practical hintsUnlocking/locking in an emergencyUnlocking the vehicle
If you cannot unlock the vehicle with the
SmartKey or SmartKey with
KEYLESS-GO*, open the driver’s door and
the trunk using the mechanical key.
Removing the mechanical key
1Mechanical key locking tab
2Mechanical key
�
Move locking tab1 in direction of ar-
row.
�
Slide mechanical key2 out of the
housing.
Unlocking the driver’s door
�
Insert mechanical key2 into the
driver’s door lock until it stops.
�
Turn mechanical key2 counterclock-
wise to position1 until the locking
knobs move up.
The driver’s door is unlocked.
�
Pull door handle to open the driver’s
door.
i
Unlocking your vehicle with the mechanical
key and opening the driver’s door or the trunk
will trigger the anti-theft alarm system.
To cancel the alarm, Insert the SmartKey or
SmartKey with KEYLESS-GO* in the starter
switch.
1
Unlocking
2
Mechanical key
Page 438 of 522
 is required to open the trunk lid. �
Insert the mechanical key1 into the
trun")
437 Practical hints
Unlocking/locking in an emergency
Unlocking the trunk
A minimum height clearance of 5.90 ft
(1.80 m) is required to open the trunk lid. �
Insert the mechanical key1 into the
trunk lid lock until it stops.
�
Turn the mechanical key1 counter-
clockwise to position2 and hold it in
this position.
�
Pull the handle3 and lift the trunk lid.
The trunk opens.
�
Turn the mechanical key1 back and
remove it from the trunk lid lock.
Locking the vehicle
If you are unable to lock the vehicle with
the SmartKey or SmartKey with
KEYLESS-GO*, do the following:�
Close the passenger door, the rear
doors and the trunk.
�
Press the central locking switch in the
center console (
�page 127).
�
Check to see whether the locking
knobs on the doors have moved down.
�
If necessary, push them down
manually.
�
Remove the mechanical key from the
SmartKey (
�page 436).
�
Check whether the trunk is locked.
1
Mechanical key
2
Unlocking in an emergency
3
Handle
!
Always make sure there is sufficient over-
head clearance.
��
Page 439 of 522
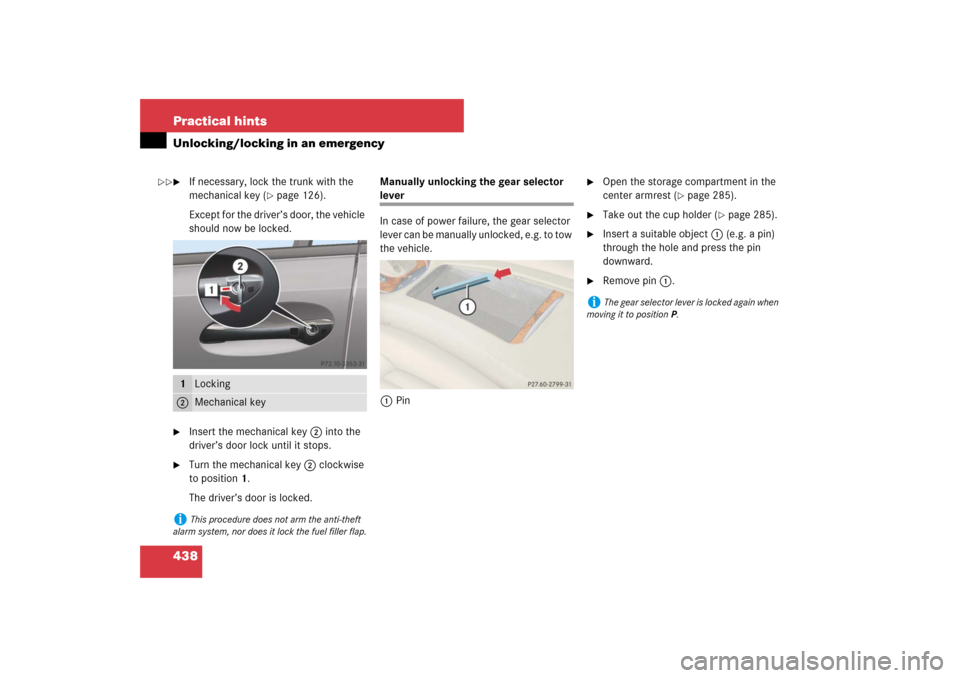
438 Practical hintsUnlocking/locking in an emergency�
If necessary, lock the trunk with the
mechanical key (
�page 126).
Except for the driver’s door, the vehicle
should now be locked.
�
Insert the mechanical key2 into the
driver’s door lock until it stops.
�
Turn the mechanical key2 clockwise
to position1.
The driver’s door is locked.Manually unlocking the gear selector
lever
In case of power failure, the gear selector
lever can be manually unlocked, e.g. to tow
the vehicle.
1Pin
�
Open the storage compartment in the
center armrest (
�page 285).
�
Take out the cup holder (
�page 285).
�
Insert a suitable object1 (e.g. a pin)
through the hole and press the pin
downward.
�
Remove pin1.
1
Locking
2
Mechanical key
i
This procedure does not arm the anti-theft
alarm system, nor does it lock the fuel filler flap.
i
The gear selector lever is locked again when
moving it to positionP.
��
Page 452 of 522
451 Practical hints
Replacing wiper blades
Vehicles with KEYLESS-GO*�
Turn off the engine (
�page 64).
With the driver’s door closed, the start-
er switch is now in position1.
�
Turn combination switch to wiper
setting U (
�page 58).
�
With wiper arms in the vertical position,
open the driver’s door.
The starter switch is set to position0,
same as SmartKey removed from start-
er switch.
�
Turn combination switch to wiper
setting0 (
�page 58).
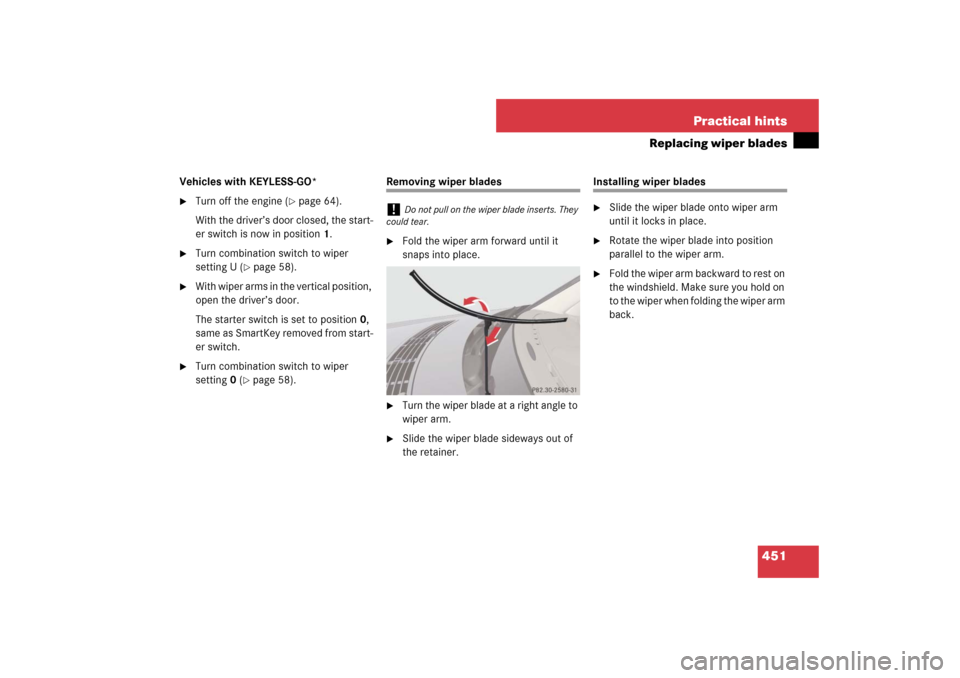
Removing wiper blades�
Fold the wiper arm forward until it
snaps into place.
�
Turn the wiper blade at a right angle to
wiper arm.
�
Slide the wiper blade sideways out of
the retainer.
Installing wiper blades�
Slide the wiper blade onto wiper arm
until it locks in place.
�
Rotate the wiper blade into position
parallel to the wiper arm.
�
Fold the wiper arm backward to rest on
the windshield. Make sure you hold on
to the wiper when folding the wiper arm
back.
!
Do not pull on the wiper blade inserts. They
could tear.