Page 128 of 522

127 Controls in detail
Locking and unlocking
�
Turn the mechanical key clockwise to
position2 to lock the trunk.
The trunk remains locked even when the
vehicle is centrally unlocked.
�
Insert the mechanical key in the trunk
lid lock.
�
Turn the mechanical key counterclock-
wise to neutral position1 to unlock the
trunk.
You can now open the trunk
(�page 120).
Automatic central locking
The doors and the trunk automatically lock
when the ignition is switched on and the
wheels are turning at vehicle speeds of ap-
proximately 9 mph (15 km / h) or more.
The locking knobs in the doors move down.
You can open a locked door from the in-
side. Open door only when conditions are
safe to do so.
You can deactivate the automatic locking
mode using the control system
(�page 176).
Locking and unlocking from the inside
You can lock or unlock the doors and the
trunk from inside using the central locking
switch. This can be useful, for example, if
you want to lock the vehicle before starting
to drive.
The fuel filler flap cannot be locked or un-
locked with the central locking switch.
i
You can only cancel the separate trunk lock-
ing mode by means of the mechanical key.
i
The doors are designed to unlock automati-
cally after an accident if the force of the impact
exceeds a preset threshold. The vehicle locks au-
tomatically when the ignition is switched on and
the wheels are turning at vehicle speeds of ap-
proximately 9 mph (15 km/h) or more. You could
therefore lock yourself out when the vehicle
�
is pushed or towed
�
is on a test stand
Warning!
G
When leaving the vehicle, always remove the
SmartKey or SmartKey with KEYLESS-GO*
from the starter switch, take it with you, and
lock the vehicle. Do not leave children unat-
tended in the vehicle, or with access to an
unlocked vehicle. A child’s unsupervised ac-
cess to a vehicle could result in an accident
and/or serious personal injury.
Page 129 of 522
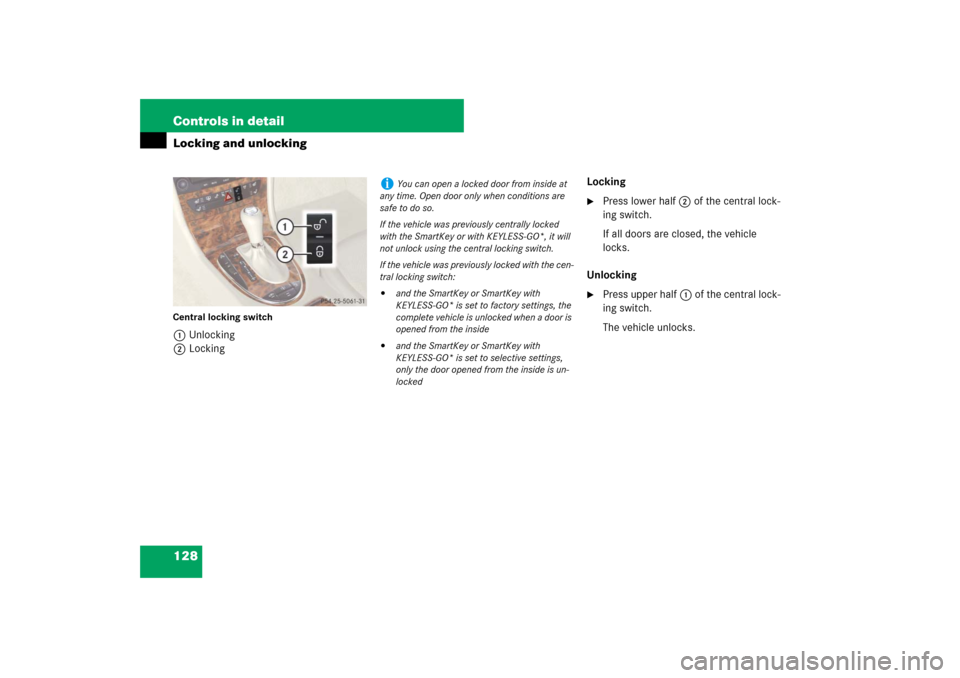
128 Controls in detailLocking and unlockingCentral locking switch1Unlocking
2LockingLocking
�
Press lower half 2 of the central lock-
ing switch.
If all doors are closed, the vehicle
locks.
Unlocking
�
Press upper half1 of the central lock-
ing switch.
The vehicle unlocks.
i
You can open a locked door from inside at
any time. Open door only when conditions are
safe to do so.
If the vehicle was previously centrally locked
with the SmartKey or with KEYLESS-GO*, it will
not unlock using the central locking switch.
If the vehicle was previously locked with the cen-
tral locking switch:
�
and the SmartKey or SmartKey with
KEYLESS-GO* is set to factory settings, the
complete vehicle is unlocked when a door is
opened from the inside
�
and the SmartKey or SmartKey with
KEYLESS-GO* is set to selective settings,
only the door opened from the inside is un-
locked
Page 146 of 522

145 Controls in detail
Lighting
Interior lighting in the front
The controls are located in the overhead
control panel.1Left front reading lamp on/off
2Automatic control on/off
3Rear interior lighting on/off
4Right front reading lamp on/off
5Front interior lighting on/off
6Interior lighting
7Ambient lighting
8Front reading lamps
Deactivating automatic control
�
Press switch2.
The interior lighting remains switched
off in darkness, even when you:�
unlock the vehicle
�
remove the SmartKey from the
starter switch
�
open a door
�
open the trunk
Activating automatic control
�
Press switch2.
The interior lighting switches on in
darkness, when you:�
unlock the vehicle
�
remove the SmartKey from the
starter switch
�
open a door
�
open the trunk
The interior lighting switches off after a
preset time (
�page 176).
!
An interior lamp switched on manually does
not go out automatically.
Leaving an interior lamp switch in the ON posi-
tion for extended periods of time with the engine
turned off could result in a discharged battery.
i
The interior lighting is factory-set to auto-
matic mode.
i
If a door remains open, the interior lighting
switches off automatically after approximately
5minutes.
An interior lamp switched on manually does not
go out automatically.
Page 149 of 522
.
1Reset button
The instrument clus")
148 Controls in detailInstrument clusterA full view illustration of the instrument
cluster can be found in the “At a glance”
section of this manual (
�page 26).
1Reset button
The instrument cluster is activated when
you
�
open a door
�
switch on the ignition (
�page 37)
�
press the reset button1
�
switch on the exterior lamps
You can modify the instrument cluster set-
tings in the instrument cluster submenu of
the control system (
�page 169).Adjusting instrument cluster illumina-
tion
Use the reset button1 to adjust the illu-
mination brightness for the instrument
cluster.
To brighten illumination�
Turn the reset button1 in the instru-
ment cluster clockwise.
The instrument cluster illumination will
brighten.
To dim illumination
�
Turn the reset button1 in the instru-
ment cluster counterclockwise.
The instrument cluster illumination will
dim.
Warning!
G
No messages will be displayed if either the
instrument cluster or the multifunction dis-
play is inoperative.
As a result, you will not be able to see infor-
mation about your driving conditions, such
as speed or outside temperature, warning/
indicator lamps, malfunction/warning mes-
sages or the failure of any systems. Driving
characteristics may be impaired.
If you must continue to drive, please do so
with added caution. Visit an authorized
Mercedes-Benz Center as soon as possible.
i
The instrument cluster illumination is
dimmed or brightened automatically to suit am-
bient light conditions.
The instrument cluster illumination will also be
adjusted automatically when you switch on the
vehicle’s exterior lamps.
Page 175 of 522

174 Controls in detailControl systemWith daytime running lamp mode activated
and the exterior lamp switch in
positionM orU, the low beam
headlamps are switched on when the en-
gine is running.
In low ambient light conditions the follow-
ing lamps will switch on additionally:�
Parking lamps
�
Tail lamps
�
License plate lamps
�
Side marker lamps
For more information on the daytime run-
ning lamp mode, see “Lighting”
(
�page 137).Setting locator lighting
With the locator lighting feature activated
and the exterior lamp switch in
positionU, the following lamps will
switch on during darkness when the vehi-
cle is unlocked using button Πon the
SmartKey or SmartKey with
KEYLESS-GO*:
�
Parking lamps
�
Tail lamps
�
License plate lamps
�
Side marker lamps
�
Front fog lamps
The locator lighting switches off when the
driver’s door is opened.
If you do not open a door after unlocking
the vehicle with the SmartKey, the lamps
will switch off automatically after approxi-
mately 40 seconds.
�
Move the selection marker with
buttonæ orç to the
Lighting
submenu.
�
Press buttonj ork repeatedly
until the message
Function Surround
lighting
appears in the multifunction
display.
The selection marker is on the current
setting.
�
Press buttonæ orç to switch
the locator lighting function
On or
Off
.
�
Turn the exterior lamp switch to
positionU when exiting the vehicle.
The locator lighting feature is activat-
ed.
i
For safety reasons, resetting the
Lighting
submenu to factory settings while driving
(
�page 166) will not deactivate the daytime
running lamp mode.
The following message appears in the multifunc-
tion display:
Lighting - Cannot be com-
pletely reset to factory settings
while driving.
��
Page 178 of 522
177 Controls in detail
Control system
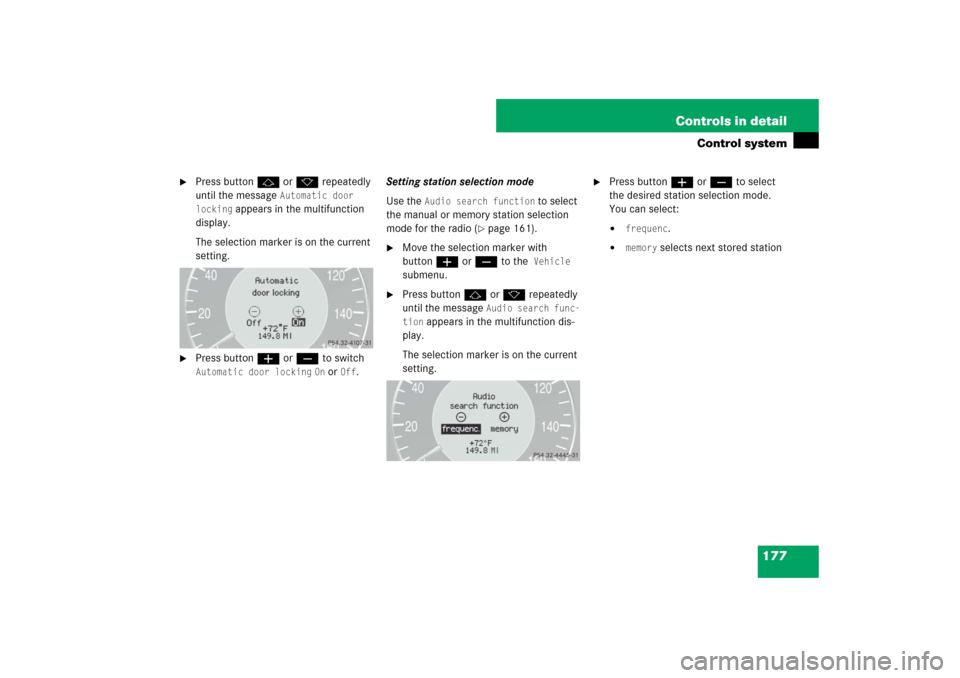
�
Press buttonj ork repeatedly
until the message
Automatic door
locking
appears in the multifunction
display.
The selection marker is on the current
setting.
�
Press buttonæ orç to switch Automatic door locking
On or
Off
.Setting station selection mode
Use the
Audio search function
to select
the manual or memory station selection
mode for the radio (
�page 161).
�
Move the selection marker with
buttonæ orç to the
Vehicle
submenu.
�
Press buttonj ork repeatedly
until the message
Audio search func-
tion
appears in the multifunction dis-
play.
The selection marker is on the current
setting.
�
Press buttonæ orç to select
the desired station selection mode.
You can select:�
frequenc
.
�
memory
selects next stored station
Page 179 of 522

178 Controls in detailControl systemConvenience submenu
Access the
Convenience
submenu via the
Settings
menu. Use the
Convenience
sub-
menu to change the settings for a number
of convenience features. The following
functions are available:
Activating easy-entry/exit feature
Use this function to activate and deacti-
vate the easy-entry/exit feature
(
�page 46).
�
Move the selection marker with
buttonæ orç to
the
Convenience
submenu.
�
Press buttonj ork repeatedly
until the message
Easy-entry func-
tion
appears in the multifunction dis-
play.
The selection marker is on the current
setting.
�
Press buttonæ orç to switch Easy-entry function
On or
Off
.
Function
Page
Activating easy-entry/exit fea-
ture
178
Setting parking position for exte-
rior rear view mirror
1
1If equipped.
179
Warning!
G
You must make sure no one can become
trapped or injured by the moving steering
wheel when the easy-entry/exit feature is
activated.
To stop steering wheel movement, do one of
the following:�
Move steering column stalk
(�page 45).
�
Press one of the memory position but-
tons (
�page 135).
Do not leave children unattended in the ve-
hicle, or with access to an unlocked vehicle.
Children could open the driver’s door and
unintentionally activate the easy-entry/exit
feature, which could result in an accident
and/or serious personal injury.
Page 186 of 522

185 Controls in detail
Automatic transmission
An additional indication of the current gear
selector lever position can be found on the
cover of the shifting-gate.
The indicators come on when you activate
a switch (e.g. unlocking the vehicle or
opening a door) and go out after approxi-
mately 15 minutes.
Shifting procedure
The automatic transmission selects indi-
vidual gears automatically, depending on:�
gear selector lever positionD
(�page 186) with gear ranges
(�page 189)
�
the selected program mode:
(C/S)(
�page 190)
or
(M/C/S) (E 63 AMG only)
(
�page 194)
�
the position of the accelerator pedal
(�page 188)
�
the vehicle speedWhen the gear selector lever is in drive
positionD, you can influence transmission
shifting by:
�
limiting the gear range
�
changing gears manually
Warning!
G
It is dangerous to shift the gear selector
lever out of park positionP or neutral
positionN if the engine speed is higher than
idle speed. If your foot is not firmly on the
brake pedal, the vehicle could accelerate
quickly forward or reverse. You could lose
control of the vehicle and hit someone or
something. Only shift into gear when the
engine is idling normally a n d w h e n y o u r r i g h t
foot is firmly on the brake pedal.
!
Allow engine to warm up under low load use.
Do not place full load on the engine until the
operating temperature has been reached.
Shift into reverse gearR or park positionP only
when the vehicle is stopped.
Avoid spinning of a drive wheel for an extended
period when driving off on slippery road
surfaces. This may cause serious damage to the
drivetrain which is not covered by the
Mercedes-Benz Limited Warranty.