Page 232 of 481

Airmatic automatically selects the opti-
mum suspension tuning and ride height for
your vehicle. The Airmatic consists of two
compon")
231 Controls in detail
Driving systems
Airmatic DC (Dual Control)
Airmatic automatically selects the opti-
mum suspension tuning and ride height for
your vehicle. The Airmatic consists of two
components:�
Adaptive Damping System (ADS)
�
Vehicle level control
The ADS automatically selects the opti-
mum damping for the respective driving
conditions. At the same time the suspen-
sion is set to either Sport 1, Sport 2 or
Comfort.
Suspension tuning
The suspension tuning is set according to:
�
Your driving style
�
Road surface conditions
�
Your choice of suspension style,
Sport 1, Sport 2 or Comfort, which you
select using the damping buttonThe following suspension styles are avail-
able:
�
Comfort
Both indicator lamps2 are off.
�
Sport 1
One indicator lamp2 is on.
�
Sport 2
Both indicator lamps2 are on.
1Damping button
2Indicator lamps
�
Start the engine (
�page 51).
�
Press the damping button1 until the
desired suspension style is set.
!
If you have selected the Comfort suspen-
sion tuning (
�page 231), the vehicle lowers
slightly when you lock it within approximately
60 seconds after switching off the engine. When
parking, make sure that your vehicle cannot
come into contact with other objects, such as a
curb, while lowering. Your vehicle could
otherwise be damaged.
i
The selected suspension style is stored in
memory, even after the SmartKey is removed
from the starter switch.
Page 234 of 481
233 Controls in detail
Driving systems
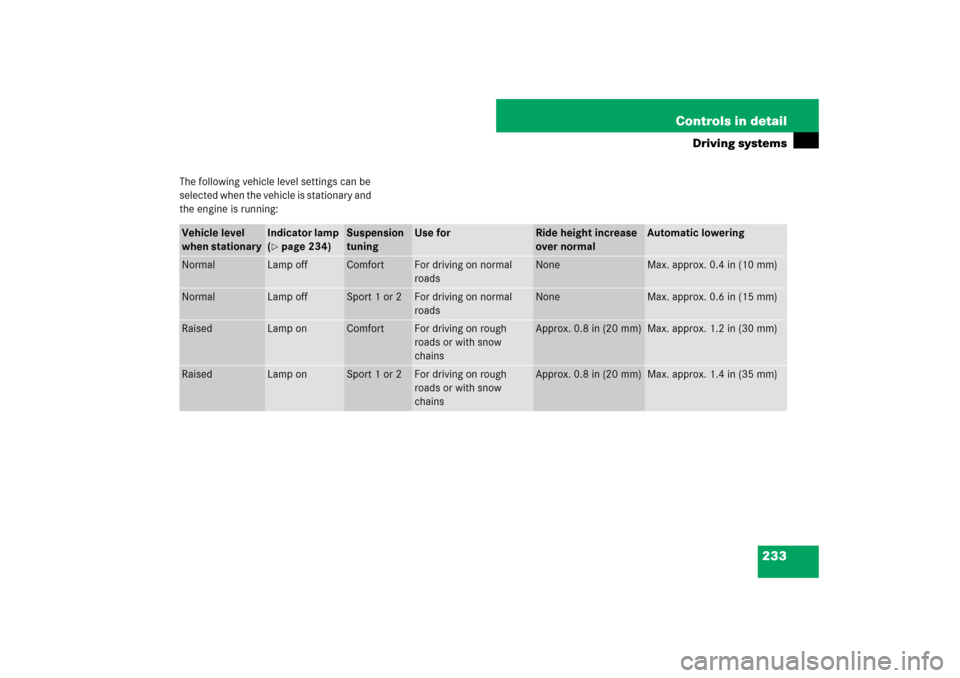
The following vehicle level settings can be
selected when the vehicle is stationary and
the engine is running:Vehicle level
when stationary
Indicator lamp
(�page 234)
Suspension
tuning
Use for
Ride height increase
over normal
Automatic lowering
Normal
Lamp off
Comfort
For driving on normal
roads
None
Max. approx. 0.4 in (10 mm)
Normal
Lamp off
Sport 1 or 2
For driving on normal
roads
None
Max. approx. 0.6 in (15 mm)
Raised
Lamp on
Comfort
For driving on rough
roads or with snow
chains
Approx. 0.8 in (20 mm)
Max. approx. 1.2 in (30 mm)
Raised
Lamp on
Sport 1 or 2
For driving on rough
roads or with snow
chains
Approx. 0.8 in (20 mm)
Max. approx. 1.4 in (35 mm)
Page 235 of 481
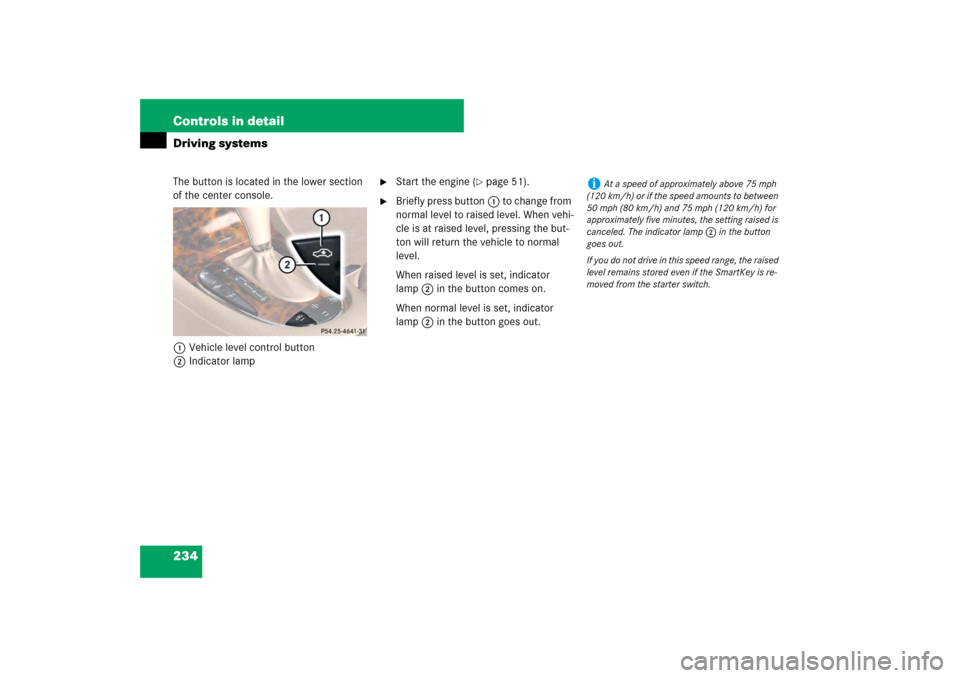
234 Controls in detailDriving systemsThe button is located in the lower section
of the center console.
1Vehicle level control button
2Indicator lamp
�
Start the engine (
�page 51).
�
Briefly press button1 to change from
normal level to raised level. When vehi-
cle is at raised level, pressing the but-
ton will return the vehicle to normal
level.
When raised level is set, indicator
lamp2 in the button comes on.
When normal level is set, indicator
lamp2 in the button goes out.
i
At a speed of approximately above 75 mph
(120 km/h) or if the speed amounts to between
50 mph (80 km/h) and 75 mph (120 km/h) for
approximately five minutes, the setting raised is
canceled. The indicator lamp2 in the button
goes out.
If you do not drive in this speed range, the raised
level remains stored even if the SmartKey is re-
moved from the starter switch.
Page 250 of 481
249 Controls in detail
Useful features
Cup holder in the rear seat armrest�
Briefly press the front of the rear arm-
rest.
The cup holder extends automatically.
Ashtrays
Center console ashtray
1Cover
2Sliding button
Opening ashtray�
Briefly press the marking on the bot-
tom of cover1.
The ashtray opens automatically.Removing ashtray insert
�
Secure vehicle from movement by set-
ting the parking brake. Move the gear
selector lever to positionN.
Now you have more room to take out
the insert.
�
Push sliding button2 to the right and
hold.
�
Grip and remove insert from ashtray
frame.Warning!
G
Remove front ashtray only with vehicle
standing still. Set the parking brake to
secure vehicle from movement. Move gear
selector lever to positionN. With gear selec-
tor lever in positionN, turn off the engine.
Page 255 of 481

254 Controls in detailUseful featuresTelephone*
Radio transmitters, such as a portable tele-
phone or a citizens band unit, should only
be used inside the vehicle if they are con-
nected to an antenna that is installed on
the outside of the vehicle.
The external antenna must be approved by
Mercedes-Benz. Please contact an autho-
rized Mercedes-Benz Center for informa-
tion on the installation of an approved
external antenna. Refer to the radio trans-
mitter operation instructions regarding use
of an external antenna.When the mobile phone is inserted in the
cradle, you can operate the telephone us-
ing the following devices:
�
mobile phone keypad
�
COMAND (see separate operating in-
structions)
�
buttonss andt on the multi-
function steering wheel
�
Voice Control* (see separate operating
instructions)
See also separate operating manual for in-
structions on how to use the mobile phone.
Warning!
G
Never operate radio transmitters equipped
with a built-in or attached antenna (i.e. with-
out being connected to an external antenna)
from inside the vehicle while the engine is
running. Doing so could lead to a malfunc-
tion of the vehicle’s electronic system, pos-
sibly resulting in an accident and/or serious
personal injury.
Warning!
G
Please do not forget that your primary re-
sponsibility is to drive the vehicle. A driver’s
attention to the road must always be
his/her primary focus when driving. For
your safety and the safety of others, we rec-
ommend that you pull over to a safe location
and stop before placing or taking a tele-
phone call.
If you choose to use the telephone
1 while
driving, please use the hands-free device
and only use the telephone when road,
weather and traffic conditions permit. Some
jurisdictions prohibit the driver from using a
mobile telephone while driving a vehicle.
Only operate the COMAND (Cockpit Man-
agement and Data System)
1 if road, weather
and traffic conditions permit.
Bear in mind that at a speed of just 30 mph
(approximately 50 km/h), your vehicle is
covering a distance of 44 feet (approximate-
ly 14 m) every second.
1Observe all legal requirements.
i
Various mobile phone cradles can be in-
stalled in the cockpit. These mobile phone cra-
dles can be obtained from an authorized
Mercedes-Benz Center.
The functions and services available to you while
using the mobile phone depend on your service
provider and the type of mobile phone you are
using.
Page 265 of 481
:")
264 Controls in detailUseful featuresInterior rear view mirror with integrated re-
mote control1Indicator lamp
2 3 4Signal transmitter button
Needed for programming (not part of vehi-
cle equipment):
5Hand-held remote control of ga-
rage door opener, gate operator
or other device
6Hand-held remote control but-
tonProgramming integrated remote
control
Step 1:
�
Switch on the ignition (
�page 38).
Warning!
G
Before programming the integrated remote
control to a garage door opener or gate
operator, make sure people and objects are
out of the way of the device to prevent po-
tential harm or damage. When programming
a garage door opener, the door moves up or
down. When programming a gate operator,
the gate opens or closes.
Do not use the integrated remote control
with any garage door opener that lacks
safety stop and reverse features as required
by U.S. federal safety standards (this
includes any garage door opener model
manufactured before April 1, 1982).
A garage door that cannot detect an object
– signaling the door to stop and reverse –
does not meet current U.S. federal safety
standards.
When programming a garage door opener,
park the vehicle outside the garage.
Do not run the engine while programming
the integrated remote control. Inhalation of
exhaust gas is hazardous to your health.
All exhaust gas contains carbon
monoxide (CO), and inhaling it can cause
unconsciousness and possible death.
Page 270 of 481
269 Operation
The first 1 000 miles (1 500 km)
Driving instructions
At the gas station
Engine compartment
Tires and wheels
Winter driving
Maintenance
Vehicle care
Page 271 of 481

The more cautiously you treat")
270 OperationIn the “Operation” section you will find de-
tailed information on operating, maintain-
ing and caring for your vehicle.The first 1 000 miles (1 500 km)
The more cautiously you treat your vehicle
during the break-in period, the more satis-
fied you will be with its performance later
on.�
Drive your vehicle during the first
1 000 miles (1 500 km) at varying but
moderate vehicle and engine speeds.
�
During this period, avoid heavy loads
(full throttle driving) and excessive
engine speeds (no more than
2/3 of
maximum rpm in each gear).
�
Avoid accelerating by kickdown.
�
Do not attempt to slow the vehicle
down by shifting to a lower gear using
the gear selector lever.
�
Select positions3, 2 or1 only when
driving at moderate speeds (for hill
driving).
�
Select C as the preferred shift program
(�page 177) for the first 1 000 miles
(1 500 km).After 1 000 miles (1 500 km) you may grad-
ually increase vehicle and engine speeds
to the permissible maximum.
All of the above instructions, as may apply
to your vehicle type, also apply when driv-
ing the first 1 000 miles (1 500 km) after
the engine or the rear differential has been
replaced.
!
Additional instructions for AMG vehicles:
�
During the first 1 000 miles (1 500 km), do
not exceed a speed of 85 mph (140 km/h).
�
During this period, avoid engine speeds
above 4500 rpm in each gear.
i
Always obey applicable speed limits.


Driving instructions
At the gas station
Engine compartment
Tires and wheels
Winter driving
Maintenance
Vehicle care")