Page 174 of 481
173 Controls in detail
Automatic transmission
Gear selector lever positions
The current gear selector lever position
appears in the multifunction display.
1Current gear selector lever position
Effect
ì
Park position
Gear selector lever position
when the vehicle is parked. Place
gear selector lever in park
positionP only when vehicle is
stopped. The park position is not
intended to serve as a brake
when the vehicle is parked.
Rather, the driver should always
set the parking brake in addition
to placing the gear selector lever
in park positionP to secure the
vehicle.
EffectThe SmartKey can only be
removed from the starter switch
with the gear selector lever in
park positionP. With the
SmartKey removed, the gear
selector lever is locked in park
positionP.
If the vehicle’s electrical system
is malfunctioning, the gear
selector lever could remain
locked in park positionP
(�page 398).
í
Reverse gear
Place gear selector lever in
positionR only when vehicle is
stopped.
Page 240 of 481

239 Controls in detail
Loading
�Loading
Roof rack*
1Trim
�
Open trim1 at the trim strips in the
roof.
�
Secure the roof rack according to
manufacturer’s instructions for instal-
lation.
Loading instructions
The total load weight including vehicle
occupants and luggage/cargo should not
exceed the total load limit indicated on the
corresponding placard located on the driv-
er’s door B-pillar.
The handling characteristics of a fully load-
ed vehicle depend greatly on the load dis-
tribution. It is therefore recommended to
load the vehicle according to the illustra-
tions shown, with the heaviest items being
placed towards the front of the vehicle.
Always place items being carried against
front or rear seat backrests, and fasten
them as securely as possible.
The heaviest portion of the cargo should
always be kept as low as possible since it
influences the handling characteristics of
the vehicle.
Warning!
G
Only use roof racks approved by
Mercedes-Benz for your vehicle model to
avoid damage to the vehicle.
Follow the manufacturer’s installation
instructions. Otherwise, an improperly at-
tached roof rack system or its load could be-
come detached from the vehicle.
Do not exceed the maximum roof load of
220 lb (100 kg).
Take into consideration that when the roof
rack is loaded, the handling characteristics
are different from those when operating the
vehicles without the roof rack loaded.
!
Load the roof rack in such a way that the ve-
hicle cannot be damaged while driving.
Make sure
�
you can fully raise the tilt/sliding sunroof
�
you can fully open the trunk
Page 241 of 481

Unfolding and loading�
Fold rear armrest down (arrow).
1Cover
2Catch
�
Pull catches2 in direction of arrows.
�
Open the cover1 downwards in the
di")
240 Controls in detailLoading
Ski bag* (Canada only)
Unfolding and loading�
Fold rear armrest down (arrow).
1Cover
2Catch
�
Pull catches2 in direction of arrows.
�
Open the cover1 downwards in the
direction of the arrow.1Hook and loop fastener
�
Unfasten hook and loop fastener1.
�
Pull ski bag into passenger compart-
ment and unfold.
�
Open the front storage compartment in
the rear center console (
�page 248).
�
Remove the cup holder (
�page 248).
Warning!
G
Always fasten items being carried as secure-
ly as possible fastening materials appropri-
ate for the weight and size of the load.
In an accident, during hard braking or sud-
den maneuvers, loose items will be thrown
around inside the vehicle and can cause in-
jury to vehicle occupants unless the items
are securely fastened in the vehicle.
To help avoid personal injury during a colli-
sion or sudden maneuver, exercise care
when transporting cargo. Put luggage or car-
go in the trunk if possible. Do not pile lug-
gage or cargo higher than the seat backs.
Do not place anything on the rear-window
shelf.
Never drive vehicle with trunk open. Deadly
carbon monoxide (CO) gases may enter ve-
hicle interior, resulting in unconsciousness
and death.
Page 242 of 481
241 Controls in detail
Loading
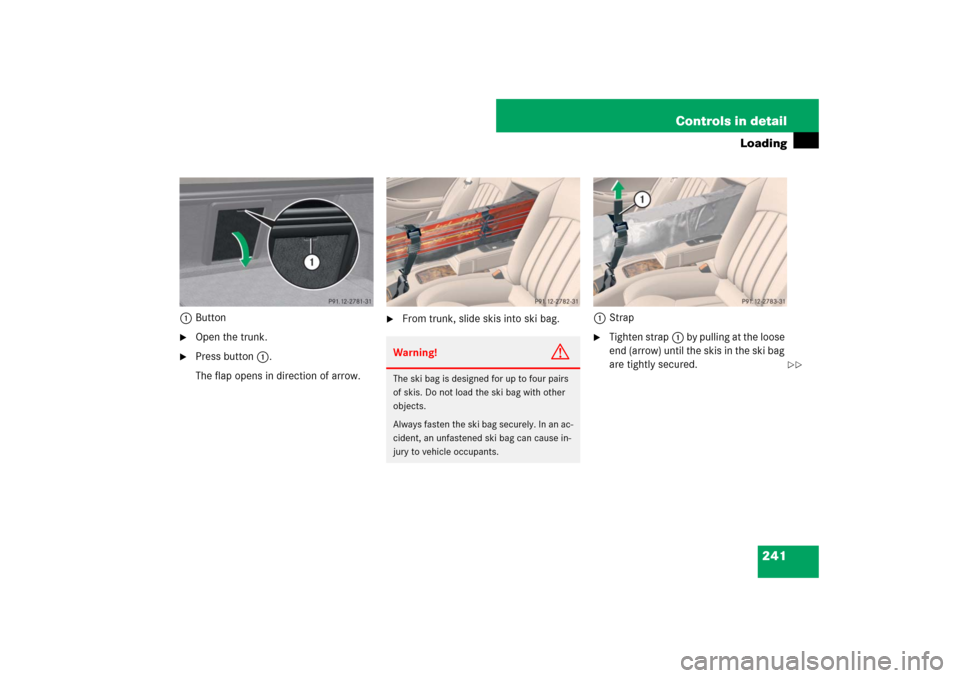
1Button�
Open the trunk.
�
Press button1.
The flap opens in direction of arrow.
�
From trunk, slide skis into ski bag.1Strap
�
Tighten strap1 by pulling at the loose
end (arrow) until the skis in the ski bag
are tightly secured.
Warning!
G
The ski bag is designed for up to four pairs
of skis. Do not load the ski bag with other
objects.
Always fasten the ski bag securely. In an ac-
cident, an unfastened ski bag can cause in-
jury to vehicle occupants.
��
Page 244 of 481
243 Controls in detail
Loading
Removal of ski bag
For removal of the ski bag, we recommend
that you contact an authorized
Mercedes-Benz Center.
Cargo tie-down rings
Four rings are located in the trunk.�
Carefully secure cargo by applying
even load on all rings with rope of suffi-
cient strength to hold down the cargo.
Always follow loading instructions
(�page 239).
Retaining hooks
Depending on vehicle production date one
or two hooks are located on the upper
edge of the trunk and can be used to at-
tach cargo items such as bags.�
Pull tab 1 of retaining hook 2 down.
Warning!
G
Never drive vehicle with trunk open while
the ski bag is removed. Deadly carbon mon-
oxide (CO) gases may enter vehicle interior,
resulting in unconsciousness and death.i
To prevent unauthorized persons from ac-
cess to the trunk, always close the cover.
!
Do not use the retaining hooks to tie down
cargo.
Page 245 of 481

244 Controls in detailUseful featuresStorage compartments Glove box
Opening and closing the glove box
�
Press glove box lid release3 to open.
The glove box lid opens downward.
�
Push lid up to close.Locking and unlocking the glove box
�
Insert mechanical key (
�page 396)
into the glove box lock.
�
Turn the mechanical key to position2
to lock or to position1 to unlock the
glove box.
Storage compartment/telephone*
compartment under center armrest
1Button to open storage/telephone*
compartment
2Cover
Warning!
G
To help avoid personal injury during a colli-
sion or sudden maneuver, exercise care
when storing objects in the vehicle. Put lug-
gage or cargo in the trunk if possible. Do not
pile luggage or cargo higher than the seat
backs. Do not place anything on the shelf
below the rear window.
Luggage nets cannot secure hard or heavy
objects.
Keep compartment lids closed. This will help
to prevent stored objects from being thrown
about and injuring vehicle occupants during
an accident.
1
Unlocked
2
Locked
3
Glove box lid release
Page 250 of 481
249 Controls in detail
Useful features
Cup holder in the rear seat armrest�
Briefly press the front of the rear arm-
rest.
The cup holder extends automatically.
Ashtrays
Center console ashtray
1Cover
2Sliding button
Opening ashtray�
Briefly press the marking on the bot-
tom of cover1.
The ashtray opens automatically.Removing ashtray insert
�
Secure vehicle from movement by set-
ting the parking brake. Move the gear
selector lever to positionN.
Now you have more room to take out
the insert.
�
Push sliding button2 to the right and
hold.
�
Grip and remove insert from ashtray
frame.Warning!
G
Remove front ashtray only with vehicle
standing still. Set the parking brake to
secure vehicle from movement. Move gear
selector lever to positionN. With gear selec-
tor lever in positionN, turn off the engine.
Page 254 of 481

253 Controls in detail
Useful features
Switching off�
Turn switch at the tip of stalk in direc-
tion of arrow2.
The heated steering wheel is switched
off. Indicator lamp3 goes out.
For information on steering wheel, see
“Multifunction steering wheel”
(
�page 142).
Floormats
1Retainer pins
2Eyelets
Removing
�
Pull floormats off of retainer pins1.
�
Remove the floormats.
Installing
�
Lay down the floormat.
�
Press the floormat eyelets2 onto re-
tainer pins1.
i
Indicator lamp3 flashes or goes out
�
in case of power surge or undervoltage
�
in case of a steering wheel heating malfunc-
tion
i
The steering wheel heating switches off au-
tomatically when you remove the SmartKey from
the starter switch or, on vehicles with
KEYLESS-GO*, when you switch off the ignition
(
�page 61) and open the driver’s door.
Warning!
G
Whenever you are using floormats, make
sure there is enough clearance and that the
floormats are securely fastened.
Floormats should always be securely fas-
tened using eyelets2 and retainer pins1.
Before driving off, check that the floormats
are securely in place and adjust them if nec-
essary. A loose floormat could slip and
hinder proper functioning of the pedals.
Do not place several floormats on top of
each other as this may impair pedal
movement.
i
To install or remove the floormat more easi-
ly, move the driver’s seat or front passenger seat
as far to the rear as possible (
�page 42).