Page 396 of 481

395 Practical hints
Where will I find...?
Setting up the collapsible wheel chock
The collapsible wheel chock serves to
additionally secure the vehicle, e.g. while
changing the wheel.
1Tilt the plate upward
2Fold the lower plate outward
3Insert the plate
�
Tilt both plates upward1.
�
Fold the lower plate outward2.
�
Guide the tabs of the lower plate all the
way into the openings of the base
plate3.
For information on where to place wheel
chocks when changing a wheel, see “Lift-
ing the vehicle” (
�page 413).
Luggage box
Remove luggage box
1Fastening clip
2Luggage box
�
Turn fastening clips1 to the left up-
wards from fastening bolts.
�
Lift luggage box in the area of the fas-
tening bolts and remove it from trunk.
Install luggage box
�
Insert luggage box into trunk so that
fastening clips are in line with fastening
bolts.
�
Push front edge of luggage box in direc-
tion of arrow under cover of trunk sill.
�
Press fastening clips onto fastening
bolts until they lock into place.
Page 397 of 481
396 Practical hintsUnlocking/locking in an emergencyUnlocking the vehicle
If you cannot unlock the vehicle with the
SmartKey or KEYLESS-GO*, unlock the
driver’s door and the trunk using the me-
chanical key. Removing the mechanical key
1Mechanical key locking tab
2Mechanical key
�
Move locking tab1 in direction of ar-
row.
�
Slide mechanical key2 out of the
housing.Unlocking the driver’s door
�
Insert mechanical key2 into the driv-
er’s door lock until it stops.
�
Turn mechanical key2 counterclock-
wise to position1 until the locking
knob moves up.
The driver’s door is unlocked.
�
Pull the door handle to open the driv-
er’s door.
i
Unlocking your vehicle with the mechanical
key and opening the driver’s door or the trunk
will trigger the anti-theft alarm system.
To cancel the alarm, Insert the SmartKey or
SmartKey with KEYLESS-GO* in the starter
switch.
1
Unlocking
2
Mechanical key
Page 398 of 481

397 Practical hints
Unlocking/locking in an emergency
Unlocking the trunk
A minimum height clearance of 5.90 ft
(1.80 m) is required to open the trunk lid. �
Insert the mechanical key into the
trunk lid lock until it stops.
�
Turn the mechanical key1 counter-
clockwise to position3 and hold it in
this position.
�
Pull the handle2 and lift the trunk lid.
The trunk opens.
�
Turn the mechanical key back and re-
move it from the trunk lid lock.
Locking the vehicle
If you cannot lock the vehicle with the
SmartKey or SmartKey with
KEYLESS-GO*, do the following:�
Close the passenger door, the rear
doors and the trunk.
�
Press the central locking switch in the
center console (
�page 118).
�
Check to see whether the locking
knobs on the doors have moved down.
�
If necessary, push them down
manually.
�
Remove the mechanical key out of the
SmartKey (
�page 396).
�
Check whether the trunk is locked.
�
If necessary, lock the trunk with the
mechanical key (
�page 117).
Except for the driver’s door, the vehicle
should now be locked.
1
Mechanical key
2
Handle
3
Unlocking in an emergency
!
Always make sure there is sufficient over-
head clearance.
��
Page 399 of 481
398 Practical hintsUnlocking/locking in an emergency�
Insert the mechanical key2 into the
driver’s door lock until it stops.
�
Turn the mechanical key clockwise to
position1.
The driver’s door is locked.
Fuel filler flap emergency release
In case the central locking system does
not release the fuel filler flap, you can open
it manually.
1Release knob�
Open trunk.
�
Remove right-side tail trim.
�
Pull release knob1 in the direction of
arrow.
The fuel filler flap can know be opened.Manually unlocking the gear selector
lever
In case of power failure, the gear selector
lever can be manually unlocked, e.g. to tow
the vehicle.
1Selector lever cover
2Release
1
Locking
2
Mechanical key
i
This procedure does not arm the anti-theft
alarm system, nor does it lock the fuel filler flap.
��
Page 414 of 481

413 Practical hints
Flat tire
Preparing the vehicle
Prepare the vehicle as described under
“Preparing the vehicle” on this page.�
Take the spare wheel out of the trunk
(�page 391).
�
Take the wheel wrench and the jack
out of the trunk (
�page 391).
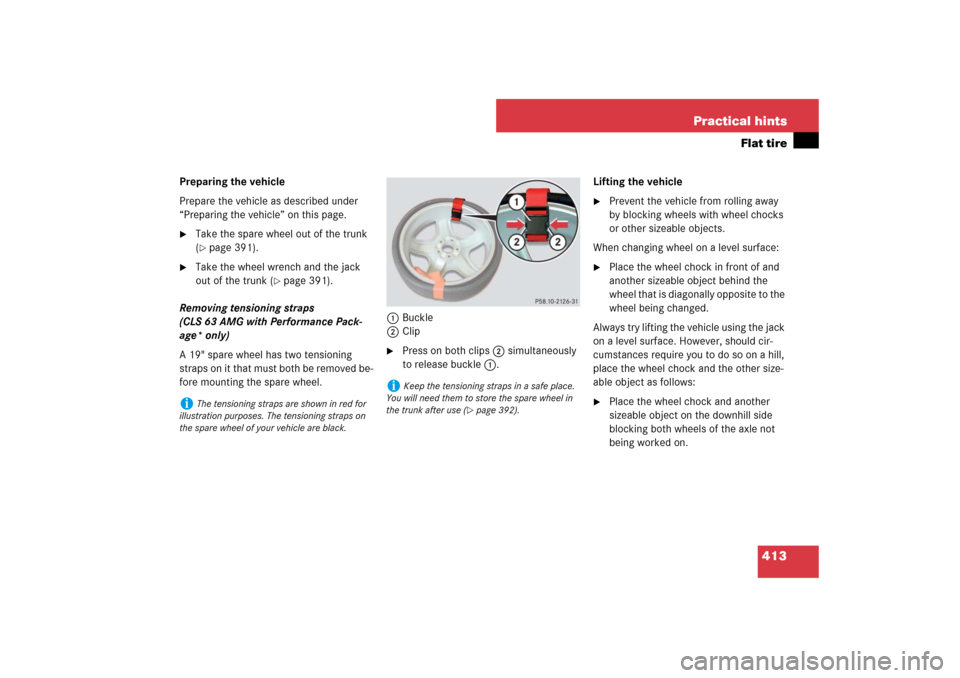
Removing tensioning straps
(CLS 63 AMG with Performance Pack-
age* only)
A 19" spare wheel has two tensioning
straps on it that must both be removed be-
fore mounting the spare wheel.1Buckle
2Clip
�
Press on both clips2 simultaneously
to release buckle1.Lifting the vehicle
�
Prevent the vehicle from rolling away
by blocking wheels with wheel chocks
or other sizeable objects.
When changing wheel on a level surface:
�
Place the wheel chock in front of and
another sizeable object behind the
wheel that is diagonally opposite to the
wheel being changed.
Always try lifting the vehicle using the jack
on a level surface. However, should cir-
cumstances require you to do so on a hill,
place the wheel chock and the other size-
able object as follows:
�
Place the wheel chock and another
sizeable object on the downhill side
blocking both wheels of the axle not
being worked on.
i
The tensioning straps are shown in red for
illustration purposes. The tensioning straps on
the spare wheel of your vehicle are black.
i
Keep the tensioning straps in a safe place.
You will need them to store the spare wheel in
the trunk after use (
�page 392).
Page 417 of 481

416 Practical hintsFlat tire
�
Unscrew the alignment bolt, install last
wheel bolt and tighten slightly.
Vehicles with Minispare wheel:
�
Continue the procedure by following
the instructions under “Lowering the
vehicle” (
�page 418).
Vehicles with collapsible tire:
�
Continue the procedure by following
the instructions under “Inflating the
collapsible tire” and then “Lowering the
vehicle” (
�page 418).Inflating the collapsible tire
�
Take the electric air pump out of the
trunk (
�page 391).
Warning!
G
Always replace wheel bolts that are dam-
aged or rusted.
Never apply oil or grease to wheel bolts.
Damaged wheel hub threads should be
repaired immediately. Do not continue to
drive under these circumstances! Contact
an authorized Mercedes-Benz Center or call
Roadside Assistance.
Incorrect wheel bolts or improperly tight-
ened wheel bolts can cause the wheel to
come off. This could cause an accident. Be
sure to use the correct wheel bolts.
Warning!
G
Only use genuine Mercedes-Benz wheel
bolts. Other wheel bolts may come loose.
Do not tighten the wheel bolts when the
vehicle is raised. Otherwise the vehicle
could fall off the jack.
!
Do not lower the vehicle before inflating the
collapsible tire. Otherwise the rim may be dam-
aged.
Warning!
G
Observe instructions on air pump label.
Page 419 of 481

418 Practical hintsFlat tire�
Detach the electric air pump.
�
Stow electrical plug3 and air hose4
behind flap1 and place the air pump
back in the trunk.Lowering the vehicle
�
Lower vehicle by turning crank coun-
terclockwise until vehicle is resting ful-
ly on its own weight.
�
Remove the jack.
1-5 Wheel bolts
�
Tighten the five wheel bolts evenly, fol-
lowing the diagonal sequence illustrat-
ed (1 to 5), until all bolts are tight.
Observe a tightening torque of 96 lb-ft
(130 Nm).
�
Before storing the jack in the trunk, it
should be fully collapsed.
Warning!
G
Follow recommend inflation pressures.
Do not overinflate tires. Overinflating tires
can result in sudden deflation (blowout)
because they are more likely to become
punctured or damaged by road debris,
potholes, etc.
Do not underinflate tires. Underinflated tires
wear unevenly, adversely affect handling
and fuel economy, and are more likely to fail
from being overheated.i
Vehicles with Advanced TPMS*:
Do not activate the tire inflation pressure moni-
tor (�page 309) until a full size wheel/tire with
functioning sensor has been placed back into
service on the vehicle.
Warning!
G
Have the tightening torque checked after
changing a wheel. The wheels could come
loose if they are not tightened to a torque of
96 lb-ft (130 Nm).i
Wrap the damaged wheel in the protective
film that comes with the spare wheel and put the
wheel in the trunk.
You can also place the damaged wheel down into
the spare wheel well. In this case, you must stow
the luggage bowl in the trunk.
��
Page 421 of 481

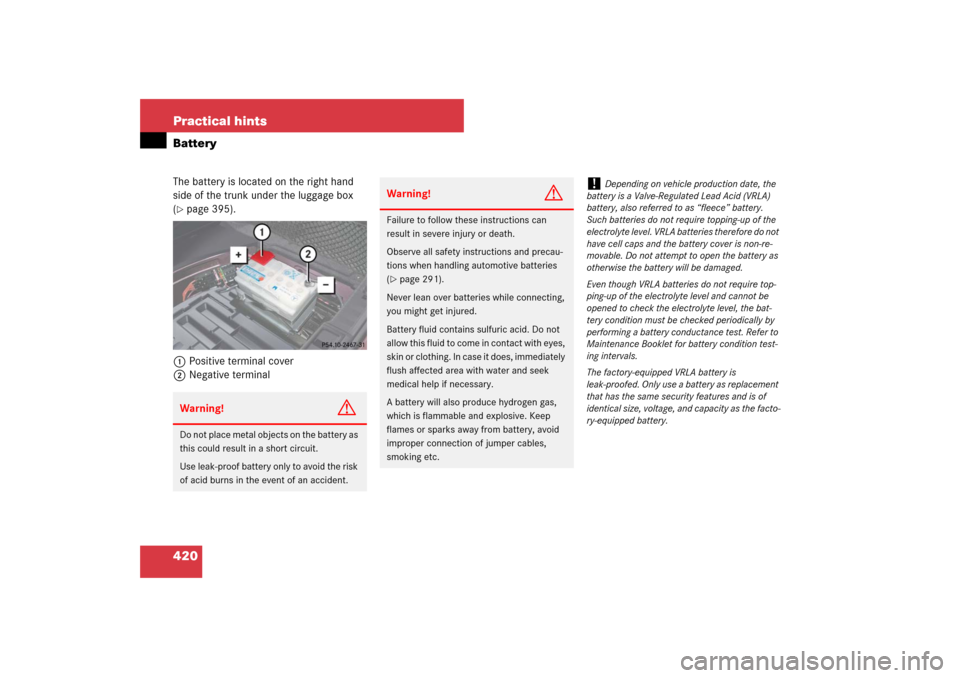
420 Practical hintsBatteryThe battery is located on the right hand
side of the trunk under the luggage box
(�page 395).
1Positive terminal cover
2Negative terminalWarning!
G
Do not place metal objects on the battery as
this could result in a short circuit.
Use leak-proof battery only to avoid the risk
of acid burns in the event of an accident.
Warning!
G
Failure to follow these instructions can
result in severe injury or death.
Observe all safety instructions and precau-
tions when handling automotive batteries
(�page 291).
Never lean over batteries while connecting,
you might get injured.
Battery fluid contains sulfuric acid. Do not
allow this fluid to come in contact with eyes,
skin or clothing. In case it does, immediately
flush affected area with water and seek
medical help if necessary.
A battery will also produce hydrogen gas,
which is flammable and explosive. Keep
flames or sparks away from battery, avoid
improper connection of jumper cables,
smoking etc.
!
Depending on vehicle production date, the
battery is a Valve-Regulated Lead Acid (VRLA)
battery, also referred to as “fleece” battery.
Such batteries do not require topping-up of the
electrolyte level. VRLA batteries therefore do not
have cell caps and the battery cover is non-re-
movable. Do not attempt to open the battery as
otherwise the battery will be damaged.
Even though VRLA batteries do not require top-
ping-up of the electrolyte level and cannot be
opened to check the electrolyte level, the bat-
tery condition must be checked periodically by
performing a battery conductance test. Refer to
Maintenance Booklet for battery condition test-
ing intervals.
The factory-equipped VRLA battery is
leak-proofed. Only use a battery as replacement
that has the same security features and is of
identical size, voltage, and capacity as the facto-
ry-equipped battery.