Page 119 of 481
.
�
Remove the mechanical key from the
SmartKey (
�page 396).
�
Insert the mechanical key in the trunk
lid lock.
�
Turn the m")
118 Controls in detailLocking and unlocking�
Close the trunk (
�page 113).
�
Remove the mechanical key from the
SmartKey (
�page 396).
�
Insert the mechanical key in the trunk
lid lock.
�
Turn the mechanical key clockwise to
position2 to lock the trunk.
The trunk remains locked even when the
vehicle is centrally unlocked.
�
Insert the mechanical key in the trunk
lid lock.
�
Turn the mechanical key counterclock-
wise to neutral position1 to unlock the
trunk.
You can now open the trunk
(�page 112).
Automatic central locking
The doors and the trunk automatically lock
when the ignition is switched on and the
wheels are turning at vehicle speeds of ap-
proximately 9 mph (15 km / h) or more.
The locking knobs in the doors move down.
You can open a locked door from the in-
side. Open door only when conditions are
safe to do so.
You can deactivate the automatic locking
mode using the control system
(�page 165).
Locking and unlocking from the inside
You can lock or unlock the doors and the
trunk from inside using the central locking
switch. This can be useful, for example, if
you want to lock the vehicle before starting
to drive.
The fuel filler flap cannot be locked or un-
locked with the central locking switch.
i
You can only cancel the separate trunk lock-
ing mode by means of the mechanical key.
i
The doors are designed to unlock automati-
cally after an accident if the force of the impact
exceeds a preset threshold. The vehicle locks au-
tomatically when the ignition is switched on and
the wheels are turning at vehicle speeds of ap-
proximately 9 mph (15 km/h) or more. You could
therefore lock yourself out when the vehicle
�
is pushed or towed
�
is on a test stand
Warning!
G
When leaving the vehicle, always remove the
SmartKey or SmartKey with KEYLESS-GO*
from the starter switch, take it with you, and
lock the vehicle. Do not leave children unat-
tended in the vehicle, or with access to an
unlocked vehicle. A child’s unsupervised ac-
cess to a vehicle could result in an accident
and/or serious personal injury.
Page 136 of 481

135 Controls in detail
Lighting
Interior lighting in the front
The controls are located in the overhead
control panel.1Left front reading lamp on/off
2Rear interior lighting on/off
3Automatic control on/off
4Front interior lighting on/off
5Right front reading lamp on/off
6Interior lighting
7Ambient lighting
8Front reading lamps
Deactivating automatic control
�
Press switch3.
The interior lighting remains switched
off in darkness, even when you:�
unlock the vehicle
�
remove the SmartKey from the
starter switch
�
open a door
�
open the trunk
Activating automatic control
�
Press switch3.
The interior lighting switches on in
darkness, when you:�
unlock the vehicle
�
remove the SmartKey from the
starter switch
�
open a door
�
open the trunk
The interior lighting switches off after a
preset time (
�page 164).
!
An interior lamp switched on manually does
not go out automatically.
Leaving an interior lamp switch in the ON posi-
tion for extended periods of time with the engine
turned off could result in a discharged battery.
i
The interior lighting is factory-set to auto-
matic mode.
i
If a door remains open, the interior lamps
switch off automatically after approximately
5minutes.
Page 138 of 481

137 Controls in detail
Lighting
Rear reading lamps�
Press rear reading lamp switch3
or7 to switch on the respective rear
reading lamp.
�
Press rear reading lamp switch3
or7 again to switch off the respective
rear reading lamp.
Ambient lighting
�
Press ambient lighting switch1or6
repeatedly until ambient lighting5
has reached the desired intensity.
You can switch the ambient lighting on and
off, using the “Control system”
(
�page 163).
Door entry lamps
For better orientation in the dark, the cor-
responding door entry lamps will switch on
in darkness when you open a door and the
automatic control is activated.
The door entry lamps will switch off when
the corresponding door is closed.
Trunk lamp
The trunk lamp switches on if the trunk is
opened.
If the trunk remains open, the trunk light-
ing switches off automatically after ap-
proximately 10 minutes.
i
If you turn the SmartKey in the starter
switch to position0 and switch off the head-
lamps, the door entry lamps will remain lit for ap-
proximately 5 minutes.
Page 240 of 481

239 Controls in detail
Loading
�Loading
Roof rack*
1Trim
�
Open trim1 at the trim strips in the
roof.
�
Secure the roof rack according to
manufacturer’s instructions for instal-
lation.
Loading instructions
The total load weight including vehicle
occupants and luggage/cargo should not
exceed the total load limit indicated on the
corresponding placard located on the driv-
er’s door B-pillar.
The handling characteristics of a fully load-
ed vehicle depend greatly on the load dis-
tribution. It is therefore recommended to
load the vehicle according to the illustra-
tions shown, with the heaviest items being
placed towards the front of the vehicle.
Always place items being carried against
front or rear seat backrests, and fasten
them as securely as possible.
The heaviest portion of the cargo should
always be kept as low as possible since it
influences the handling characteristics of
the vehicle.
Warning!
G
Only use roof racks approved by
Mercedes-Benz for your vehicle model to
avoid damage to the vehicle.
Follow the manufacturer’s installation
instructions. Otherwise, an improperly at-
tached roof rack system or its load could be-
come detached from the vehicle.
Do not exceed the maximum roof load of
220 lb (100 kg).
Take into consideration that when the roof
rack is loaded, the handling characteristics
are different from those when operating the
vehicles without the roof rack loaded.
!
Load the roof rack in such a way that the ve-
hicle cannot be damaged while driving.
Make sure
�
you can fully raise the tilt/sliding sunroof
�
you can fully open the trunk
Page 241 of 481

Unfolding and loading�
Fold rear armrest down (arrow).
1Cover
2Catch
�
Pull catches2 in direction of arrows.
�
Open the cover1 downwards in the
di")
240 Controls in detailLoading
Ski bag* (Canada only)
Unfolding and loading�
Fold rear armrest down (arrow).
1Cover
2Catch
�
Pull catches2 in direction of arrows.
�
Open the cover1 downwards in the
direction of the arrow.1Hook and loop fastener
�
Unfasten hook and loop fastener1.
�
Pull ski bag into passenger compart-
ment and unfold.
�
Open the front storage compartment in
the rear center console (
�page 248).
�
Remove the cup holder (
�page 248).
Warning!
G
Always fasten items being carried as secure-
ly as possible fastening materials appropri-
ate for the weight and size of the load.
In an accident, during hard braking or sud-
den maneuvers, loose items will be thrown
around inside the vehicle and can cause in-
jury to vehicle occupants unless the items
are securely fastened in the vehicle.
To help avoid personal injury during a colli-
sion or sudden maneuver, exercise care
when transporting cargo. Put luggage or car-
go in the trunk if possible. Do not pile lug-
gage or cargo higher than the seat backs.
Do not place anything on the rear-window
shelf.
Never drive vehicle with trunk open. Deadly
carbon monoxide (CO) gases may enter ve-
hicle interior, resulting in unconsciousness
and death.
Page 242 of 481
241 Controls in detail
Loading
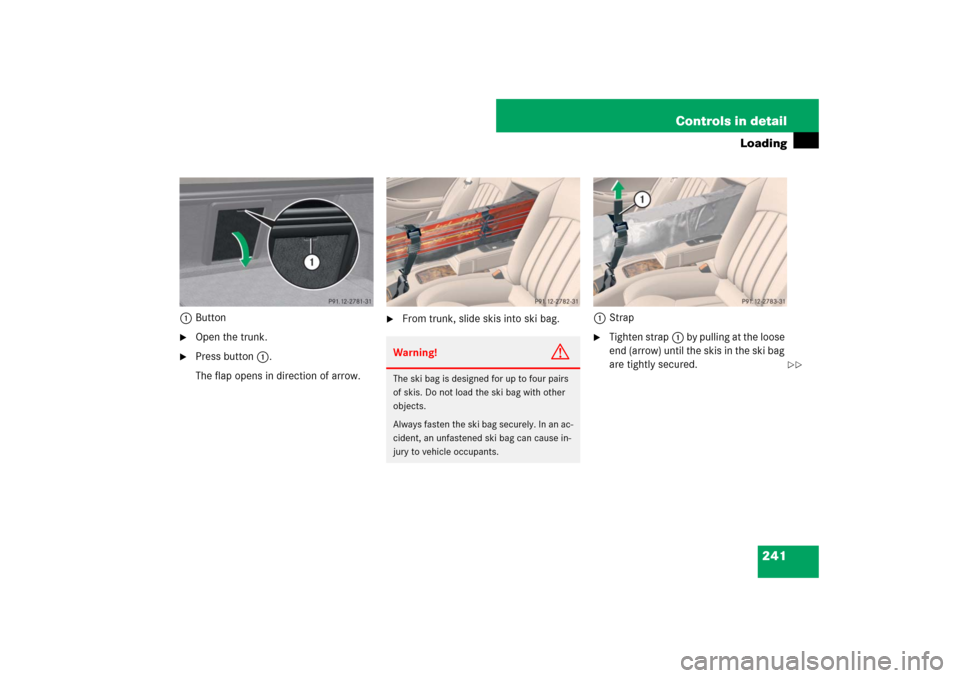
1Button�
Open the trunk.
�
Press button1.
The flap opens in direction of arrow.
�
From trunk, slide skis into ski bag.1Strap
�
Tighten strap1 by pulling at the loose
end (arrow) until the skis in the ski bag
are tightly secured.
Warning!
G
The ski bag is designed for up to four pairs
of skis. Do not load the ski bag with other
objects.
Always fasten the ski bag securely. In an ac-
cident, an unfastened ski bag can cause in-
jury to vehicle occupants.
��
Page 243 of 481
242 Controls in detailLoading1Cover�
With insert or cup holder removed, fold
cover1 upward.1Hook
2Eye
�
Connect hook1 to eye2 located in
the front storage compartment in the
rear center console.
�
Tighten strap by pulling at the loose
end (arrow).Unloading and folding
�
Loosen both straps.
�
Disconnect hook1 from eye2.
�
Unload skis.
�
Close flap in trunk.
�
Fold and flatten ski bag lengthwise.
�
Place folded ski bag inside recess of
backrest.
�
Fasten hook and loop fastener
�
Close ski bag compartment cover.
��
Page 244 of 481
243 Controls in detail
Loading
Removal of ski bag
For removal of the ski bag, we recommend
that you contact an authorized
Mercedes-Benz Center.
Cargo tie-down rings
Four rings are located in the trunk.�
Carefully secure cargo by applying
even load on all rings with rope of suffi-
cient strength to hold down the cargo.
Always follow loading instructions
(�page 239).
Retaining hooks
Depending on vehicle production date one
or two hooks are located on the upper
edge of the trunk and can be used to at-
tach cargo items such as bags.�
Pull tab 1 of retaining hook 2 down.
Warning!
G
Never drive vehicle with trunk open while
the ski bag is removed. Deadly carbon mon-
oxide (CO) gases may enter vehicle interior,
resulting in unconsciousness and death.i
To prevent unauthorized persons from ac-
cess to the trunk, always close the cover.
!
Do not use the retaining hooks to tie down
cargo.