Page 236 of 481
*
The Parktronic system is an electronic aid
designed to assist the driver during park-
ing maneuvers. It visually and audibly")
235 Controls in detail
Driving systems
Parktronic system (Parking assist)*
The Parktronic system is an electronic aid
designed to assist the driver during park-
ing maneuvers. It visually and audibly indi-
cates the relative distance between the
vehicle and an obstacle.
The Parktronic system is automatically
activated when you switch on the ignition,
release the parking brake, and placed the
gear selector lever in positionD,R,orN.
The Parktronic system deactivates at
speeds over approximately 11 mph
(18 km/h). At lower speeds the Parktronic
system turns on again.
The Parktronic system also deactivates
when you place the gear selector lever in
positionP or depress the parking brake
pedal.The Parktronic system monitors the sur-
roundings of your vehicle with six sensors
in the front bumper and four sensors in the
rear bumper.
1Sensors in the front bumper
Range of the sensors
To function properly, the sensors must be
free of dirt, ice, snow and slush. Clean the
sensors regularly, being careful not to
scratch or damage the sensors, see
“Cleaning the Parktronic* system sensors”
(
�page 336).
Warning!
G
Parktronic is a supplemental system. It is
not intended to, nor does it replace, the
need for extreme care. The responsibility
during parking and other critical maneuvers
always rests with the driver.
Special attention must be paid to objects
with smooth surfaces or low silhouettes
(e.g. trailer couplings, painted posts, or road
curbs). Such objects may not be detected by
the system and can damage the vehicle.
The operational function of the Parktronic
system can be affected by dirty sensors,
especially at times of snow and ice, see
“Cleaning the Parktronic* system sensors”
(�page 336).
Interference caused by other ultrasonic sig-
nals (e.g. working jackhammers, car wash or
the air brakes of trucks) can cause the sys-
tem to send erratic indications, and should
be taken into consideration.
Warning!
G
Make sure no persons or animals are in the
area in which you are maneuvering. You
could otherwise injure them.
Page 237 of 481
236 Controls in detailDriving systems
Front sensors
Rear sensorsMinimum distance
If the system detects an obstacle in this
range, all the distance warning segments
illuminate and you hear a warning signal. If
the obstacle is closer than the minimum
distance, the actual distance might no
longer be indicated by the system.Center
approx. 40 in (100 cm)
Corners
approx. 24 in (60 cm)
Center
approx. 48 in (120 cm)
Corners
approx. 32 in (80 cm)
!
During parking maneuvers, pay special at-
tention to objects located above or below the
height of the sensors (e.g. planters or trailer
hitches). The Parktronic system will not detect
such objects at close range and damage to your
vehicle or the object may result.
Ultrasonic signals from outside sources (e.g.
truck air brakes, car wash or jackhammers) may
impair the operation of the Parktronic system.
Center
approx. 8 in (20 cm)
Corners
approx. 6 in (15 cm)
Page 238 of 481

237 Controls in detail
Driving systems
Warning indicators
Visual signals indicate to the driver the rel-
ative distance between the sensors and an
obstacle. The warning indicator for the
front area is located above the center air
vents in the dashboard. The warning indi-
cator for the rear area is integrated in the
rear trim.Front area warning indicator1Left side of the vehicle
2Right side of the vehicle
3Readiness indicatorsEach warning indicator is divided into five
yellow and two red segments for either
side of the vehicle. The Parktronic system
is operational when the yellow readiness
indicators3 are illuminated.
The position of the gear selector lever
determines which warning indicators will
be activated.
As your vehicle approaches an object, one
or more segments will come on, depending
on the distance. When the seventh seg-
ment illuminates, you have reached the
minimum distance.
�
Front area: An intermittent acoustic
warning will sound as the first red
distance segment illuminates and a
constant acoustic warning lasting a
maximum of 2 seconds will sound for
the second red distance segment. The
signal is canceled when the gear selec-
tor lever is placed in positionP or the
parking brake is activated.
�
Rear area: An intermittent acoustic
warning will sound as the first red
distance segment illuminates and a
constant acoustic warning lasting a
maximum of 2 seconds will sound for
the second red distance segment. The
signal is canceled when the gear selec-
tor lever is placed in positionD, P or
the parking brake is activated.
Gear selector
lever position
Warning indicator
D
Front area activated
R or N
Front and rear area
activated
P
Neither activated
Page 239 of 481

238 Controls in detailDriving systemsSwitching the Parktronic system
on/off
The Parktronic system can be switched off
manually.
The Parktronic switch is located in the low-
er part of the center console (
�page 30).
1Parktronic switch
2Indicator lampSwitching off the Parktronic system
�
Press Parktronic switch1.
Indicator lamp2 comes on.
Switching on the Parktronic system
�
Press Parktronic switch1 again.
Indicator lamp2 goes out.
Parktronic system malfunction
If only the red distance segments illumi-
nates and an acoustic warning sounds,
there is a malfunction in the Parktronic
system. The Parktronic system will auto-
matically switch off after 20 seconds and
the indicator lamp in the Parktronic switch
comes on.
�
Have the Parktronic system checked
by an authorized Mercedes-Benz
Center as soon as possible.
If only the red distance segments illumi-
nates and no acoustic warning sounds, the
Parktronic system sensors are dirty or
there is an interference from other radio or
ultrasonic signals. The Parktronic system
will automatically switch off after
20 seconds and the indicator lamp in the
Parktronic switch comes on.
�
Switch off the ignition (
�page 38).
�
Clean the Parktronic system sensors
(�page 336).
�
Switch on the ignition (
�page 38).
or
�
Check the Parktronic system operation
at another location to rule out interfer-
ence from outside radio or ultrasonic
signals.
i
The Parktronic system is automatically
switched on when the ignition is switched on
(
�page 38).
Page 240 of 481

239 Controls in detail
Loading
�Loading
Roof rack*
1Trim
�
Open trim1 at the trim strips in the
roof.
�
Secure the roof rack according to
manufacturer’s instructions for instal-
lation.
Loading instructions
The total load weight including vehicle
occupants and luggage/cargo should not
exceed the total load limit indicated on the
corresponding placard located on the driv-
er’s door B-pillar.
The handling characteristics of a fully load-
ed vehicle depend greatly on the load dis-
tribution. It is therefore recommended to
load the vehicle according to the illustra-
tions shown, with the heaviest items being
placed towards the front of the vehicle.
Always place items being carried against
front or rear seat backrests, and fasten
them as securely as possible.
The heaviest portion of the cargo should
always be kept as low as possible since it
influences the handling characteristics of
the vehicle.
Warning!
G
Only use roof racks approved by
Mercedes-Benz for your vehicle model to
avoid damage to the vehicle.
Follow the manufacturer’s installation
instructions. Otherwise, an improperly at-
tached roof rack system or its load could be-
come detached from the vehicle.
Do not exceed the maximum roof load of
220 lb (100 kg).
Take into consideration that when the roof
rack is loaded, the handling characteristics
are different from those when operating the
vehicles without the roof rack loaded.
!
Load the roof rack in such a way that the ve-
hicle cannot be damaged while driving.
Make sure
�
you can fully raise the tilt/sliding sunroof
�
you can fully open the trunk
Page 241 of 481

Unfolding and loading�
Fold rear armrest down (arrow).
1Cover
2Catch
�
Pull catches2 in direction of arrows.
�
Open the cover1 downwards in the
di")
240 Controls in detailLoading
Ski bag* (Canada only)
Unfolding and loading�
Fold rear armrest down (arrow).
1Cover
2Catch
�
Pull catches2 in direction of arrows.
�
Open the cover1 downwards in the
direction of the arrow.1Hook and loop fastener
�
Unfasten hook and loop fastener1.
�
Pull ski bag into passenger compart-
ment and unfold.
�
Open the front storage compartment in
the rear center console (
�page 248).
�
Remove the cup holder (
�page 248).
Warning!
G
Always fasten items being carried as secure-
ly as possible fastening materials appropri-
ate for the weight and size of the load.
In an accident, during hard braking or sud-
den maneuvers, loose items will be thrown
around inside the vehicle and can cause in-
jury to vehicle occupants unless the items
are securely fastened in the vehicle.
To help avoid personal injury during a colli-
sion or sudden maneuver, exercise care
when transporting cargo. Put luggage or car-
go in the trunk if possible. Do not pile lug-
gage or cargo higher than the seat backs.
Do not place anything on the rear-window
shelf.
Never drive vehicle with trunk open. Deadly
carbon monoxide (CO) gases may enter ve-
hicle interior, resulting in unconsciousness
and death.
Page 242 of 481
241 Controls in detail
Loading
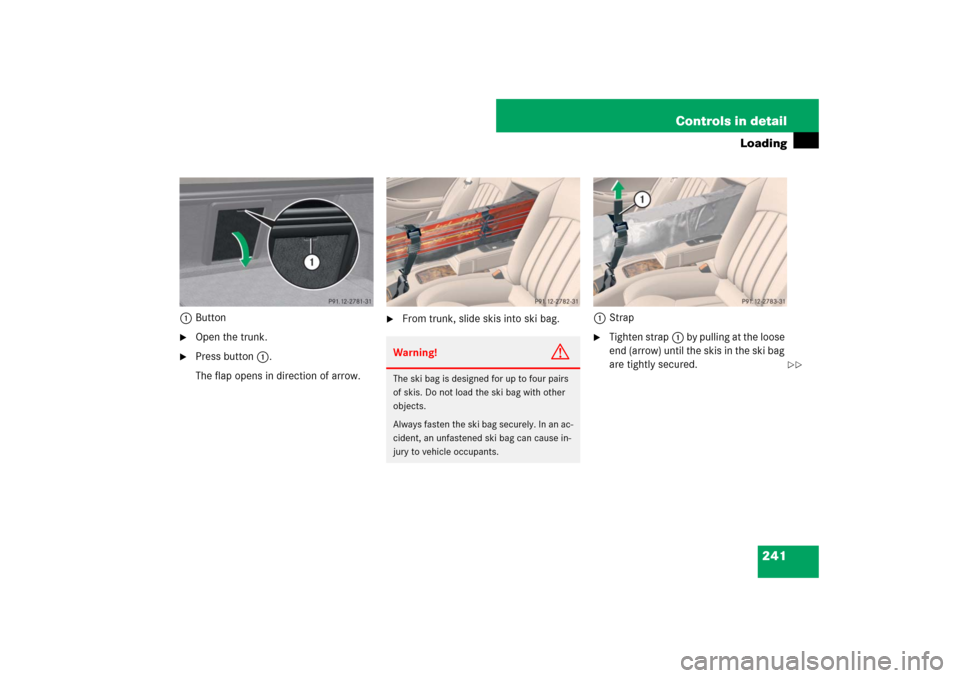
1Button�
Open the trunk.
�
Press button1.
The flap opens in direction of arrow.
�
From trunk, slide skis into ski bag.1Strap
�
Tighten strap1 by pulling at the loose
end (arrow) until the skis in the ski bag
are tightly secured.
Warning!
G
The ski bag is designed for up to four pairs
of skis. Do not load the ski bag with other
objects.
Always fasten the ski bag securely. In an ac-
cident, an unfastened ski bag can cause in-
jury to vehicle occupants.
��
Page 244 of 481
243 Controls in detail
Loading
Removal of ski bag
For removal of the ski bag, we recommend
that you contact an authorized
Mercedes-Benz Center.
Cargo tie-down rings
Four rings are located in the trunk.�
Carefully secure cargo by applying
even load on all rings with rope of suffi-
cient strength to hold down the cargo.
Always follow loading instructions
(�page 239).
Retaining hooks
Depending on vehicle production date one
or two hooks are located on the upper
edge of the trunk and can be used to at-
tach cargo items such as bags.�
Pull tab 1 of retaining hook 2 down.
Warning!
G
Never drive vehicle with trunk open while
the ski bag is removed. Deadly carbon mon-
oxide (CO) gases may enter vehicle interior,
resulting in unconsciousness and death.i
To prevent unauthorized persons from ac-
cess to the trunk, always close the cover.
!
Do not use the retaining hooks to tie down
cargo.