Page 87 of 505

86 Safety and Security
Occupant safety
Blocking of rear side window operation
You can block the rear side window
operation (for instance when you have
children riding in the rear passenger
compartment).
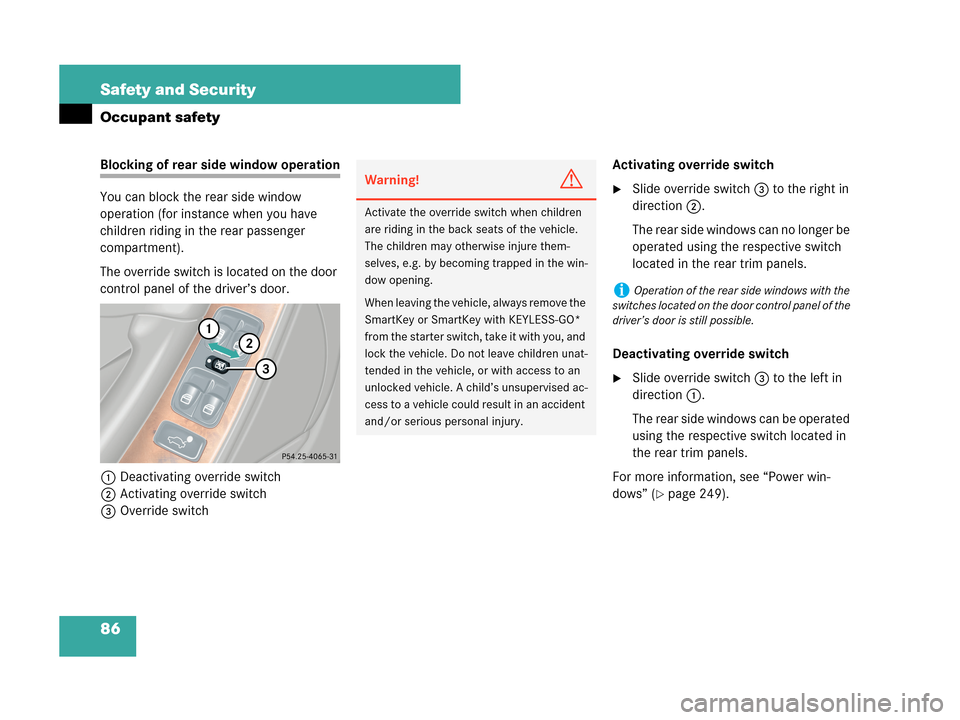
The override switch is located on the door
control panel of the driver’s door.
1Deactivating override switch
2Activating override switch
3Override switchActivating override switch
�Slide override switch3 to the right in
direction2.
The rear side windows can no longer be
operated using the respective switch
located in the rear trim panels.
Deactivating override switch
�Slide override switch3 to the left in
direction1.
The rear side windows can be operated
using the respective switch located in
the rear trim panels.
For more information, see “Power win-
dows” (
�page 249).
Warning!G
Activate the override switch when children
are riding in the back seats of the vehicle.
The children may otherwise injure them-
selves, e.g. by becoming trapped in the win-
dow opening.
When leaving the vehicle, always remove the
SmartKey or SmartKey with KEYLESS-GO*
from the starter switch, take it with you, and
lock the vehicle. Do not leave children unat-
tended in the vehicle, or with access to an
unlocked vehicle. A child’s unsupervised ac-
cess to a vehicle could result in an accident
and/or serious personal injury.
iOperation of the rear side windows with the
switches located on the door control panel of the
driver’s door is still possible.
Page 98 of 505
97 Controls in detail
Locking and unlocking
Seats
Memory function
Lighting
Instrument cluster
Control system
Automatic transmission
Good visibility
Climate control
Automatic climate control
Audio system
Power windows
Soft top
Driving systems
Loading
Useful features
Page 120 of 505

119 Controls in detail
Seats
�Seats
For information on seat adjustment, see
“Adjusting” (
�page 39).
Front seat active head restraintsYou cannot remove the active head re-
straints on the driver’s and front passen-
ger’s seat.
For removal of the active head restraints
we recommend that you contact an
authorized Mercedes-Benz Center.
For information on head restraint adjust-
ment, see “Seats” (
�page 39).
For information on active head restraints,
see “Active head restraints” (
�page 80).
Rear seat head restraints
Warning!G
For your protection, drive only with properly
positioned head restraints.
Adjust the head restraint so that it is as
close to the head as possible and the center
of the head restraint supports the back of
the head at eye level. This will reduce the po-
tential for injury to the head and neck in the
event of an accident or similar situation.
Warning!G
For safety reasons, always drive with the
rear head restraints in the raised position
when the rear seats are occupied.
Keep the area around head restraints clear
of articles (e.g. clothing) to not obstruct the
lowering/raising operation of the head
restraints.
Page 121 of 505

120 Controls in detail
Seats
Raising rear head restraints
1Rear seat head restraint
�Pull head restraint1 to its highest
position.Lowering rear head restraints with
switch in the center console
1Rear head restraint lowering switch
�Switch on the ignition (�page 36).
�Push the rear head restraints lowering
switch1.
The rear head restraints are lowered.
iThe rear head restraints cannot be lowered
using the switch1 when the roll bars have been
released. The roll bars need to be lowered before
the rear head restraints can be operated again
using switch1.
�If the roll bars have released and the soft top
is closed, contact an authorized
Mercedes-Benz Center to have the roll bars
lowered. Do not attempt to lower the roll
bars manually with the soft top closed. Low-
ering the roll bars manually with the soft top
closed may impair the function of the roll
bars.
�If the roll bars have released and the soft top
is open, you can lower the roll bars manually
(
�page 414) or contact an authorized
Mercedes-Benz Center to have the roll bars
lowered.
Page 122 of 505
121 Controls in detail
Seats
Multicontour seat*
The multicontour seat has a movable seat
cushion and inflatable air cushions built
into the backrest to provide additional
lumbar and side support.
The seat cushion movement, backrest
cushion height and curvature can be
continuously varied with switches on the
side of the seat after switching on ignition.
1Seat cushion depth
2Backrest bottom
3Backrest center
4Side bolster adjustment
�Switch on the ignition (�page 38).Seat cushion depth
�Adjust the seat cushion depth to the
length of your upper leg using
switch1.
Backrest contour
�Adjust the contour of the backrest to
the desired position using switches2
and3.
Backrest side bolsters
�Adjust the backrest side bolsters so
that they provide good lateral support
using switch4.
iIf, after a period of time, the seat no longer
provides the desired contour, then repeat the ad-
justment procedure.
Page 123 of 505

122 Controls in detail
Seats
Seat heating*
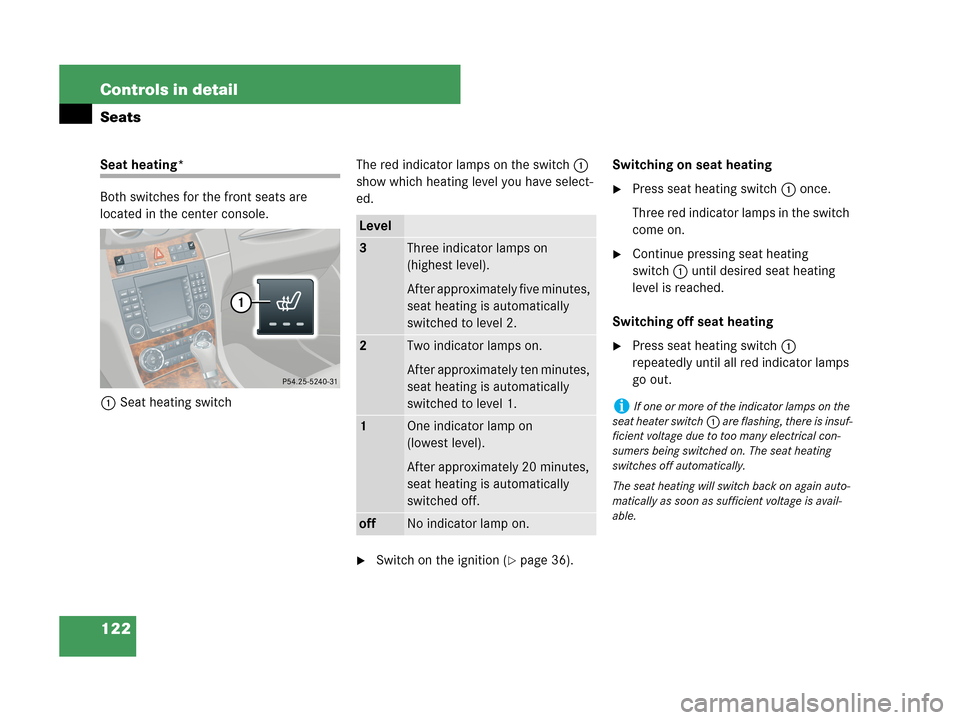
Both switches for the front seats are
located in the center console.
1Seat heating switchThe red indicator lamps on the switch1
show which heating level you have select-
ed.
�Switch on the ignition (�page 36).Switching on seat heating
�Press seat heating switch1 once.
Three red indicator lamps in the switch
come on.
�Continue pressing seat heating
switch1 until desired seat heating
level is reached.
Switching off seat heating
�Press seat heating switch1
repeatedly until all red indicator lamps
go out.
Level
3Three indicator lamps on
(highest level).
After approximately five minutes,
seat heating is automatically
switched to level 2.
2Two indicator lamps on.
After approximately ten minutes,
seat heating is automatically
switched to level 1.
1One indicator lamp on
(lowest level).
After approximately 20 minutes,
seat heating is automatically
switched off.
offNo indicator lamp on.
iIf one or more of the indicator lamps on the
seat heater switch1 are flashing, there is insuf-
ficient voltage due to too many electrical con-
sumers being switched on. The seat heating
switches off automatically.
The seat heating will switch back on again auto-
matically as soon as sufficient voltage is avail-
able.
Page 124 of 505

123 Controls in detail
Seats
Seat ventilation*
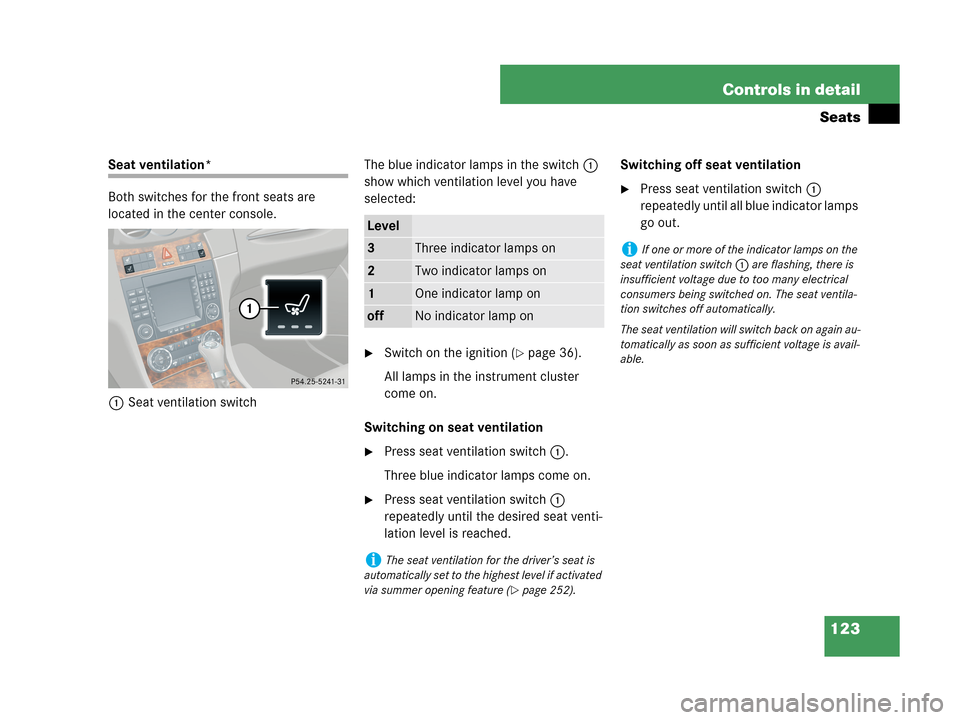
Both switches for the front seats are
located in the center console.
1Seat ventilation switchThe blue indicator lamps in the switch1
show which ventilation level you have
selected:
�Switch on the ignition (�page 36).
All lamps in the instrument cluster
come on.
Switching on seat ventilation
�Press seat ventilation switch1.
Three blue indicator lamps come on.
�Press seat ventilation switch1
repeatedly until the desired seat venti-
lation level is reached.Switching off seat ventilation
�Press seat ventilation switch1
repeatedly until all blue indicator lamps
go out.
Level
3Three indicator lamps on
2Two indicator lamps on
1One indicator lamp on
offNo indicator lamp on
iThe seat ventilation for the driver’s seat is
automatically set to the highest level if activated
via summer opening feature (
�page 252).
iIf one or more of the indicator lamps on the
seat ventilation switch1 are flashing, there is
insufficient voltage due to too many electrical
consumers being switched on. The seat ventila-
tion switches off automatically.
The seat ventilation will switch back on again au-
tomatically as soon as sufficient voltage is avail-
able.
Page 126 of 505
125 Controls in detail
Memory function
Storing positions into memory
�Adjust the seats, steering wheel and
exterior rear view mirrors to the
desired position (
�page 39).
�Turn memory position switch2 to the
desired memory position.
�Press memory button1.
�Release memory button1 and press
memory position switch2 within
3 seconds.
All settings are stored to the selected
position.
Recalling positions from memory
�Turn memory position switch2 to the
desired memory position.
�Press and hold memory position
switch2 until the seat, steering wheel
and exterior rear view mirrors have
completely moved to the stored
positions.
!Do not operate the seats using the memory
button if the seat backrest is in an excessively re-
clined position. Doing so could cause damage to
front or rear seats.
First move the seat backrest to an upright posi-
tion.
iReleasing the memory position switch stops
movement to the stored positions immediately.