Page 420 of 505

419 Practical hints
Opening/closing in an emergency
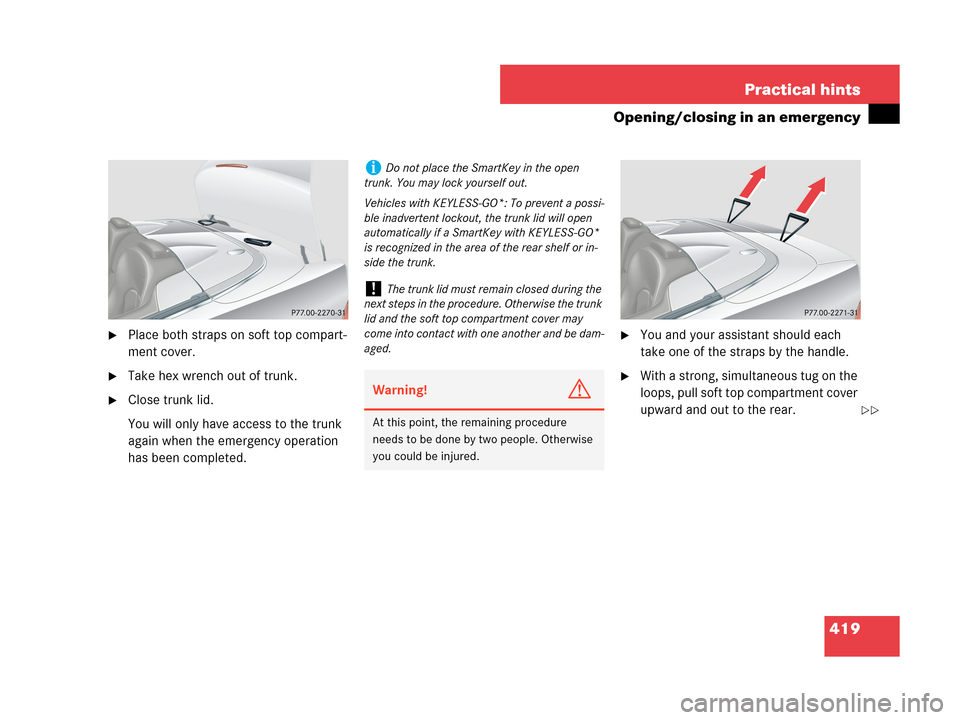
�Place both straps on soft top compart-
ment cover.
�Take hex wrench out of trunk.
�Close trunk lid.
You will only have access to the trunk
again when the emergency operation
has been completed.
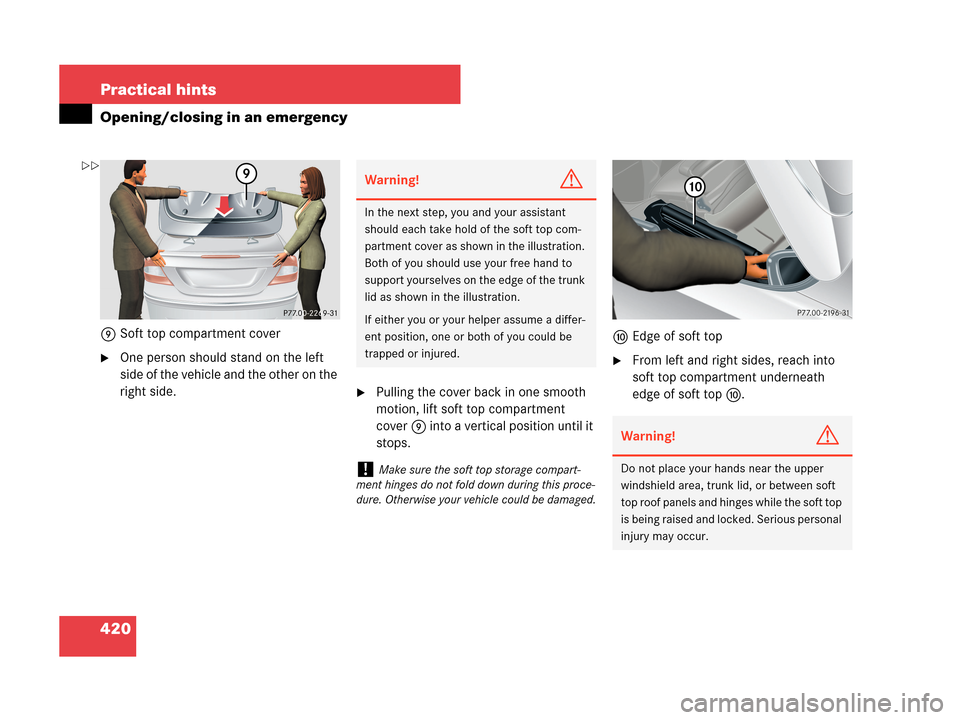
�You and your assistant should each
take one of the straps by the handle.
�With a strong, simultaneous tug on the
loops, pull soft top compartment cover
upward and out to the rear.
iDo not place the SmartKey in the open
trunk. You may lock yourself out.
Vehicles with KEYLESS-GO*: To prevent a possi-
ble inadvertent lockout, the trunk lid will open
automatically if a SmartKey with KEYLESS-GO*
is recognized in the area of the rear shelf or in-
side the trunk.
!The trunk lid must remain closed during the
next steps in the procedure. Otherwise the trunk
lid and the soft top compartment cover may
come into contact with one another and be dam-
aged.
Warning!G
At this point, the remaining procedure
needs to be done by two people. Otherwise
you could be injured.��
Page 421 of 505

420 Practical hints
Opening/closing in an emergency
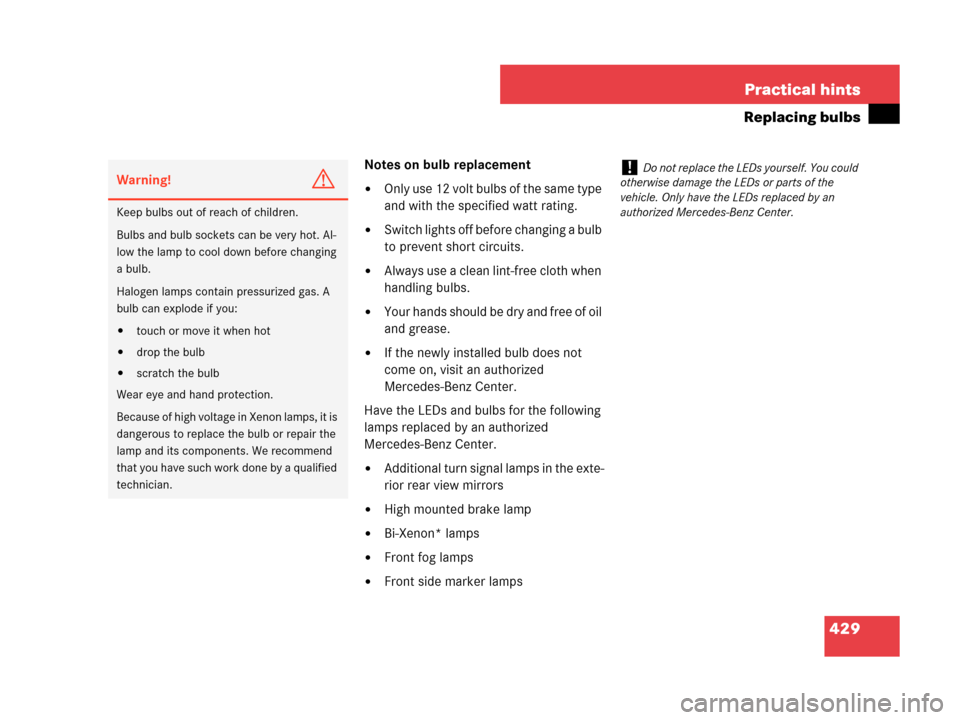
9Soft top compartment cover
�One person should stand on the left
side of the vehicle and the other on the
right side.
�Pulling the cover back in one smooth
motion, lift soft top compartment
cover9 into a vertical position until it
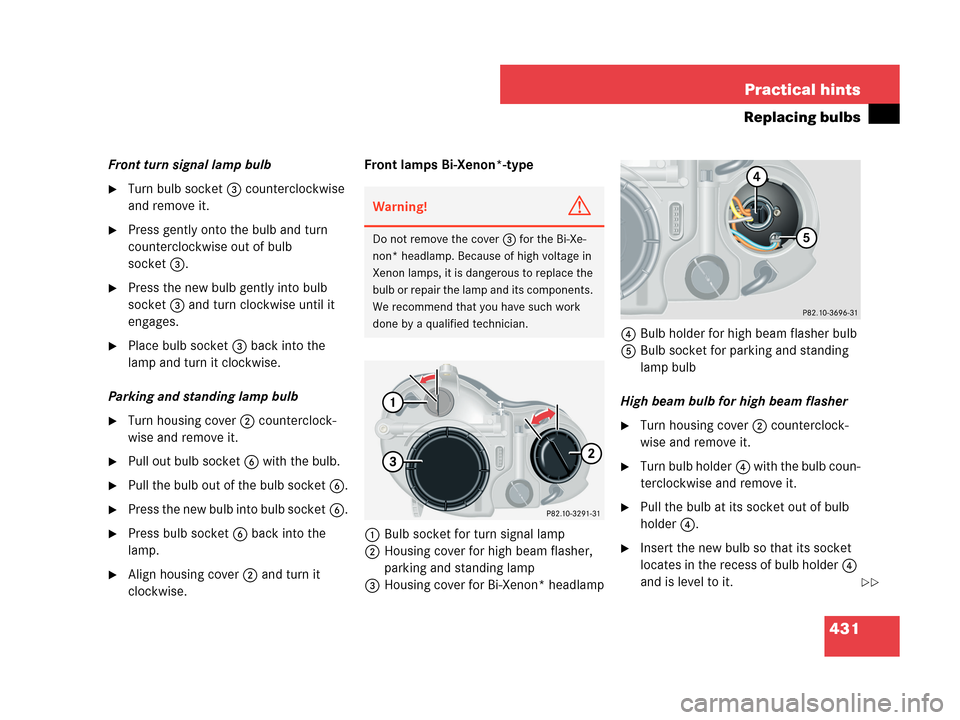
stops.aEdge of soft top
�From left and right sides, reach into
soft top compartment underneath
edge of soft topa.
Warning!G
In the next step, you and your assistant
should each take hold of the soft top com-
partment cover as shown in the illustration.
Both of you should use your free hand to
support yourselves on the edge of the trunk
lid as shown in the illustration.
If either you or your helper assume a differ-
ent position, one or both of you could be
trapped or injured.
!Make sure the soft top storage compart-
ment hinges do not fold down during this proce-
dure. Otherwise your vehicle could be damaged.
Warning!G
Do not place your hands near the upper
windshield area, trunk lid, or between soft
top roof panels and hinges while the soft top
is being raised and locked. Serious personal
injury may occur.
��
Page 424 of 505

423 Practical hints
Opening/closing in an emergency
hLocking
�Insert hex wrench into soft top locking
mechanism screw.
�Turn the soft top locking mechanism
screw with hex wrench counterclock-
wise in direction of arrowh as far as it
will go.
The soft top is locked onto the wind-
shield frame.
�Have the soft top operation checked at
an authorized Mercedes-Benz Center
as soon as possible.
Warning!G
Position hands as indicated by arrows so
that when you press soft top compartment
coverf forward and lower material ten-
sioning framee, your hands cannot be-
come trapped.
!Make sure you turn the hex wrench counter-
clockwise as far as it will go. Otherwise the soft
top may not lock properly.
!If, after completing the soft top emergency
operation, the trunk cannot be opened using the
remote trunk lid release switch in the driver’s
door, theŠ button on the SmartKey, or the
trunk lid release handle in the license plate re-
cess, press the soft top compartment cover
down again as described above.
Do not open the trunk with the emergency key,
as this could otherwise damage the trunk lid and
the soft top compartment cover.
Page 425 of 505

424 Practical hints
Resetting activated head restraints
Resetting activated head restraints
If the active head restraints have been trig-
gered in a rear-end collision, the active
head restraints must be reset. Otherwise,
the active head restraints cannot offer any
additional protection in the event of anoth-
er rear-end collision.
You can tell that the head restraints have
been triggered when they have been
moved forward and cannot be adjusted.
1Head restraint cushion
2Head restraint cover
3Reset tool
4Hole
�Take the reset tool3 out of the
Mercedes-Benz vehicle literature
pouch.
�Guide reset tool3 into the hole4 be-
tween the rear head restraint cover2
and the head restraint cushion1.
�Press the reset tool3 downward until
you hear the active head restraint re-
lease mechanism audibly engage.
�Pull out reset tool3.
�Firmly press the head restraint
cushion1 back toward the rear head
restraint cover2 until it engages.
�Repeat this procedure on the active
head restraint for the second seat.
�After resetting the active head re-
straints store the reset tool3 in the
Mercedes-Benz vehicle literature
pouch.
For information on active head restraints,
see “Active head restraints” (
�page 80).
For information on head restraint adjust-
ment, see “Seats” (
�page 39).
iFor your convenience, we recommend that
you have this work carried out by an authorized
Mercedes-Benz Center.
You will find the reset tool for manually operating
the active head restraints in the Mercedes-Benz
vehicle literature pouch.
Warning!G
For safety reasons, have the active head re-
straints checked by an authorized
Mercedes-Benz Center after a rear-end
collision.
Warning!G
When pushing back the head restraint cush-
ion, take care that your fingers do not be-
come caught between the head restraint
cushion and the cover. Failing to do so may
lead to injury.!Be careful not to damage upholstery.
Page 426 of 505
425 Practical hints
Replacing SmartKey batteries
�Replacing SmartKey batteries
If the batteries in the SmartKey or the
SmartKey with KEYLESS-GO* are dis-
charged, the vehicle can no longer be
locked or unlocked. It is recommended to
have the batteries replaced at an
authorized Mercedes-Benz Center.Batteries contain materials that can harm
the environment if disposed of improperly.
Recycling of batteries is the preferred
method of disposal. Many states require
sellers of batteries to accept old batteries
for recycling.
Warning!G
Keep the batteries out of reach of children.
If a battery is swallowed, seek medical help
immediately.
iWhen inserting the batteries, make sure
they are clean and free of lint.
iWhen changing batteries, always replace
both batteries.
The required replacement batteries are available
at any Mercedes-Benz Center.
Page 430 of 505

429 Practical hints
Replacing bulbs
Notes on bulb replacement
�Only use 12 volt bulbs of the same type
and with the specified watt rating.
�Switch lights off before changing a bulb
to prevent short circuits.
�Always use a clean lint-free cloth when
handling bulbs.
�Your hands should be dry and free of oil
and grease.
�If the newly installed bulb does not
come on, visit an authorized
Mercedes-Benz Center.
Have the LEDs and bulbs for the following
lamps replaced by an authorized
Mercedes-Benz Center.
�Additional turn signal lamps in the exte-
rior rear view mirrors
�High mounted brake lamp
�Bi-Xenon* lamps
�Front fog lamps
�Front side marker lamps
Warning!G
Keep bulbs out of reach of children.
Bulbs and bulb sockets can be very hot. Al-
low the lamp to cool down before changing
a bulb.
Halogen lamps contain pressurized gas. A
bulb can explode if you:
�touch or move it when hot
�drop the bulb
�scratch the bulb
Wear eye and hand protection.
Because of high voltage in Xenon lamps, it is
dangerous to replace the bulb or repair the
lamp and its components. We recommend
that you have such work done by a qualified
technician.
!Do not replace the LEDs yourself. You could
otherwise damage the LEDs or parts of the
vehicle. Only have the LEDs replaced by an
authorized Mercedes-Benz Center.
Page 432 of 505

431 Practical hints
Replacing bulbs
Front turn signal lamp bulb
�Turn bulb socket3 counterclockwise
and remove it.
�Press gently onto the bulb and turn
counterclockwise out of bulb
socket3.
�Press the new bulb gently into bulb
socket3 and turn clockwise until it
engages.
�Place bulb socket3 back into the
lamp and turn it clockwise.
Parking and standing lamp bulb
�Turn housing cover2 counterclock-
wise and remove it.
�Pull out bulb socket6 with the bulb.
�Pull the bulb out of the bulb socket6.
�Press the new bulb into bulb socket6.
�Press bulb socket6 back into the
lamp.
�Align housing cover2 and turn it
clockwise.Front lamps Bi-Xenon*-type
1Bulb socket for turn signal lamp
2Housing cover for high beam flasher,
parking and standing lamp
3Housing cover for Bi-Xenon* headlamp4Bulb holder for high beam flasher bulb
5Bulb socket for parking and standing
lamp bulb
High beam bulb for high beam flasher
�Turn housing cover2 counterclock-
wise and remove it.
�Turn bulb holder4 with the bulb coun-
terclockwise and remove it.
�Pull the bulb at its socket out of bulb
holder4.
�Insert the new bulb so that its socket
locates in the recess of bulb holder4
and is level to it.
Warning!G
Do not remove the cover 3 for the Bi-Xe-
non* headlamp. Because of high voltage in
Xenon lamps, it is dangerous to replace the
bulb or repair the lamp and its components.
We recommend that you have such work
done by a qualified technician.
��
Page 435 of 505

434 Practical hints
Replacing wiper blades
Removing and installing wiper blades
�Remove SmartKey from starter switch
(vehicles with KEYLESS-GO*: make
sure the vehicle's on board electronics
have status 0).
Removing wiper blades
1Unlocking
2Tab
�Pull the tab2 in the direction of
arrow1.
The wiper blade is unlocked.
�Lift up the wiper arm as far as you need
to remove the wiper blade.
�Carefully fold the wiper arm back to
rest on the windshield.
Warning!G
For safety reasons, switch off wipers and
remove SmartKey from starter switch
(vehicles with KEYLESS-GO*: make sure the
vehicle’s on-board electronics have
status0) before replacing a wiper blade.
Otherwise, the wiper motor could suddenly
turn on and cause injury.
Warning!G
Wiper blades are components that are sub-
ject to wear and tear. Change the wiper
blades twice a year, preferably in the spring
and fall. Otherwise the windows will not be
properly wiped. As a result, you may not be
able to observe surrounding traffic condi-
tions and could cause an accident.
!Never open the hood when the wiper arms
are folded forward.
For your convenience, we recommend that you
have this work carried out by an authorized
Mercedes-Benz Center.
!Do not pull on the wiper blade inserts. They
could tear.
!Hold on to the wiper arm. If released, the
force of the impact from the tensioning spring
could crack the windshield.