Page 405 of 505

404 Practical hints
Where will I find...?
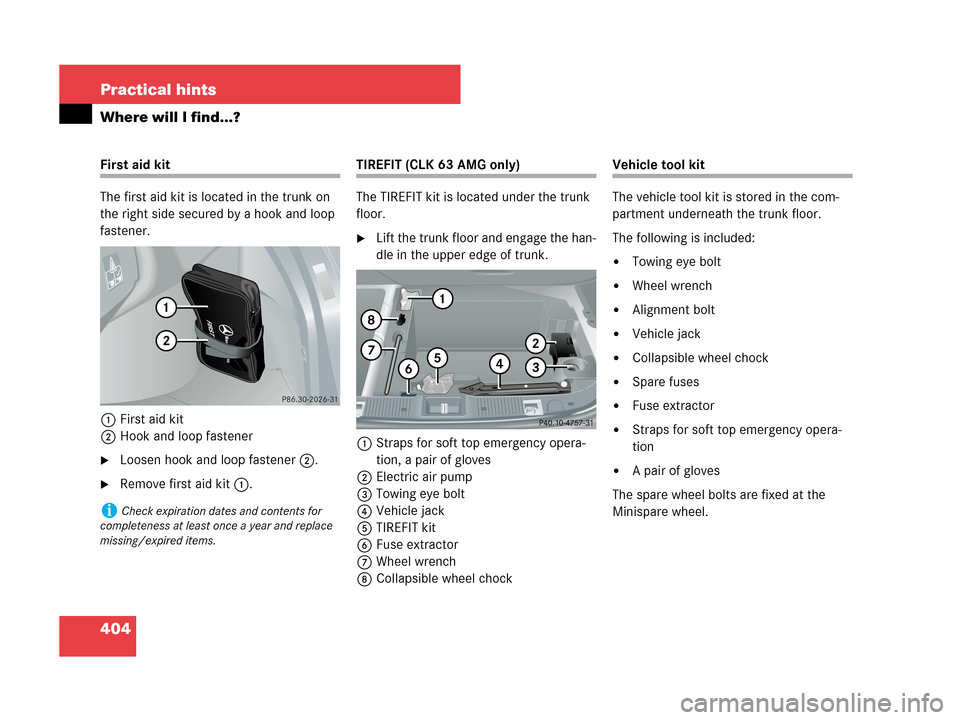
First aid kit
The first aid kit is located in the trunk on
the right side secured by a hook and loop
fastener.
1First aid kit
2Hook and loop fastener
�Loosen hook and loop fastener2.
�Remove first aid kit1.
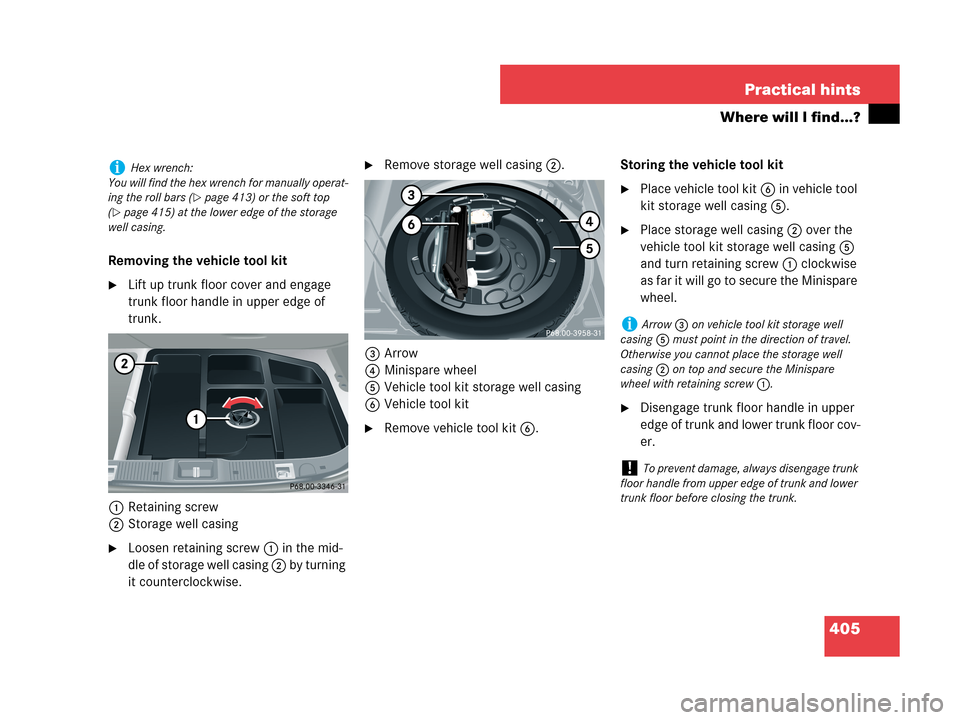
TIREFIT (CLK 63 AMG only)
The TIREFIT kit is located under the trunk
floor.
�Lift the trunk floor and engage the han-
dle in the upper edge of trunk.
1Straps for soft top emergency opera-
tion, a pair of gloves
2Electric air pump
3Towing eye bolt
4Vehicle jack
5TIREFIT kit
6Fuse extractor
7Wheel wrench
8Collapsible wheel chock
Vehicle tool kit
The vehicle tool kit is stored in the com-
partment underneath the trunk floor.
The following is included:
�Towing eye bolt
�Wheel wrench
�Alignment bolt
�Vehicle jack
�Collapsible wheel chock
�Spare fuses
�Fuse extractor
�Straps for soft top emergency opera-
tion
�A pair of gloves
The spare wheel bolts are fixed at the
Minispare wheel.
iCheck expiration dates and contents for
completeness at least once a year and replace
missing/expired items.
Page 406 of 505

405 Practical hints
Where will I find...?
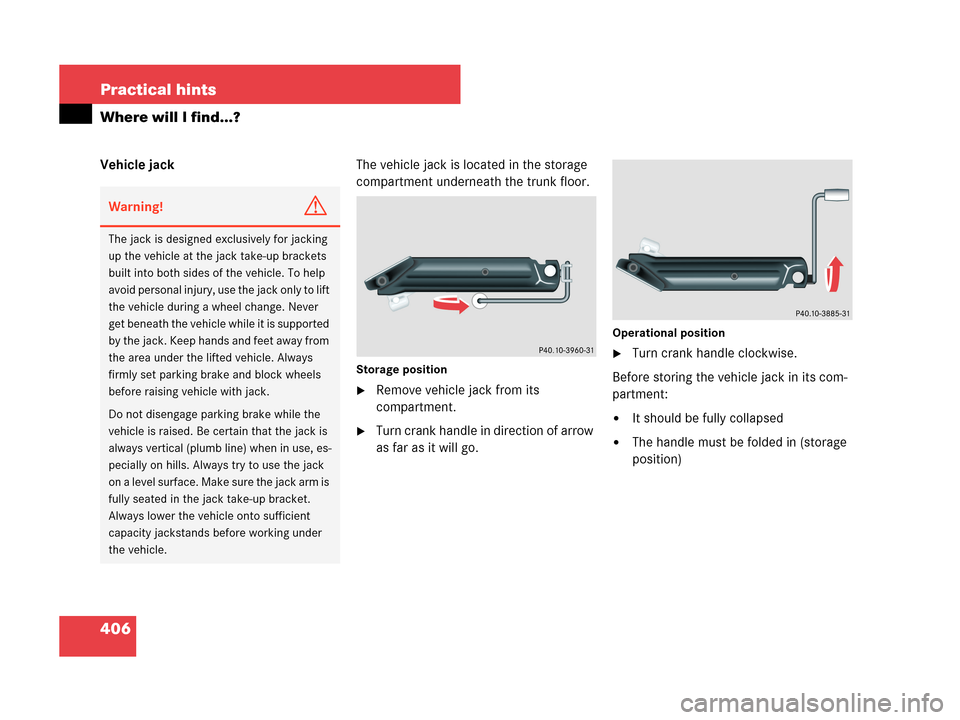
Removing the vehicle tool kit
�Lift up trunk floor cover and engage
trunk floor handle in upper edge of
trunk.
1Retaining screw
2Storage well casing
�Loosen retaining screw 1 in the mid-
dle of storage well casing 2 by turning
it counterclockwise.
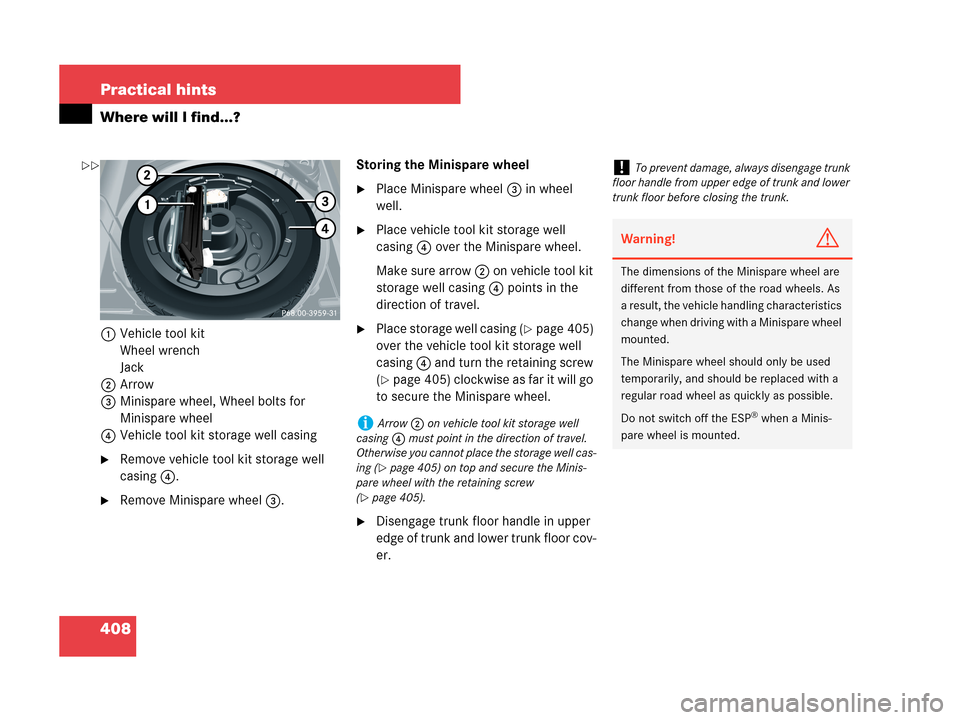
�Remove storage well casing2.
3Arrow
4Minispare wheel
5Vehicle tool kit storage well casing
6Vehicle tool kit
�Remove vehicle tool kit6.Storing the vehicle tool kit
�Place vehicle tool kit6 in vehicle tool
kit storage well casing5.
�Place storage well casing2 over the
vehicle tool kit storage well casing5
and turn retaining screw1 clockwise
as far it will go to secure the Minispare
wheel.
�Disengage trunk floor handle in upper
edge of trunk and lower trunk floor cov-
er.
iHex wrench:
You will find the hex wrench for manually operat-
ing the roll bars (
�page 413) or the soft top
(
�page 415) at the lower edge of the storage
well casing.
iArrow3 on vehicle tool kit storage well
casing5 must point in the direction of travel.
Otherwise you cannot place the storage well
casing2 on top and secure the Minispare
wheel with retaining screw1.
!To prevent damage, always disengage trunk
floor handle from upper edge of trunk and lower
trunk floor before closing the trunk.
Page 407 of 505

406 Practical hints
Where will I find...?
Vehicle jackThe vehicle jack is located in the storage
compartment underneath the trunk floor.
Storage position
�Remove vehicle jack from its
compartment.
�Turn crank handle in direction of arrow
as far as it will go.
Operational position
�Turn crank handle clockwise.
Before storing the vehicle jack in its com-
partment:
�It should be fully collapsed
�The handle must be folded in (storage
position)
Warning!G
The jack is designed exclusively for jacking
up the vehicle at the jack take-up brackets
built into both sides of the vehicle. To help
avoid personal injury, use the jack only to lift
the vehicle during a wheel change. Never
get beneath the vehicle while it is supported
by the jack. Keep hands and feet away from
the area under the lifted vehicle. Always
firmly set parking brake and block wheels
before raising vehicle with jack.
Do not disengage parking brake while the
vehicle is raised. Be certain that the jack is
always vertical (plumb line) when in use, es-
pecially on hills. Always try to use the jack
on a level surface. Make sure the jack arm is
fully seated in the jack take-up bracket.
Always lower the vehicle onto sufficient
capacity jackstands before working under
the vehicle.
Page 408 of 505
407 Practical hints
Where will I find...?
Setting up the collapsible wheel chock
The collapsible wheel chock serves to
additionally secure the vehicle, e.g. while
changing the wheel.
1Tilt the plate upward
2Fold the lower plate outward
3Insert the plate�Tilt both plates upward1.
�Fold the lower plate outward2.
�Guide the tabs of the lower plate all the
way into the openings of the base
plate3.
For information on where to place wheel
chocks when changing a wheel, see “Lift-
ing the vehicle” (
�page 441).
Minispare wheel
The Minispare wheel is located in the
storage compartment underneath the
trunk floor.
Removing the Minispare wheel
�Lift up trunk floor cover and engage
trunk floor handle in upper edge of
trunk.
�Loosen the retaining screw in the mid-
dle of storage well casing by turning it
counterclockwise (
�page 405).
�Remove the storage well casing
(
�page 405).��
Page 409 of 505

408 Practical hints
Where will I find...?
1Vehicle tool kit
Wheel wrench
Jack
2Arrow
3Minispare wheel, Wheel bolts for
Minispare wheel
4Vehicle tool kit storage well casing
�Remove vehicle tool kit storage well
casing4.
�Remove Minispare wheel3.Storing the Minispare wheel
�Place Minispare wheel3 in wheel
well.
�Place vehicle tool kit storage well
casing4 over the Minispare wheel.
Make sure arrow 2 on vehicle tool kit
storage well casing4 points in the
direction of travel.
�Place storage well casing (�page 405)
over the vehicle tool kit storage well
casing 4 and turn the retaining screw
(
�page 405) clockwise as far it will go
to secure the Minispare wheel.
�Disengage trunk floor handle in upper
edge of trunk and lower trunk floor cov-
er.
iArrow2 on vehicle tool kit storage well
casing4 must point in the direction of travel.
Otherwise you cannot place the storage well cas-
ing (
�page 405) on top and secure the Minis-
pare wheel with the retaining screw
(
�page 405).
!To prevent damage, always disengage trunk
floor handle from upper edge of trunk and lower
trunk floor before closing the trunk.
Warning!G
The dimensions of the Minispare wheel are
different from those of the road wheels. As
a result, the vehicle handling characteristics
change when driving with a Minispare wheel
mounted.
The Minispare wheel should only be used
temporarily, and should be replaced with a
regular road wheel as quickly as possible.
Do not switch off the ESP
® when a Minis-
pare wheel is mounted.
��
Page 410 of 505
409 Practical hints
Where will I find...?
In case of a flat tire, you may temporarily
use the Minispare wheel when observing
the following restrictions:
�Do not exceed a vehicle speed of
50 mph (80 km/h).
�Drive to the nearest tire repair facility
to have the flat tire repaired or
replaced as appropriate.
�Do not operate vehicle with more than
one Minispare wheel mounted.
For more information, see “Rims and tires”
(
�page 466).
Spare wheel bolts
The spare wheel bolts are fixed at the
Minispare wheel.
1Wheel bolt for light alloy rims
2Wheel bolt for Minispare wheel
(located in trunk with spare wheel)!Wheel bolts2 must be used when mount-
ing the Minispare wheel. The use of any wheel
bolts other than wheel bolts2 for the Minispare
wheel will physically damage the vehicle’s
brakes.
Warning!G
Make sure to use the original length wheel
bolts when remounting the original wheel
after it has been repaired.
Page 437 of 505

436 Practical hints
Flat tire
The CLK 63 AMG is equipped with a
TIREFIT kit
Preparing the vehicle
�Park the vehicle in a safe distance from
moving traffic on a hard, flat surface
when possible.
�Turn on the hazard warning flashers
(
�page 133).
�Turn the steering wheel so that the
front wheels are in a straight ahead
position.
�Set the parking brake (�page 58).
�Move the gear selector lever toP.
Vehicles with SmartKey:
�Turn off the engine (�page 60).
�Remove the SmartKey from the starter
switch.Vehicles with SmartKey with
KEYLESS-GO*:
�Turn off the engine by pressing the
KEYLESS-GO* start/stop button on the
gear selector lever once (
�page 60).
�Open the driver’s door (this puts the ig-
nition in position0 (
�page 38), same
as with the SmartKey removed from
the starter switch). The driver’s door
then can be closed again.
�Have any passenger exit the vehicle at
a safe distance from the roadway.Sealing tires with TIREFIT
(CLK 63 AMG only)
Small tire punctures, particularly those in
the tread, can be sealed with TIREFIT.
TIREFIT can be used in ambient tempera-
tures down to -4°F (-20°C).
iOpen door only when conditions are safe to
do so.
Warning!G
Keep TIREFIT away from sparks, open flame
or heat source.
Do not smoke.
Page 438 of 505

437 Practical hints
Flat tire
�Foreign objects (e.g. screws or nails)
should not be removed from the tire.
�Take TIREFIT, the sticker, and the
electric air pump out of the trunk
(
�page 404).
�Attach the sticker (supplied with the
TIREFIT kit) where it will be easily seen
by the driver on the instrument cluster.1TIREFIT container
2Flap
3Notch
4Electrical plug
5Air hose
6Flange
�Open flap2 on the electric air pump.
�Pull electrical plug4 and air hose5
out of the pump housing.
Warning!G
TIREFIT is a limited repair device. TIREFIT
cannot be used for cuts or punctures larger
than approximately 0.16 in (4 mm) and tire
damage caused by driving with extremely
low tire inflation pressure, or on a flat tire, or
a damaged wheel.
Do not drive the vehicle under such circum-
stances.
Contact your nearest Mercedes-Benz
Center for assistance or call Roadside
Assistance.
Warning!G
Take care not to allow the contents of
TIREFIT to come in contact with hair, eyes or
clothing. TIREFIT is harmful if inhaled,
swallowed or absorbed through the skin -
causes skin, eye and respiratory irritation.
Any contact with eyes or skin should be
flushed immediately with plenty of water.
If clothing comes in contact with TIREFIT,
change clothing as soon as possible.
In case of allergic reaction or rash, consult a
physician immediately.
Warning!G
Keep TIREFIT out of reach of children.
If swallowed, rinse mouth immediately with
plenty of water and drink plenty of water.
Do not induce vomiting!
Consult a physician immediately.
Keep away from open flame or heat source.
iIf sealant has leaked out, let it dry. You can
then peel it off.
��