Page 433 of 505

432 Practical hints
Replacing bulbs
�Reinsert bulb holder4 with the bulb in
the lamp and turn clockwise.
�Align housing cover2 and turn it
clockwise.
Front turn signal lamp bulb
�Turn bulb socket1 counterclockwise
and remove it.
�Press gently onto the bulb and turn
counterclockwise out of bulb
socket1.
�Press the new bulb gently into bulb
socket1 and turn clockwise until it
engages.
�Place bulb socket1 back into the
lamp and turn it clockwise.
Parking and standing lamp bulb
�Turn housing cover2 counterclock-
wise and remove it.
�Pull out bulb socket5 with the bulb.
�Pull the bulb out of the bulb socket5.
�Press the new bulb into bulb socket5.
�Press bulb socket5 back into the
lamp.
�Align housing cover2 and turn it
clockwise.
Additional turn signal lamps
The additional turn signal lamps in the ex-
terior rear view mirrors have LEDs.
If a malfunction occurs or LEDs fail to func-
tion, the entire turn signal unit must be re-
placed. Have the additional turn signal unit
replaced by an authorized Mercedes-Benz
Center.
Front side marker lamp
Since replacing the side marker lamp bulbs
is a technically highly demanding process,
we recommend you have the side marker
lamp bulbs replaced by an authorized
Mercedes-Benz Center.
Replacing bulbs for rear lamps
Before you start to replace a bulb for a rear
lamp, do the following first:
�Turn the exterior lamp switch to
positionM (
�page 126).
Tail lamp unit
�Open trunk lid.
�Swing the trim panel covering the cor-
responding rear lights to the side.
1Connector
2Tab
�Disconnect electrical connector1.
��
Page 439 of 505

438 Practical hints
Flat tire
�Screw the air pump’s air hose5 onto
flange6 of the TIREFIT container.
�Stick TIREFIT container1 upside
down into notch3 of the electric air
pump.
7Tire valve
8Electric air pump switch
9Air hose with pressure gauge and vent
screw
aFiller hose
�Unscrew the valve cap from tire
valve7.
�Screw filler hosea onto tire valve7.
�Insert electrical plug4 into vehicle
cigarette lighter socket (
�page 282)
or the power outlet in the rear passen-
ger compartment (
�page 283).
�Turn the SmartKey in the starter switch
to position1 (
�page 36).
Vehicles with KEYLESS-GO*:
�Press the KEYLESS-GO* start/stop
button (
�page 37) on the gear se-
lector lever once. Do not depress
brake pedal.
�PressI on electric air pump switch8.
The electric air pump should now
switch on and inflate the tire.After 5 minutes, the pressure gauge must
display at least 26 psi (1.8 bar). The air
hose can become hot during inflation.
Please exercise appropriate caution.
�If this tire inflation pressure is not
attained:
�Turn off the electric air pump, de-
tach the filler hose from the tire
valve, and drive vehicle back and
forth very slowly approximately
30 ft (10 m).
This serves to better distribute the
TIREFIT sealant material inside the
tire.
�Unscrew the air pump’s air hose5
from flange6 of the TIREFIT
container.
�Screw air hose5onto tire
valve7.
�Inflate the tire again.Warning!G
Observe safety instructions on air pump
label.
!Do not operate the electric air pump longer
than 6 minutes without interruption. Otherwise it
may overheat.
��
Page 445 of 505
�Clean contact surfaces of wheel and
wh")
444 Practical hints
Flat tire
Mounting the spare wheel
1Wheel bolt for light alloy rims
2Wheel bolt for Minispare wheel
(located in trunk with Minispare wheel)�Clean contact surfaces of wheel and
wheel hub.
1Alignment bolt
�Guide the spare wheel onto the align-
ment bolt and push it on.
�Insert wheel bolts and tighten them
slightly.!Wheel bolts2 must be used when mount-
ing the Minispare wheel. The use of any wheel
bolts other than wheel bolts2 for the Minispare
wheel will physically damage the vehicle’s
brakes.
!To avoid paint damage, place wheel flat
against hub and hold it there while installing first
wheel bolt.
Warning!G
Always replace wheel bolts that are dam-
aged or rusted.
Never apply oil or grease to wheel bolts.
Damaged wheel hub threads should be re-
paired immediately. Do not continue to drive
under these circumstances! Contact an au-
thorized Mercedes-Benz Center or call
Roadside Assistance.
Incorrect wheel bolts or improperly tight-
ened wheel bolts can cause the wheel to
come off. This could cause an accident.
Make sure to use the correct wheel bolts.
Page 446 of 505
445 Practical hints
Flat tire
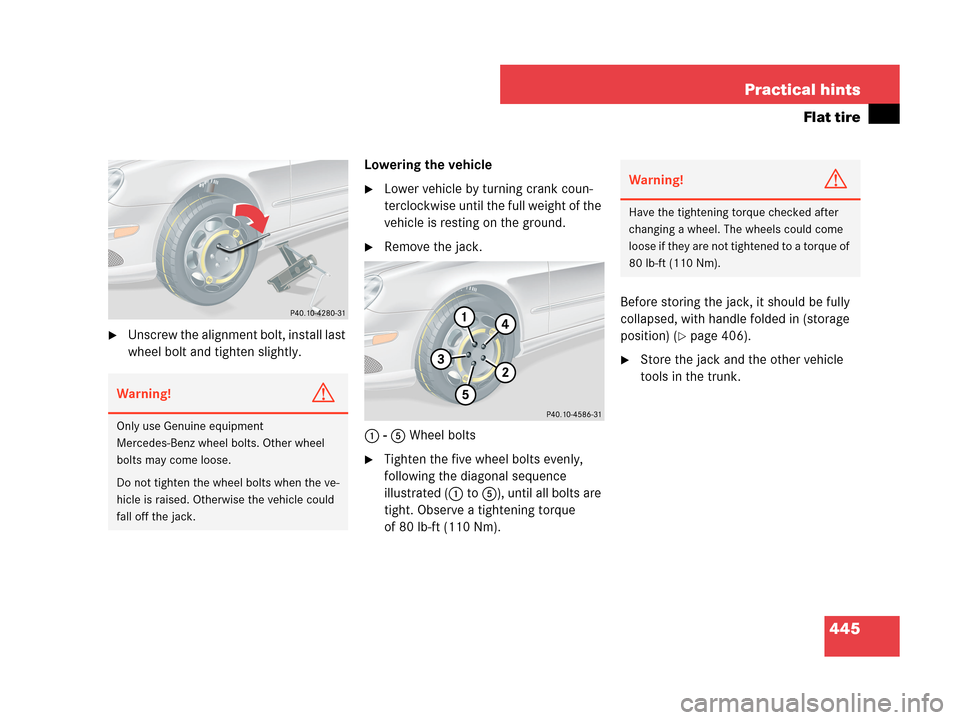
�Unscrew the alignment bolt, install last
wheel bolt and tighten slightly.Lowering the vehicle
�Lower vehicle by turning crank coun-
terclockwise until the full weight of the
vehicle is resting on the ground.
�Remove the jack.
1 - 5 Wheel bolts
�Tighten the five wheel bolts evenly,
following the diagonal sequence
illustrated (1 to 5), until all bolts are
tight. Observe a tightening torque
of 80 lb-ft (110 Nm).Before storing the jack, it should be fully
collapsed, with handle folded in (storage
position) (
�page 406).
�Store the jack and the other vehicle
tools in the trunk.
Warning!G
Only use Genuine equipment
Mercedes-Benz wheel bolts. Other wheel
bolts may come loose.
Do not tighten the wheel bolts when the ve-
hicle is raised. Otherwise the vehicle could
fall off the jack.
Warning!G
Have the tightening torque checked after
changing a wheel. The wheels could come
loose if they are not tightened to a torque of
80 lb-ft (110 Nm).
Page 459 of 505
458 Practical hints
Fuses
Opening fuse box
4Fuse box cover
5Clamps
�With a dry cloth, remove any moisture
from the fuse box.
�Release clamps5.
�Remove fuse box cover4.Closing fuse box
�Make sure that the sealing rubber is
properly positioned.
�Press fuse box cover4 down and
secure with clamps5.
Installing cover
�Insert cover1 sideways into
retainer3.
�Twist screws2 90° clockwise.
Fuse box in trunk
The fuse box is located in the trunk behind
the left-hand trim panel.
1Trim panel
Opening fuse box
�To open, pull trim panel1 in the direc-
tion of the rear light and outward.
Closing fuse box
�Press trim panel1 back into place.
!The fuse box cover4 must be properly po-
sitioned as described to prevent moisture or dirt
from entering the fuse box and possibly impair-
ing fuse operation.
Page 468 of 505
467 Technical data
Rims and tires
Same size tires
ModelCLK 350CLK 550
Rims (light alloy)7.5 J x 17 H27.5 J x 17 H2
Wheel offset1.42 in (36 mm)1.45 in (37 mm)
Winter tires1,3
1Radial-ply tires
225/45 R17 91 H M+S.225/45 R17 91 H M+S.
Winter tires1,2,3
2Must be used in conjunction with Run Flat Indicator* only. 3Not available as factory equipment.
225/45 R17 91 H M+S.MOExtended225/45 R17 91 H M+S.MOExtended
ModelCLK 63 AMG
Rims (light alloy)8 J x 18 H2
Wheel offset1.34 in (34 mm)
Winter tires1,2,3225/40 R18 92 V XL (Extra Load) M+S.
1Radial-ply tires2Not available as factory equipment.3For use with snow chains contact an authorized Mercedes-Benz Center.
Page 469 of 505
468 Technical data
Rims and tires
Mixed size tires
ModelCLK 350CLK 550CLK 63 AMG
Front axle:
Rims (light alloy)7.5 J x 17 H27.5 J x 17 H28 J x 18 H2
Wheel offset1.42 in (36 mm)1.46 in (37 mm)1.34 in (34 mm)
Summer tires1
1Radial-ply tires
225/45 R17 91W225/45 ZR17 91W225/40 ZR18 92Y XL (Extra Load)
Summer tires*1,2
2Must be used in conjunction with Run Flat Indicator* only.
225/45 R17 91W MOExtended225/45 R17 91W MOExtended -
Rear axle:
Rims (light alloy)8.5 J x17 H28.5 J x17 H28.5 J x18 H2
Wheel offset1.18 in (30 mm)1.18 in (30 mm)1.18 in (30 mm)
Summer tires1,3
3Must not be used with snow chains.
245/40 R17 91W245/40 ZR17 91W255/35 ZR18 94Y XL (Extra Load)
Summer tires*1,2,3245/40 R17 91W MOExtended245/40 R17 91W MOExtended -
Page 476 of 505

475 Technical data
Fuels, coolants, lubricants, etc.
Brake fluid
During vehicle operation, the boiling point
of the brake fluid is continuously reduced
through the absorption of moisture from
the atmosphere.
Only brake fluid approved by
Mercedes-Benz is recommended. An
authorized Mercedes-Benz Center will
provide you with additional information.Premium unleaded gasoline
Warning!G
Under extremely strenuous operating condi-
tions, this moisture content can lead to the
formation of bubbles in the system, thus re-
ducing the system’s efficiency.
Therefore, the brake fluid must be replaced
regularly. Refer to your vehicle's Mainte-
nance Booklet for replacement interval.
Warning!G
Gasoline is highly flammable and poisonous.
It burns violently and can cause serious per-
sonal injury.
Never allow sparks, flame or smoking mate-
rials near gasoline!
Turn off the engine before refueling
Whenever you are around gasoline, avoid in-
haling fumes and skin or clothing contact,
extinguish all smoking materials.
Direct skin contact with fuels and the inha-
lation of fuel vapors can be damaging to
your health.
!To maintain the engine’s durability and per-
formance, premium unleaded gasoline must be
used. If premium unleaded is not available and
low octane fuel is used, follow these precau-
tions:
�Have the fuel tank only partially filled with
unleaded regular and fill up with premium
unleaded as soon as possible.
�Avoid full throttle driving and abrupt acceler-
ation.
�Do not exceed an engine speed of 3 000 rpm
if the vehicle is loaded with a light load such
as two persons and no luggage.
�Do not exceed 2/3 of maximum accelerator
pedal position if the vehicle is fully loaded or
operating in mountainous terrain.

7.5 J x 17 H27.5 J x 17 H2
Wheel offset1.42 in (36 mm)1.45 in (37 mm)
Winter tires1,3
1Radial-ply tires
225/45 R")
7.5 J x 17 H27.5 J x 17 H28 J x 18 H2
Wheel offset1.42 in (36 mm)1.46 in (37 mm)1.34 in (")