Page 390 of 505

389 Practical hints
What to do if …?
Display symbolDisplay messagePossible cause/consequencePossible solution
2Brakepad wearThe brake pads have reached their wear
limit.�Have the brake pads replaced as soon
as possible.
;(USA only)
!(Canada only)
Release parking
brakeYou are driving with the parking brake set.�Release the parking brake
(
�page 52).
3 Check brake
fluid levelThere is insufficient brake fluid in the res-
ervoir.�Risk of accident! Stop the vehicle in a
safe location as soon as possible and
notify an authorized Mercedes-Benz
Center. Do not add brake fluid! This
will not solve the problem.
Warning!G
Driving with the message Check brake
fluid level
displayed can result in an ac-
cident. Have your brake system checked im-
mediately. Do not add brake fluid before
checking the brake system. Overfilling the
brake fluid reservoir can result in spilling
brake fluid on hot engine parts and the
brake fluid catching fire. You could be seri-
ously burned.
!If you find that the brake fluid in the brake
fluid reservoir has fallen to the minimum mark or
below, have the brake system checked for brake
pad thickness and leaks.!Brake pad thickness must be visually
checked by a qualified technician at the intervals
specified in the Maintenance Booklet.
Page 392 of 505
391 Practical hints
What to do if …?
Display symbolDisplay messagePossible cause/consequencePossible solution
•Coolant
Stop, turn engine offThe coolant is too hot.
Among other possible causes, the
poly-V-belt could be broken.�Stop the vehicle in a safe location or
as soon as it is safe to do so.
�Apply the parking brake (�page 58).
�Turn off the engine.
�Check the poly-V-belt.
If it is broken:
�Do not continue to drive. Otherwise
the engine will overheat due to an in-
operative water pump which may re-
sult in damage to the engine. Contact
an authorized Mercedes-Benz Center.
If it is intact:
�Wait for the message to disappear be-
fore restarting the engine.
Doing otherwise could result in seri-
ous engine damage that is not covered
by the Mercedes-Benz Limited War-
ranty.
(Continued on next page)
Page 396 of 505

395 Practical hints
What to do if …?
Display symbolDisplay messagePossible cause/consequencePossible solution
A Reserve fuelThe fuel level has dropped below the re-
serve mark.�Refuel at the next gas station
(
�page 312).
I Remove keyYou have forgotten to remove the
SmartKey.�Remove the SmartKey from the start-
er switch.
Replace keyNo additional code available for SmartKey
or SmartKey with KEYLESS-GO*.�Contact an authorized Mercedes-Benz
Center as soon as possible.
Change
key batteriesThe SmartKey with KEYLESS-GO* batter-
ies are discharged.�Change the batteries (�page 425).
Key
not detectedThe SmartKey with KEYLESS-GO* is not
recognized while the engine is running be-
cause
�the SmartKey is not in the vehicle
�there is strong radio-frequency inter-
ference
�Stop the vehicle as soon as it is safe to
do so.
�Apply the parking brake (�page 58).
�Search for the SmartKey.
Otherwise the vehicle cannot be centrally
locked nor can the engine be started
again after the engine has been stopped.
The SmartKey with KEYLESS-GO* is mo-
mentarily not recognized.�Change the position of the SmartKey
in the vehicle.
�Operate the vehicle with the SmartKey
in the starter switch if necessary.
Page 407 of 505

406 Practical hints
Where will I find...?
Vehicle jackThe vehicle jack is located in the storage
compartment underneath the trunk floor.
Storage position
�Remove vehicle jack from its
compartment.
�Turn crank handle in direction of arrow
as far as it will go.
Operational position
�Turn crank handle clockwise.
Before storing the vehicle jack in its com-
partment:
�It should be fully collapsed
�The handle must be folded in (storage
position)
Warning!G
The jack is designed exclusively for jacking
up the vehicle at the jack take-up brackets
built into both sides of the vehicle. To help
avoid personal injury, use the jack only to lift
the vehicle during a wheel change. Never
get beneath the vehicle while it is supported
by the jack. Keep hands and feet away from
the area under the lifted vehicle. Always
firmly set parking brake and block wheels
before raising vehicle with jack.
Do not disengage parking brake while the
vehicle is raised. Be certain that the jack is
always vertical (plumb line) when in use, es-
pecially on hills. Always try to use the jack
on a level surface. Make sure the jack arm is
fully seated in the jack take-up bracket.
Always lower the vehicle onto sufficient
capacity jackstands before working under
the vehicle.
Page 416 of 505

415 Practical hints
Opening/closing in an emergency
�Press hex wrench down firmly in direc-
tion of arrow3 and hold.
�Press head restraint down in direction
of arrow4.
�Pull hex wrench 2 out and take weight
off head restraint.
�Repeat this procedure on roll bar for
second head restraint.
Soft top emergency operation
If the soft top cannot be automatically
closed, check the following:
�Is the luggage cover engaged in place
(
�page 260)?
�Have the roll bars been released? If so,
lower the roll bars manually
(
�page 414).
�Is the trunk lid closed (�page 110)?
�Is there sufficient on-board voltage?
Start the engine if necessary.
These messages will also appear in the
multifunction display (
�page 402).
If automatic operation still does not func-
tion properly, you can close the soft top
manually.
This procedure should be performed with
great care by two persons.
�Engage parking brake.
�Lower the side windows.
!Manually closing the soft top is a complicat-
ed and technically demanding procedure. Close
the soft top manually in emergency cases only.
Otherwise, visit an authorized Mercedes-Benz
Center. Please read the instructions fully before
beginning operation and only undertake it with
another person and if you feel fully capable of
performing the tasks involved.
Warning!G
�It is important that a second person
helps you. Otherwise, you could become
trapped or injured.
�Remove any wristwatches or jewelry
such as rings or bracelets. Otherwise,
they could get caught in the vehicle
mechanism, causing personal injury to
yourself or damage to the vehicle.
�Always use the grips provided as indi-
cated. Otherwise you could injure your-
self.
��
Page 429 of 505
428 Practical hints
Replacing bulbs
Bulbs Front lamps Rear lamps
LampType
1Additional turn signal
lampLED
2Turn signal lamp1156 NA
3Halogen headlamp:
Low beam
Bi-Xenon* headlamp:
Low and high beam
1
1Vehicles with Bi-Xenon headlamps* do not replace
the Bi-Xenon bulbs yourself.
H7 (55 W)
D2S-35 W
4Halogen headlamp:
High beam/high beam
flasher
Bi-Xenon* headlamp:
High beam flasher
H7 (55 W)
H7 (55 W)
Parking and standing
lampW 5 W
5Front fog lamp
Corner-illuminating
front fog lamp*HB4 (51 W)
H7 (55 W)
6Side marker lampW 5 W
LampType
7High mounted brake
lampLED
8Brake lampP 21 W
9Turn signal lampP 21 W
aTail, parking and stand-
ing lamp, side markerP 21/4 W
W 5 W
bBackup lampP 21 W
cLicense plate lampsC 5 W
dRear fog lamp
(driver’s side only)P 21/4 W
Page 434 of 505
433 Practical hints
Replacing bulbs
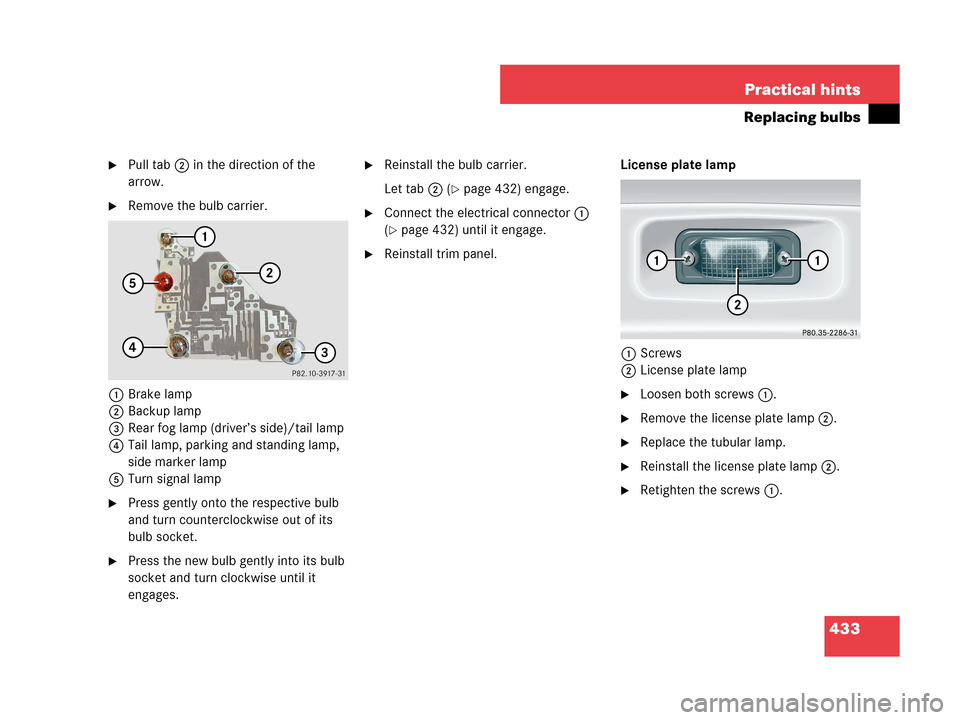
�Pull tab2 in the direction of the
arrow.
�Remove the bulb carrier.
1Brake lamp
2Backup lamp
3Rear fog lamp (driver’s side)/tail lamp
4Tail lamp, parking and standing lamp,
side marker lamp
5Turn signal lamp
�Press gently onto the respective bulb
and turn counterclockwise out of its
bulb socket.
�Press the new bulb gently into its bulb
socket and turn clockwise until it
engages.
�Reinstall the bulb carrier.
Let tab2 (
�page 432) engage.
�Connect the electrical connector1
(
�page 432) until it engage.
�Reinstall trim panel.License plate lamp
1Screws
2License plate lamp
�Loosen both screws1.
�Remove the license plate lamp2.
�Replace the tubular lamp.
�Reinstall the license plate lamp2.
�Retighten the screws1.
Page 437 of 505

436 Practical hints
Flat tire
The CLK 63 AMG is equipped with a
TIREFIT kit
Preparing the vehicle
�Park the vehicle in a safe distance from
moving traffic on a hard, flat surface
when possible.
�Turn on the hazard warning flashers
(
�page 133).
�Turn the steering wheel so that the
front wheels are in a straight ahead
position.
�Set the parking brake (�page 58).
�Move the gear selector lever toP.
Vehicles with SmartKey:
�Turn off the engine (�page 60).
�Remove the SmartKey from the starter
switch.Vehicles with SmartKey with
KEYLESS-GO*:
�Turn off the engine by pressing the
KEYLESS-GO* start/stop button on the
gear selector lever once (
�page 60).
�Open the driver’s door (this puts the ig-
nition in position0 (
�page 38), same
as with the SmartKey removed from
the starter switch). The driver’s door
then can be closed again.
�Have any passenger exit the vehicle at
a safe distance from the roadway.Sealing tires with TIREFIT
(CLK 63 AMG only)
Small tire punctures, particularly those in
the tread, can be sealed with TIREFIT.
TIREFIT can be used in ambient tempera-
tures down to -4°F (-20°C).
iOpen door only when conditions are safe to
do so.
Warning!G
Keep TIREFIT away from sparks, open flame
or heat source.
Do not smoke.