Page 624 of 723
621 Practical hints
What to do if …?
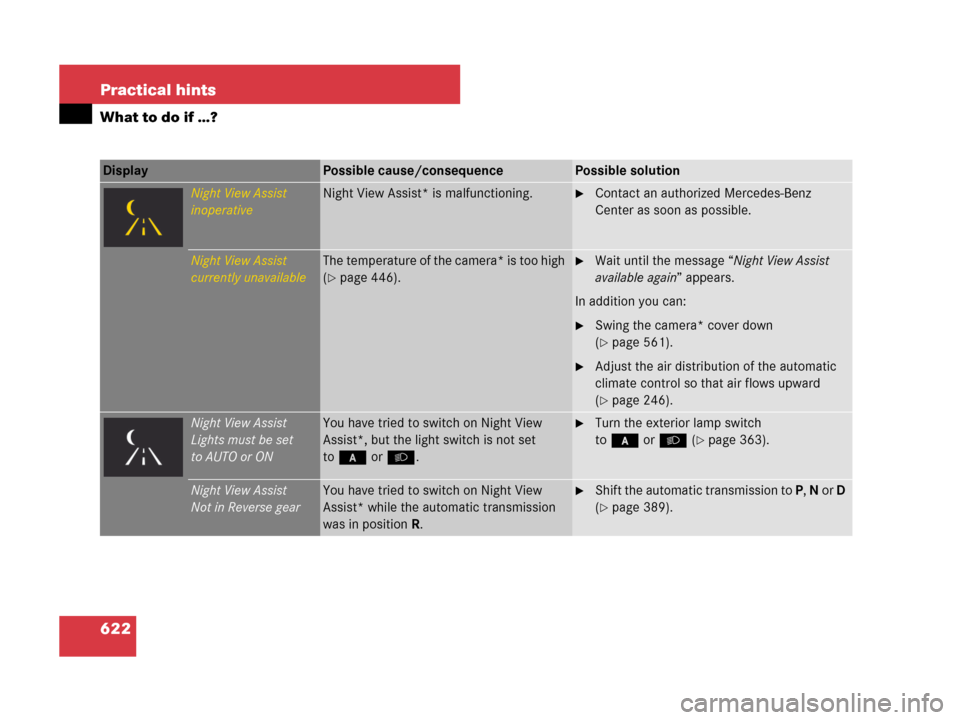
Display Possible cause/consequencePossible solution
Tail lamp/
brake lamp, LeftThe left tail lamp/brake lamp is malfunc-
tioning.
This message will only appear if all light
emitting diodes have stopped working. A
substitute bulb is being used.�Contact an authorized Mercedes-Benz
Center as soon as possible.
Tail lamp/
brake lamp, RightThe right tail lamp/brake lamp is malfunc-
tioning.
This message will only appear if all light
emitting diodes have stopped working. A
substitute bulb is being used.�Contact an authorized Mercedes-Benz
Center as soon as possible.
Page 625 of 723
622 Practical hints
What to do if …?
Display Possible cause/consequencePossible solution
Night View Assist
inoperativeNight View Assist* is malfunctioning.�Contact an authorized Mercedes-Benz
Center as soon as possible.
Night View Assist
currently unavailableThe temperature of the camera* is too high
(
�page 446).
�Wait until the message “Night View Assist
available again” appears.
In addition you can:
�Swing the camera* cover down
(
�page 561).
�Adjust the air distribution of the automatic
climate control so that air flows upward
(
�page 246).
Night View Assist
Lights must be set
to AUTO or ONYou have tried to switch on Night View
Assist*, but the light switch is not set
to* or B.�Turn the exterior lamp switch
to*orB (
�page 363).
Night View Assist
Not in Reverse gearYou have tried to switch on Night View
Assist* while the automatic transmission
was in position R.�Shift the automatic transmission to P, N or D
(
�page 389).
Page 626 of 723
623 Practical hints
What to do if …?
Display Possible cause/consequencePossible solution
Night View Assist
Lights ON or AUTO,
not in R gearYou have tried to switch on Night View
Assist* but the light switch is not set
to*or B.
In addition, the automatic transmission is in
positionR.�Turn the exterior lamp switch
to*orB (
�page 363).
�Shift the automatic transmission to P, N or D
(
�page 389).
Night View Assist
only when
it is darkYou have tried to switch on Night View
Assist* by daylight.You can only switch on Night View Assist* when
it is dark.
Engine oil level
Stop vehicle!
Switch engine offCL 600 only
There is no oil in the engine. There is a dan-
ger of engine damage.�Carefully bring the vehicle to a halt as soon
as it is safe to do so in a safe location.
�Turn off the engine.
�Add engine oil (�page 516) and check the
engine oil level (
�page 513).
Page 644 of 723
641 Practical hints
Replacing bulbs
�Replacing bulbs
Safe vehicle operation depends on proper
exterior lighting and signaling. It is there-
fore essential that all bulbs and lamp as-
semblies are in good working order at all
times.
Correct headlamp adjustment is extremely
important. Have headlamps checked and
readjusted at regular intervals and when a
bulb has been replaced. See an authorized
Mercedes-Benz Center for headlamp ad-
justment.iIf the headlamps or front fog lamps are
fogged up on the inside as a result of high humid-
ity, driving the vehicle a distance with the lights
on should clear up the fogging.iSubstitute bulbs will be brought into use
when the following lamps malfunction:
�Brake lamps
�Rear fog lamps
�Front parking lamps
�Tail lamps
�Turn signal lamps
Read and observe messages in the multifunction
display (
�page 580).
Page 646 of 723

643 Practical hints
Replacing bulbs
Notes on bulb replacement�Only use 12-volt-bulbs of the same
type and with the specified watt rating.
�Switch lights off before changing a bulb
to prevent short circuits.
�Always use a clean lint-free cloth when
handling bulbs.
�Your hands should be dry and free of oil
and grease.
�If the newly installed bulb does not
come on, contact an authorized
Mercedes-Benz Center.
Have the LEDs and bulbs for the following
lamps replaced by an authorized
Mercedes-Benz Center:
�the Bi-Xenon lamps
�the front turn signal lamps
�the front fog lamps
�the additional turn signal lamps in the
exterior rear view mirrors
�the parking and standing lamps
�the front side marker lamps
�the high mounted brake lamps
�the brake, tail and rear standing lamps
�the rear side marker lamps
�the rear fog lamp
�the rear turn signal lamps
�the rear side marker lamps
�the license plate lamps
Warning!G
Bulbs and bulb sockets can be very hot. Al-
low the lamp to cool down before changing
a bulb.
Keep bulbs out of reach of children.
Halogen lamps contain pressurized gas. A
bulb can explode if you:
�touch or move it when hot
�drop the bulb
�scratch the bulb
Wear eye and hand protection.
Because of high voltage in Xenon lamps, it is
dangerous to replace the bulb or repair the
lamp and its components. We recommend
that you have such work done by a qualified
technician.
!Do not replace the LEDs yourself. You could
otherwise damage the LEDs or parts of the vehi-
cle. Only have the LEDs replaced by an autho-
rized Mercedes-Benz Center.
iHave the headlamp adjustment checked
regularly.
Page 655 of 723

652 Practical hints
Flat tire
Removing the wheel
1Alignment bolt
�Unscrew upper-most wheel bolt and re-
move.
�Replace this wheel bolt with alignment
bolt1 supplied in the tool kit.
�Remove the remaining bolts.
�Remove the wheel.Mounting the Minispare wheel
1Wheel bolt for light alloy rims
2Wheel bolt for Minispare wheel
(located in trunk with spare wheel)
Warning!G
The jack is intended only for lifting the
vehicle briefly for wheel changes. It is not
suited for performing maintenance work
under the vehicle.
�Never start the engine when the vehicle
is raised.
�Never lie down under the raised vehicle.
!Do not place wheel bolts in sand or dirt. This
could result in damage to the bolt and wheel hub
threads.
!Wheel bolts2 must be used when mount-
ing a Minispare wheel. The use of any wheel
bolts other than wheel bolts2 for a Minispare
wheel will physically damage the vehicle’s
brakes.
Warning!G
Make sure to use the original length wheel
bolts when remounting the original wheel
after it has been repaired.
��
Page 656 of 723

653 Practical hints
Flat tire
�Clean contact surfaces of wheel and
wheel hub.�Guide the Minispare wheel onto the
alignment bolt and push it on.
�Insert wheel bolts and tighten them
slightly.
�Unscrew the alignment bolt, install the
last wheel bolt and tighten slightly.
!To avoid paint damage, place wheel flat
against hub and hold it there while installing first
wheel bolt.
Warning!G
Always replace wheel bolts that are dam-
aged or rusted.
Never apply oil or grease to wheel bolts.
Damaged wheel hub threads should be re-
paired immediately. Do not continue to drive
under these circumstances! Contact an au-
thorized Mercedes-Benz Center or call
Roadside Assistance.
Incorrect wheel bolts or improperly tight-
ened wheel bolts can cause the wheel to
come off. This could cause an accident.
Make sure you are using the correct wheel
bolts.
Warning!G
Only use genuine Mercedes-Benz wheel
bolts. Other wheel bolts may come loose.
Do not tighten the wheel bolts when the ve-
hicle is raised. Otherwise the vehicle could
fall off the jack.
Page 664 of 723
661 Practical hints
Jump starting
Jump starting should only be performed on
the starter battery. The starter battery is
located in the engine compartment on the
passenger side (
�page 657).
�Make sure the two vehicles do not
touch.
�Secure vehicle in place with electronic
parking brake (
�page 384).
�Shift the automatic transmission toP
(
�page 389).
�Turn off all electrical consumers, ex-
cept hazard warning flashers or work
lights.
�Open the hood (�page 512).
�Start the engine of the vehicle with the
charged battery and run at idle speed.1Negative clamp
2Negative terminal of charged battery
3Positive terminal of charged battery
4Positive terminal of discharged battery
Warning!G
Keep flames or sparks away from battery.
Do not smoke.
Observe all safety instructions and precau-
tions when handling automotive batteries
(
�page 655).
iVehicles with KEYLESS-GO: remove the
KEYLESS-GO button (
�page 337) and use the
SmartKey with KEYLESS-GO like a normal
SmartKey.
��