Page 12 of 723

Contents
Practical hints................................. 565
What to do if …?................................. 566
Lamps in instrument cluster ........ 566
Air bag off indicator lamp............. 578
Vehicle status messages
in the multifunction display .......... 580
Where will I find ...? ........................... 632
First aid kit ................................... 632
Vehicle jack, vehicle tool kit,
luggage bowl, Minispare wheel .... 632
Unlocking/locking in an emergency .. 635
Unlocking the vehicle ................... 635
Locking the vehicle ...................... 636
Mechanically releasing
the electronic parking brake ........ 637
Opening/closing in an emergency..... 638
Power tilt/sliding sunroof ............ 638
Replacing SmartKey batteries ........... 639
SmartKey/SmartKey
with KEYLESS-GO*....................... 639Replacing bulbs .................................. 641
Bulbs ............................................. 642
Replacing bulbs
for front lamps .............................. 644
Replacing bulbs
for the rear lamps ......................... 646
Replacing wiper blades....................... 647
Placing wiper arms
in vertical position ........................ 647
Removing wiper blades ................. 648
Installing wiper blades .................. 648
Flat tire ............................................... 649
Preparing the vehicle .................... 649
Mounting the Minispare wheel...... 649Batteries............................................. 655
Disconnecting starter battery ....... 657
Removing starter battery .............. 658
Charging battery ........................... 658
Reinstalling starter battery ........... 659
Reconnecting starter battery ........ 659
Jump starting...................................... 660
Towing the vehicle.............................. 663
Installing towing eye bolt .............. 666
Fuses.................................................. 667
Fuse boxes
in engine compartment................. 668
Fuse boxes
in passenger compartment ........... 669
Emergency engine shut-down ....... 670
ProCarManuals.com
Page 421 of 723

420 Controls in detail
Driving systems
StoppingWhen DISTRONIC Plus detects that the ve-
hicle in front of you is stopping, the vehicle
brakes until it also stops.
Once DISTRONIC Plus has stopped your
vehicle and it is at a standstill, it remains
stationary; the brake pedal does not need
to be depressed.
Warning!G
DISTRONIC Plus’s braking effect is canceled
and the vehicle can start to roll if
�DISTRONIC Plus is switched off using
the DISTRONIC Plus lever
�you accelerate
�the system or the power supply is mal-
functioning, e.g. due to battery failure
�the electrical components in the engine
compartment or the fuses have been
manipulated
�the battery is disconnected
Warning!G
Never get out of the vehicle while
DISTRONIC Plus is switched on!
DISTRONIC Plus must never be operated or
switched off by passengers or from outside
the vehicle.
DISTRONIC Plus is not a substitute for the
electronic parking brake and may not be
used for parking.
When you get out of the vehicle or switch off
the engine, deactivate DISTRONIC Plus and
secure the vehicle from rolling away by en-
gaging the electronic parking brake.
iAfter a short while, your vehicle is secured in
place by the electronic parking brake so that the
operating brake can be relieved of load.
iDepending on the following distance set us-
ing the distance setting switch on the DISTRON-
IC Plus lever, your vehicle will stop
approximately 13.1 ft away from the vehicle in
front of you.
ProCarManuals.com
Page 568 of 723
565 Practical hints
What to do if …?
Where will I find ...?
Unlocking/locking in an emergency
Opening/closing in an emergency
Replacing SmartKey batteries
Replacing bulbs
Replacing wiper blades
Flat tire
Batteries
Jump starting
Towing the vehicle
Fuses
ProCarManuals.com
Page 635 of 723

632 Practical hints
Where will I find ...?
First aid kit
The first aid kit is located in the storage
compartment under the front passenger
seat.
1Tab
2Cover
�Pull tab1 upward.
�Fold the covering forward in the direc-
tion of arrow.
�Remove the first aid kit.
Vehicle jack, vehicle tool kit, luggage
bowl, Minispare wheel
The vehicle jack, Minispare wheel, the ve-
hicle tools, and the luggage bowl are
stored in the compartment underneath the
trunk floor.
�Lift up trunk floor cover and engage
trunk floor handle in upper edge of
trunk.
You can now remove the tools and ac-
cessories.The vehicle tool kit includes:
�One towing eye bolt
�One wheel wrench
�One alignment bolt
�One pair of gloves
�One fuse extractor
�One fuse chart
�Spare fuses
�One collapsible wheel chock
�Release tool for mechanically releasing
the electronic parking brake
The spare wheel bolts are fixed at the
Minispare wheel.
!Always keep the storage compartment un-
der the front passenger seat closed while the ve-
hicle is in motion.
iCheck expiration dates and contents for
completeness at least once a year and replace
missing/expired items.
!To prevent damage, always disengage trunk
floor handle from trunk lid and lower trunk floor
before closing the trunk.
ProCarManuals.com
Page 670 of 723
 and
systems secured by that fuse will s")
667 Practical hints
Fuses
�Fuses
The electrical fuses in your vehicle serve to
switch off malfunctioning power circuits.
If a fuse is blown, the component(s) and
systems secured by that fuse will stop op-
erating.
If a newly inserted fuse blows again, have
the cause determined and rectified by an
authorized Mercedes-Benz Center.
The following aids are available to help you
replace fuses. They are located in the trunk
with the vehicle tool kit (
�page 632):
�Fuse chart
The fuse chart explains the fuse alloca-
tion and fuse amperages.
�Spare fuses
�Special fuse extractor
The electrical fuses are located in different
fuse boxes:
�in the dashboard on the passenger side
(
�page 669)
�in the dashboard on the driver’s side
(
�page 669)
�behind the rear center armrest
(
�page 669)
�on the driver’s side of the engine com-
partment (
�page 668)
�on the passenger side of the engine
compartment (
�page 668)
Before replacing fuses:
�Engage the electronic parking brake
(
�page 384).
�Make sure the automatic transmission
is set to P (
�page 389).
The gear position indicator in the ta-
chometer display should be on P.
�Turn off all electrical consumers.
�Turn off the engine (�page 387).
�Switch off the vehicle’s internal electri-
cal functions (
�page 658).
Warning!G
Only use fuses approved by Mercedes-Benz
with the specified amperage for the system
in question and do not attempt to repair or
bridge a blown fuse. Using other than ap-
proved fuses or using repaired or bridged
fuses may cause an overload leading to a
fire, and/or cause damage to electrical
components and/or systems. Have the
cause determined and remedied by an
authorized Mercedes-Benz Center.
!Switch off the vehicle’s internal electrical
functions (
�page 658) when you are working on
the fuses.
iA blown fuse must be replaced by an appro-
priate spare fuse (recognizable by its color or the
fuse rating given on the fuse) of the amperage
recommended in the fuse chart.
Any Mercedes-Benz Center will be glad to advise
you on this subject.
ProCarManuals.com
Page 671 of 723
668 Practical hints
Fuses
Fuse boxes in engine compartment
�Open the hood (�page 512).
Box on the driver’s side
Example illustration from CL 550
14 screws
2Cover
3JumperOpening
�Take the crank from the Operator’s
Manual pouch.
�Loosen screws1 with crank.
�Remove jumper3.
�Remove cover2.
Closing
�Attach cover2.
�Attach jumper3.
�Tighten screws1 with crank.Box on the front passenger side
Example illustration from CL 550
1Retaining lugs
2Cover
Opening
�Press retaining lugs1.
�Remove cover2.
!The cover must fit properly, as otherwise
moisture or dirt may impair the functionality of
the fuses.
ProCarManuals.com
Page 672 of 723
669 Practical hints
Fuses
Closing
�Attach cover2.
�Press cover2 down manually.
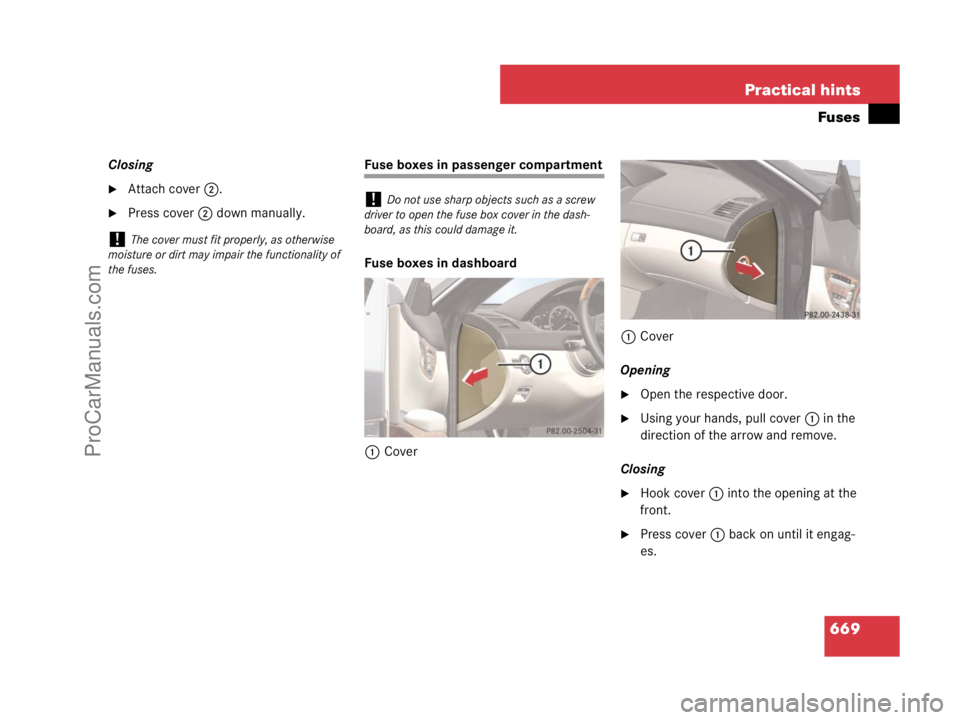
Fuse boxes in passenger compartment
Fuse boxes in dashboard
1Cover1Cover
Opening
�Open the respective door.
�Using your hands, pull cover1 in the
direction of the arrow and remove.
Closing
�Hook cover1 into the opening at the
front.
�Press cover1 back on until it engag-
es.
!The cover must fit properly, as otherwise
moisture or dirt may impair the functionality of
the fuses.
!Do not use sharp objects such as a screw
driver to open the fuse box cover in the dash-
board, as this could damage it.
ProCarManuals.com
Page 673 of 723
670 Practical hints
Fuses
Fuse box in the rear passenger
compartment
1CoverOpening
�Swing down center armrest.
�Open cover behind center armrest.
�Pull cover1 forward in direction of ar-
row.
Closing
�Press cover1 backward and engage.
Emergency engine shut-down
If the engine cannot be turned off as de-
scribed in the “Turning off the engine” sec-
tion (
�page 387), you may use the
following emergency procedure.
�Take the fuse chart from the vehicle
tool kit (
�page 632).
�Find row “Emergency engine
shut-down” in the fuse chart table to
identify the fuses that have to removed
as well as their locations.
�Remove the respective fuses.
!Make sure that the seal in the cover is not
damaged during opening or closing.
ProCarManuals.com